生命周期
- 1 引出生命周期
- 2 分析生命周期
- 3 总结生命周期
1 引出生命周期
<!DOCTYPE html>
<html lang="en">
<head>
    <meta charset="UTF-8">
    <meta http-equiv="X-UA-Compatible" content="IE=edge">
    <meta name="viewport" content="width=device-width, initial-scale=1.0">
    <title>引出生命周期</title>
    <script src="../JS/vue.js"></script>
</head>
<body>
    <!--总结
		生命周期:
			1.又名:生命周期回调函数、生命周期函数、生命周期钩子。
			2.是什么:Vue在关键时刻帮我们调用的一些特殊名称的函数。
			3.生命周期函数的名字不可更改,但函数的具体内容是程序员根据需求编写的。
			4.生命周期函数中的this指向是vm 或 组件实例对象。
	-->

    <div id="root">
        <!-- <h2 :style="{opacity:opacity}">欢迎学习Vue</h2> opacity透明度,前一个是CSS属性,后一个是数据名 -->
        <!-- 采用对象的简写形式,可简写为: -->
        <h2 :style="{opacity}">欢迎学习Vue</h2>
    </div>
</body>
<script>
    Vue.config.productionTip = false

    // const vm = new Vue({
    new Vue({
        el: '#root',
        data: {
            opacity:1
        },
        methods:{

        },
        // Vue完成模板的解析并把初始的真实的DOM元素挂载(放入)页面后调用mounted()函数
        mounted(){
            setInterval(() => {
                this.opacity -= 0.01
                if(this.opacity <= 0) this.opacity = 1
            },16);
        }
    })

    // 通过外部的循环定时器实现(不推荐)
    /* setInterval(() => {
        vm.opacity -= 0.01
        if(vm.opacity <= 0) vm.opacity = 1
    },16); */
</script>
</html>

2 分析生命周期
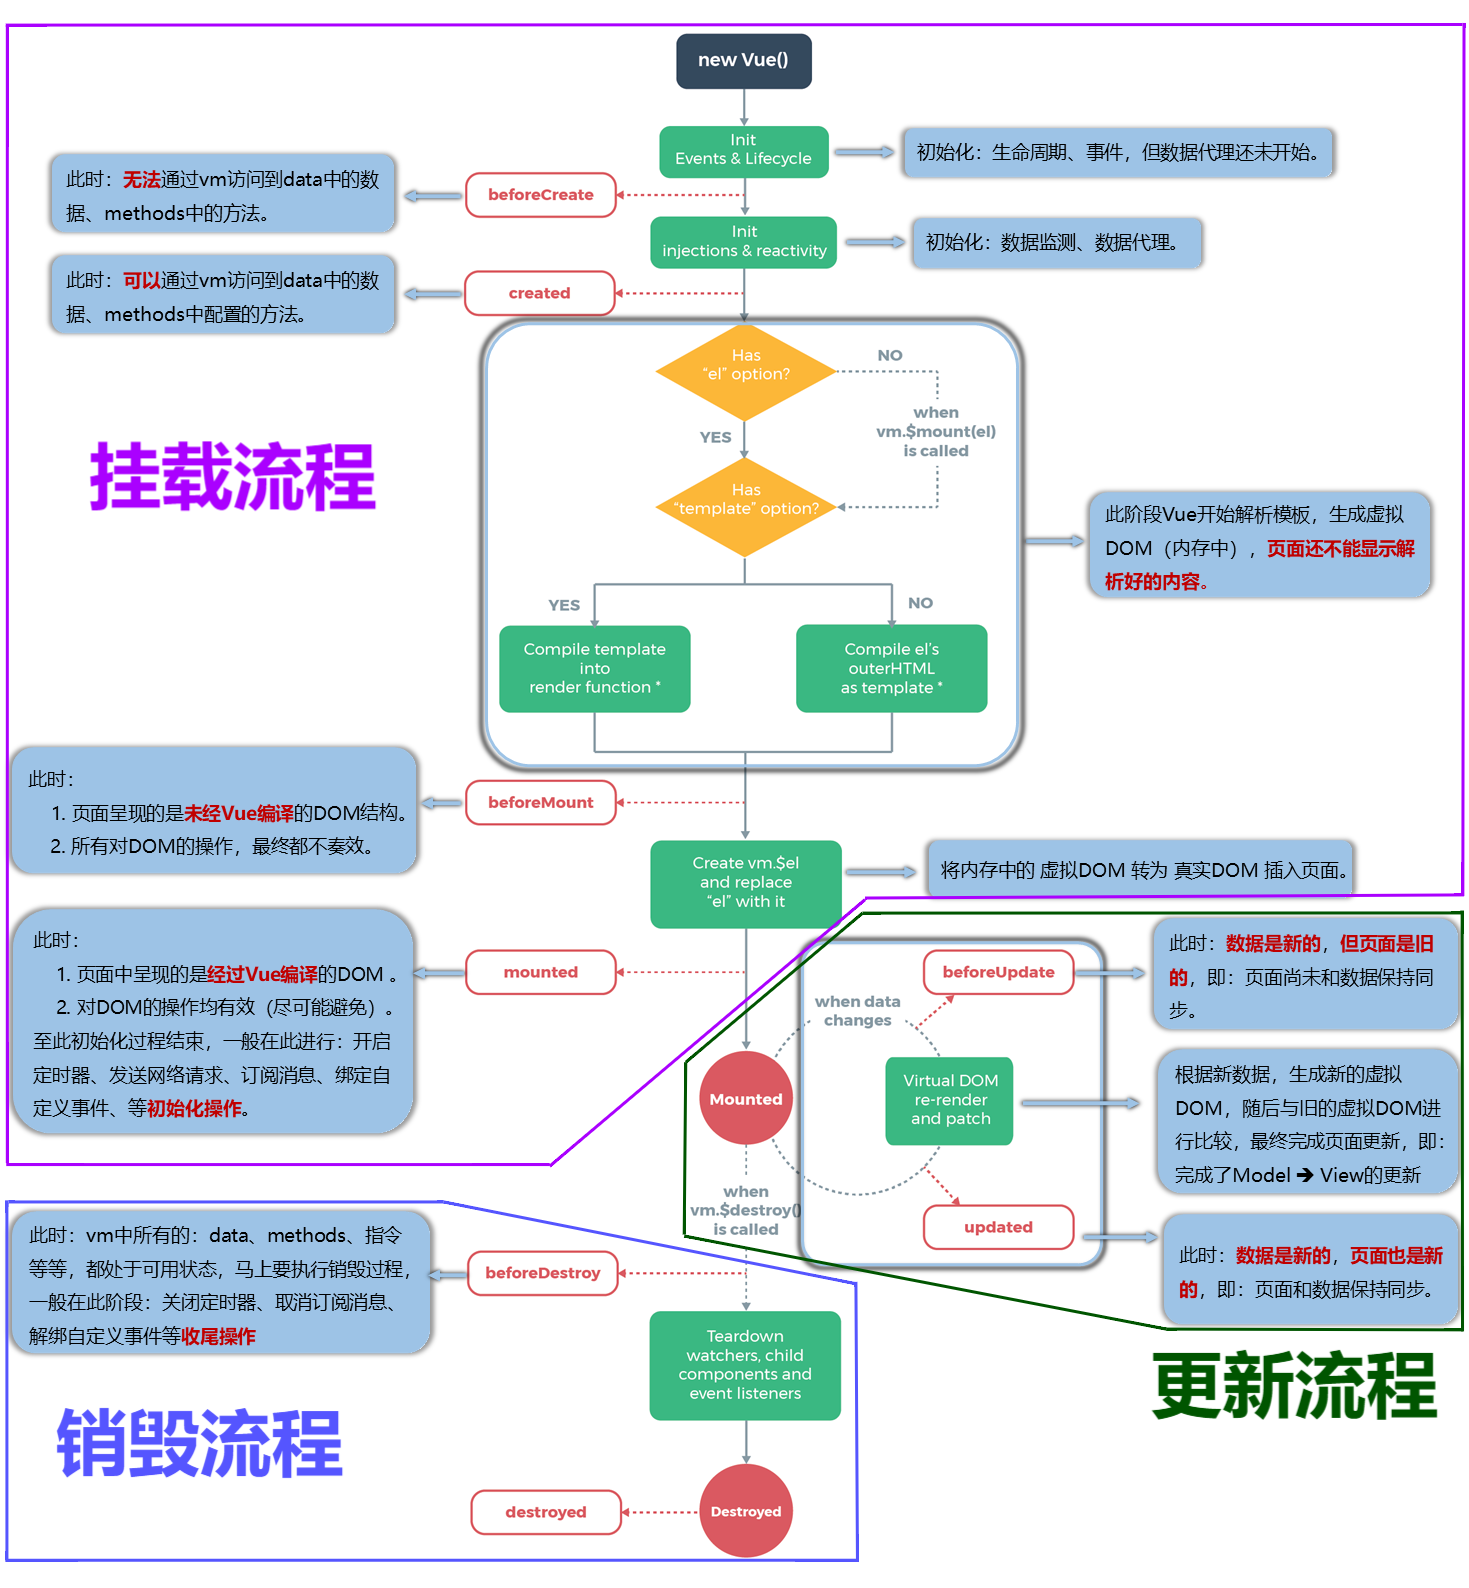
<!DOCTYPE html>
<html lang="en">
<head>
    <meta charset="UTF-8">
    <meta http-equiv="X-UA-Compatible" content="IE=edge">
    <meta name="viewport" content="width=device-width, initial-scale=1.0">
    <title>分析生命周期</title>
    <script src="../JS/vue.js"></script>
</head>
<body>


    <div id="root">
        <h2 v-text="n"></h2>
        <h2>当前的n值是:{{n}}</h2>
        <button @click="add">点我n+1</button>
        <button @click="bye">点我销毁vm</button>
    </div>
</body>
<script>
    Vue.config.productionTip = false

    new Vue({
        el: '#root',
        data: {
            n:1
        },
        methods:{
            add(){
                console.log('add');
                this.n++
            },
            bye(){
                console.log('bye');
                this.$destroy()
            }
        },
        watch:{
            n(){
                console.log('n变了');
            }
        },
        beforeCreate() {
            console.log('beforeCreate');
            // console.log(this); // 此时vm里没有_data、vm.n、vm.add()
            // debugger; // 卡一个顿点
        },
        created() {
            console.log('created');
            // console.log(this); // 此时vm里有了_data、vm.n、vm.add()、getter()、setter()
            // debugger;
        },
        beforeMount() {
            console.log('beforeMount');
            // console.log(this); // 此时页面呈现的是未经编译的DOM结构
            // debugger;
        },
        mounted() { // 重要的钩子
            console.log('mounted');
            // console.log(this); // 此时页面呈现的是经过编译的DOM结构
            // debugger;
        },
        beforeUpdate() {
            console.log('beforeUpdate');
            // console.log(this.n); // 数据是新的 但页面是旧的
            // debugger;
        },
        updated() {
            console.log('updated');
            //console.log(this.n); // 数据是新的 页面也是新的
            // debugger;
        },
        beforeDestroy(){ // 重要的钩子
            console.log('beforeDestroy');
            // console.log(this.n); // 此时能拿到数据
            // this.add() // 此时调用了add() 但页面没发生变化
            // debugger;
        },
        destroyed() {
            console.log('destroyed');
            // debugger;
        }
    })
</script>
</html>

3 总结生命周期
<!DOCTYPE html>
<html lang="en">
<head>
    <meta charset="UTF-8">
    <meta http-equiv="X-UA-Compatible" content="IE=edge">
    <meta name="viewport" content="width=device-width, initial-scale=1.0">
    <title>总结生命周期</title>
    <script src="../JS/vue.js"></script>
</head>
<body>
    <!--总结
		常用的生命周期钩子:
			1.mounted: 发送ajax请求、启动定时器、绑定自定义事件、订阅消息等【初始化操作】。
			2.beforeDestroy: 清除定时器、解绑自定义事件、取消订阅消息等【收尾工作】。

		关于销毁Vue实例
			1.销毁后借助Vue开发者工具看不到任何信息。
			2.销毁后自定义事件会失效,但原生DOM事件依然有效。
			3.一般不会在beforeDestroy操作数据,因为即便操作数据,也不会再触发更新流程了。
	-->

    <div id="root">
        <h2 :style="{opacity}">欢迎学习Vue</h2>
        <button @click="opacity = 1">透明度设置为1</button>
        <button @click="stop">点我停止变换</button>
    </div>
</body>
<script>
    Vue.config.productionTip = false

    // const vm = new Vue({
    new Vue({
        el: '#root',
        data: {
            opacity:1
        },
        methods:{
            stop() {
                // clearInterval(this.timer) // 清除定时器(温柔) 点击停止变换后再点透明度为1 透明度改变
                this.$destroy() // 暴力清除 点击停止变换后再点透明度为1不再发生变化 此时vm关了 但定时器没关
            }
        },
        // Vue完成模板的解析并把初始的真实的DOM元素挂载(放入)页面后调用mounted()函数
        mounted(){
            this.timer = setInterval(() => {
                this.opacity -= 0.01
                if(this.opacity <= 0) this.opacity = 1
            },16);
        },
        beforeDestroy() {
            clearInterval(this.timer) // 清除定时器
        }
    })
</script>
</html>


