本文介绍两种方法
1、经纬度矫正法
2、棋盘格矫正法
一、经纬度矫正法

1、算法说明
经纬度矫正法, 可以把鱼眼图想象成半个地球, 然后将地球展开成地图,经纬度矫正法主要是利用几何原理, 对图像进行展开矫正。
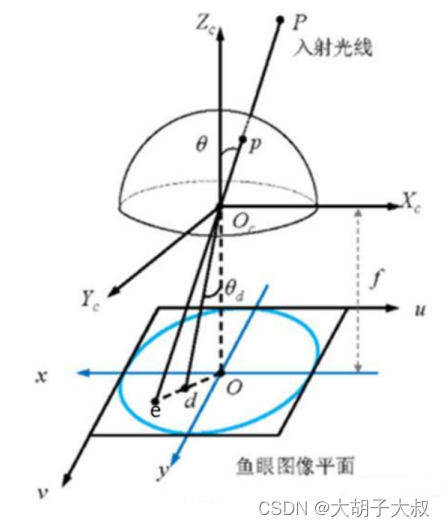
经过P点的入射光线没有透镜的话,本应交于相机成像平面的e点。然而,经过鱼眼相机的折射,光线会交于相机成像平面的d点,就产生了畸变,因此畸变图像整体上呈现出像素朝图像中心点聚集的态势。
而去畸变,就是将折射到d点的点,重新映射回到e点,因此去畸变之后的图像与原始的鱼眼图像相比,仿佛是把向心聚集的像素又重新向四周铺展开来。
详细的推导流程及公式见地址:AVM环视系统——鱼眼相机去畸变算法 - 知乎
2、 代码
import math
from PIL import Image


im = Image.open("/Users/Fisheye_photo-600x600.jpg")
im.show()

width, high = im.size
sqrt_len = min(width, high)
im = im.transform((sqrt_len, sqrt_len),
                    Image.EXTENT,
                    ((width-sqrt_len)/2, (high-sqrt_len)/2,
                    sqrt_len+(width-sqrt_len)/2, sqrt_len+(high-sqrt_len)/2)
                    )
width = high = sqrt_len

idata = im.getdata()
odata = []

alpha = math.pi/2

out_high = round(high * math.tan(alpha/2))
out_width = round(width * math.tan(alpha/2))
out_radius = round(high * math.tan(alpha/2))
out_center_x = out_width / 2
out_center_y = out_high / 2

out_bl_x = 0
out_br_x = out_width - 1
out_bt_y = 0
out_bb_y = out_high - 1

out_bl_cx = out_bl_x - out_center_x
out_br_cx = out_br_x - out_center_x
out_bt_cy = out_bt_y - out_center_y
out_bb_cy = out_bb_y - out_center_y

src_radius = round(high * math.sin(alpha/2))
src_center_x = width / 2
src_center_y = high / 2

for i in range(0, high * width):
    ox = math.floor(i / out_width)
    oy = i % out_high

    cx = ox - out_center_x;
    cy = oy - out_center_y;

    out_distance = round(math.sqrt(pow(cx, 2) + pow(cy, 2)))
    theta = math.atan2(cy, cx)
    if (-math.pi/4 <= theta <= math.pi/4):
        bx = out_radius * math.cos(math.pi/4)
        by = bx * math.tan(theta)
    elif (math.pi/4 <= theta <= math.pi*3/4):
        by = out_radius * math.sin(math.pi/4)
        bx = by / math.tan(theta)
    elif (-math.pi*3/4 <= theta <= -math.pi/4):
        by = out_radius * math.sin(-math.pi/4)
        bx = by / math.tan(theta)
    else:
        bx = out_radius * math.cos(-math.pi*3/4)
        by = bx * math.tan(theta)


    bdy_distance = round(math.sqrt(pow(cx, 2) + pow(cy, 2)))
    src_distance = src_radius * bdy_distance / out_radius


    src_x = round(src_center_x + math.cos(theta) * src_distance)
    src_y = round(src_center_y + math.sin(theta) * src_distance)

    src_idx = src_x*width + src_y
    if(0 < src_idx < high*width):
        odata.append(idata[src_idx])
    else:
        odata.append((0,0,0))


om = Image.new("RGB", (high, width))
om.putdata(odata)
om.show()
3、代码及图片地址:GitHub - duducosmos/defisheye: Fast Corrects for fisheye distortion in an image.
二、棋盘格矫正方法
1、算法说明
利用棋盘格进行标定, 然后计算鱼眼镜头的畸变系数以及内参, opencv中自带有fisheye模块, 可以直接根据棋盘格标定结果,采用cv2.fisheye.calibrate计算畸变系数以及内参, 然后使用cv2.fisheye.initUndistortRectifyMap函数计算映射矩阵, 最后根据映射矩阵, 使用cv2.remap进行矫正。
2、代码
import cv2
import numpy as np
import math
import time

# 鱼眼有效区域截取
def cut(img):
    img_gray = cv2.cvtColor(img, cv2.COLOR_BGR2GRAY)
    (_, thresh) = cv2.threshold(img_gray, 20, 255, cv2.THRESH_BINARY)
    contours, hierarchy = cv2.findContours(thresh, cv2.RETR_EXTERNAL, cv2.CHAIN_APPROX_SIMPLE)
    cnts = sorted(contours, key=cv2.contourArea, reverse=True)[0]
    x,y,w,h = cv2.boundingRect(cnts)
    r = max(w/ 2, h/ 2)
    # 提取有效区域
    img_valid = img[y:y+h, x:x+w]
    return img_valid, int(r)

# 鱼眼矫正
def undistort(src,r):
    # r: 半径, R: 直径
    R = 2*r
    # Pi: 圆周率
    Pi = np.pi
    # 存储映射结果
    dst = np.zeros((R, R, 3))
    src_h, src_w, _ = src.shape
    # 圆心
    x0, y0 = src_w//2, src_h//2

    for dst_y in range(0, R):

        theta =  Pi - (Pi/R)*dst_y
        temp_theta = math.tan(theta)**2

        for dst_x in range(0, R):
            # 取坐标点 p[i][j]
            # 计算 sita 和 fi

            phi = Pi - (Pi/R)*dst_x
            temp_phi = math.tan(phi)**2

            tempu = r/(temp_phi+ 1 + temp_phi/temp_theta)**0.5
            tempv = r/(temp_theta + 1 + temp_theta/temp_phi)**0.5

            if (phi < Pi/2):
                u = x0 + tempu
            else:
                u = x0 - tempu

            if (theta < Pi/2):
                v = y0 + tempv
            else:
                v = y0 - tempv

            if (u>=0 and v>=0 and u+0.5<src_w and v+0.5<src_h):
                dst[dst_y, dst_x, :] = src[int(v+0.5)][int(u+0.5)]

                # 计算在源图上四个近邻点的位置
                # src_x, src_y = u, v
                # src_x_0 = int(src_x)
                # src_y_0 = int(src_y)
                # src_x_1 = min(src_x_0 + 1, src_w - 1)
                # src_y_1 = min(src_y_0 + 1, src_h - 1)
                #
                # value0 = (src_x_1 - src_x) * src[src_y_0, src_x_0, :] + (src_x - src_x_0) * src[src_y_0, src_x_1, :]
                # value1 = (src_x_1 - src_x) * src[src_y_1, src_x_0, :] + (src_x - src_x_0) * src[src_y_1, src_x_1, :]
                # dst[dst_y, dst_x, :] = ((src_y_1 - src_y) * value0 + (src_y - src_y_0) * value1 + 0.5).astype('uint8')

    return dst

if __name__ == "__main__":
    t = time.perf_counter()
    frame = cv2.imread('../imgs/pig.jpg')
    cut_img,R = cut(frame)
    result_img = undistort(cut_img,R)
    cv2.imwrite('../imgs/pig_nearest.jpg',result_img)
    print(time.perf_counter()-t)
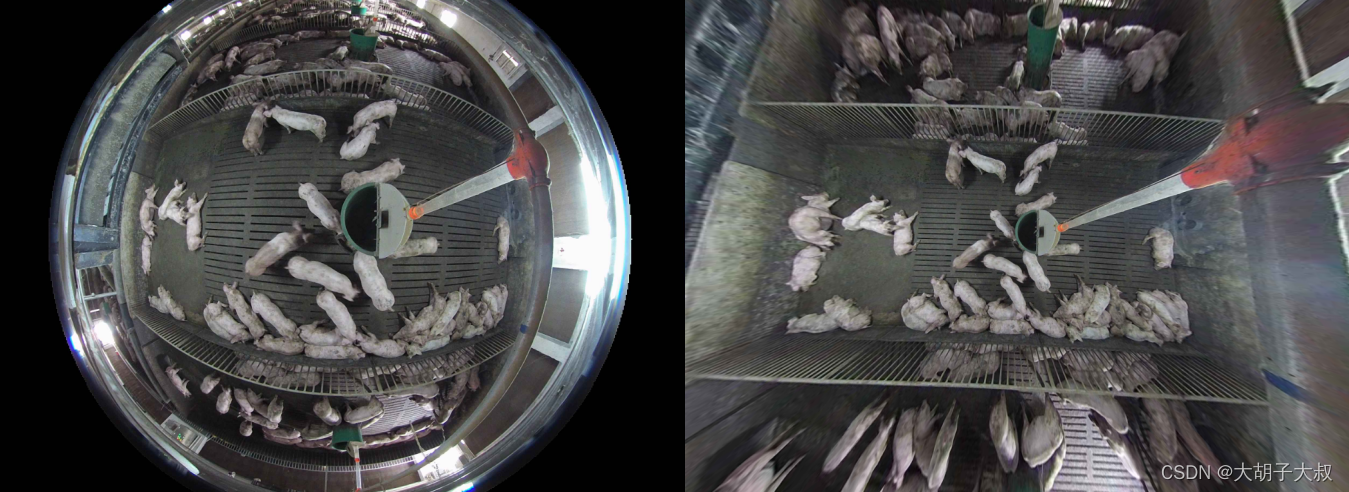
效果图
 3、代码地址
https://github.com/HLearning/fisheye
三、总结:比对两个算法
本人用两个算法对一张图像进行拉直,发现经过经纬度矫正算法生成的图像原作者裁剪掉了边缘部分,见下图效果图,中间黑框内的图像是经过“经纬度矫正法”得到的效果图,外面的大图是用“棋盘格矫正法”得到的效果图

为了更直观,更改了图像的透明度,可以看出两个算法的效果还是多少有些差别的。
其实,两个算法的边缘部分都被严重拉伸,丢不丢掉看适用场景和个人需要吧。
四、知识拓展
立体标定
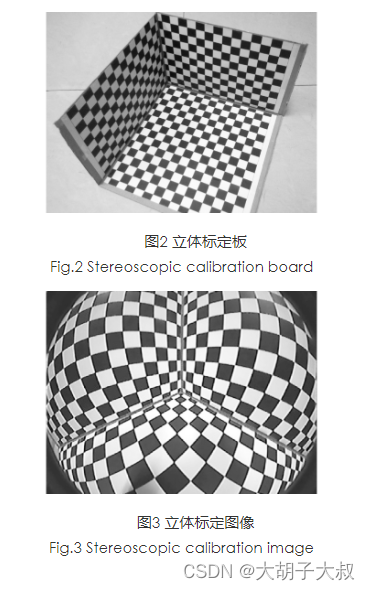
算法说明
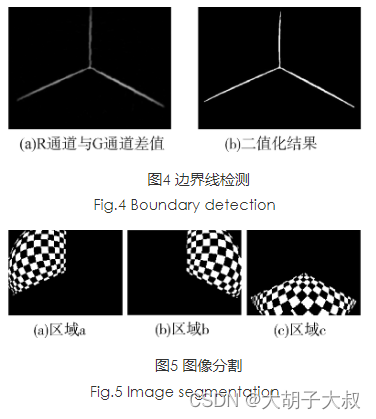
坐标映射建立,各区域的角点都有一维世界坐标为0,对应图5中三幅子图像分别为Y=0,X=0,Z=0。根据棋盘方格边长以及与世界坐标原点间隔的方格数,可得到所有角点的世界坐标。从而建立起二维图像坐标与三维世界坐标的一一映射,用于模型参数的求解。
参考地址:采用立体标定板的鱼眼相机快速标定方法_真空技术_新闻动态_深圳市鼎达信装备有限公司
基于双经度模型的鱼眼图像畸变矫正方法
基于双经度模型的鱼眼图像畸变矫正方法 - 百度文库
