一 介绍
官网:https://docs.celeryq.dev/en/latest/index.html
celery是一个简单、灵活、可靠的分布式系统,用于 处理大量消息,同时为操作提供 维护此类系统所需的工具。
Celery架构
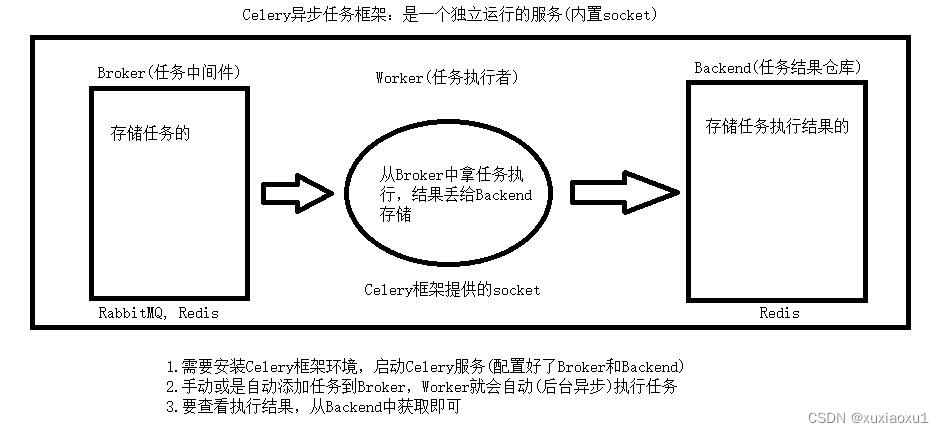
Celery的架构由三部分组成,消息中间件(message broker)、任务执行单元(worker)和 任务执行结果存储(task result store)组成。
消息中间件
Celery本身不提供消息服务,但是可以方便的和第三方提供的消息中间件集成。包括,RabbitMQ, Redis等等。
任务执行单元
Worker是Celery提供的任务执行的单元,worker并发的运行在分布式的系统节点中。
任务结果存储
Task result store用来存储Worker执行的任务的结果,Celery支持以不同方式存储任务的结果,包括AMQP, redis等。
使用场景
异步执行:解决耗时任务,将耗时操作任务提交给Celery去异步执行,比如发送短信/邮件、消息推送、音视频处理等等。
延迟执行:解决延迟任务。
定时执行:解决周期(周期)任务,比如每天数据统计。
二 安装使用
安装
pip install celery
pip install eventlet
使用
tasks.py
from celery import Celery

# 任务提交保存的地方
broker = 'redis://127.0.0.1:6379/0'

# 任务执行完结果保存的地方
backend = 'redis://127.0.0.1:6379/1'

app = Celery(main=__name__, broker=broker, backend=backend)

# 创建任务
@app.task
def add(x, y):
    return x + y
提交任务
submit_task.py
from tasks import add

# 使用delay方法
res = add.delay(10, 10)

# 返回值是celery.result.AsyncResult类的对象,可以根据这个对象查看执行结果等。

# 也可以通过返回值直接查看任务的状态
print(res)  # 3dcef2f9-d266-4d70-8aab-73073ba9e691

# 这才是真正的id号
print(res.task_id)
执行后,会将任务保存到broker对应的redis缓存库中。

启动celery工作服务器
在工作路径下终端输入命令
celery -A tasks worker -l info -P eventlet
或
celery -A tasks worker --loglevel=INFO -P eventlet
backend中查看任务执行结果
check_result.py
from tasks import app

from celery.result import AsyncResult

task_id = '3dcef2f9-d266-4d70-8aab-73073ba9e691'

if __name__ == '__main__':
    res = AsyncResult(id=task_id, app=app)
    if res.successful():
        result = res.get()
        print(result)
    # 等同上面代码
    # if res.state == 'SUCCESS':
    #     result = res.get()
    #     print(result)
    elif res.failed():
        print('任务失败')
    # elif res.state == 'FAILURE':
    #     print('任务失败')
    elif res.status == 'PENDING':
        print('任务等待中被执行')
    elif res.status == 'RETRY':
        print('任务异常后正在重试')
    elif res.status == 'STARTED':
        print('任务已经开始被执行')
AsyncResult下的方法
def failed(self):
    """Return :const:`True` if the task failed."""
    return self.state == states.FAILURE

def successful(self):
    """Return :const:`True` if the task executed successfully."""
    return self.state == states.SUCCESS
三 自定义celery包
新建包:celery_tasks。
在包先新建一个 celery.py,初始化app。
from celery import Celery

broker = 'redis://127.0.0.1:6379/0'
# backend='redis://:123456@127.0.0.1:6379/1' 加密码
backend = 'redis://127.0.0.1:6379/1'
app = Celery(main=__name__, broker=broker, backend=backend,
             include=['celery_tasks.home_tasks', 'celery_tasks.user_tasks'])
在包里新建user_tasks.py 编写用户相关任务 。
# 用户相关任务
from .celery import app
在包里新建home_task.py 编写首页相关任务 。
# 首页相关任务
from .celery import app
其它程序,提交任务。
启动worker
celery -A celery_tasks worker -l info -P eventlet
四 celery异步任务,延迟任务,定时任务
异步任务
task.delay(*args, **kwargs)
延迟任务
task.apply_async(args=[参数,参数],eta=时间对象(utc时间))
from datetime import timedelta, datetime

res = add.apply_async(args=(1, 2), eta=(datetime.utcnow() + timedelta(seconds=20)))

print(res.task_id)  # c78505e2-614d-4bb2-930c-c73c325af519

定时任务
app的配置文件中配置
app.conf.beat_schedule = {
    'add': {
        'task': 'celery_tasks.home_tasks.add',
        'schedule': timedelta(seconds=5),  # 每隔五秒提交任务
        # 'schedule': crontab(hour=8, day_of_week=1),  # 每周一早八点
        'args': ('100', '200'),
    },
}
启动worker
celery -A celery_tasks worker -l info -P eventlet
启动beat(真正干活的人)
celery -A celery_tasks beat -l info

五 django中使用celery
将包复制到django项目路径下
在包内的celery.py中添加代码
import os
from celery import Celery
from datetime import timedelta
from celery.schedules import crontab

os.environ.setdefault('DJANGO_SETTINGS_MODULE', 'luffy.settings.dev')
import django
django.setup()

broker = 'redis://127.0.0.1:6379/0'
backend = 'redis://127.0.0.1:6379/1'
app = Celery(main=__name__, broker=broker, backend=backend,
             include=['celery_tasks.home_tasks', 'celery_tasks.user_tasks'])
在任务中就可以用到django的ORM等。
在django的视图类中,导入任务,提交任务。
启动worker,beat。
六 秒杀接口
新建秒杀商品表
class Shop(models.Model):
    name = models.CharField(max_length=32)
    # 秒杀商品数量不能为负
    shop_num = models.PositiveIntegerField()
user_tasks.py
# 用户相关任务
from .celery import app


# 秒杀任务
@app.task
def seckill_task():
    from user.models import Shop
    try:
        from django.db.models import F
        import time
        Shop.objects.filter(name='秒杀商品').update(shop_num=F('shop_num') - 1)
        time.sleep(10)
        return True
    # 出错解释商品库存不足 不能秒杀
    except:
        return False
views.py
# 提交秒杀
 @action(methods=['GET'], detail=False, url_path='submit_seckill')
 def submit_seckill(self, request):
     from celery_tasks.user_tasks import seckill_task
     res = seckill_task.delay()
     return APIResponse(task_id=res.task_id)

 # 查看秒杀结果
 @action(methods=['GET'], detail=False, url_path='check_seckill')
 def check_seckill(self, request):
     from celery.result import AsyncResult
     from celery_tasks.celery import app
     task_id = request.query_params.get('task_id')
     res = AsyncResult(id=task_id, app=app)
     if res.successful():
         is_true = res.get()
         if is_true:
             return APIResponse(code=100, msg='秒杀成功')
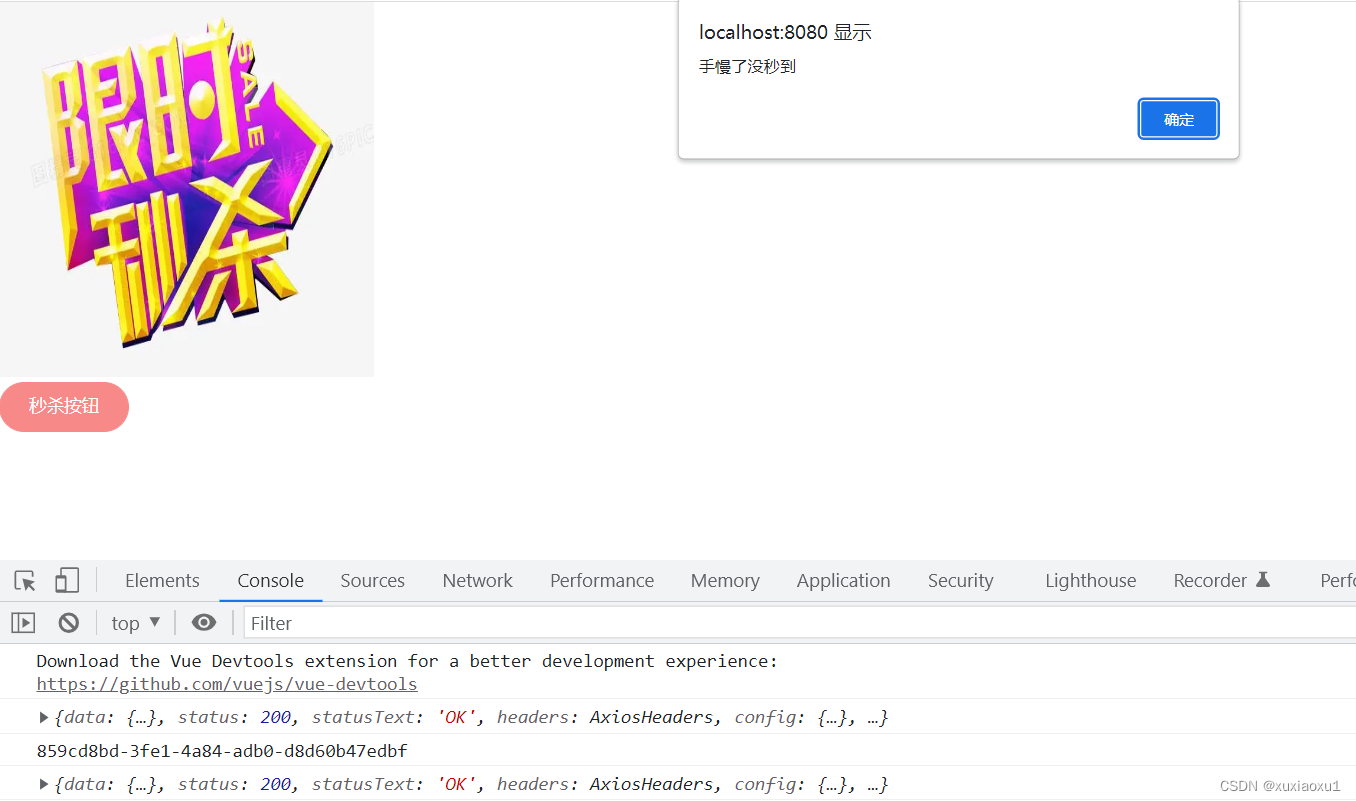
         return APIResponse(code=101, msg='手慢了没秒到')
     elif res.status == 'PENDING':
         return APIResponse(code=102, msg='任务等待中被执行')
     elif res.status == 'RETRY':
         return APIResponse(code=103, msg='任务异常后正在重试')
     elif res.status == 'STARTED':
         return APIResponse(code=104, msg='任务已经开始被执行')
前端
<template>
    <div>
        <img src="https://img1.baidu.com/it/u=3467439571,3022033088&fm=253&app=138&size=w931&n=0&f=JPEG&fmt=auto?sec=1668704400&t=5ff8a17feab5b05d5e27c41ad2776bc9" alt="" width="300px" height="300px">
        <br>
        <el-button type="danger" round @click.once="submit">秒杀按钮</el-button>
    </div>
</template>

<script>
export default {
    name: 'Seckill',
    methods: {
        submit() {
            this.$axios.get(this.$settings.BASE_URL + 'user/submit_seckill/').then(res => {
                console.log(res)
                if (res.data.code === 100) {
                    let task_id = res.data.task_id
                    console.log(task_id)
                    let t = setInterval(() => {
                        this.$axios.get(this.$settings.BASE_URL + 'user/check_seckill/?task_id=' + task_id).then(re => {
                            console.log(re)
                            if (re.data.code === 100 || re.data.code === 101) {
                                this.$message({
                                    message: re.data.msg,
                                    type: 'success'
                                });
                                alert(re.data.msg)
                                clearInterval(t)
                            }
                        })
                    }, 1000)
                }
            })
        }
    }

}
</script>
七 双写一致性
7.1 轮播图接口加缓存
提交了接口的响应速度
提高并发量
class SlideShowView(GenericViewSet, ListMixinView):
    queryset = SlideShow.objects.all().filter(is_delete=False, is_show=True).order_by('orders')[
               :settings.SLIDE_SHOW_COUNT]
    serializer_class = SlideShowSer

    def list(self, request, *args, **kwargs):
        result = cache.get('banner_list')
        if result:
            print('走了缓存')
            return APIResponse(code=1001, result=result)
        res = super().list(request, *args, **kwargs)
        result = res.data.get('result')
        cache.set('banner_list', result)
        print('走了数据库')
        return res
7.2 celery定时任务实现双写一致性
加了缓存,如果mysql数据变了,由于请求的都是缓存的数据,导致mysql和redis的数据不一致。
双写一致性问题:
- 修改mysql数据库,删除缓存 【缓存的修改是在后】
- 修改数据库,修改缓存 【缓存的修改是在后】
- 定时更新缓存,针对于实时性不是很高的接口适合定时更新。
home_tasks.py
# 首页相关任务
import time

from .celery import app
from home.models import SlideShow
from django.conf import settings
from home.serializer import SlideShowSer
from django.core.cache import cache


@app.task
def update_banner():
    # 更新缓存
    queryset = SlideShow.objects.all().filter(is_delete=False, is_show=True).order_by('orders')[:settings.SLIDE_SHOW_COUNT]
    ser = SlideShowSer(instance=queryset, many=True)
    # print(ser.data)
    for item in ser.data:
        item['image'] = settings.HOST_URL + item['image']
    cache.set('banner_list', ser.data)
    return True
celery.py
import os
from celery import Celery
from datetime import timedelta
from celery.schedules import crontab

os.environ.setdefault('DJANGO_SETTINGS_MODULE', 'luffy.settings.dev')
import django

django.setup()

broker = 'redis://127.0.0.1:6379/0'
backend = 'redis://127.0.0.1:6379/1'
app = Celery(main=__name__, broker=broker, backend=backend,
             include=['celery_tasks.home_tasks', 'celery_tasks.user_tasks'])

app.conf.beat_schedule = {
    # 定时任务
    'update_banner': {
        'task': 'celery_tasks.home_tasks.update_banner',
        'schedule': timedelta(minutes=30),
        # 'schedule': crontab(hour=8, day_of_week=1),
        'args': (),
    },
}
启动django,worker,beat。
每隔30分钟查询数据库中的轮播图,放进缓存中,请求来之后,缓存中有先从缓存中拿,没有才去数据库拿。
mysql数据修改后,前端拿到的数据可能不一致,但是最多30分钟缓存中的数据就会更新。


