Vue官网地址:gVue.js - The Progressive JavaScript Framework | Vue.js
选项式vs组合式
vue的两种风格,搬运官网源码:
选项式 API (Options API)
使用选项式 API,我们可以用包含多个选项的对象来描述组件的逻辑,例如 data、methods 和 mounted。选项所定义的属性都会暴露在函数内部的 this 上,它会指向当前的组件实例。
<script>
export default {
  // data() 返回的属性将会成为响应式的状态
  // 并且暴露在 `this` 上
  data() {
    return {
      count: 0
    }
  },

  // methods 是一些用来更改状态与触发更新的函数
  // 它们可以在模板中作为事件处理器绑定
  methods: {
    increment() {
      this.count++
    }
  },

  // 生命周期钩子会在组件生命周期的各个不同阶段被调用
  // 例如这个函数就会在组件挂载完成后被调用
  mounted() {
    console.log(`The initial count is ${this.count}.`)
  }
}
</script>

<template>
  <button @click="increment">Count is: {{ count }}</button>
</template>
组合式 API (Composition API)
通过组合式 API,我们可以使用导入的 API 函数来描述组件逻辑。在单文件组件中,组合式 API 通常会与 <script setup> 搭配使用。这个 setup attribute 是一个标识,告诉 Vue 需要在编译时进行一些处理,让我们可以更简洁地使用组合式 API。比如,<script setup> 中的导入和顶层变量/函数都能够在模板中直接使用。
下面是使用了组合式 API 与 <script setup> 改造后和上面的模板完全一样的组件:
<script setup>
import { ref, onMounted } from 'vue'

// 响应式状态
const count = ref(0)

// 用来修改状态、触发更新的函数
function increment() {
  count.value++
}

// 生命周期钩子
onMounted(() => {
  console.log(`The initial count is ${count.value}.`)
})
</script>

<template>
  <button @click="increment">Count is: {{ count }}</button>
</template>
创建vue3项目
vue create yf_vue3_1

选择vue3
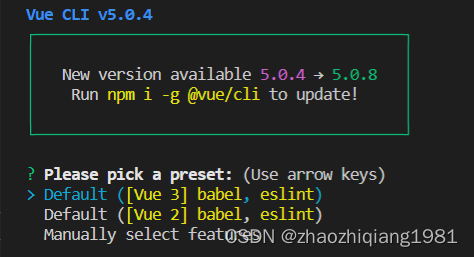
进入创建的yf_vue3_1项目中
cd yf_vue3_1
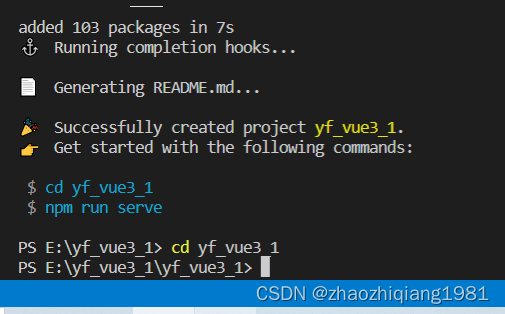
通过上图的提示,使用
npm run serve
启动项目即可
vue3核心语法
保留了绝大部分的vue2语法
<script>
import HelloWorld from "./components/HelloWorld.vue";

export default {
  name: "App",
  data() {},
  methods: {},
  components: {
    HelloWorld,
  },
};
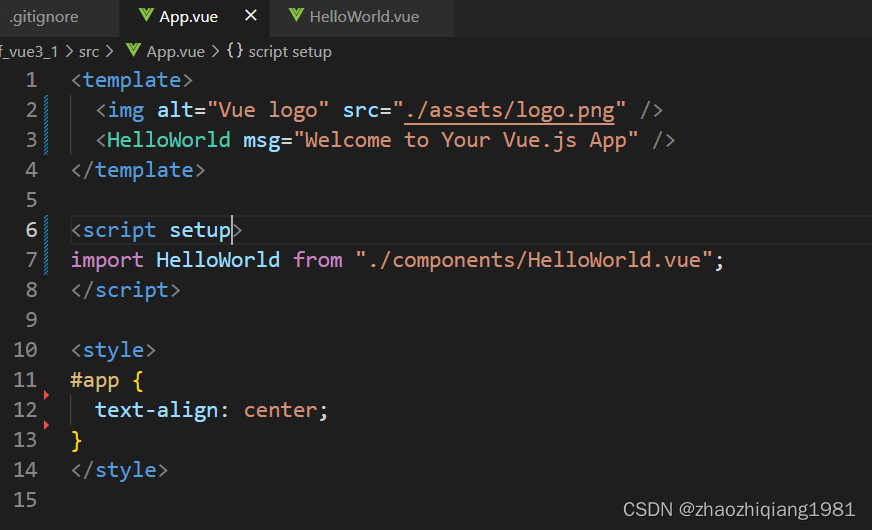
通过setup启动组合式api
其中import 的 HelloWorld组件不需要再components中注册,导入即注册!
defineProps
组件间传值
<template>
  <div class="hello">
    <h1>{{ props.msg }}</h1>
  </div>
</template>

<script setup>
import { defineProps } from "vue";
const props = defineProps({
  msg: {
    type: String,
    require: true,
  },
});
</script>
响应式的基本类型ref()
ref(0) ref("abc"),操作值需要加.value,具体原理可以参考ts中的proxy部分。
响应式的对象类型reactive()
综合例子:
<template>
  <div class="hello">
    <h1>{{ props.msg }}</h1>

    <form>
      <label for="username">Username:</label>
      <input type="text" id="username" v-model="username" />

      <label for="password">Password:</label>
      <input type="password" id="password" v-model="password" />

      <button type="button" @click="submitForm">Submit</button>
    </form>

    <form>
      <label for="username">Username:</label>
      <input type="text" id="username1" v-model="userData.username1" />

      <label for="password">Password:</label>
      <input type="password" id="password1" v-model="userData.password1" />

      <button type="button" @click="submitForm1">Submit</button>
    </form>
  </div>
</template>

<script setup>
import { defineProps, reactive, ref } from "vue";
const props = defineProps({
  msg: {
    type: String,
    require: true,
  },
});

const username = ref("初始值");
const password = ref("");

// 提交表单数据的函数
function submitForm() {
  console.log("Username:", username.value);
  console.log("Password:", password.value);
}

const userData = reactive({
  username1: "",
  password1: "",
});
// 提交表单数据的函数
function submitForm1() {
  console.log("Username:", userData.username1);
  console.log("Password:", userData.password1);
}
</script>
浅响应shallowReactive
如果修改根属性,则多维属性会一起修改。如果只修改role这个多维属性,则不会修改。
const showData = shallowReactive({
  name: "有风",
  role: ["admin", "admin1"],
});
function updateData() {
  //showData.name = "程序猿有风";
  showData.role.push("admin2");
}
计算属性computed
const getRole = computed(() => {
  return showData.role;
});
watch与watchEffect
//监听基本属性
watch(username, (newVal, oldVal) => {
  console.log(newVal + "---" + oldVal);
});
//监听reavtive中的单个属性
watch(
  () => showData.name,
  (newVal, oldVal) => {
    console.log("监听reavtive中的单个属性:" + newVal + "---" + oldVal);
  }
);
//监听reavtive中的多个属性
watchEffect(() => {
  console.log("监听多个属性:" + showData.name + "---" + showData.role);
});
最终的完整源码
<template>
  <div class="hello">
    <h1>{{ props.msg }}</h1>

    <form>
      <label for="username">Username:</label>
      <input type="text" id="username" v-model="username" />

      <label for="password">Password:</label>
      <input type="password" id="password" v-model="password" />

      <button type="button" @click="submitForm">Submit</button>
    </form>

    <form>
      <label for="username">Username:</label>
      <input type="text" id="username1" v-model="userData.username1" />

      <label for="password">Password:</label>
      <input type="password" id="password1" v-model="userData.password1" />

      <button type="button" @click="submitForm1">Submit</button>
    </form>

    <div>
      {{ showData }}
      <br />
      <button type="button" @click="updateData">update</button>
    </div>
    <div>{{ getRole }}</div>
    <div>{{ getRole }}</div>
    <div>{{ getRole }}</div>
  </div>
</template>

<script setup>
import {
  computed,
  defineProps,
  reactive,
  ref,
  shallowReactive,
  watch,
  watchEffect,
} from "vue";
const props = defineProps({
  msg: {
    type: String,
    require: true,
  },
});

const username = ref("初始值");
const password = ref("");

// 提交表单数据的函数
function submitForm() {
  console.log("Username:", username.value);
  console.log("Password:", password.value);
}

const userData = reactive({
  username1: "",
  password1: "",
});
// 提交表单数据的函数
function submitForm1() {
  console.log("Username:", userData.username1);
  console.log("Password:", userData.password1);
}

const showData = shallowReactive({
  name: "有风",
  role: ["admin", "admin1"],
});
function updateData() {
  showData.name = "程序猿有风";
  showData.role.push("admin2");
}

const getRole = computed(() => {
  return showData.role;
});

//监听基本属性
watch(username, (newVal, oldVal) => {
  console.log(newVal + "---" + oldVal);
});
//监听reavtive中的单个属性
watch(
  () => showData.name,
  (newVal, oldVal) => {
    console.log("监听reavtive中的单个属性:" + newVal + "---" + oldVal);
  }
);
//监听reavtive中的多个属性
watchEffect(() => {
  console.log("监听多个属性:" + showData.name + "---" + showData.role);
});
</script>

