绘制矩形面
- 可以绘制的面只有三角面,要绘制矩形面的话,只能用两个三角形去拼
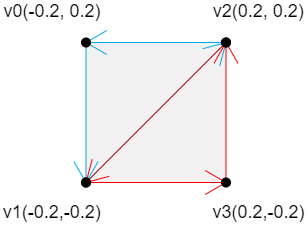
1 ) 使用 三角带 TRIANGLE_STRIP 绘制矩形
-
回顾一下之前的规律:
- 第一个三角形:v0>v1>v2
- 第偶数个三角形:以上一个三角形的第二条边+下一个点为基础,以和第二条边相反的方向绘制三角形
- 第奇数个三角形:以上一个三角形的第三条边+下一个点为基础,以和第二条边相反的方向绘制三角形
-
关键顶点绘制数据
const vertices = new Float32Array([ -0.2, 0.2, -0.2,-0.2, 0.2, 0.2, 0.2,-0.2, ]) -
绘制:
gl.drawArrays(gl.TRIANGLE_STRIP, 0, 4)
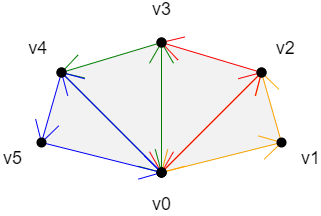
2 ) 使用 三角带 TRIANGLE_FAN 绘制矩形
-
回顾一下之前的规律:
- v0>v1>v2: 以上一个三角形的第三条边+下一个点为基础,按照和第三条边相反的顺序,绘制三角形
- v0>v2>v3: 同上
- v0>v3>v4: 同上
- v0>v4>v5: 同上
-
基于此,设计顶点关键数据
const vertices = new Float32Array([ -0.2, -0.2, 0.2, -0.2, 0.2, 0.2, -0.2, 0.2 ]) -
绘制:
gl.drawArrays(gl.TRIANGLE_FAN, 0, 4)
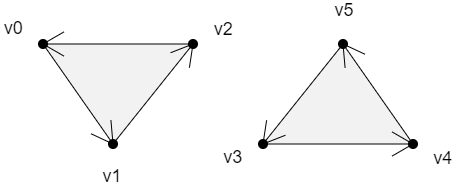
3 )使用独立三角形,绘制矩形
-
绘制规律
- 这里就是普通的三角形,画了2个,需要6个点
- 上面两个面的绘制顺序是: v0>v1>v2,v3>v4>v5
-
顶点关键数据
const vertices = new Float32Array([
    -0.2, 0.2,
    -0.2, -0.2,
    0.2, 0.2,
    0.2, 0.2,
    -0.2, -0.2,
    0.2, -0.2
])
可以根据自己的需求,绘制各种各样的图形
封装多边形对象
1 )封装一个Poly 对象,用于绘制多边形
const defAttr = () => ({
  gl: null,
  vertices: [],
  geoData: [],
  size: 2,
  attrName: 'a_Position',
  count: 0,
  types: ['POINTS'],
})

export default class Poly {
  constructor(attr) {
    Object.assign(this,defAttr(),attr)
    this.init()
  }
  init() {
    const { attrName, size, gl } = this;
    if(!gl) return
    const vertexBuffer = gl.createBuffer()
    gl.bindBuffer(gl.ARRAY_BUFFER, vertexBuffer)
    this.updateBuffer()
    const a_Position = gl.getAttribLocation(gl.program,attrName)
    gl.vertexAttribPointer(a_Position, size, gl.FLOAT, false, 0, 0)
    gl.enableVertexAttribArray(a_Position)
  }
  addVertice(...params) {
    this.vertices.push(...params)
    this.updateBuffer()
  }
  popVertice() {
    const { vertices, size }=this
    const len = vertices.length
    vertices.splice(len-size,len)
    this.updateCount()
  }
  setVertice(ind,...params) {
    const { vertices, size }=this
    const i = ind * size
    params.forEach((param,paramInd) => {
      vertices[i+paramInd] = param
    })
  }
  updateBuffer() {
    const { gl,vertices } = this
    this.updateCount()
    gl.bufferData(gl.ARRAY_BUFFER, new Float32Array(vertices), gl.STATIC_DRAW)
  }
  updateCount() {
    this.count = this.vertices.length / this.size
  }
  updateVertices(params) {
    const { geoData } = this
    const vertices = []
    geoData.forEach(data => {
      params.forEach(key => {
        vertices.push(data[key])
      })
    })
    this.vertices=vertices
  }
  draw(types = this.types) {
    const { gl, count } = this
    for(let type of types) {
      gl.drawArrays(gl[type],0,count);
    }
  }
}
-
属性
- gl webgl上下文对象
- vertices 顶点数据集合,在被赋值的时候会做两件事
- 更新count 顶点数量,数据运算尽量不放渲染方法里
- 向缓冲区内写入顶点数据
- geoData 模型数据,对象数组,可解析出 vertices 顶点数据
- size 顶点分量的数目
- positionName 代表顶点位置的attribute 变量名
- count 顶点数量
- types 绘图方式,可以用多种方式绘图
-
方法
- init() 初始化方法,建立缓冲对象,并将其绑定到webgl 上下文对象上,然后向其中写入顶点数据。将缓冲对象交给attribute变量,并开启attribute 变量的批处理功能。
- addVertice() 添加顶点
- popVertice() 删除最后一个顶点
- setVertice() 根据索引位置设置顶点
- updateBuffer() 更新缓冲区数据,同时更新顶点数量
- updateCount() 更新顶点数量
- updateVertices() 基于geoData 解析出vetices 数据
- draw() 绘图方法
2 )应用1
const poly = new Poly({
  gl,
  vertices:[0, 0.2]
})

poly.draw(['POINTS'])

setTimeout(()=>{
  poly.addVertice(-0.2, -0.1);
  gl.clear(gl.COLOR_BUFFER_BIT);
  poly.draw(['POINTS'])
}, 1000)

setTimeout(()=>{
  gl.clear(gl.COLOR_BUFFER_BIT);
  poly.draw(['POINTS','LINE_STRIP'])
}, 2000)
3 )应用2
// 实例化多边形
const poly = new Poly({
    gl,
    types:['POINTS','LINE_STRIP']
})

// 鼠标点击事件
canvas.addEventListener("click", (event) => {
    const { x,y } = getMousePosInWebgl(event, canvas);
    poly.addVertice(x,y);
    gl.clear(gl.COLOR_BUFFER_BIT);
    poly.draw();
});




![[ubuntu]ubuntu设置虚拟内存](https://img-blog.csdnimg.cn/f361ea3758bb4d9dab55d713413d60ca.jpeg)


