第一个Hello World
- 注意点:默认只匹配了
http网站,如果需要https网站,需要自己添加@match https://*/* - 代码如下
- 这样子访问任意网站就可以输出
Hello World
- 这样子访问任意网站就可以输出
// ==UserScript==
// @name         第一个脚本
// @namespace    http://tampermonkey.net/
// @version      0.1
// @description  try to take over the world!
// @author       You
// @match        http://*/*
// @match        https://*/*
// @icon         data:image/gif;base64,R0lGODlhAQABAAAAACH5BAEKAAEALAAAAAABAAEAAAICTAEAOw==
// @grant        none
// ==/UserScript==

(function() {
    'use strict';
    console.log("你好,世界")
})();
重要了解
@grant
-
@grant用于将GM_*和GM.*函数、unsafeWindow对象和一些强大的window函数列入白名单。// @grant GM_setValue // @grant GM_getValue // @grant GM.setValue // @grant GM.getValue // @grant GM_setClipboard // @grant unsafeWindow // @grant window.close // @grant window.focus // @grant window.onurlchange -
由于关闭和聚焦选项卡是一个强大的功能,因此也需要将其添加到
@grant语句中。如果@grant后跟none,则禁用沙盒。在此模式下,没有GM_*函数,但GM_info属性将可用。
// @grant none
- 如果没有给定
@grant标记,则假定为空列表。但是,这与使用none不同。 - 说白了就是你不设置
@grant标记,你就不能使用GM_addElement等等GM_的函数
@match
- 主要运行脚本的网站
- 如果需要在全部链接上运行,就只需添加如下
@match *://*/*
- 需要注意的是
@match规则是匹配多少次,就运行多少次编写的脚本文件

- 下面的例子就可以很好的说明match几次就执行多少次脚本
// @match        http://www.yinghuavideo.com/v/*
// @match        https://tup.yinghuavideo.com/*
// 输出查看
console.log(window.location.href)

//输出如下内容
	//第一次输出
http://www.yinghuavideo.com/v/5971-9.html
	//第二次输出
https://tup.yinghuavideo.com/?vid=https://cdn18.vipyz-cdn3.com/20230902/15434_377b32aa/index.m3u8$mp4
@require
-
油猴给我们提供了一个@require属性给我们来引用用户脚本,并且油猴给我们提供了md5,sha256等校验方法来校验引用的脚本是否正确,例如下面这样:
// @require https://cdn.jsdelivr.net/npm/vue@2.6.12/dist/vue.min.js#md5=xxxx -
如果md5不正确,console中则会显示下面的内容

- 也支持
SHA-256和MD5哈希 - 如果给出多个哈希(用逗号或分号分隔),则当前支持的最后一个哈希值由 Tampermonkey 使用。所有哈希都需要以十六进制或 Base64 格式编码。
// @require              https://code.jquery.com/jquery-2.1.1.min.js#md5=45eef...
// @require              https://code.jquery.com/jquery-2.1.2.min.js#md5-ac56d...,sha256-6e789...
// @require              https://code.jquery.com/jquery-3.6.0.min.js#sha256-/xUj+3OJU...ogEvDej/m4=
@resource
-
一些可以通过
GM_getResourceText和GM_getResourceURL访问的静态资源。 后面写名值对,名是资源的名称,值是相应的url,中间以空格隔开(所以名字中不能包含空格😄),可多次定义// @resource logo https://my.cdn.com/logo.png // @resource text https://my.cdn.com/some-text.txt -
然后就可以使用
getResourceText引入了
// ==UserScript==
// @name         TEST调试专用
// @namespace    https://blog.csdn.net/jx520
// @version      0.1
// @author       jerryjin
// @match        *://*/*
// @grant        GM_getResourceText
// @resource myTxt https://cdn.jsdelivr.net/gh/wandou-cc/blog-ui@20230314_v1/index.css
// ==/UserScript==
(async function() {
    'use strict';
    let txt = GM_getResourceText('myTxt');
    console.log(txt);
    let json = JSON.parse(txt);
    console.log(json);
})();
@GM_addElement
- 可以用来添加
script,css,或者为指定的DOM添加对应属性或元素
添加script-1
head下添加
GM_addElement('script',{
	textContent: " window.foo = 'bar' "
})

添加script-指向url
head下添加
GM_addElement('script',{
    src:'https://example.com/script.js',
    type:'text/javascript',
})

添加style和css的link
- 下面这个操作就不解释什么意思了,应该都看得懂
GM_addElement(document.getElementsByTagName('div')[0], 'img', {
  src: 'https://example.com/image.png'
});

GM_addElement(shadowDOM, 'style', {
  textContent: 'div { color: black; };'
});
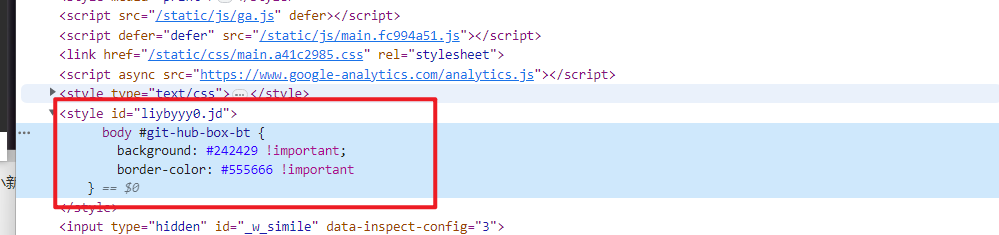
style应该这么用
  GM_addElement("style", {
    textContent: `
    body #git-hub-box-bt {
      background: #242429 !important;
      border-color: #555666 !important
  }`,
  });
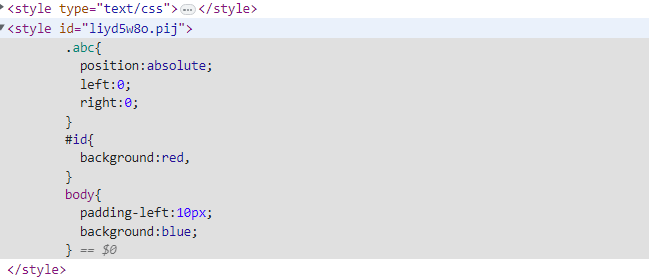
@GM_addStyle
- 传入的参数就是css样式,css样式这么写,这里就可以写,用模板语法会很方便,和css书写一样,下面例子就是模板语法添加的样式信息
  GM_addStyle(
    `
      .abc{
        position:absolute;
        left:0;
        right:0;
      }
      #id{
        background:red,
      }
      body{
        padding-left:10px;
        background:blue;
      }
    `
  )
@GM_setValue
GM_setValue(key,value)
GM_setValue("someKey", "someData");
await GM.setValue("otherKey", "otherData");
- 暂时不明白为什么需要
await
@GM_getValue
GM_getValue(key,defaultValue)- 当
key不存在的时候,则返回默认值
- 当
const someKey = GM_getValue("someKey", null);
const otherKey = await GM.getValue("otherKey", null);
@GM_deleteValue
GM_deleteValue("someKey")- 从用户脚本的存储中删除对应的key
GM_deleteValue("someKey");
await GM.deleteValue("otherKey");
@GM_listValues
GM_listValues函数返回所有存储数据的key列表。
const keys = GM_listValues();
const asyncKeys = await GM.listValues();

//刚刚设置了
//GM_setValue('sexInfo',JSON.stringify({
//  name:'李白',
//  age:18,
//  sex:'男',
//}))

//输出 数组: ['sexInfo']
console.log(GM_listValues());
unsafeWindow
- 作用:允许脚本可以完整访问原始页面,包括原始页面的脚本和变量。
- 简单理解为自己脚本里面的
window是独立于外面的,无法访问到原始网页的window对象里面的信息 - 注意
unsafeWindow和window是不一样的 - 比如有一个网页,代码如下
<html lang="en">
<head>
  <meta charset="UTF-8">
  <meta http-equiv="X-UA-Compatible" content="IE=edge">
  <meta name="viewport" content="width=device-width, initial-scale=1.0">
  <title>Document</title>
</head>
<body>
  <script>
    var from4 = '我是来自网页4.html的内容';
  </script>
</body>
</html>
- 然后我们
@grant引入unsafeWindow
//油猴脚本内容如下

console.log(window.from4,unsafeWindow.from4);
//网页输出结果为
// undefined '我是来自网页4.html的内容'
- 可以看到,我们在代码直接访问
window是获取不到的,需要使用unsafeWindow
@GM_registerMenuCommand
-
GM_registerMenuCommand(name, callback, accessKey);-
name: 包含要为菜单项显示的文本的字符串。
-
callback: 回调:选择菜单项时要调用的函数。该函数将传递单个参数,即当前活动的选项卡。从Tampermonkey 4.14开始,MouseEvent或KeyboardEvent作为函数参数传递。
-
accessKey: 访问键:菜单项的可选访问键。这可用于为菜单项创建快捷方式。例如,如果访问键为“s”,则用户可以在打开Tampermonkey的弹出菜单时按“s”来选择菜单项。
-
-
该函数返回可用于注销命令的菜单项 ID。
- 也就是通过
GM_unregisterMenuCommand(menuCmdId)
- 也就是通过
const menu_command_id = GM_registerMenuCommand("Show Alert", function(event: MouseEvent | KeyboardEvent) {
  alert("Menu item selected");
}, "a");
- 如果需要通过
alt或者ctrl这种组合键的,就需要如下的做法了
(function () {
  "use strict";
  const userSelfKey = "h"; //结合后面,设置用户按下alt + h 完成回调
  //点击后执行的回调
  const callback =  () => {
    console.log("点击执行回调");
  };
  GM_registerMenuCommand(`是否启动(Alt+${userSelfKey})`,);
  document.addEventListener("keydown", (e) => {
    if ((e.altKey, e.key.toLowerCase() === userSelfKey)) {
      callback();
    }
  });
})();
@run-at
- 说通俗点就是代码什么时候注入(因为注入时机不同,可以对网页的操作量也不同)
- 官方文档 @地址
- 就如同作者说的,想要替换
setInterval函数,达到时间加速,就必须在调用之前被替换,所以就应该更改run-at的值
首先来介绍一下时间加速的原理.一般情况下,都是使用setInterval来做定时器,我们只要把这个定时器的时间缩短,比如之前是1s触发一次,现在变成500ms触发一次,那么就相当于时间缩短了一倍.

怎么缩短呢?我们可以劫持setInterval这个函数,传入值为1000,我们把他变为500.代码类似下面这样:

let hookSetInterval=window.setInterval;//将系统提供的setInterval保存
window.setInterval=function(a,b){//将系统的setInterval替换为我们自己的
    return hookSetInterval(a,b/2);//经过处理后再调用系统的setInterval
}
@GM_xmlhttpRequest
- 和自带的ajax请求和fetch更强大,支持跨域这个
GM_xmlHttpRequest - 重要提示:如果要使用此方法,请同时查看有关
@connect的文档。
// ==UserScript==
// @name         02.GM_xmlhttpRequest演示
// @namespace    http://tampermonkey.net/
// @version      0.1
// @description  try to take over the world!
// @author       You
// @match        https://bbs.tampermonkey.net.cn/*
// @icon         data:image/gif;base64,R0lGODlhAQABAAAAACH5BAEKAAEALAAAAAABAAEAAAICTAEAOw==
// @require      file://D:\develop\phpstudy_pro\WWW\studyMaster\油猴脚本\day3\02.GM_xmlhttpRequest演示.js
// @grant        GM_xmlhttpRequest
// @connect      bbs.tampermonkey.net.cn
// ==/UserScript==

//index.js
(function () {
    'use strict';
    GM_xmlhttpRequest({
        method: 'GET',
        url: 'https://bbs.tampermonkey.net.cn/home.php?mod=spacecp&ac=favorite&type=thread&id=1268&formhash=fa62a5ea&infloat=yes&handlekey=k_favorite&inajax=1&ajaxtarget=fwin_content_k_favorite',
        onload: (response) => {
            console.log(response,response.response)
        }
    })
})();
@connect
- 设置允许通过
GM_xmlhttpRequest连接访问的域名(包括子域名)。 - 说白了就是如果在调用
@GM_xmlhttpRequest的时候,好像会有一个确认访问域的对话框
代码编写前置工作
前置工作1-@require引入本地文件
- 方式1:可以在油猴那边编写,然后运行
- 方法2:借助于
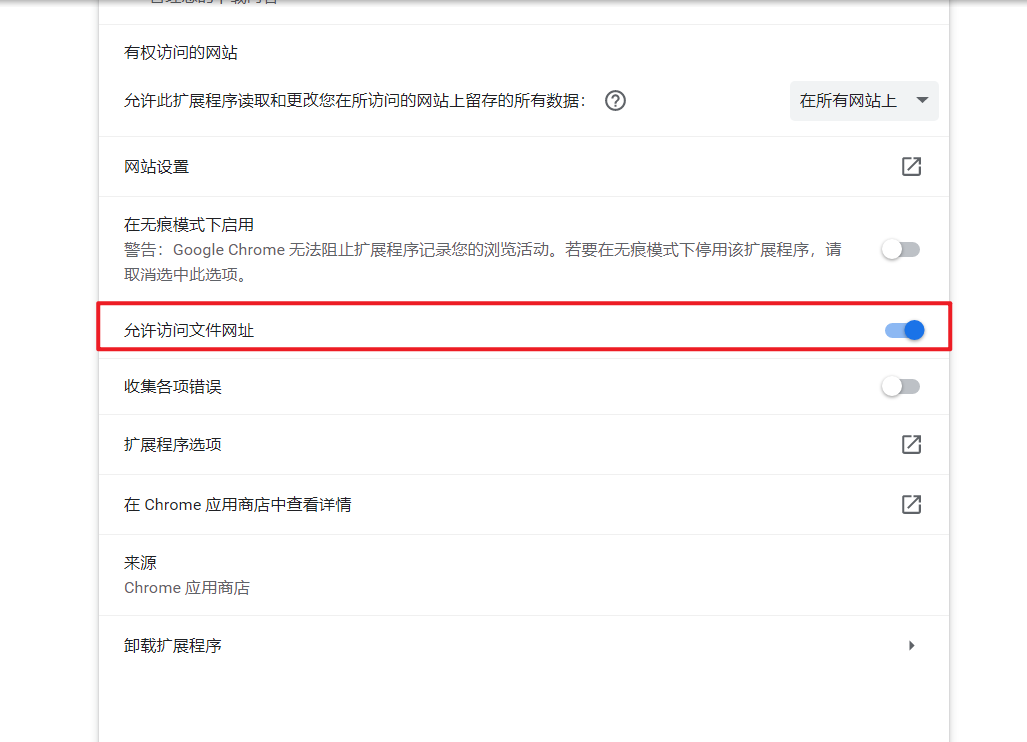
@require引入本地文件,然后借助于第三方编辑器进行编写- 注意,需要开启
允许访问文件网址才可以引入本地文件
- 注意,需要开启
- 然后将下面的文件路径替换为你自己的就好了
@require file://文件路径: 将文件路径替换为自己的
// ==UserScript==
// @name         我的脚本开发
// @namespace    http://tampermonkey.net/
// @version      0.1
// @description  try to take over the world!
// @author       You
// @match        http://*/*
// @match        https://*/*
// @icon         data:image/gif;base64,R0lGODlhAQABAAAAACH5BAEKAAEALAAAAAABAAEAAAICTAEAOw==
// @require      file://文件路径
//比如我的如下
// @require 	 file://D:\develop\phpstudy_pro\WWW\vue\classWork\油猴\1.helloworld.js
// @grant        none
// ==/UserScript==
前置工作2-添加jQuery便携DOM操作
- 如果不想用原生的或者原生的会用但是没jQuery方便,可以用jQuery来操作DOM,如下
// ==UserScript==
// @name         我的脚本开发
// @namespace    http://tampermonkey.net/
// @version      0.1
// @description  try to take over the world!
// @author       You
// @match        http://*/*
// @match        https://*/*
// @icon         data:image/gif;base64,R0lGODlhAQABAAAAACH5BAEKAAEALAAAAAABAAEAAAICTAEAOw==
// @require      https://cdn.bootcdn.net/ajax/libs/jquery/3.6.4/jquery.js
// @require      file://D:\develop\phpstudy_pro\WWW\vue\classWork\油猴\1.helloworld.js
// @grant        none
// ==/UserScript==
- 这样子我们编写脚本直接就可以使用了
- 下面是我文件的
helloworld.js内容
- 下面是我文件的
(function() {
  'use strict';
  console.log($);
  console.log("你好,世界")
})();

代码正式编写
1.练习-1
- 一个网页添加一个可操作的方块,并有几个功能按钮,效果图如下

-
测试网站
- https://dreamlove.top/53b29abd
-
具体代码
(function () {
  "use strict";
  //创建外层容器
  const wrapperDOM = $(`<div></div>`).css({
    width: 300,
    height: 150,
    backgroundColor: "hotpink",
    position: "absolute",
    top: 60,
    right: 0,
  });

  const button1DOM = $("<button>点击我滚动到底部</button>");
  const button2DOM = $(
    "<button>点击我将'梦洁小站-属于你我的小天地'更改为'这是我的天下了'</button>"
  );
  const button3DOM = $("<button>点击我发表评论</button>");

  button1DOM.click(() => {
    window.scrollTo(0, document.documentElement.scrollHeight);
  });

  button2DOM.click(() => {
    document.getElementById("site-title").textContent = "这是我的天下了";
  });

  button3DOM.click(() => {
    const temp = Date.now();
    localStorage.removeItem("WALINE_COMMENT_BOX_EDITOR");
    localStorage.removeItem("WALINE_USER_META");
    localStorage.setItem("WALINE_COMMENT_BOX_EDITOR", "自动填充评论" + temp);
    localStorage.setItem(
      "WALINE_USER_META",
      JSON.stringify({
        nick: "自动填充昵称" + temp,
        mail: "自动填充邮箱" + temp,
      })
    );
    window.location.reload();
    window.scrollTo(0, document.documentElement.scrollHeight); //先滚动到底部
    document.documentElement.addEventListener("load", () => {
      window.scroll(0, document.documentElement.scrollHeight);
    });
  });

  wrapperDOM.append([button1DOM, button2DOM, button3DOM]);

  //添加到网页当中
  $("html").append(wrapperDOM).css({
    position: "relative",
  });
})();
2.练习-2-CSDN黑夜模式
2.1个人中心页面黑夜模式添加
- 先观察vip用户和普通用户看看
- 普通用户: upward_tomato_javascript,vue,javascript复习之旅-CSDN博客
- vip用户:LaoYuanPython_老猿Python,PyQt+moviepy音视频剪辑实战,OpenCV-Python图形图像处理-CSDN博客
- 观察这二个人,后面发现一个类不同
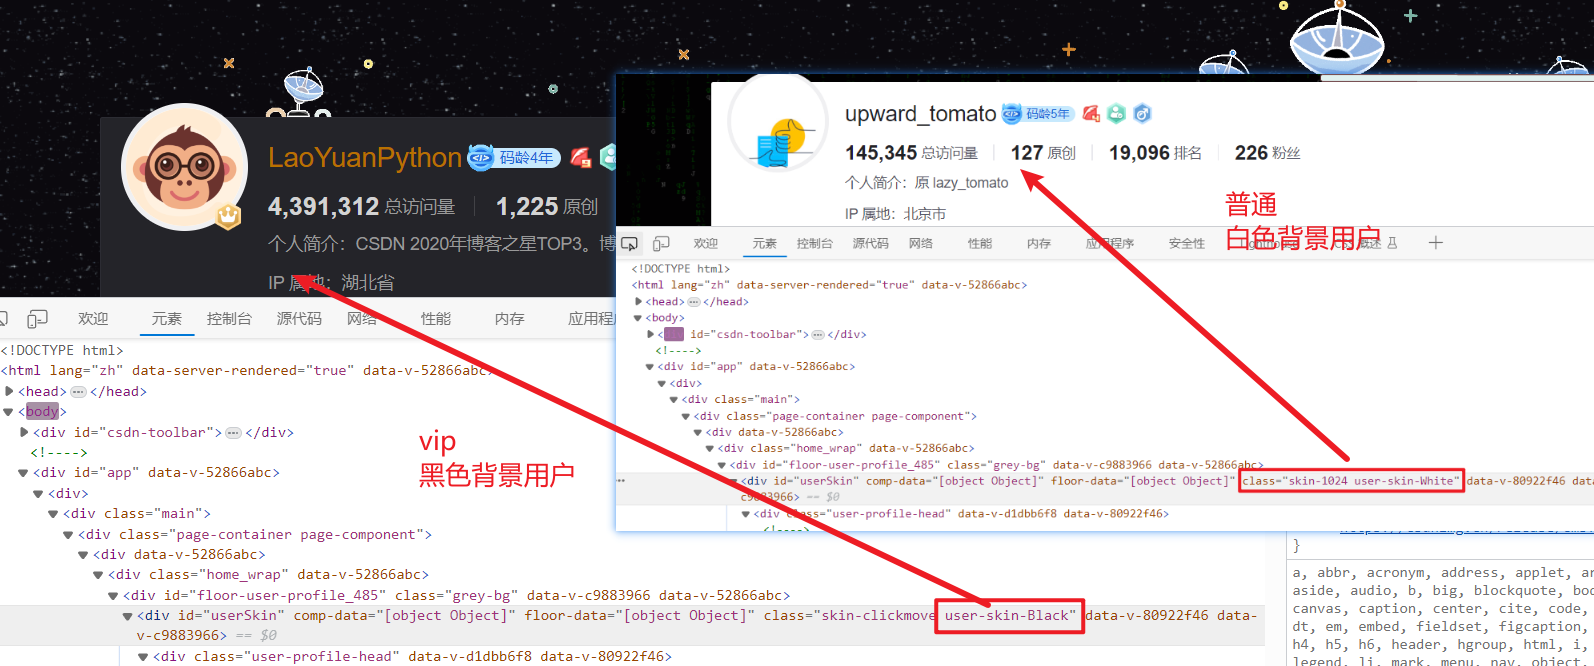
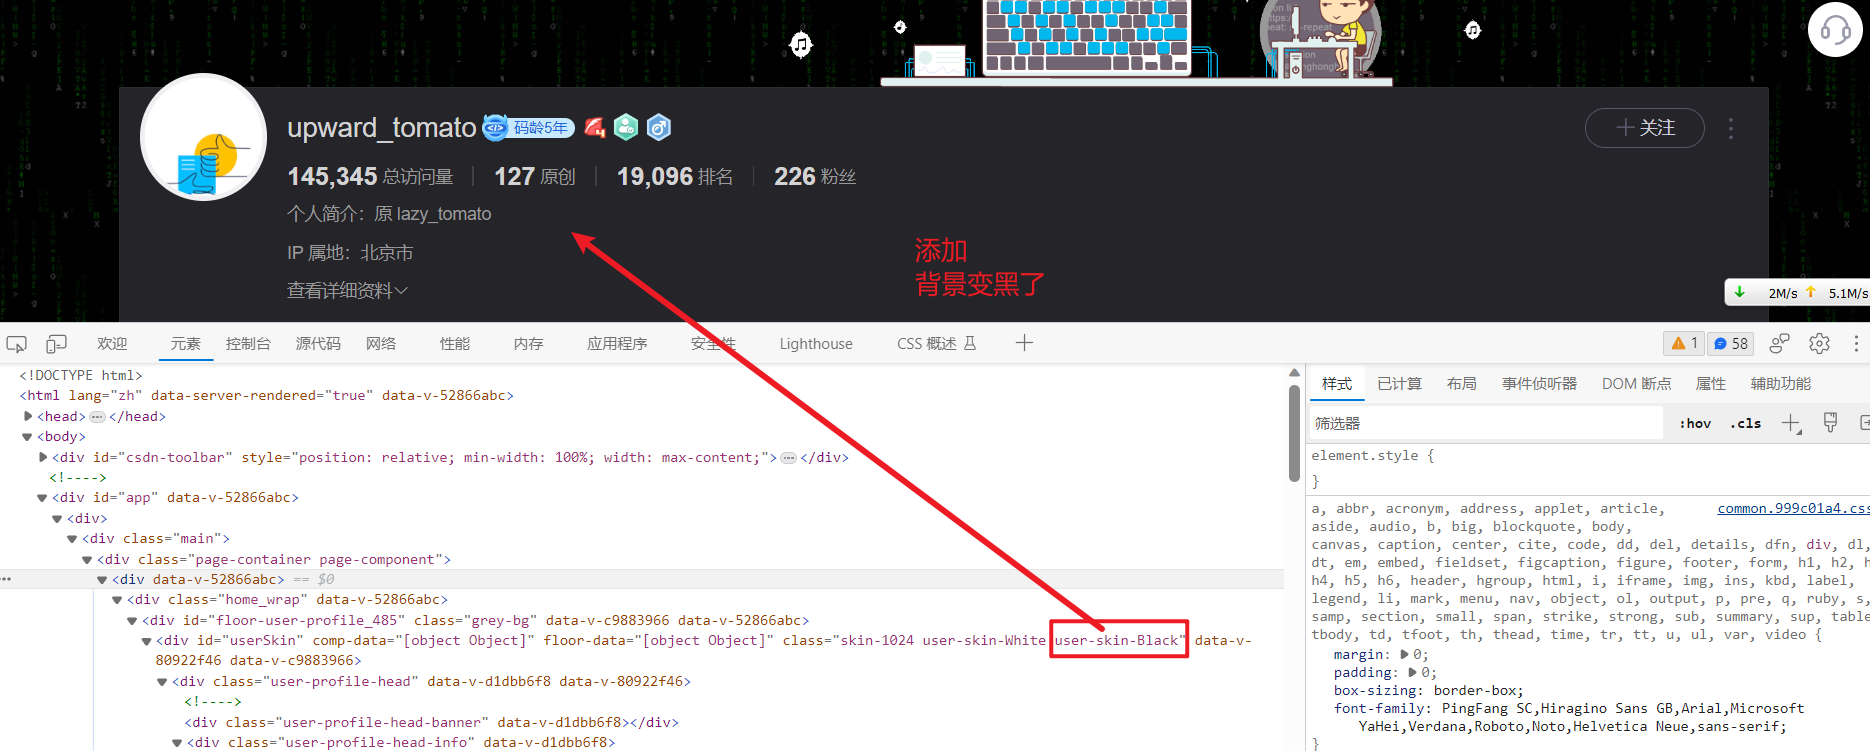
- 然后我们尝试把
user-skin-Black添加上去,发现变化了
- 我们书写下油猴脚本代码
(function() {
    'use strict';
    const skinDivDOM = document.getElementById('userSkin');
    console.log(skinDivDOM.classList.add('user-skin-Black'))
})();
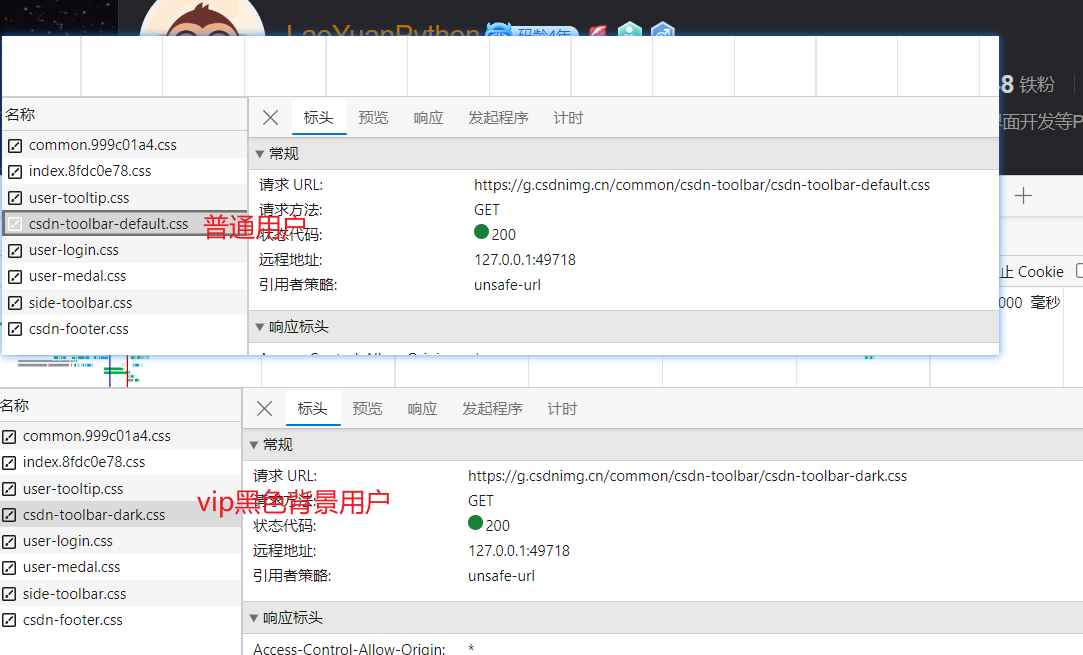
- 但是发现顶部还没有变化

- 观察发现是这一个类的问题
- vip黑色背景为:
csdn-toolbar-dark.css - 普通用户背景为:
csdn-toolbar-default.css
- vip黑色背景为:
- 我们油猴试试添加下这个css文件看看,代码就变成了下面这样子
@match后期优化
// ==UserScript==
// @name         day2-实现csdn黑色效果
// @namespace    http://tampermonkey.net/
// @version      0.1
// @description  try to take over the world!
// @author       You
// @match        *://*/*
// @icon         data:image/gif;base64,R0lGODlhAQABAAAAACH5BAEKAAEALAAAAAABAAEAAAICTAEAOw==
// @resource darkToolBarCss https://g.csdnimg.cn/common/csdn-toolbar/csdn-toolbar-dark.css
// @require      file://D:\develop\phpstudy_pro\WWW\studyMaster\油猴脚本\day2-实现csdn黑色效果\index.js
// @grant        GM_addStyle
// @grant        GM_getResourceText
// @grant        GM_addElement
// ==/UserScript==

//index.js内容
(function() {
    'use strict';
    const skinDivDOM = document.getElementById('userSkin');
    //个人页面内容区黑色化
    skinDivDOM.classList.add('user-skin-Black')
    //顶部导航栏黑色化
    const darkToolBarCss = GM_getResourceText('darkToolBarCss')
    GM_addStyle(darkToolBarCss)
})();
- 添加完成后是这样子的

- 发现差一点效果和vip的

- 查看代码,然后优化后代码如下
// ==UserScript==
// @name         day2-实现csdn黑色效果
// @namespace    http://tampermonkey.net/
// @version      0.1
// @description  try to take over the world!
// @author       You
// @match        https://blog.csdn.net/*
// @icon         data:image/gif;base64,R0lGODlhAQABAAAAACH5BAEKAAEALAAAAAABAAEAAAICTAEAOw==
// @resource darkToolBarCss https://g.csdnimg.cn/common/csdn-toolbar/csdn-toolbar-dark.css
// @require      file://D:\develop\phpstudy_pro\WWW\studyMaster\油猴脚本\day2-实现csdn黑色效果\index.js
// @grant        GM_addStyle
// @grant        GM_getResourceText
// @grant        GM_addElement
// ==/UserScript==

//index.js内容如下
(function() {
    'use strict';
    const skinDivDOM = document.getElementById('userSkin');
    //个人页面内容区黑色化
    skinDivDOM.classList.add('user-skin-Black')
    //顶部导航栏黑色化
    const darkToolBarCss = GM_getResourceText('darkToolBarCss')
    GM_addStyle(darkToolBarCss)
    //顶部导航栏细节优化
    const toolBarDOM = document.querySelector('#csdn-toolbar .toolbar-inside');
    toolBarDOM.style.background = '#242429';
    //顶部导航栏图片替换
    const toolBarImgDark = document.querySelector('#csdn-toolbar > div > div > div.toolbar-container-left > div > a > img');
    toolBarImgDark.src = 'https://img-home.csdnimg.cn/images/20211028053651.png';
})();
2.2文章内容黑夜模式添加

- 老样子,观察下标题的样式,看看有什么区别
- 发现vip用户的黑色背景下的标题多了这个样式,而普通用户没有这个skin-clickm…1.min.css样式文件(不信看网络加载的css文件)

- 那就很简单了,优化下逻辑代码和添加css,结果如下
// ==UserScript==
// @name         day2-实现csdn黑色效果
// @namespace    http://tampermonkey.net/
// @version      0.1
// @description  try to take over the world!
// @author       You
// @match        https://blog.csdn.net/*
// @icon         data:image/gif;base64,R0lGODlhAQABAAAAACH5BAEKAAEALAAAAAABAAEAAAICTAEAOw==
// @resource darkToolBarCss https://g.csdnimg.cn/common/csdn-toolbar/csdn-toolbar-dark.css
// @resource darkArticleCss https://csdnimg.cn/release/blogv2/dist/pc/themesSkin/skin-clickmove/skin-clickmove-3ae5e69ee1.min.css
// @require      file://D:\develop\phpstudy_pro\WWW\studyMaster\油猴脚本\day2-实现csdn黑色效果\index.js
// @grant        GM_addStyle
// @grant        GM_getResourceText
// @grant        GM_addElement
// ==/UserScript==


//index.js
(function() {
    'use strict';
    /**
     * 个人中心黑色背景化
     */
    const skinDivDOM = document.getElementById('userSkin');
    if(skinDivDOM){
        //个人页面内容区黑色化
        skinDivDOM.classList.add('user-skin-Black')
    }
    //顶部导航栏黑色化
    const darkToolBarCss = GM_getResourceText('darkToolBarCss')
    if(!darkToolBarCss){
        console.error('获取顶部导航栏黑色化样式文件失败,请检查css链接是否失效')
        return;
    }
    GM_addStyle(darkToolBarCss)
    //顶部导航栏细节优化
    const toolBarDOM = document.querySelector('#csdn-toolbar .toolbar-inside');
    if(toolBarDOM){
        toolBarDOM.style.background = '#242429';
    }
    //顶部导航栏图片替换
    const toolBarImgDark = document.querySelector('#csdn-toolbar > div > div > div.toolbar-container-left > div > a > img');
    if(toolBarImgDark){
        toolBarImgDark.src = 'https://img-home.csdnimg.cn/images/20211028053651.png';
    }
    /**
     * 文章黑色背景化
     */
    const darkArticleCss = GM_getResourceText('darkArticleCss');
    if(!darkArticleCss){
        console.error('获取文章黑色背景化样式文件失败,请检查css链接是否失效')
        return;
    }
    GM_addStyle(darkArticleCss)
})();
3.脚本自动化之模拟点击和表单填写
- 示例网站
- 油猴中文网 - 油猴脚本分享交流 - Powered by Discuz! (tampermonkey.net.cn)
// ==UserScript==
// @name        01.脚本自动化之模拟点击和表单填写
// @namespace    http://tampermonkey.net/
// @version      0.1
// @description  try to take over the world!
// @author       You
// @match        https://bbs.tampermonkey.net.cn/*
// @icon         data:image/gif;base64,R0lGODlhAQABAAAAACH5BAEKAAEALAAAAAABAAEAAAICTAEAOw==
// @require      file://D:\develop\phpstudy_pro\WWW\studyMaster\油猴脚本\day3\01.脚本自动化之模拟点击和表单填写.js
// ==/UserScript==


//index.js
(function() {
    'use strict';
    const timer = setInterval(() => {
        const loginNameDOM = document.querySelector("input[name = 'username']");
        const loginPassDOM = document.querySelector("input[name = 'password']");
        const loginBtnDOM = document.querySelector("button[name = 'loginsubmit']")
        console.log('循环')
        if(loginNameDOM && loginPassDOM){
            loginNameDOM.value = 'testAccount';
            loginPassDOM.value = 'testPassword'
            //点击登录
            loginBtnDOM.click();
            //界面显示,清空循环
            clearInterval(timer);
        }
    },1000)

})();
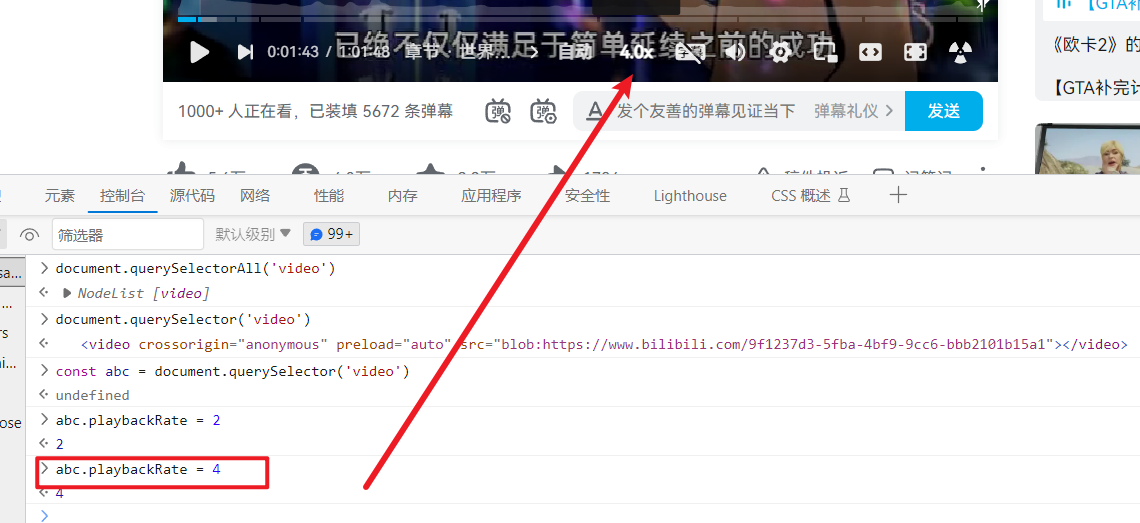
4.视频倍速播放
- 借助于video元素身上的
playbackRate属性即可- HTMLMediaElement.playbackRate - Web API 接口参考 | MDN (mozilla.org)
5.bilibili一键三连
- 我们长按三连看看
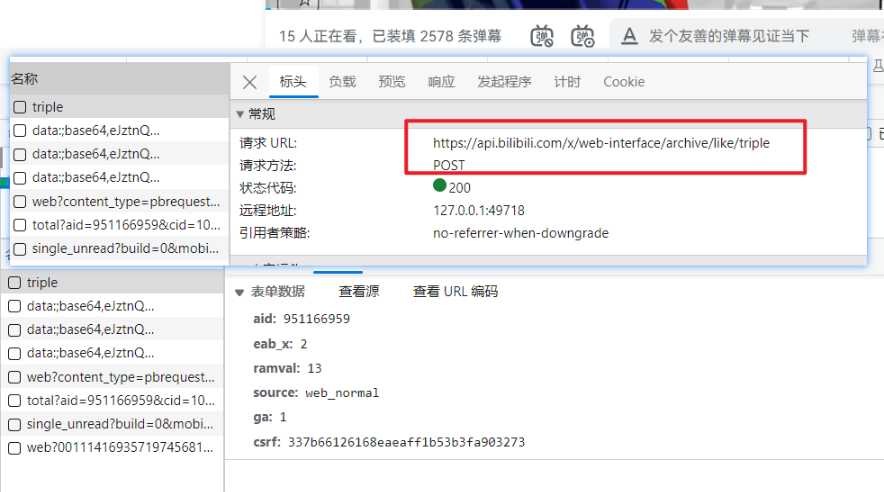
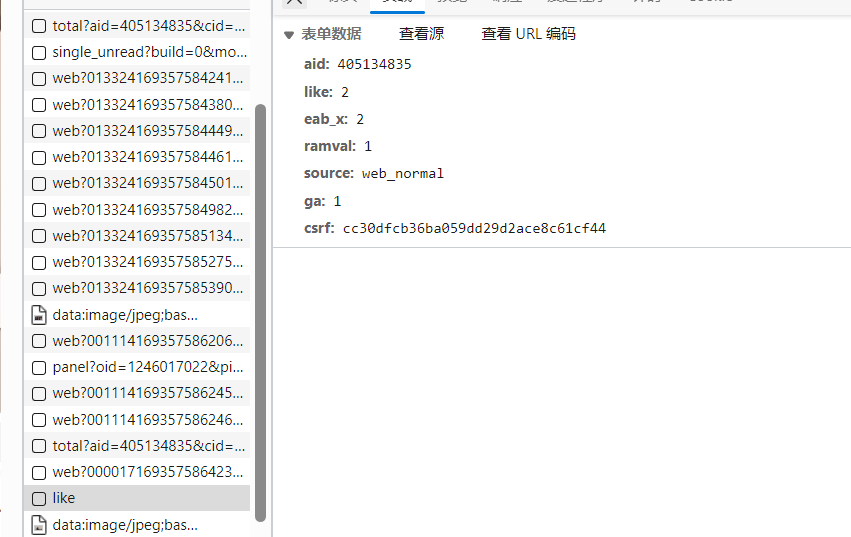
- 参数重要的几个
csrf: 发现是从cookie获取

aid:发现可以通过window.__INITIAL_STATE__.aid来获取,至于为什么这样子,服务器渲染知识了,百度~

其他几个可能和投银币数量有关的参数在里面,但是不管他了~
- 至于为什么是3秒,好像需要等页面加载完成后再插入,否则会无限刷新
// ==UserScript==
// @name         03.b站一键三连
// @namespace    http://tampermonkey.net/
// @version      0.1
// @description  try to take over the world!
// @author       You
// @match        https://www.bilibili.com/video/*
// @icon         data:image/gif;base64,R0lGODlhAQABAAAAACH5BAEKAAEALAAAAAABAAEAAAICTAEAOw==
// @require      https://cdn.bootcdn.net/ajax/libs/js-cookie/3.0.2/js.cookie.min.js
// @require      file://D:\develop\phpstudy_pro\WWW\studyMaster\油猴脚本\day3\03.b站一键三连.js
// @grant        unsafeWindow
// ==/UserScript==

//index.js

(function() {
    'use strict';
    setTimeout(() => {
        const videoBarDOM = document.querySelector('.video-toolbar-left');
        const btnDOM = document.createElement('button');
        btnDOM.textContent = '三连';
        btnDOM.onclick = () => {
            const aid = unsafeWindow.__INITIAL_STATE__.aid;
            const csrf = Cookies.get('bili_jct');
            fetch('https://api.bilibili.com/x/web-interface/archive/like/triple',{
                method:"POST",
                headers:{
                    'Content-Type': 'application/x-www-form-urlencoded',
                },
                credentials:'include',
                body:`aid=${aid}&csrf=${csrf}`,
            }).then((res) => {
                return res.json();
            }).then(result => {
                const code = result.code;
                if(code === 0){
                    alert("三连成功!刷新页面可见");
                }else{
                    alert("三连失败/(ㄒoㄒ)/~~");
                }
            })
        }
        videoBarDOM.append(btnDOM)
    },3000)
})();
6.樱花动漫简易去广告
- 打开樱花动漫,可以看到一堆广告
- 布莱泽奥特曼日语 09集—在线播放—樱花动漫,视频高清在线观看 (yinghuavideo.com)

- 原理很简单,
display:none就可以隐藏了,视频播放暂停的广告一开始是display:none,暂停的时候被修改为display:block,所以我们把宽度,高度更改为0就可以了
// ==UserScript==
// @name         05.樱花动漫简易去广告
// @namespace    http://tampermonkey.net/
// @version      0.1
// @description  try to take over the world!
// @author       You
// @match        http://www.yinghuavideo.com/v/*
// @match        https://tup.yinghuavideo.com/*
// @icon         data:image/gif;base64,R0lGODlhAQABAAAAACH5BAEKAAEALAAAAAABAAEAAAICTAEAOw==
// @require      file://D:\develop\phpstudy_pro\WWW\studyMaster\油猴脚本\day3\05.樱花动漫简易去广告.js
// @grant        GM_addStyle
// ==/UserScript==


//index.js
(function () {
    'use strict';
    const url = window.location.href;
    if (url.indexOf('yinghuavideo.com') !== -1) {
        GM_addStyle(`
                #HMcoupletDivleft {
                    display:none !important;
                }
                #HMcoupletDivright {
                    display:none !important;
                }
        `);
        //移除右下角
        const ttt = document.querySelector('divz');
        if (ttt) {
            ttt.style.display = 'none';
        }
    }
    if (url.indexOf('tup.yinghuavideo.com') !== -1) {
        let i = 0;
        const timer = setInterval(() => {
            const tempDOM = document.getElementById('adv_wrap_hh');
            //超过一分钟还没加载出来,取消加载
            if(++i >= 60){
                clearInterval(timer);
            }
            //移除暂停视频广告
            if (tempDOM) {
                tempDOM.style.cssText = 'width:0!important;height:0!important';
                clearInterval(timer);
            }
        },1000)
    }

})();
- 效果

7.bilibili小尾巴-hook思想
- 我们发送一个消息看看
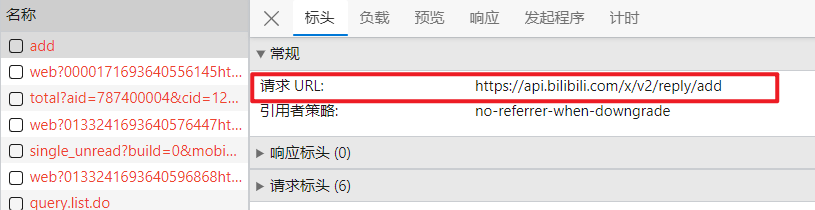
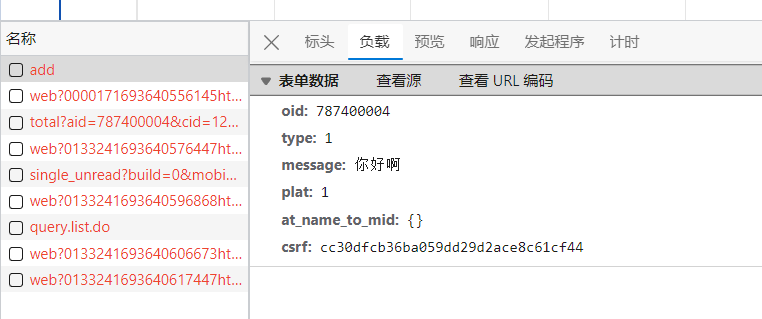
- 参数有下面这些
- 发送的方式是
fetch

-
有关于怎么拦截重写fetch,这个文章说的很好
- JavaScript 中如何拦截全局 Fetch API 的请求和响应? - 掘金 (juejin.cn)
-
这里就使用博主的猴子补丁(monkey patching)
const { fetch: originalFetch } = window;

window.fetch = async (...args) => {
    let [resource, config ] = args;
    // request interceptor here
    const response = await originalFetch(resource, config);
    // response interceptor here
    return response;
};
- 代码如下
decodeURIComponent目的是小尾巴所有的字符都编码,不管是不是特殊字符
// ==UserScript==
// @name         06.bilibili小尾巴-hook思想.js
// @namespace    http://tampermonkey.net/
// @version      0.1
// @description  try to take over the world!
// @author       You
// @match        https://www.bilibili.com/video/*
// @icon         data:image/gif;base64,R0lGODlhAQABAAAAACH5BAEKAAEALAAAAAABAAEAAAICTAEAOw==
// @require      file://D:\develop\phpstudy_pro\WWW\studyMaster\油猴脚本\day3\06.bilibili小尾巴-hook思想.js
// @grant        unsafeWindow
// ==/UserScript==

//index.js
(function() {
    'use strict';
    let tailContent = '\n-----我是可爱的小尾巴'
    const { fetch:originalFetch } = unsafeWindow;
    unsafeWindow.fetch = async (...args) => {
        let [ resource,config ] = args;
        //resource 网站url
        if(resource.includes('api.bilibili.com/x/v2/reply/add')){
            //config 请求设置
            let { body } = config || {};
            const newBody = body.replace(/message=(.*?)&/,(match,$1) => `message=${$1}${decodeURIComponent(tailContent)}&`)
            config.body = newBody;
        }
        const response = await originalFetch(resource,config);
        return response
    }
})();

链接
- 油猴官方文档
- https://www.tampermonkey.net/documentation.php
- post请求提交的数据
- Content-Type:application/x-www-form-urlencoded
- 点击查看源
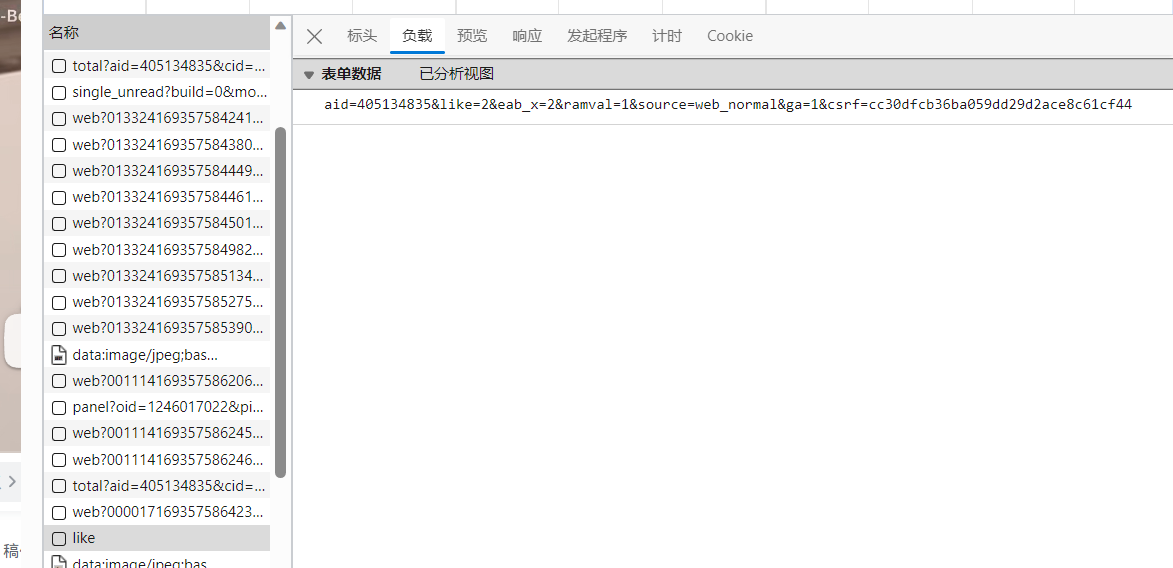
- 我们的却是这样子

- 点击查看源
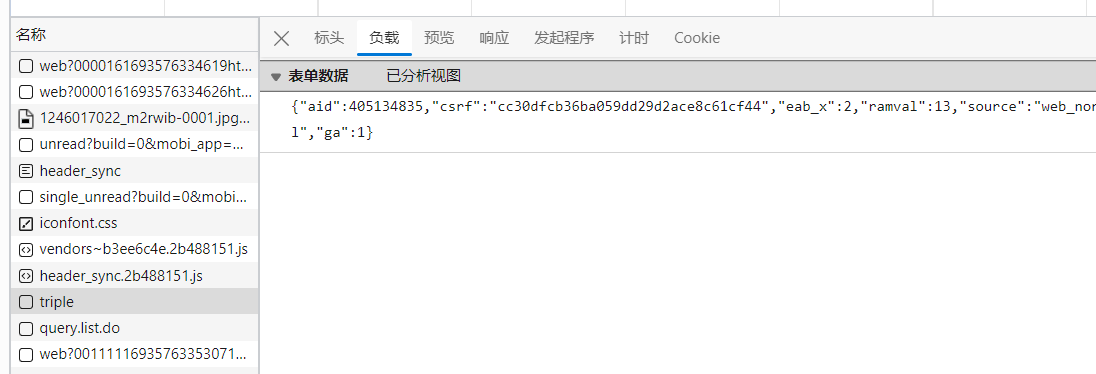
         fetch('https://api.bilibili.com/x/web-interface/archive/like/triple',{
                method:"POST",
                headers:{
                    'Content-Type': 'application/x-www-form-urlencoded',
                    'User-Agent': 'Mozilla/5.0 (Windows NT 10.0; Win64; x64) AppleWebKit/537.36 (KHTML, like Gecko) Chrome/116.0.0.0 Safari/537.36 Edg/116.0.1938.62'
                },
                credentials:'include',
                body:JSON.stringify({
                    aid,
                    csrf,
                    eab_x: 2,
                    ramval: 13,
                    source: 'web_normal',
                    ga: 1,
                })
            }).then((res) => {
                return res.json();
            }).then(json => {
                console.log('结果',json)
            })
-
错误原因,我使用了json方式发送数据,这种对应的Content-type应该为application/json
- 而哔哩哔哩那种是Content-Type为application/x-www-form-urlencoded,也就是类似于key=value&key2=value2…这种形式
- 而Content-Type为form-data,一般是文件上传的,如下图