更好用的的MybatisPlus:MybatisFlex(上)
前言
Mybatis 是我们常用的一个 ORM 框架,而 MybatisPlus (以下简称 MP) 则是对 Mybatis 进行了一层封装,便捷了我们的开发工作,但是由于其只能进行单表操作,所以有些功能还是需要在 XML 中手写 SQL。MybatisFlex 就是为了解决这类问题的框架。
摘自官网:MyBatis-Flex 是一个优雅的 MyBatis 增强框架,它非常轻量、同时拥有极高的性能与灵活性。我们可以轻松的使用 Mybaits-Flex 链接任何数据库,其内置的 QueryWrapper 亮点 帮助我们极大的减少了 SQL 编写的工作的同时,减少出错的可能性。
总而言之,MyBatis-Flex 能够极大地提高我们的开发效率和开发体验,让我们有更多的时间专注于自己的事情。
同类型框架功能对比
| 功能或特点 | Mybatis-Flex | Mybatis-Plus | Fluent-Mybatis |
|---|---|---|---|
| 对 entity的基本增删改查 | ✅ | ✅ | ✅ |
| 分页查询 | ✅ | ✅ | ✅ |
| 分页查询之缓存总量 | ✅ | ✅ | ❌ |
| 分页无SQL解析设计(更轻量,及更高性能) | ✅ | ❌ | ✅ |
| 多表查询:from多表 | ✅ | ❌ | ❌ |
| 多表查询:left join、inner join等 | ✅ | ❌ | ✅ |
| 多表查询:union、union all | ✅ | ❌ | ✅ |
| 单主键配置 | ✅ | ✅ | ✅ |
| 多种id生成策略 | ✅ | ✅ | ✅ |
| 支持多主键、复合主键 | ✅ | ❌ | ❌ |
| 字段的typeHandler配置 | ✅ | ✅ | ✅ |
| 除了 MyBatis,无其他第三方依赖(更轻量) | ✅ | ❌ | ❌ |
| QueryWrapper 是否支持在微服务项目下进行 RPC 传输 | ✅ | ❌ | 未知 |
| 逻辑删除 | ✅ | ✅ | ✅ |
| 乐观锁 | ✅ | ✅ | ✅ |
| SQL审计 | ✅ | ❌ | ❌ |
| 数据填充 | ✅ | ✅ | ✅ |
| 数据脱敏 | ✅ | ✔️ (收费) | ❌ |
| 字段权限 | ✅ | ✔️ (收费) | ❌ |
| 字段加密 | ✅ | ✔️ (收费) | ❌ |
| 字段回写 | ✅ | ✔️ (收费) | ❌ |
| Db+Row | ✅ | ❌ | ❌ |
| Entity监听 | ✅ | ❌ | ❌ |
| 多数据源支持 | ✅ | 借助其他框架或收费 | ❌ |
| 多数据源是否支持 Spring 的事务管理,比如 @Transactional 和 TransactionTemplate 等 | ✅ | ❌ | ❌ |
| 多数据源是否支持 “非Spring” 项目 | ✅ | ❌ | ❌ |
| 多租户 | ✅ | ✅ | ❌ |
| 动态表名 | ✅ | ✅ | ❌ |
| 动态Scheme | ✅ | ❌ | ❌ |
常用注解
@Table
@Table 主要是标识数据库表与实体类的关系,注解内部共有以下属性:
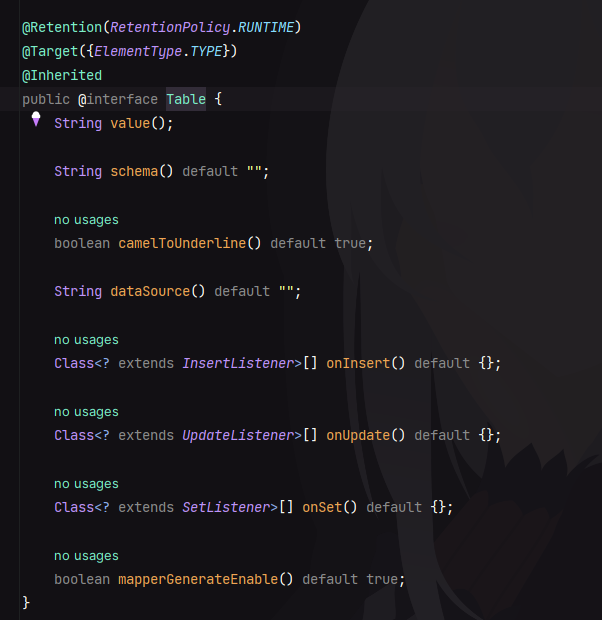
代表含义如下:
value:显示指定表名。schema:指定数据库的模式。camelToUnderline:驼峰命名转下划线命名。dataSource:指定默认数据源,当系统找不到该指定数据源时默认使用第一个数据源。onInsert:指定使用哪个 insert 监听器。onUpdate:指定使用哪个 update 监听器。onSet:指定使用哪个 set 监听器(主动 set 不会触发)。mapperGenerateEnable:是否关闭 APT 生成的mapper。
@Id
@Id 注解主要用来标识主键,并且可以指定主键的生成策略,其内部属性如下:
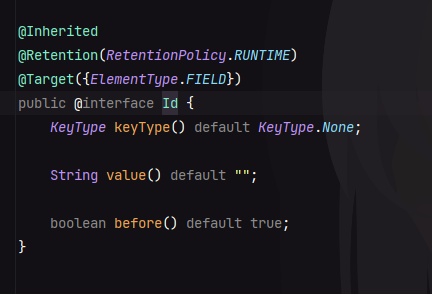
keyType:指定主键的生成策略,默认为不生成。value:当keyType为sequence时,value代表的是sequence序列的sql内容;当keyType为Generator时,value代表的是使用的KeyGenerator的名称。before:是否在数据插入前主动执行。
@Column
@Column 注解主要是提供了一些对字段的配置信息,其内部属性如下:
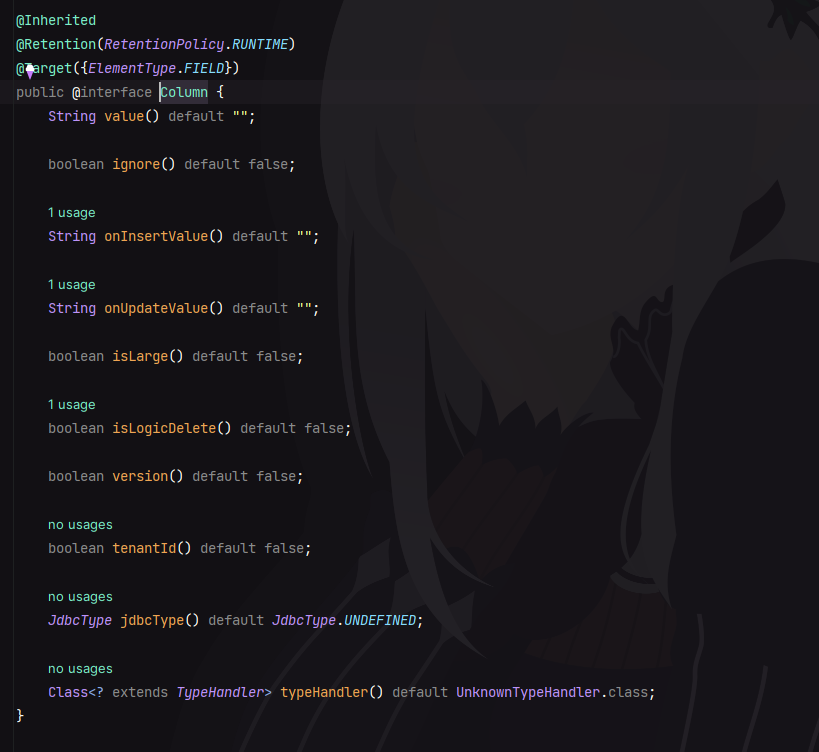
value:指定数据库中的字段名称。ignore:是否忽略当前字段。当数据库中字段不存在,但是需要在业务中使用时即可设置该属性。onInsertValue:insert 时该字段的默认值,会将值直接拼到 SQL 上,而不是通过参数进行设置。onUpdateValue:update 时该字段的默认值,其余同上。isLarge:是否为大字段,大字段的APT不会生成到 DEFAULT_COLUMN 中。isLogicDelete:逻辑删除字段,0 为正常,1表示已被删除。version:乐观锁字段,当字段被标明为乐观锁字段时,每次数据更新会先去检测该字段的版本,并对将该字段的版本+1(只能用于数值字段)。jdbcType:配置的 jdbxType。typeHandler:指明自定义的TypeHandler。
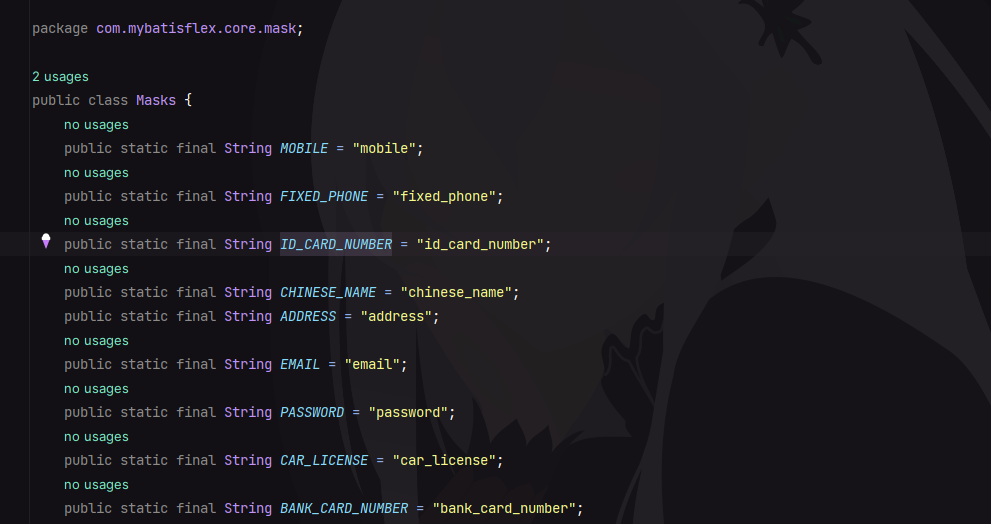
@ColumnMask
其为数据脱敏注解,内部属性如下:
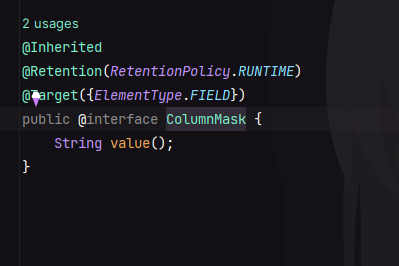
它只有一个属性 value ,用来指定数据脱敏的方式,通过 Masks 中提供的即可,如下:
使用
依赖
<!-- mybaits-flex -->
        <dependency>
            <groupId>com.mybatis-flex</groupId>
            <artifactId>mybatis-flex-spring-boot-starter</artifactId>
            <version>1.6.5</version>
        </dependency>

        <dependency>
            <groupId>com.mybatis-flex</groupId>
            <artifactId>mybatis-flex-processor</artifactId>
            <version>1.6.5</version>
        </dependency>

        <!-- 代码生成器 -->
        <dependency>
            <groupId>com.mybatis-flex</groupId>
            <artifactId>mybatis-flex-codegen</artifactId>
            <version>1.6.5</version>
        </dependency>

        <!-- 数据源 -->
        <dependency>
            <groupId>com.zaxxer</groupId>
            <artifactId>HikariCP</artifactId>
            <version>4.0.3</version>
        </dependency>
代码生成器
public class CodeGenerator {
    public static void codeGenerator() {
        //配置数据源
        HikariDataSource dataSource = new HikariDataSource();
        dataSource.setJdbcUrl("jdbc:mysql://127.0.0.1:3306/mybatis_flex?characterEncoding=utf-8");
        dataSource.setUsername("root");
        dataSource.setPassword("root");

        //创建配置内容,两种风格都可以。
        GlobalConfig globalConfig = createGlobalConfigUseStyle2();
        //GlobalConfig globalConfig = createGlobalConfigUseStyle2();

        //通过 datasource 和 globalConfig 创建代码生成器
        Generator generator = new Generator(dataSource, globalConfig);

        //生成代码
        generator.generate();
    }

    private GlobalConfig createGlobalConfigUseStyle2() {
        //创建配置内容
        GlobalConfig globalConfig = new GlobalConfig();

        //设置根包
        globalConfig.getPackageConfig()
                .setBasePackage("com.generator");

        //设置作者
        globalConfig.setAuthor("Bummon");

        //设置表前缀和只生成哪些表,setGenerateTable 未配置时,生成所有表
        globalConfig.getStrategyConfig()
                .setTablePrefix("sys_");

        //设置生成 entity 并启用 Lombok
        globalConfig.enableEntity()
                .setWithLombok(true);

        //设置生成Controller并开启REST风格
        globalConfig.enableController()
                .isRestStyle();

        //设置生成Service
        globalConfig.enableService();

        //设置生成Impl
        globalConfig.enableServiceImpl();

        //设置生成 mapper
        globalConfig.enableMapper();

        //生成mapper.xml文件
        globalConfig.enableMapperXml();

        ColumnConfig columnConfig = new ColumnConfig();
        columnConfig.setColumnName("id")
                .setKeyType(KeyType.Auto);
        columnConfig.setColumnName("create_time")
                .setOnUpdateValue("now()");
        globalConfig.getStrategyConfig()
                .setColumnConfig(columnConfig)
                .setLogicDeleteColumn("deleted");

        return globalConfig;
    }

    public static void main(String[] args){
        codeGenerator();
    }
}
基础查询
以下为实体类:
@Data
@Table("sys_user")
public class SysUser {

    @Id(keyType = KeyType.Auto)
    private Integer userId;

    private String username;

    private String password;

    private String nickName;

    private Integer age;

    @Column(onInsertValue = "now()")
    private LocalDateTime createTime;

    @Column(onUpdateValue = "now()")
    private LocalDateTime updateTime;

}
为了方便演示,以下我们均使用 SpringBoot Test 来进行测试
@Test
    void simpleSelect() {
        List<SysUser> sysUsers = userMapper.selectAll();
        sysUsers.forEach(System.out::println);
    }
执行 SQL 如下:
SELECT
  *
FROM
  sys_user;
以上查询为查询全部数据,在使用代码生成器生成之后,我们可以看一下生成的 Mapper:
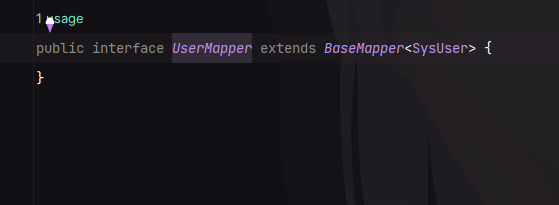
与 MP 一样,这里也是继承了一个 BaseMapper ,我们进到内部看一下:
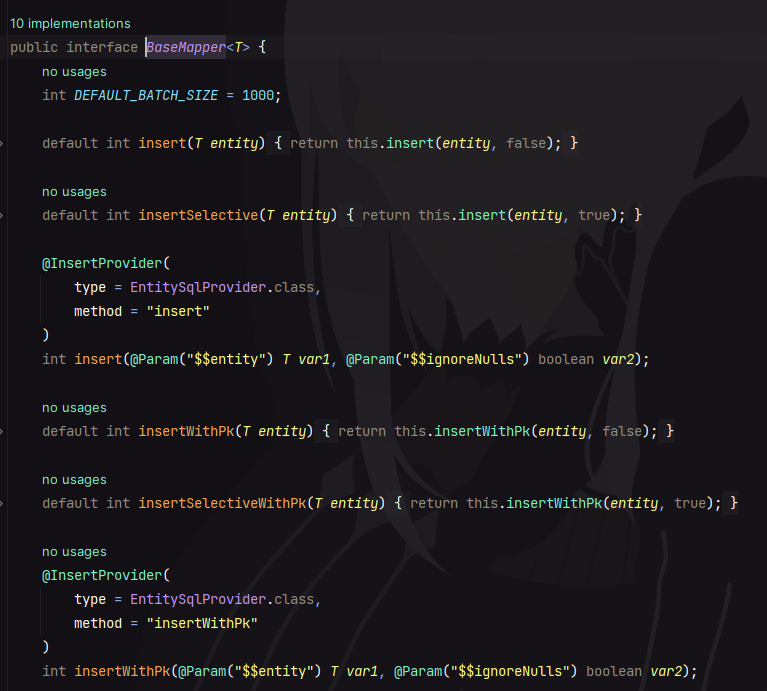
与我们预期一样,里面封装了一些基础的方法供我们使用,其中查询方法如下:
selectOneById(id):根据主键查询数据。selectOneByMap(whereConditions):根据 Map 构建的条件来查询数据。selectOneByCondition(whereConditions):根据查询条件查询数据。selectOneByQuery(queryWrapper):根据查询条件来查询 1 条数据。selectOneByQueryAs(queryWrapper, asType):根据查询条件来查询 1 条数据。selectOneWithRelationsByMap(whereConditions):根据 Map 构建的条件来查询 1 条数据。selectOneWithRelationsByCondition(whereConditions):根据查询条件查询 1 条数据。selectOneWithRelationsByQuery(queryWrapper):根据查询条件来查询 1 条数据。selectOneWithRelationsByQueryAs(queryWrapper, asType):根据查询条件来查询 1 条数据。selectListByIds(ids):根据多个主键来查询多条数据。selectListByMap(whereConditions):根据 Map 来构建查询条件,查询多条数据。selectListByMap(whereConditions, count):根据 Map 来构建查询条件,查询多条数据。selectListByCondition(whereConditions):根据查询条件查询多条数据。selectListByCondition(whereConditions, count):根据查询条件查询多条数据。selectListByQuery(queryWrapper):根据查询条件查询数据列表。selectListByQuery(queryWrapper, consumers):根据查询条件查询数据列表。selectCursorByQuery(queryWrapper):根据查询条件查询游标数据,该方法必须在事务中才能正常使用,非事务下无法获取数据。selectRowsByQuery(queryWrapper):根据查询条件查询 Row 数据。selectListByQueryAs(queryWrapper, asType):根据查询条件查询数据列表,要求返回的数据为 asType。这种场景一般用在 left join 时,有多出了实体类本身的字段内容,可以转换为 dto、vo 等场景。selectListByQueryAs(queryWrapper, asType, consumers):根据查询条件查询数据列表,要求返回的数据为 asType 类型。selectListWithRelationsByQuery(queryWrapper):查询实体类及其 Relation 注解字段。selectListWithRelationsByQueryAs(queryWrapper, asType):查询实体类及其 Relation 注解字段。selectListWithRelationsByQueryAs(queryWrapper, asType, consumers):查询实体类及其 Relation 注解字段。selectAll():查询全部数据。selectAllWithRelations():查询全部数据,及其 Relation 字段内容。selectObjectByQuery(queryWrapper):查询第一列返回的数据,QueryWrapper 执行的结果应该只有 1 列,例如:QueryWrapper.create().select(ACCOUNT.id).where(...);selectObjectByQueryAs(queryWrapper, asType):查询第一列返回的数据,QueryWrapper 执行的结果应该只有 1 列,例如:QueryWrapper.create().select(ACCOUNT.id).where(...);selectObjectListByQuery(queryWrapper):查询第一列返回的数据集合,QueryWrapper 执行的结果应该只有 1 列,例如:QueryWrapper.create().select(ACCOUNT.id).where(...);selectObjectListByQueryAs(queryWrapper, asType):查询第一列返回的数据集合,QueryWrapper 执行的结果应该只有 1 列,例如:QueryWrapper.create().select(ACCOUNT.id).where(...);selectCountByQuery(queryWrapper):查询数据量。selectCountByCondition(whereConditions):根据条件查询数据总量。
复杂查询
我们除了简单的查询之外,还可能会有一些复杂的查询,例如:JOIN 、UNION 、UNION ALL 等等,又或者我们想查询某些字段或者使用聚合函数时,可以使用如下用法:
@Test
    void complexSelect() {
        List<SysUserVo> sysUserVos = userMapper.selectListByQueryAs(QueryWrapper.create()
                        .select(SYS_USER.ALL_COLUMNS,
                                ROLE.ALL_COLUMNS)
                        .from(SysUser.class)
                        .leftJoin(UserRole.class)
                        .on(SYS_USER.USER_ID.eq(USER_ROLE.USER_ID))
                        .leftJoin(Role.class)
                        .on(USER_ROLE.ROLE_ID.eq(ROLE.ROLE_ID))
                        .where(SYS_USER.USER_ID.gt(5))
                        .groupBy(SYS_USER.NICK_NAME)
                        .having(SYS_USER.AGE.gt(20)),
                SysUserVo.class);
        sysUserVos.forEach(System.out::println);
    }
执行 SQL 如下:
SELECT
  sys_user.*,
  sys_role.*
FROM
  sys_user
LEFT JOIN sys_user_role ON sys_user.user_id = sys_user_role.user_id
LEFT JOIN sys_role ON sys_user_role.role_id = sys_role.role_id
WHERE sys_user.user_id > 5
GROUP BY sys_user.nick_name
  HAVING sys_user.age > 20
以上使用了 LEFT JOIN 用户角色中间表和角色表来查询用户拥有的角色信息,此处的 SysUserVo 是我创建的一个 VO 类,其内容如下:
@Data
@EqualsAndHashCode(callSuper = true)
public class SysUserVo extends SysUser {

    private List<Role> role;

    @Override
    public String toString() {
        return "SysUserVo{" +
                "userId=" + getUserId() +
                ", username='" + getUsername() + '\'' +
                ", password='" + getPassword() + '\'' +
                ", nickName='" + getNickName() + '\'' +
                ", age=" + getAge() +
                ", createTime=" + getCreateTime() +
                ",role=" + role +
                '}';
    }
}
Mybatis-Flex 会自动将查询出来的字段映射到实体类的属性上,而其中 SYS_USER 这个类并不是我们创建的,当我们引入依赖并创建好实体类后,我们点击 maven 中的 compiler 来进行编译,此时会在 target → generated-sources → annotations 中对应的实体类包中生成 xxxTableDef 的文件,而我们使用的类就是引用的该类中与我们实体类同名的类,这个类中包含了 Mybatis-Flex 封装的一些方法和扩展的一些属性。
新增
@Test
    void simpleInsert() {
        SysUser sysUser = new SysUser();
        sysUser.setUsername("Zhangsan");
        sysUser.setPassword("123456");
        sysUser.setNickName("张三");
        sysUser.setAge(23);
        userMapper.insert(sysUser);
        System.out.println(sysUser);
    }
执行 SQL 如下:
INSERT INTO
  `sys_user`(username, password, nick_name, age, create_time, update_time)
VALUES ('Zhangsan', '123456', '张三', 23, now(), null)
BaseMapper 的接口提供了 insert 和 insertBatch 方法,用于新增数据;
insert(entity):插入实体类数据,不忽略null值。insertSelective(entity):插入实体类数据,但是忽略null的数据,只对有值的内容进行插入。这样的好处是数据库已经配置了一些默认值,这些默认值才会生效。insert(entity, ignoreNulls):插入实体类数据。insertWithPk(entity):插入带有主键的实体类,不忽略null值。insertSelectiveWithPk(entity):插入带有主键的实体类,忽略null值。insertWithPk(entity, ignoreNulls):带有主键的插入,此时实体类不会经过主键生成器生成主键。insertBatch(entities):批量插入实体类数据,只会根据第一条数据来构建插入的字段内容。insertBatch(entities, size):批量插入实体类数据,按 size 切分。insertOrUpdate(entity):插入或者更新,若主键有值,则更新,若没有主键值,则插入,插入或者更新都不会忽略null值。insertOrUpdateSelective(entity):插入或者更新,若主键有值,则更新,若没有主键值,则插入,插入或者更新都会忽略null值。insertOrUpdate(entity, ignoreNulls):插入或者更新,若主键有值,则更新,若没有主键值,则插入。
修改
和 MP 一样,直接进行修改即可
@Test
    void simpleUpdate() {
        SysUser sysUser = new SysUser();
        sysUser.setUserId(11);
        sysUser.setUsername("Lisi");
        sysUser.setNickName("李四");
        userMapper.update(sysUser);
    }
执行 SQL 如下:
UPDATE
  sys_user
SET
  username = '李四',
  nick_name = 'Lisi'
WHERE
  user_id = 11;
BaseMapper 的接口提供了 update、updateByMap、updateByQuery 方法,用于更新数据;
update(entity):根据主键来更新数据,若实体类属性数据为null,该属性不会更新到数据库。update(entity, ignoreNulls):根据主键来更新数据到数据库。updateByMap(entity, whereConditions):根据 Map 构建的条件来更新数据。updateByMap(entity, ignoreNulls, whereConditions):根据 Map 构建的条件来更新数据。updateByCondition(entity, whereConditions):根据查询条件来更新数据。updateByCondition(entity, ignoreNulls, whereConditions):根据查询条件来更新数据。updateByQuery(entity, queryWrapper):根据查询条件来更新数据。updateByQuery(entity, ignoreNulls, queryWrapper):根据查询条件来更新数据。updateNumberAddByQuery(fieldName, value, queryWrapper):执行类似update table set field = field + 1 where ...的场景。updateNumberAddByQuery(column, value, queryWrapper):执行类似update table set field = field + 1 where ...的场景。updateNumberAddByQuery(fn, value, queryWrapper):执行类似update table set field = field + 1 where ...的场景。
以上用法会将 null 值自动忽略,而当我们想将数据中的某个字段值设置为 null 时,我们可以使用UpdateEntity.of 来创建实体,也可以使用现有实体来实现,如下:
@Test
    void simpleUpdate2() {
        SysUser sysUser = UpdateEntity.of(SysUser.class);
        sysUser.setUserId(11);
        sysUser.setUsername(null);
        sysUser.setNickName("王五");
        userMapper.update(sysUser);
    }
其执行 SQL 如下:
UPDATE
  sys_user
SET
  username = null,
  nick_name = '王五'
WHERE
  user_id = 11;
或者我们想要使用查询出来的数据来填充时也不必写多行代码来实现,如下:
@Test
    void simpleUpdate3() {
        SysUser sysUser = UpdateEntity.of(SysUser.class);
        sysUser.setUserId(11);
        sysUser.setUsername("Zhaoliu");
        sysUser.setNickName("赵六");
        UpdateWrapper<SysUser> wrapper = UpdateWrapper.of(sysUser);
        wrapper.set(SysUser::getAge, select(...).from(...));
        userMapper.update(sysUser);
    }
其执行 SQL 如下:
UPDATE
  sys_user
SET
  username = 'Zhaoliu' ,
  nick_name = '赵六' ,
  age = (SELECT ... FROM ...),
  update_time = now()
WHERE
  user_id = 11
删除
@Test
    void simpleDelete() {
        //根据id删除
        userMapper.deleteById(11);

        //根据条件删除
        userMapper.deleteByCondition(SYS_USER.AGE.ge(20));
    }
其执行 SQL 如下:
# 根据id删除
DELETE FROM
  sys_user
WHERE
  user_id = 11;

# 根据条件删除
DELETE FROM
  sys_user
WHERE
  age >= 20;
BaseMapper 的接口提供了 deleteById、deleteBatchByIds、deleteByMap、deleteByQuery 方法,用于删除数据;
deleteById(id):根据主键删除数据。如果是多个主键的情况下,需要传入数组,例如:new Integer[]{100,101}。deleteBatchByIds(ids):根据多个主键批量删除数据。deleteBatchByIds(ids, size):根据多个主键批量删除数据。deleteByMap(whereConditions):根据 Map 构建的条件来删除数据。deleteByCondition(whereConditions):根据查询条件来删除数据。deleteByQuery(queryWrapper):根据查询条件来删除数据。
总结
Mybatis Flex 中确实提供了一些比 Mybatis Plus 中更好用的功能,扩展性与灵活性都比较高,总体来说是一款不错的 ORM 框架。
感谢观看。
推荐
关注博客和公众号获取最新文章
Bummon’s Blog | Bummon’s Home | 公众号

![[移动通讯]【Carrier Aggregation-4】【LTE-6】](https://img-blog.csdnimg.cn/da502bc45408420b9e9bfb2d97ada6be.png)




![linux使用操作[2]](https://img-blog.csdnimg.cn/e1babd9512df4c81be6d6f74796fb591.png)
