文章目录
- 1. 完整模型的训练套路
- 1.2 导入必要的包
- 1.3 准备数据集
- 1.3.1 使用公开数据集:
- 1.3.2 获取训练集、测试集长度:
- 1.3.3 利用 DataLoader来加载数据集
- 1.4 搭建神经网络
- 1.4.1 测试搭建的模型
- 1.4.2 创建用于训练的模型
- 1.5 定义损失函数和优化器
- 1.6 使用tensorboard(非必要)
- 1.7 定义早停策略等参数
- 1.8 训练模型
- 1.8.1 通过训练得到best_model
- 1.9 验证模型
- 1.9.1标签数据:
- 1.9.2 开始验证模型
- 导入必要的包:
- 读取图片(网上随便找的):
- 转换图像维度:
- 加载best_model
- 开始用模型预测
- 1.10 扩展知识
- 1.10.1 使用GPU加速的方法
- 1.10.2 使用早停策略
- 1.10.3 两种保存模型的方法
- 导包:
- 两种保存模型方式:
- 两种读取模型方式:
- 完整代码获取方式:
1. 完整模型的训练套路
任务:给图片做分类,飞机、鸟、狗、猫。。等共十种标签
ps:针对不同任务,只是在数据处理和模型搭建上有所不同而已,模型的训练流程套路都是一样的。
1.2 导入必要的包
import torchvision
from torch import nn
import torch
1.3 准备数据集
1.3.1 使用公开数据集:
# 准备数据集
train_data = torchvision.datasets.CIFAR10(root="../data",train=True,transform=torchvision.transforms.ToTensor(),download=True)
test_data = torchvision.datasets.CIFAR10(root="../data",train=False,transform=torchvision.transforms.ToTensor(),download=True)
1.3.2 获取训练集、测试集长度:
# length长度
train_data_size = len(train_data)
test_data_size = len(test_data)

print("训练数据集的长度为:{}".format(train_data_size))
print("测试数据集的长度为:{}".format(test_data_size))
1.3.3 利用 DataLoader来加载数据集
# 利用 DataLoader来加载数据集
from torch.utils.data import DataLoader
train_dataloader = DataLoader(train_data,batch_size=64)
test_dataloader = DataLoader(test_data,batch_size=64)
1.4 搭建神经网络
# 搭建神经网络
class MyModel(nn.Module):
    def __init__(self):
        super(MyModel,self).__init__()

        self.model = nn.Sequential(
            nn.Conv2d(3,32,5,1,2),
            nn.MaxPool2d(2),

            nn.Conv2d(32,32,5,1,2),
            nn.MaxPool2d(2),

            nn.Conv2d(32,64,5,1,2),
            nn.MaxPool2d(2),

            nn.Flatten(),

            nn.Linear(64*4*4,64),
            nn.Linear(64,10)
        )

    def forward(self,x):
        x = self.model(x)
        return x
1.4.1 测试搭建的模型
# 测试搭建的模型
model1 = MyModel()
input = torch.ones((64,3,32,32))
output = model1(input)
print(output.shape) #torch.Size([64, 10])
1.4.2 创建用于训练的模型
# 定义是否使用gpu加速的设备
# 支持gpu加速的pytorch版本,device = cuda:0,否则为cpu
device = torch.device("cuda:0" if torch.cuda.is_available() else "cpu")
print(device) # cuda:0

# 创建模型
model = MyModel()
# model.to(device) # 模型和损失函数不需要另外复制
model = model.to(device)
1.5 定义损失函数和优化器
# 损失函数
loss_fn = nn.CrossEntropyLoss() # 交叉熵,现在常用mse
loss_fn.to(device)

learning_rate = 1e-2
# learning_rate = 0.01
# 优化器
optimizer = torch.optim.SGD(model.parameters(),lr=learning_rate) #SGD,现在常用Adam
1.6 使用tensorboard(非必要)
# 使用tensorboard
from torch.utils.tensorboard.writer import SummaryWriter
# 添加tensorbord
writer = SummaryWriter("../logs_train")

import time
import numpy as np
1.7 定义早停策略等参数
# 定义 Early Stopping 参数
early_stopping_patience = 3  # 如果 3 个 epoch 后性能没有改善,就停止训练
early_stopping_counter = 0
best_loss = float('inf')  # 初始化为无穷大

# 初始化最好模型的性能为无穷大
best_valid_loss = float('inf')

# 初始化好的准确率
best_accuracy = 0.00
1.8 训练模型
# 设置训练网络的一些参数

# 记录测试的次数
total_test_step = 0

# 训练的次数
epoch = 100

start_time = time.time()
for i in range(epoch):
    print("----------------第{}轮训练开始----------------".format(i+1))

    # 训练步骤开始
    model.train() #训练模式,对DropOut等有用

    train_loss = []
    # 记录训练的次数
    iter_count = 0
    for data in train_dataloader:
        imgs,targets = data
        imgs = imgs.to(device)
        targets = targets.to(device)

        outputs = model(imgs) # 调用模型计算输出值

        loss = loss_fn(outputs,targets) # 计算损失值

        train_loss.append(loss.item())

        # 优化器优化模型
        optimizer.zero_grad() # 梯度清零
        loss.backward() # 反向传播
        optimizer.step() # 优化参数

        iter_count = iter_count + 1 # 迭代次数

        if (iter_count %100 == 0):
            end_time = time.time()
#             print("cost_time:",end_time-start_time)
            print("训练次数:{0},Loss:{1:.7f}".format(iter_count,loss.item()))
            writer.add_scalar("train_loss:",loss.item(),iter_count)

    train_loss = np.average(train_loss)
    print("第{0}轮训练结束".format(i+1))
    print("Epoch:{0} | Train_Loss:{1:.7f}\n".format(i+1,train_loss))

    # 测试步骤开始
    model.eval()# 测试模式
    print("第{0}轮测试开始:".format(i+1))
    test_loss = []

    test_accuracy = 0
    with torch.no_grad(): # 不计算梯度
        for data in test_dataloader:
            imgs,targets = data

            imgs = imgs.to(device)
            targets = targets.to(device)

            outputs = model(imgs)
            loss = loss_fn(outputs,targets)

            test_loss.append(loss.item())

            accuracy = (outputs.argmax(1) == targets).sum()
            test_accuracy = test_accuracy+accuracy

    test_loss = np.average(test_loss)
    print("Epoch:{0} | Test_Loss:{1:.7f}".format(i+1,test_loss))
    test_accuracy = test_accuracy/test_data_size
    print("Test_Accuracy:{0:.7f}".format(test_accuracy))

    writer.add_scalar("test_loss:",test_loss,total_test_step )
    writer.add_scalar("test_accuracy:",test_accuracy,total_test_step )

    total_test_step = total_test_step + 1


    # 每一轮保存模型
    # torch.save(model,"model_{}.pth".format(i+1))
    # torch.save(model.state_dict(),"model_{}.pth".format(i)) # 官方推荐的保存模型方法


    # # 如果当前模型在验证集上的性能更好,保存该模型  (以Loss为标准)
    # if test_loss < best_valid_loss:
    #     best_valid_loss = test_loss
    #     torch.save(model.state_dict(), './model/best_model.pth')
    #     print("当前第{}轮模型为best_model,已保存!".format(i+1))

    # 以正确率为标准
    if best_accuracy < test_accuracy:
        best_accuracy = test_accuracy
        torch.save(model.state_dict(), './model/'+'ac_{0:.4f}_best_model.pth'.format(best_accuracy))
        print("当前第{}轮模型为best_model,已保存!".format(i+1))

        early_stopping_counter = 0 #只要模型有更新,早停patience就初始化为0
    else:  #早停策略
        early_stopping_counter += 1
        if early_stopping_counter >= early_stopping_patience:
            print("Early stopping at epoch {}".format(i+1))
            break
    print("\n")

writer.close()
训练过程展示(只给出两轮的信息):

…
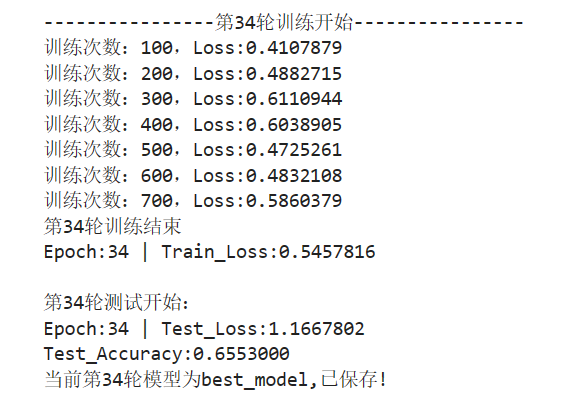
1.8.1 通过训练得到best_model
我自得到的best_model :ac_0.6553_best_model.pth
准确率:0.65,还行,练手的项目,就不一一调参多次训练了
1.9 验证模型
1.9.1标签数据:

1.9.2 开始验证模型
导入必要的包:
from PIL import Image
import torchvision
import torch
读取图片(网上随便找的):
图1-dog1:
图2-dog2:

image_path = "./data/dog2.png"
image = Image.open(image_path)
image = image.convert('RGB')
转换图像维度:
transform = torchvision.transforms.Compose([torchvision.transforms.Resize((32,32)),
                                torchvision.transforms.ToTensor()])
image = transform(image)
print(image.shape) #torch.Size([3, 32, 32])
加载best_model
神经网络类:
from torch import nn
class MyModel(nn.Module):
    def __init__(self):
        super(MyModel,self).__init__()

        self.model = nn.Sequential(
            nn.Conv2d(3,32,5,1,2),
            nn.MaxPool2d(2),

            nn.Conv2d(32,32,5,1,2),
            nn.MaxPool2d(2),

            nn.Conv2d(32,64,5,1,2),
            nn.MaxPool2d(2),

            nn.Flatten(),

            nn.Linear(64*4*4,64),
            nn.Linear(64,10)
        )

    def forward(self,x):
        x = self.model(x)
        return x
因为我保存模型用了state_dict(),(这样的模型小,省空间),所以加载模型需要以下这样加载,下文会给出保存模型的两种方法:
best_model = MyModel()
best_model.load_state_dict(torch.load("./best_model/ac_0.6553_best_model.pth"))
print(best_model)
输出:
MyModel(
  (model): Sequential(
    (0): Conv2d(3, 32, kernel_size=(5, 5), stride=(1, 1), padding=(2, 2))
    (1): MaxPool2d(kernel_size=2, stride=2, padding=0, dilation=1, ceil_mode=False)
    (2): Conv2d(32, 32, kernel_size=(5, 5), stride=(1, 1), padding=(2, 2))
    (3): MaxPool2d(kernel_size=2, stride=2, padding=0, dilation=1, ceil_mode=False)
    (4): Conv2d(32, 64, kernel_size=(5, 5), stride=(1, 1), padding=(2, 2))
    (5): MaxPool2d(kernel_size=2, stride=2, padding=0, dilation=1, ceil_mode=False)
    (6): Flatten(start_dim=1, end_dim=-1)
    (7): Linear(in_features=1024, out_features=64, bias=True)
    (8): Linear(in_features=64, out_features=10, bias=True)
  )
)
开始用模型预测
再转换一下图片维度:
image = torch.reshape(image,(1,3,32,32))
best_model.eval()
with torch.no_grad():
    output = best_model(image)
print(output)
print(output.argmax(1)) # 取出预测最大概率的值
输出结果:由结果可知,预测的十个标签中,从0开始,第5个结果的值最大,查看标签数据知,序号5为dog,预测成功了
ps:我得到的这个模型,把图片dog1,预测成了猫
tensor([[ -3.7735,  -9.3045,   6.1250,   2.3422,   4.8322,  11.0666,  -2.2375,
           7.5186, -11.7261,  -8.5249]])
tensor([5])
1.10 扩展知识
1.10.1 使用GPU加速的方法
GPU训练:
- 网络模型
- 数据(输入、标注)
- 损失函数
- .cuda
# 使用GPU训练
import torch

device = torch.device("cuda:0" if torch.cuda.is_available() else "cpu")

# 将模型移动到 GPU
model = model.to(device)

# 将损失函数移动到 GPU
loss_fn = loss_fn.to(device)

# 将输入数据移动到 GPU
inputs = inputs.to(device)

# 将标签移动到 GPU
labels = labels.to(device)
# 命令行的方式查看显卡配置(在jupyter上)
!nvidia-smi
1.10.2 使用早停策略
# 使用早停策略
import torch
import torch.nn as nn
from torch.optim import Adam
from torch.utils.data import DataLoader, TensorDataset

# 定义一个简单的模型
class SimpleModel(nn.Module):
    def __init__(self, input_dim, output_dim):
        super(SimpleModel, self).__init__()
        self.linear = nn.Linear(input_dim, output_dim)

    def forward(self, x):
        return self.linear(x)

# 创建数据
input_dim = 10
output_dim = 1
x_train = torch.randn(100, input_dim)
y_train = torch.randn(100, output_dim)
dataset = TensorDataset(x_train, y_train)
dataloader = DataLoader(dataset, batch_size=10)

# 初始化模型、损失函数和优化器
model = SimpleModel(input_dim, output_dim)
criterion = nn.MSELoss()
optimizer = Adam(model.parameters(), lr=0.01)

# 定义 Early Stopping 参数
early_stopping_patience = 5  # 如果 5 个 epoch 后性能没有改善,就停止训练
early_stopping_counter = 0
best_loss = float('inf')  # 初始化为无穷大

# 训练循环
for epoch in range(100):  # 例如我们训练 100 个 epoch
    for inputs, targets in dataloader:
        optimizer.zero_grad()
        outputs = model(inputs)
        loss = criterion(outputs, targets)
        loss.backward()
        optimizer.step()

    # 计算当前 epoch 的损失
    current_loss = 0
    with torch.no_grad():
        for inputs, targets in dataloader:
            outputs = model(inputs)
            current_loss += criterion(outputs, targets).item() / len(dataloader)
    current_loss /= len(dataloader)

    # 检查是否应提前停止训练
    if current_loss < best_loss:
        best_loss = current_loss
        early_stopping_counter = 0
    else:
        early_stopping_counter += 1
        if early_stopping_counter >= early_stopping_patience:
            print("Early stopping at epoch {}".format(epoch))
            break
1.10.3 两种保存模型的方法
导包:
import torch
import torchvision
两种保存模型方式:
vgg16 = torchvision.models.vgg16(weights=None)

# 保存方式1,模型结构+参数结构
torch.save(vgg16,"vgg16_method1.pth")

# 保存方式2,模型参数(官方推荐)模型较小
torch.save(vgg16.state_dict(),"vgg16_method2.pth")
两种读取模型方式:
# 方式1
model1 = torch.load("vgg16_method1.pth")
# model1
# 方式2
model2 = torch.load("vgg16_method2.pth")
# model2 # 参数结构
# 将方式2 恢复成模型结构
vgg16 = torchvision.models.vgg16(weights=None)
vgg16.load_state_dict(torch.load("vgg16_method2.pth"))

print(vgg16)
输出结果:
VGG(
  (features): Sequential(
    (0): Conv2d(3, 64, kernel_size=(3, 3), stride=(1, 1), padding=(1, 1))
    (1): ReLU(inplace=True)
    (2): Conv2d(64, 64, kernel_size=(3, 3), stride=(1, 1), padding=(1, 1))
    (3): ReLU(inplace=True)
    (4): MaxPool2d(kernel_size=2, stride=2, padding=0, dilation=1, ceil_mode=False)
    (5): Conv2d(64, 128, kernel_size=(3, 3), stride=(1, 1), padding=(1, 1))
    (6): ReLU(inplace=True)
    (7): Conv2d(128, 128, kernel_size=(3, 3), stride=(1, 1), padding=(1, 1))
    (8): ReLU(inplace=True)
    (9): MaxPool2d(kernel_size=2, stride=2, padding=0, dilation=1, ceil_mode=False)
    (10): Conv2d(128, 256, kernel_size=(3, 3), stride=(1, 1), padding=(1, 1))
    (11): ReLU(inplace=True)
    (12): Conv2d(256, 256, kernel_size=(3, 3), stride=(1, 1), padding=(1, 1))
    (13): ReLU(inplace=True)
    (14): Conv2d(256, 256, kernel_size=(3, 3), stride=(1, 1), padding=(1, 1))
    (15): ReLU(inplace=True)
    (16): MaxPool2d(kernel_size=2, stride=2, padding=0, dilation=1, ceil_mode=False)
    (17): Conv2d(256, 512, kernel_size=(3, 3), stride=(1, 1), padding=(1, 1))
    (18): ReLU(inplace=True)
    (19): Conv2d(512, 512, kernel_size=(3, 3), stride=(1, 1), padding=(1, 1))
    (20): ReLU(inplace=True)
    (21): Conv2d(512, 512, kernel_size=(3, 3), stride=(1, 1), padding=(1, 1))
    (22): ReLU(inplace=True)
    (23): MaxPool2d(kernel_size=2, stride=2, padding=0, dilation=1, ceil_mode=False)
    (24): Conv2d(512, 512, kernel_size=(3, 3), stride=(1, 1), padding=(1, 1))
    (25): ReLU(inplace=True)
    (26): Conv2d(512, 512, kernel_size=(3, 3), stride=(1, 1), padding=(1, 1))
    (27): ReLU(inplace=True)
    (28): Conv2d(512, 512, kernel_size=(3, 3), stride=(1, 1), padding=(1, 1))
    (29): ReLU(inplace=True)
    (30): MaxPool2d(kernel_size=2, stride=2, padding=0, dilation=1, ceil_mode=False)
  )
  (avgpool): AdaptiveAvgPool2d(output_size=(7, 7))
  (classifier): Sequential(
    (0): Linear(in_features=25088, out_features=4096, bias=True)
    (1): ReLU(inplace=True)
    (2): Dropout(p=0.5, inplace=False)
    (3): Linear(in_features=4096, out_features=4096, bias=True)
    (4): ReLU(inplace=True)
    (5): Dropout(p=0.5, inplace=False)
    (6): Linear(in_features=4096, out_features=1000, bias=True)
  )
)
完整代码获取方式:
点赞、收藏、加关注
加我vx:ls888726