一、LinearLayout 线性布局
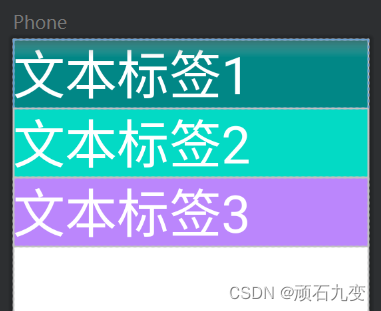
LinearLayout 是一个视图组,用于使所有子视图在单个方向(垂直或水平)保持对齐。您可以使用 android:orientation 属性指定布局方向。
- android:orientation,指定布局方向,vertical-竖向布局,horizontal-横向布局
- android:layout_weight,为各个子视图分配权重(数字)
- android:layout_gravity,容器自身相对于的上级容器的排列方式
- android:gravity,容器内部组件的排列方式(top,bottom,start,end,center)
<?xml version="1.0" encoding="utf-8"?>
<LinearLayout xmlns:android="http://schemas.android.com/apk/res/android"
    android:layout_width="match_parent"
    android:layout_height="match_parent"
    android:orientation="vertical"
    >

    <TextView
        android:layout_width="match_parent"
        android:layout_height="wrap_content"
        android:text="文本标签1"
        android:background="@color/teal_700"
        android:textColor="@color/white"
        android:textSize="60sp"
        />
    <TextView
        android:layout_width="match_parent"
        android:layout_height="wrap_content"
        android:text="文本标签2"
        android:background="@color/teal_200"
        android:textColor="@color/white"
        android:textSize="60sp"
        />
    <TextView
        android:layout_width="match_parent"
        android:layout_height="wrap_content"
        android:text="文本标签3"
        android:background="@color/purple_200"
        android:textColor="@color/white"
        android:textSize="60sp"
        />
</LinearLayout>
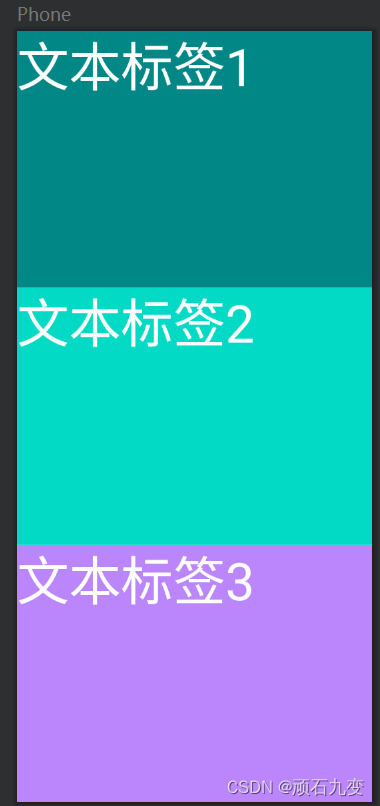
线性布局 - 均等分布
如果要让每个子视图使用大小相同的屏幕空间,请将每个视图的 android:layout_height 设置为 “0dp”(针对垂直布局),或将每个视图的 android:layout_width 设置为 “0dp”(针对水平布局)。然后,将每个视图的 android:layout_weight 设置为 “1”。
<?xml version="1.0" encoding="utf-8"?>
<LinearLayout xmlns:android="http://schemas.android.com/apk/res/android"
    android:layout_width="match_parent"
    android:layout_height="match_parent"
    android:orientation="vertical"
    >

    <TextView
        android:layout_width="match_parent"
        android:layout_height="0dp"
        android:layout_weight="1"
        android:text="文本标签1"
        android:background="@color/teal_700"
        android:textColor="@color/white"
        android:textSize="60sp"
        />
    <TextView
        android:layout_width="match_parent"
        android:layout_height="0dp"
        android:layout_weight="1"
        android:text="文本标签2"
        android:background="@color/teal_200"
        android:textColor="@color/white"
        android:textSize="60sp"
        />
    <TextView
        android:layout_width="match_parent"
        android:layout_height="0dp"
        android:layout_weight="1"
        android:text="文本标签3"
        android:background="@color/purple_200"
        android:textColor="@color/white"
        android:textSize="60sp"
        />
</LinearLayout>
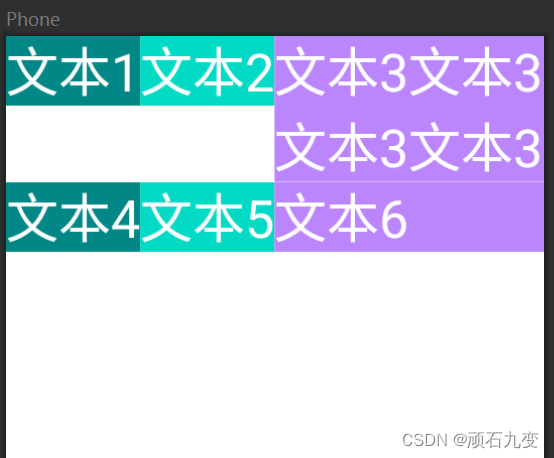
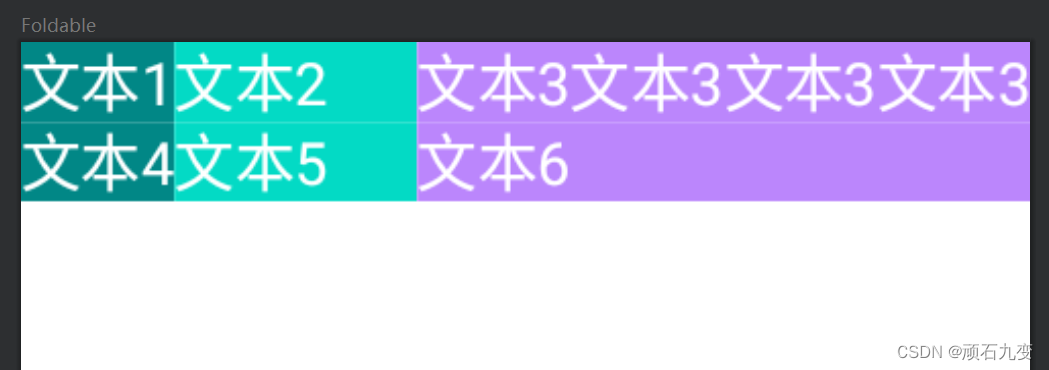
二、TableLayout 表格布局
1、TableLayout继承了LinearLayout
- android:stretchColumns,设置需要被隐藏的列的序号,从0开始,多个用,隔开
- android:collapseColumns,设置需要被隐藏的列的序号,从0开始,多个用,隔开
- android:shrinkColumns,设置允许被收缩的列的列序号,从0开始,多个用,隔开
2、子控件设置属性
- android:layout_span,横向跨几列
- android:layout_column,显示在第几列,从0开始
3、子控件TableRow,控制每行显示数据
4、如何确定行数与列数
- 如果我们直接往TableLayout中添加组件的话,那么这个组件将占满一行!!!
- 如果我们想一行上有多个组件的话,就要添加一个TableRow的容器,把组件都丢到里面!
- tablerow中的组件个数就决定了该行有多少列,而列的宽度由该列中最宽的单元格决定
- tablerow的layout_width属性,默认是fill_parent的,我们自己设置成其他的值也不会生效!!! 但是layout_height默认是wrapten——content的,我们却可以自己设置大小!
- 整个表格布局的宽度取决于父容器的宽度(占满父容器本身)
- 有多少行就要自己数啦,一个tablerow一行,一个单独的组件也一行!多少列则是看tableRow中 的组件个数,组件最多的就是TableLayout的列数
<TableLayout xmlns:android="http://schemas.android.com/apk/res/android"
    android:layout_width="match_parent"
    android:layout_height="match_parent"
    android:collapseColumns=""
    android:stretchColumns="1"
    android:shrinkColumns="2"
    >
    <TableRow>
    <TextView
        android:layout_width="wrap_content"
        android:layout_height="wrap_content"
        android:text="文本1"
        android:background="@color/teal_700"
        android:textColor="@color/white"
        android:textSize="40sp"
        android:layout_span="1"
        android:layout_column="0"
        />
    <TextView
        android:layout_width="wrap_content"
        android:layout_height="wrap_content"
        android:text="文本2"
        android:background="@color/teal_200"
        android:textColor="@color/white"
        android:textSize="40sp"
        />
    <TextView
        android:layout_width="wrap_content"
        android:layout_height="wrap_content"
        android:text="文本3文本3文本3文本3"
        android:background="@color/purple_200"
        android:textColor="@color/white"
        android:textSize="40sp"
        />
    </TableRow>
    <TableRow>
        <TextView
            android:layout_width="wrap_content"
            android:layout_height="wrap_content"
            android:text="文本4"
            android:background="@color/teal_700"
            android:textColor="@color/white"
            android:textSize="40sp"
            />
        <TextView
            android:layout_width="wrap_content"
            android:layout_height="wrap_content"
            android:text="文本5"
            android:background="@color/teal_200"
            android:textColor="@color/white"
            android:textSize="40sp"
            />
        <TextView
            android:layout_width="wrap_content"
            android:layout_height="wrap_content"
            android:text="文本6"
            android:background="@color/purple_200"
            android:textColor="@color/white"
            android:textSize="40sp"
            />
    </TableRow>
</TableLayout>
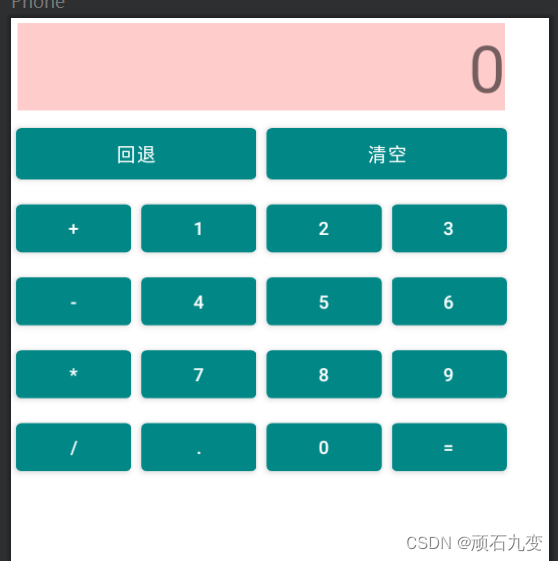
三、GridLayout 网格布局
GridLayout和TableLayout(表格布局)有点类似,不过比TableLayout更加灵活好用。
- android:orientation,指定布局方向,vertical-竖向布局,horizontal-横向布局
- android:columnCount,设置总共多少列,默认没限制
- android:rowCount,设置总共多少行,默认没限制
- android:useDefaultMargins,true-如果组件没设置margin属性,则使用默认间距
子控件属性
- android:layout_columnSpan,设置组件横跨多列
- android:layout_rowSpan,设置组件横跨多行
- 如果设置了多行或多列,且你要让组件填满横越过的行或列的话,需要添加下面这个属性: android:layout_gravity = “fill”
<?xml version="1.0" encoding="utf-8"?>
<GridLayout xmlns:android="http://schemas.android.com/apk/res/android"
    android:layout_width="wrap_content"
    android:layout_height="wrap_content"
    android:columnCount="4"
    android:orientation="horizontal"
    android:rowCount="6"
    android:useDefaultMargins="true">

    <TextView
        android:layout_columnSpan="4"
        android:layout_gravity="fill"
        android:gravity="end"
        android:layout_marginLeft="5dp"
        android:layout_marginRight="5dp"
        android:background="#FFCCCC"
        android:text="0"
        android:textSize="50sp" />

    <Button
        android:layout_columnSpan="2"
        android:layout_gravity="fill"
        android:text="回退" />

    <Button
        android:layout_columnSpan="2"
        android:layout_gravity="fill"
        android:padding="10sp"
        android:text="清空" />

    <Button android:text="+" />
    <Button android:text="1" />
    <Button android:text="2" />
    <Button android:text="3" />
    <Button android:text="-" />
    <Button android:text="4" />
    <Button android:text="5" />
    <Button android:text="6" />
    <Button android:text="*" />
    <Button android:text="7" />
    <Button android:text="8" />
    <Button android:text="9" />
    <Button android:text="/" />
    <Button android:text="." />
    <Button android:text="0" />
    <Button android:text="=" />
</GridLayout>
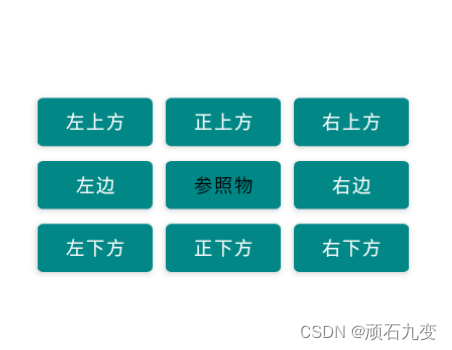
四、RelativeLayout 相对布局
RelativeLayout 相对布局,可以相对父容器,也可以相对兄弟组件。
- android:gravity,容器内部组件的排列方式(top,bottom,start,end,center),可以同时设置竖向横向两个竖向,用|隔开,比如end|top(左上方)
- android:ignoreGravity,指定id的组件不受gravity影响
子控件属性
1)根据父容器定位
- android:layout_alignParentStart,左对齐
- android:layout_alignParentEnd,右对齐
- android:layout_alignParentTop,上对齐
- android:layout_alignParentBottom,下对齐
- android:layout_centerHorizontal,水平居中
- android:layout_centerVertical,垂直居中
- android:layout_centerInParent,正中间
2)根据兄弟组件定位
- android:layout_toStartOf,参考组件的左边
- android:layout_toEndOf,参考组件的右边
- android:layout_above,参考组件的上面
- android:layout_below,参加组件的下面
- android:layout_alignTop,对齐参考组件的上边界
- android:layout_alignBottom,对齐参考组件的下边界
- android:layout_alignStart,对齐参考组件的左边界
- android:layout_alignEnd,对齐参考组件的右边界
<?xml version="1.0" encoding="utf-8"?>
<RelativeLayout xmlns:android="http://schemas.android.com/apk/res/android"
    android:layout_width="match_parent"
    android:layout_height="match_parent"
    >

    <!-- 参照组件,在容器中间位置 -->
    <Button
        android:layout_width="wrap_content"
        android:layout_height="wrap_content"
        android:id="@+id/btn01"
        android:textColor="@color/black"
        android:layout_centerInParent="true"
        android:text="参照物"/>

    <!-- 下方,且和参照物左对齐,如果控件大小一样,左右对齐效果是一样的 -->
    <Button
        android:layout_width="wrap_content"
        android:layout_height="wrap_content"
        android:layout_alignStart="@id/btn01"
        android:layout_above="@id/btn01"
        android:text="正上方"/>

    <!-- 上方,且和参照物左对齐,如果控件大小一样,左右对齐效果是一样的 -->
    <Button
        android:layout_width="wrap_content"
        android:layout_height="wrap_content"
        android:layout_marginEnd="10dp"
        android:layout_toStartOf="@id/btn01"
        android:layout_alignTop="@id/btn01"
        android:text="左边"/>

    <!-- 右方,且和参照物下对齐,如果控件大小一样,上下对齐效果是一样的 -->
    <Button
        android:layout_width="wrap_content"
        android:layout_height="wrap_content"
        android:layout_marginStart="10dp"
        android:layout_toEndOf="@id/btn01"
        android:layout_alignBottom="@id/btn01"
        android:text="右边"/>

    <!-- 右方,上方 -->
    <Button
        android:layout_width="wrap_content"
        android:layout_height="wrap_content"
        android:layout_marginStart="10dp"
        android:layout_toEndOf="@id/btn01"
        android:layout_above="@id/btn01"
        android:text="右上方"/>

    <!-- 右方,下方 -->
    <Button
        android:layout_width="wrap_content"
        android:layout_height="wrap_content"
        android:layout_marginStart="10dp"
        android:layout_toEndOf="@id/btn01"
        android:layout_below="@id/btn01"
        android:text="右下方"/>

    <!-- 左方,下方 -->
    <Button
        android:layout_width="wrap_content"
        android:layout_height="wrap_content"
        android:layout_marginEnd="10dp"
        android:layout_toStartOf="@id/btn01"
        android:layout_below="@id/btn01"
        android:text="左下方"/>

    <!-- 左方,上方 -->
    <Button
        android:layout_width="wrap_content"
        android:layout_height="wrap_content"
        android:layout_marginEnd="10dp"
        android:layout_toStartOf="@id/btn01"
        android:layout_above="@id/btn01"
        android:text="左上方"/>

    <!-- 下方,且和参照物左对齐 -->
    <Button
        android:layout_width="wrap_content"
        android:layout_height="wrap_content"
        android:layout_alignStart="@id/btn01"
        android:layout_below="@id/btn01"
        android:text="正下方"/>
</RelativeLayout>