由于辐照度贴图是.hdr格式,
glTexImage2D(GL_TEXTURE_2D, 0, GL_RGB16F, width, height, 0, GL_RGB, GL_FLOAT, data);
osg的.hdr插件需要修改,否则格式不对。
即在ReaderWriterHDR::readImage()中修改,
	bool convertToRGB8 = true;

		int pixelFormat = GL_RGB;
        int dataType = GL_UNSIGNED_BYTE;

		int internalFormat = GL_RGB16;
		img->setImage(res.width, res.height, 1,
			internalFormat, // Why this value are here?
			pixelFormat,
			dataType,
			(unsigned char*)rgb,
			osg::Image::USE_NEW_DELETE);
直接把该函数拷贝过来。
virtual ReadResult readImage(const std::string &_file, const osgDB::ReaderWriter::Options *_opts) const
{
    std::string filepath = osgDB::findDataFile(_file, _opts);
    if (filepath.empty())
        return ReadResult::FILE_NOT_FOUND;

    if (!HDRLoader::isHDRFile(filepath.c_str()))
        return ReadResult::FILE_NOT_HANDLED;

    float mul = 1.0f;
    bool bYFlip = false;
    //bool convertToRGB8 = false;
	bool convertToRGB8 = true;
    bool rawRGBE = false;
    if(_opts)
    {
        std::istringstream iss(_opts->getOptionString());
        std::string opt;
        while (iss >> opt)
        {
            if(opt == "RGBMUL")
            {
                iss >> mul;
            }
            else if(opt == "RGB8")
            {
                convertToRGB8 = true;
            }
            /* RAW: store the RGBE values into a Image, to use this option you
             * need to decode the RGBE value in the fragment shader. Follow
             * the cube map glsl decoder:
             *
             * vec4 textureCubeRGBE( uniform samplerCube sampler, vec3 coords )
             * {
             *     ivec4 rgbe = textureCube( sampler, coords ) * 255. + 0.5;
             *     float e = rgbe.a - ( 128 + 8 );
             *     return vec4( rgbe.rgb * exp2( e ), 1.0 );
             * }
             *
             */
            else if(opt == "RAW")
            {
                rawRGBE = true;
            }
            else if(opt == "YFLIP")
            {
                bYFlip = true; // Image is flipped later if required
            }
        }
    }

    HDRLoaderResult res;
    bool ret = HDRLoader::load(filepath.c_str(), rawRGBE, res);
    if (!ret)
        return ReadResult::ERROR_IN_READING_FILE;

    // create the osg::Image to fill in.
    osg::Image *img = new osg::Image;

    // copy across the raw data into the osg::Image
#if 1
if (convertToRGB8)
{
int nbPixs = res.width * res.height;
int nbElements = nbPixs * 3;
unsigned char *rgb = new unsigned char[ nbElements ];
unsigned char *tt = rgb;
float *cols = res.cols;
        for (int i = 0; i < nbElements; i++) {
            float element = *cols++;
            element *= mul;

			if (element < 0)
			{
				element = 0;
			}
			else if (element > 1)
			{
				element = 1;
			}
            int intElement = (int) (element * 255.0f);
            *tt++ = intElement;
        }

        delete [] res.cols;

		int pixelFormat = GL_RGB;
        int dataType = GL_UNSIGNED_BYTE;

        img->setFileName(filepath.c_str());
#if 0
img->setImage( res.width, res.height, 1,
3, // Why this value are here?
pixelFormat,
dataType,
(unsigned char*) rgb,
osg::Image::USE_NEW_DELETE);
#else
int internalFormat = GL_RGB16;
img->setImage(res.width, res.height, 1,
internalFormat, // Why this value are here?
pixelFormat,
dataType,
(unsigned char*)rgb,
osg::Image::USE_NEW_DELETE);
#endif
}
else
{
int internalFormat;
int pixelFormat;
int dataType = GL_FLOAT;
        if (rawRGBE)
        {
            internalFormat = GL_RGBA8;
            pixelFormat = GL_RGBA;
        } else {
            internalFormat = GL_RGB32F_ARB;
            pixelFormat = GL_RGB;
        }

        img->setFileName(filepath.c_str());
        img->setImage(  res.width, res.height, 1,
                        internalFormat,
                        pixelFormat,
                        dataType,
                        (unsigned char*) res.cols,
                        osg::Image::USE_NEW_DELETE);
    }
#else
{
//转换到RGB16,GL_Float
img->setFileName(filepath.c_str());
int nbPixs = res.width * res.height;
int nbElements = nbPixs * 3;
int internalFormat = GL_RGB16;
int pixelFormat = GL_RGB;
int dataType = GL_RGBA;
img->allocateImage(res.width, res.height, 1, GL_RGB, GL_FLOAT);
float* ptr = (float*)img->data();
float *cols = res.cols;
		for (int row = 0; row < res.height; row++)
		{
			for (int coloumn = 0; coloumn < res.width; coloumn++)
			{
				*ptr++ = *cols++;
				*ptr++ = *cols++;
				*ptr++ = *cols++;
			}
		}
		delete[] res.cols;


	}
#endif
// Y flip
if(bYFlip==true) img->flipVertical();
    return img;
}
结果如下:
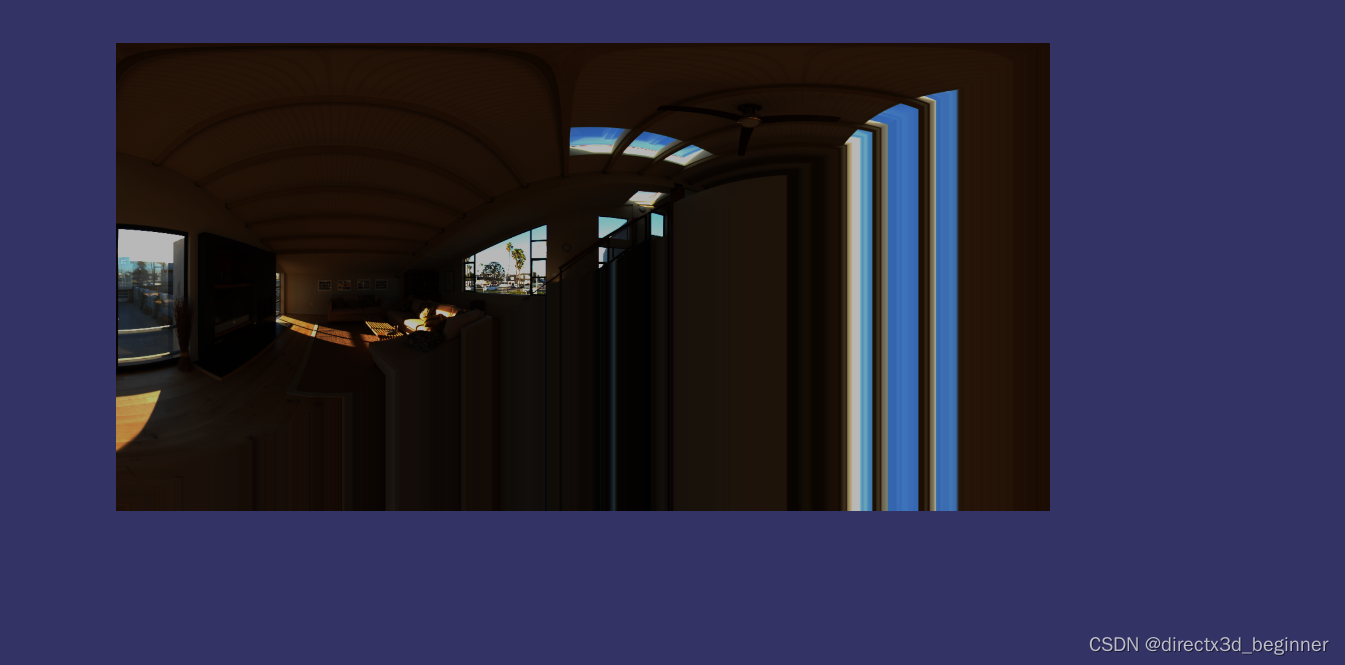
加载图片代码如下:
#include <osg/TextureCubeMap>
#include <osg/TexGen>
#include <osg/TexEnvCombine>
#include <osgUtil/ReflectionMapGenerator>
#include <osgDB/ReadFile>
#include <osgViewer/Viewer>
#include <osg/NodeVisitor>
#include <osg/ShapeDrawable>
#include <osg/Texture2D>
static const char * vertexShader =
{
“in vec3 aPos;\n”
“varying vec3 outPos;”
“void main(void)\n”
“{\n”
“outPos = aPos;\n”
" gl_Position = ftransform();\n"
“}\n”
};
static const char *psShader =
{
“varying vec3 outPos;”
“uniform samplerCube tex0;”
“void main(void)\n”
“{\n”
“float x = outPos.r;\n”
“float y = outPos.g;\n”
“float z = outPos.b;\n”
“vec3 dir = vec3(x,y,z);\n”
“gl_FragColor = texture(tex0,dir);\n”
“}\n”
};
class MyNodeVisitor : public osg::NodeVisitor
{
public:
MyNodeVisitor() : osg::NodeVisitor(osg::NodeVisitor::TRAVERSE_ALL_CHILDREN)
{
}
void apply(osg::Geode& geode)
{
	int count = geode.getNumDrawables();
	for (int i = 0; i < count; i++)
	{
		osg::ref_ptr<osg::Geometry> geometry = geode.getDrawable(i)->asGeometry();
		if (!geometry.valid())
		{
			continue;
		}
		osg::Array* vertexArray = geometry->getVertexArray();
		geometry->setVertexAttribArray(1, vertexArray);

	}
	traverse(geode);
}
};
int main()
{
std::string strHDRImageName = “D:/tutorial/LearnOpenGL-master/LearnOpenGL-master/resources/textures/hdr/newport_loft.hdr”;
osg::ref_ptrosg::Image image = osgDB::readImageFile(strHDRImageName);
int imageWidth = image->s();
int imageHeight = image->t();
osg::ref_ptr<osg::Vec3Array> vertices = new osg::Vec3Array;
//vertices->push_back(osg::Vec3(-0.5f, 0.0f, -0.5f));
// vertices->push_back(osg::Vec3(0.5f, 0.0f, -0.5f));
// vertices->push_back(osg::Vec3(0.5f, 0.0f, 0.5f));
// vertices->push_back(osg::Vec3(-0.5f, 0.0f, 0.5f));

 vertices->push_back(osg::Vec3(-imageWidth, 0.0f, -imageHeight));
 vertices->push_back(osg::Vec3(imageWidth, 0.0f, -imageHeight));
 vertices->push_back(osg::Vec3(imageWidth, 0.0f, imageHeight));
 vertices->push_back(osg::Vec3(-imageWidth, 0.0f, imageHeight));
 osg::ref_ptr<osg::Vec3Array> normals = new osg::Vec3Array;
 normals->push_back(osg::Vec3(0.0f, -1.0f, 0.0f));
 osg::ref_ptr<osg::Vec2Array> texcoords = new osg::Vec2Array;
 texcoords->push_back(osg::Vec2(0.0f, 0.0f));
 texcoords->push_back(osg::Vec2(1.0f, 0.0f));
 texcoords->push_back(osg::Vec2(1.0f, 1.0f));
 texcoords->push_back(osg::Vec2(0.0f, 1.0f));
 osg::ref_ptr<osg::Geometry> quad = new osg::Geometry;
 quad->setVertexArray(vertices.get());
 quad->setNormalArray(normals.get());
 quad->setNormalBinding(osg::Geometry::BIND_OVERALL);
 quad->setTexCoordArray(0, texcoords.get());
 quad->addPrimitiveSet(new osg::DrawArrays(GL_QUADS, 0, 4));

 osg::ref_ptr<osg::Texture2D> texture = new osg::Texture2D;
 texture->setImage(image.get());
 texture->setTextureSize(imageWidth, imageHeight);
 //texture->setInternalFormat(GL_RGB16F_ARB);
 texture->setInternalFormat(GL_RGB16);
// texture->setSourceFormat(GL_RGB16);
// texture->setSourceType(GL_FLOAT);
 texture->setFilter(osg::Texture2D::MIN_FILTER, osg::Texture2D::LINEAR);
 texture->setFilter(osg::Texture2D::MAG_FILTER, osg::Texture2D::LINEAR);
 texture->setWrap(osg::Texture::WRAP_S, osg::Texture::CLAMP_TO_EDGE);
 texture->setWrap(osg::Texture::WRAP_T, osg::Texture::CLAMP_TO_EDGE);
 //glTexImage2D(GL_TEXTURE_2D, 0, GL_RGB16F, width, height, 0, GL_RGB, GL_FLOAT, data);
 //
 //glTexParameteri(GL_TEXTURE_2D, GL_TEXTURE_WRAP_S, GL_CLAMP_TO_EDGE);
 //glTexParameteri(GL_TEXTURE_2D, GL_TEXTURE_WRAP_T, GL_CLAMP_TO_EDGE);
 //glTexParameteri(GL_TEXTURE_2D, GL_TEXTURE_MIN_FILTER, GL_LINEAR);
 //glTexParameteri(GL_TEXTURE_2D, GL_TEXTURE_MAG_FILTER, GL_LINEAR);
 osg::ref_ptr<osg::Geode> root = new osg::Geode;
 root->addDrawable(quad.get());
 root->getOrCreateStateSet()->setTextureAttributeAndModes(
     0, texture.get());

osgViewer::Viewer viewer;
 viewer.setSceneData(root.get());
 return viewer.run();
}
