一、查漏补缺、熟能生巧:
只有熬过不熟练的时期,反复琢磨,才会有熟练之后,藐视众生的时刻
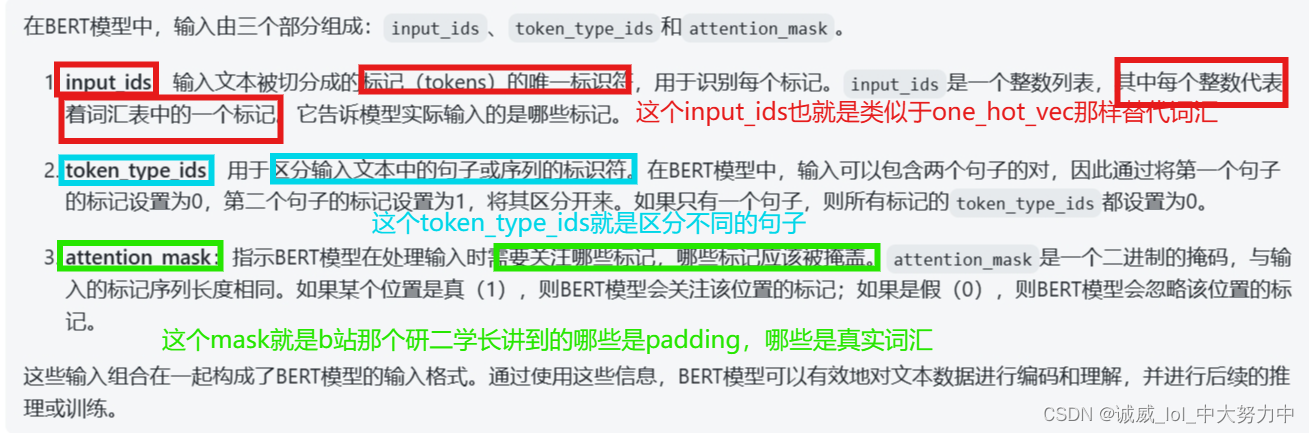
1.关于transformers中的tokenizer的用法的简单介绍:
from transformers import BertTokenizerFast

# 加载预训练的BERT模型tokenizer
tokenizer = BertTokenizerFast.from_pretrained('bert-base-uncased')

# 文本输入
text = "This is an example sentence."

# 对文本进行分词和标记化
tokens = tokenizer(text, truncation=True, padding=True)

# 获取分词后的token IDs
input_ids = tokens['input_ids']

# 获取token类型IDs
token_type_ids = tokens['token_type_ids']

# 获取注意力遮罩
attention_mask = tokens['attention_mask']

print("Token IDs:", input_ids)
print("Token Type IDs:", token_type_ids)
print("Attention Mask:", attention_mask)
运行结果如下:
Token IDs: [101, 2023, 2003, 2019, 2742, 6251, 102]
Token Type IDs: [0, 0, 0, 0, 0, 0, 0]
Attention Mask: [1, 1, 1, 1, 1, 1, 1]
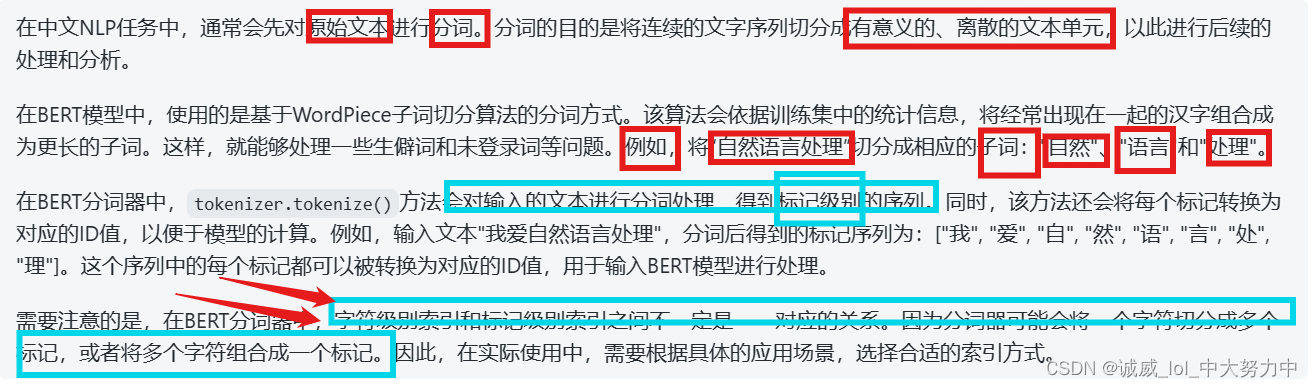
2.char_to_token的用法和作用说明:
from transformers import BertTokenizer

# 初始化BERT分词器
tokenizer = BertTokenizer.from_pretrained('bert-base-chinese')

# 原始文本
text = "我爱自然语言处理"

# 分词
tokens = tokenizer.tokenize(text)
print("分词后的标记序列:", tokens)

# 字符级别的索引
char_index = 3

# 将标记序列转换为句子字符串,并查找字符在句子字符串中的位置
sentence = tokenizer.convert_tokens_to_string(tokens)
char_position = sentence.index(text[char_index])
print("字符级别索引 {} 对应的句子字符串位置为: {}".format(char_index, char_position))

# 将标记序列转换为ID序列
input_ids = tokenizer.convert_tokens_to_ids(tokens)
print("ID序列:", input_ids)
输出结果:
分词后的标记序列: ['我', '爱', '自', '然', '语', '言', '处', '理']
字符级别索引 3 对应的句子字符串位置为: 6
ID序列: [2769, 4263, 5632, 4197, 6427, 6241, 1905, 4415]
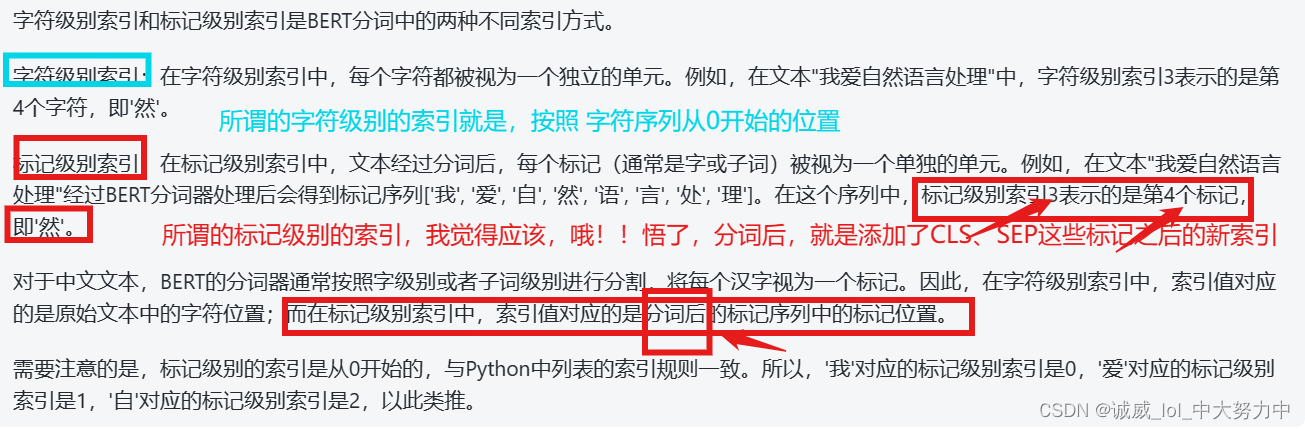
上面的红色字体说明得不准确,下面是准确的“分词”的描述
3.关于list中:max_len允许本来的长度不够,那就返回本来长度的数值:
tokenized_question.ids[:self.max_question_len]#测试:
test = [1,2,3,4]
print(test[:100])输出:[1, 2, 3, 4]
4.
二、代码研读:
version_1:助教版本的代码:
#下载data数据
# Download link 1
!gdown --id '1AVgZvy3VFeg0fX-6WQJMHPVrx3A-M1kb' --output hw7_data.zip

# Download Link 2 (if the above link fails)
# !gdown --id '1qwjbRjq481lHsnTrrF4OjKQnxzgoLEFR' --output hw7_data.zip

# Download Link 3 (if the above link fails)
# !gdown --id '1QXuWjNRZH6DscSd6QcRER0cnxmpZvijn' --output hw7_data.zip

!unzip -o hw7_data.zip

# For this HW, K80 < P4 < T4 < P100 <= T4(fp16) < V100
!nvidia-smi
#安装transformers
# You are allowed to change version of transformers or use other toolkits
!pip install transformers#引入库,fix seed
import json
import numpy as np
import random
import torch
from torch.utils.data import DataLoader, Dataset
from transformers import AdamW, BertForQuestionAnswering, BertTokenizerFast
from tqdm.auto import tqdm
device = "cuda" if torch.cuda.is_available() else "cpu"
# Fix random seed for reproducibility
def same_seeds(seed):
torch.manual_seed(seed)
if torch.cuda.is_available():
torch.cuda.manual_seed(seed)
torch.cuda.manual_seed_all(seed)
np.random.seed(seed)
random.seed(seed)
torch.backends.cudnn.benchmark = False
torch.backends.cudnn.deterministic = True
same_seeds(0)# Change "fp16_training" to True to support automatic mixed precision training (fp16)
#解读baseline的代码,暂时还不需要考虑这个fp16的部分
fp16_training = False
if fp16_training:
!pip install accelerate==0.2.0
from accelerate import Accelerator
accelerator = Accelerator(fp16=True)
device = accelerator.device
# Documentation for the toolkit: https://huggingface.co/docs/accelerate/#载入bert 的model 和 tokenizer
model = BertForQuestionAnswering.from_pretrained("bert-base-chinese").to(device) #从transformers库中的pretrained好的model获取到这个中文版本的翻译 model
tokenizer = BertTokenizerFast.from_pretrained("bert-base-chinese") #用于tokenize的对象
# You can safely ignore the warning message (it pops up because new prediction heads for QA are initialized randomly)#从文件中把 数据 读取到 数组中
#这个部分就是定义1个读取数据的函数,然后调用这个函数,从3个json文件中读取对应的paragraphs 和 questions数据
#(1)先查看各个文件中的数据的类型和分布情况:
#"questions": [
# {
# "id": 0,
# "paragraph_id": 660,
# "question_text": "福岡市的兩大中心地區指的是博多地區,還有哪一地區?",
# "answer_text": "天神地區",
# "answer_start": 343,
# "answer_end": 346
#里面的questions数据就是1个map映射到1个数组,每个元素是上述这些,注意,每个quetion的id都不一样,对应于token_type_ids
#paragraphs是1个map映射到1个数组,每个元素都是1串文字,每一串都是1篇文章,没有其他东西了,所以应该是用上面的paragraphs_id去找
def read_data(file):
with open(file, 'r', encoding="utf-8") as reader:
data = json.load(reader)
return data["questions"], data["paragraphs"]
train_questions, train_paragraphs = read_data("hw7_train.json")
dev_questions, dev_paragraphs = read_data("hw7_dev.json")
test_questions, test_paragraphs = read_data("hw7_test.json")#将原始的数据 进行 tokenizer
# Tokenize questions and paragraphs separately
# 「add_special_tokens」 is set to False since special tokens will be added when tokenized questions and paragraphs are combined in datset __getitem__
#这个部分估计就是用上述的bert_tokenizer来对这些数据中的"中文字"进行tokenize了
train_questions_tokenized = tokenizer([train_question["question_text"] for train_question in train_questions], add_special_tokens=False)
dev_questions_tokenized = tokenizer([dev_question["question_text"] for dev_question in dev_questions], add_special_tokens=False)
test_questions_tokenized = tokenizer([test_question["question_text"] for test_question in test_questions], add_special_tokens=False)
#这段代码的作用无非就是 利用tokenizer这个对象处理 对上面的3组数据进行挨个地处理罢了:
#上面也就是对train_question数组中的每一项中的"question_text"中的《中文文字内容进行tokenizer》之后,只是将这一段文字的tokens存储到train_questions_tokenized这个数组中
train_paragraphs_tokenized = tokenizer(train_paragraphs, add_special_tokens=False)
dev_paragraphs_tokenized = tokenizer(dev_paragraphs, add_special_tokens=False)
test_paragraphs_tokenized = tokenizer(test_paragraphs, add_special_tokens=False)
#这一段也是上面一样的作用,也是将文字转换为tokens之后保存到对应的数组中
# You can safely ignore the warning message as tokenized sequences will be futher processed in datset __getitem__ before passing to model#获取 train_loader,dev_loader,test_loader:
class QA_Dataset(Dataset):
def __init__(self, split, questions, tokenized_questions, tokenized_paragraphs): #参数split对象,QA分别的tokens数组,还有1个questions不知道是什么
self.split = split #split == 'train' of 'Dev'
self.questions = questions
self.tokenized_questions = tokenized_questions
self.tokenized_paragraphs = tokenized_paragraphs
self.max_question_len = 40
self.max_paragraph_len = 150
##### TODO: Change value of doc_stride #####
self.doc_stride = 150
# Input sequence length = [CLS] + question + [SEP] + paragraph + [SEP]
self.max_seq_len = 1 + self.max_question_len + 1 + self.max_paragraph_len + 1
def __len__(self):
return len(self.questions) #需要提问的数量,所以,这个questions到底是什么呢
def __getitem__(self, idx):
question = self.questions[idx]
tokenized_question = self.tokenized_questions[idx]
tokenized_paragraph = self.tokenized_paragraphs[question["paragraph_id"]] #从这里可以看出这个questions就是存储有结构体的questions原始内容
#上面已经完成了__getitem__中的基本内容,可以返回tokenized_que 和 对应的paragraph_tokens
#下面就是一些对这些数据进行预处理的内容,为了方便得到更加nice的训练数据
##### TODO: Preprocessing #####
# Hint: How to prevent model from learning something it should not learn
if self.split == "train":
# Convert answer's start/end positions in paragraph_text to start/end positions in tokenized_paragraph
#这里的tokenized_paragraph就是1个文段而已,这2行代码的作用就是
#首先,这个question['answer_start']得到的就是一个数值,这个数值代表再对应文章中的其实的位置
#通过这2行代码得到 分词之后的 索引位置
answer_start_token = tokenized_paragraph.char_to_token(question["answer_start"])
answer_end_token = tokenized_paragraph.char_to_token(question["answer_end"])
# A single window is obtained by slicing the portion of paragraph containing the answer
#这个部分就是助教说的可以修改的部分,因为这里的删减,导致了 一些信息的 丢失,如果修改这个preprocess部分,应该可以提高正确率
mid = (answer_start_token + answer_end_token) // 2
paragraph_start = max(0, min(mid - self.max_paragraph_len // 2, len(tokenized_paragraph) - self.max_paragraph_len)) #由于有最长的paragraph的长度限制,所以开始的位置取0,或者后面合理的一个位置
paragraph_end = paragraph_start + self.max_paragraph_len #end的位置就是start + max_len咯
# Slice question/paragraph and add special tokens (101: CLS, 102: SEP)<————其实这里将input_que和input_para相加就得到了左边这个窗口,也就是bert的输入窗口
input_ids_question = [101] + tokenized_question.ids[:self.max_question_len] + [102] #这里面就是ids--相当于的一个文字的替代数值,
input_ids_paragraph = tokenized_paragraph.ids[paragraph_start : paragraph_end] + [102]#paragraph_input_token数组的设置
# Convert answer's start/end positions in tokenized_paragraph to start/end positions in the window
answer_start_token += len(input_ids_question) - paragraph_start #如果我没有想错的话,就是将CLS+question + sep +paragraph+sep拼接的位置
answer_end_token += len(input_ids_question) - paragraph_start
# Pad sequence and obtain inputs to model
input_ids, token_type_ids, attention_mask = self.padding(input_ids_question, input_ids_paragraph) #返回input的ids 和 token_type_ids,mask下面查看一下这个padding函数的作用
return torch.tensor(input_ids), torch.tensor(token_type_ids), torch.tensor(attention_mask), answer_start_token, answer_end_token
# Validation/Testing
else:
input_ids_list, token_type_ids_list, attention_mask_list = [], [], []
# Paragraph is split into several windows, each with start positions separated by step "doc_stride"
#这里返回的是好几个list,也就是说,这些内容之间起点的位置相隔为doc_stride,也就是相当于 不同窗口之间的有doc_stride部分不相交
for i in range(0, len(tokenized_paragraph), self.doc_stride):
# Slice question/paragraph and add special tokens (101: CLS, 102: SEP)
input_ids_question = [101] + tokenized_question.ids[:self.max_question_len] + [102]
input_ids_paragraph = tokenized_paragraph.ids[i : i + self.max_paragraph_len] + [102]
# Pad sequence and obtain inputs to model
input_ids, token_type_ids, attention_mask = self.padding(input_ids_question, input_ids_paragraph)
input_ids_list.append(input_ids)
token_type_ids_list.append(token_type_ids)
attention_mask_list.append(attention_mask)
return torch.tensor(input_ids_list), torch.tensor(token_type_ids_list), torch.tensor(attention_mask_list)
#下面分析一下这个padding函数的作用,其实就是那个研二的学长在讲transformer时候提到的长度不够,需要补齐padding1的功能
#其实这里最好是联系那个 CSL + question_tokens + SEP + para_tokens + SEP的那个transformer的输入窗口进行理解
def padding(self, input_ids_question, input_ids_paragraph):
# Pad zeros if sequence length is shorter than max_seq_len
padding_len = self.max_seq_len - len(input_ids_question) - len(input_ids_paragraph)
# Indices of input sequence tokens in the vocabulary
input_ids = input_ids_question + input_ids_paragraph + [0] * padding_len
#token_type_ids就是用来 标注出其中的para的位置(不过它原来的作用是区分不同的 句子)
# Segment token indices to indicate first and second portions of the inputs. Indices are selected in [0, 1]
token_type_ids = [0] * len(input_ids_question) + [1] * len(input_ids_paragraph) + [0] * padding_len
#将padding部分的mask设置为0,非padding1的部分设置为1
# Mask to avoid performing attention on padding token indices. Mask values selected in [0, 1]
attention_mask = [1] * (len(input_ids_question) + len(input_ids_paragraph)) + [0] * padding_len
return input_ids, token_type_ids, attention_mask
train_set = QA_Dataset("train", train_questions, train_questions_tokenized, train_paragraphs_tokenized)
dev_set = QA_Dataset("dev", dev_questions, dev_questions_tokenized, dev_paragraphs_tokenized)
test_set = QA_Dataset("test", test_questions, test_questions_tokenized, test_paragraphs_tokenized)
train_batch_size = 32
# Note: Do NOT change batch size of dev_loader / test_loader !
# Although batch size=1, it is actually a batch consisting of several windows from the same QA pair
train_loader = DataLoader(train_set, batch_size=train_batch_size, shuffle=True, pin_memory=True)
dev_loader = DataLoader(dev_set, batch_size=1, shuffle=False, pin_memory=True)
test_loader = DataLoader(test_set, batch_size=1, shuffle=False, pin_memory=True)#定义1个eval处理的部分:
def evaluate(data, output): #这个data就是dev_loader中的每个元素,也就是那3组数据, out_put就是将data输入到bert的结果
##### TODO: Postprocessing #####
# There is a bug and room for improvement in postprocessing
# Hint: Open your prediction file to see what is wrong
answer = ''
max_prob = float('-inf')
num_of_windows = data[0].shape[1]
for k in range(num_of_windows):
# Obtain answer by choosing the most probable start position / end position
start_prob, start_index = torch.max(output.start_logits[k], dim=0) #获得最大可能的起始index 和 对应的probablility
end_prob, end_index = torch.max(output.end_logits[k], dim=0) #获取最大可能的结尾index 和 对应的probablility
# Probability of answer is calculated as sum of start_prob and end_prob
prob = start_prob + end_prob #相加作为总prob
# Replace answer if calculated probability is larger than previous windows
if prob > max_prob:
max_prob = prob
# Convert tokens to chars (e.g. [1920, 7032] --> "大 金")
answer = tokenizer.decode(data[0][0][k][start_index : end_index + 1])
# Remove spaces in answer (e.g. "大 金" --> "大金")
return answer.replace(' ','')#train里面的代码
num_epoch = 1
validation = True
logging_step = 100 #每隔logging_step进行1次输出
learning_rate = 1e-4
optimizer = AdamW(model.parameters(), lr=learning_rate)
if fp16_training:
model, optimizer, train_loader = accelerator.prepare(model, optimizer, train_loader)
model.train()
print("Start Training ...")
for epoch in range(num_epoch):
step = 1
train_loss = train_acc = 0
for data in tqdm(train_loader):
# Load all data into GPU
data = [i.to(device) for i in data]
# Model inputs: input_ids, token_type_ids, attention_mask, start_positions, end_positions (Note: only "input_ids" is mandatory)
# Model outputs: start_logits, end_logits, loss (return when start_positions/end_positions are provided)
#这个bert模型的输出都已经是封装好的了,所以loss也在里面了
output = model(input_ids=data[0], token_type_ids=data[1], attention_mask=data[2], start_positions=data[3], end_positions=data[4])
# Choose the most probable start position / end position
start_index = torch.argmax(output.start_logits, dim=1)
end_index = torch.argmax(output.end_logits, dim=1)
# Prediction is correct only if both start_index and end_index are correct
train_acc += ((start_index == data[3]) & (end_index == data[4])).float().mean()
train_loss += output.loss
if fp16_training:
accelerator.backward(output.loss)
else:
output.loss.backward()
optimizer.step()
optimizer.zero_grad()
step += 1
##### TODO: Apply linear learning rate decay #####
# Print training loss and accuracy over past logging step
if step % logging_step == 0:
print(f"Epoch {epoch + 1} | Step {step} | loss = {train_loss.item() / logging_step:.3f}, acc = {train_acc / logging_step:.3f}")
train_loss = train_acc = 0
if validation:
print("Evaluating Dev Set ...")
model.eval()
with torch.no_grad():
dev_acc = 0
for i, data in enumerate(tqdm(dev_loader)):
output = model(input_ids=data[0].squeeze(dim=0).to(device), token_type_ids=data[1].squeeze(dim=0).to(device),
attention_mask=data[2].squeeze(dim=0).to(device))
# prediction is correct only if answer text exactly matches
dev_acc += evaluate(data, output) == dev_questions[i]["answer_text"] #如果返回的结果就是ans,那么dev_acc+1
print(f"Validation | Epoch {epoch + 1} | acc = {dev_acc / len(dev_loader):.3f}")
model.train()
# Save a model and its configuration file to the directory 「saved_model」
# i.e. there are two files under the direcory 「saved_model」: 「pytorch_model.bin」 and 「config.json」
# Saved model can be re-loaded using 「model = BertForQuestionAnswering.from_pretrained("saved_model")」
print("Saving Model ...")
model_save_dir = "saved_model"
model.save_pretrained(model_save_dir)#test部分的内容:
print("Evaluating Test Set ...")
result = []
model.eval()
with torch.no_grad():
for data in tqdm(test_loader):
output = model(input_ids=data[0].squeeze(dim=0).to(device), token_type_ids=data[1].squeeze(dim=0).to(device),
attention_mask=data[2].squeeze(dim=0).to(device))
result.append(evaluate(data, output))
result_file = "result.csv"
with open(result_file, 'w') as f:
f.write("ID,Answer\n")
for i, test_question in enumerate(test_questions):
# Replace commas in answers with empty strings (since csv is separated by comma)
# Answers in kaggle are processed in the same way
f.write(f"{test_question['id']},{result[i].replace(',','')}\n")
print(f"Completed! Result is in {result_file}")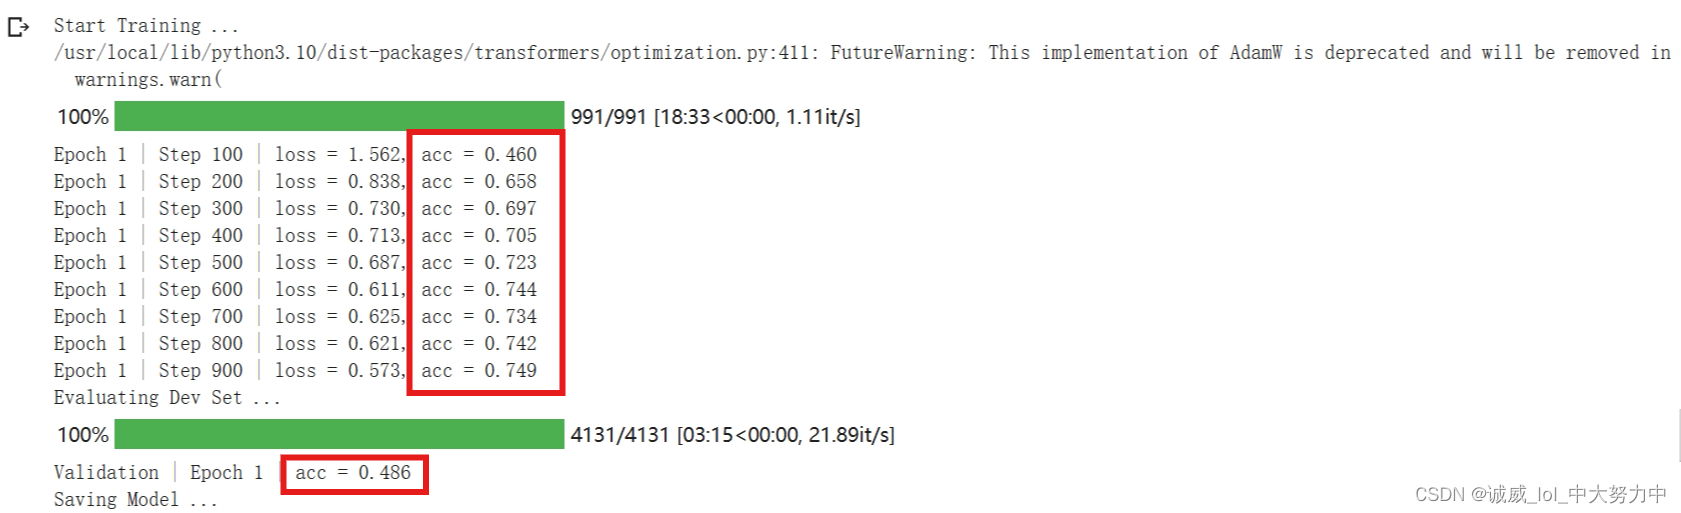
version2:改进版本
1.改进那个learning rate decay部分:
torch.optim — PyTorch 2.0 documentation
optimizer = optim.SGD(model.parameters(), lr=0.01, momentum=0.9)
scheduler = ExponentialLR(optimizer, gamma=0.9)

for epoch in range(20):
    for input, target in dataset:
        optimizer.zero_grad()
        output = model(input)
        loss = loss_fn(output, target)
        loss.backward()
        optimizer.step()
    scheduler.step()  #每隔epoch调用1次(如果我只有1个epoch呢?)
另一种2次decay:
optimizer = optim.SGD(model.parameters(), lr=0.01, momentum=0.9)
scheduler1 = ExponentialLR(optimizer, gamma=0.9)
scheduler2 = MultiStepLR(optimizer, milestones=[30,80], gamma=0.1)

for epoch in range(20):
    for input, target in dataset:
        optimizer.zero_grad()
        output = model(input)
        loss = loss_fn(output, target)
        loss.backward()
        optimizer.step()
    scheduler1.step()
    scheduler2.step()
2.减少doc_step的数值:
第一次改为75 + decay_gamma=0.99->效果如下:(kaggle)
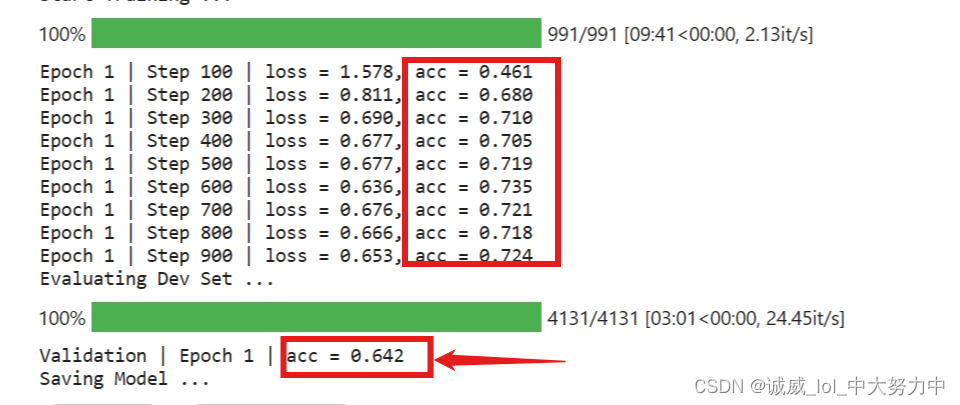
colab:
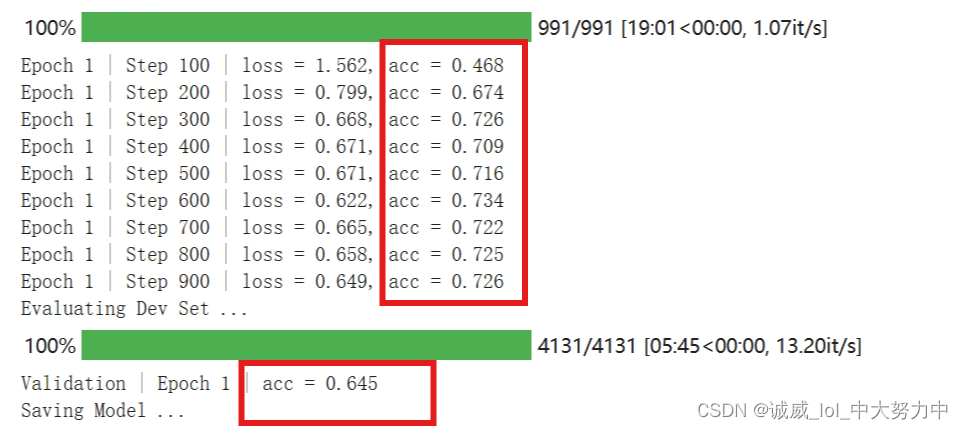
效果非常不错!!!嘻嘻!!在Dev上表现有显著提升
备注:在kaggle上下载数据改成如下:
!pip install gdown
import gdown
url = 'https://drive.google.com/uc?id=1AVgZvy3VFeg0fX-6WQJMHPVrx3A-M1kb'
output = 'hw7_data.zip'
gdown.download(url, output, quiet=False)
version3:使用hugging_face上的pretrained_model
第一点,修改dataloader中input_para的start和end的位置,使得ans_start 和 ans_end并不总是处于这个para的中间位置,(总是处于中间的话,会让model产生误解,以为ans总是处于窗口中间),不过,这里怎么进行修改呢?
答:主要是修改para_start和ans_start的距离,这样,就可以让ans_start处于窗口的不同位置
(......目前没有进行修改,我想用概率的方法应该比较容易实现,以后再说吧 ...)
第二点,改用其他model:
(1)
hfl/chinese-pert-base-mrc · Hugging Face
# Load model directly
from transformers import AutoTokenizer, AutoModelForQuestionAnswering

tokenizer = AutoTokenizer.from_pretrained("hfl/chinese-pert-base-mrc")
model = AutoModelForQuestionAnswering.from_pretrained("hfl/chinese-pert-base-mrc").to(device)

#很多时候,报错就是因为 忘记了to(device)
我里个去,Hugging_face上面的pretrained model就是好用!!!!无敌了老哥
直接吊打一切
(2)
这个model也还行,不过比起上面那个,还是拉了一些
(我当时忘了他说要用berttokenizerFast了)
ckiplab/bert-base-chinese-qa · Hugging Face
# Load model directly
from transformers import AutoTokenizer, AutoModelForQuestionAnswering

tokenizer = AutoTokenizer.from_pretrained("ckiplab/bert-base-chinese-qa")
model = AutoModelForQuestionAnswering.from_pretrained("ckiplab/bert-base-chinese-qa").to(device)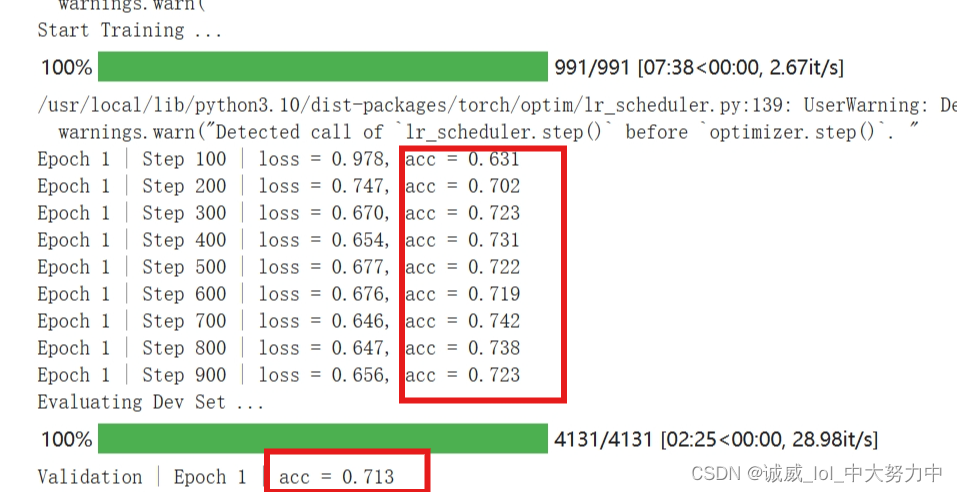


![nginx 报错[emerg]: unknown directive “锘? in E:\nginx-1.18.0/conf/nginx.conf:3](https://img-blog.csdnimg.cn/b5c6cbba5b6b41729990c58aa77c56d5.png)