Swing提供了一些具有特殊功能的容器 , 这些特殊容器可以用于创建一些更复杂的用户界面。
使用JSplitPane
JSplitPane 用于创建一个分割面板,它可以将 一个组件(通常是一个容器)分割成两个部分,并提供一个分割条 , 用户可以拖动该分割条来调整两个部分的大小。
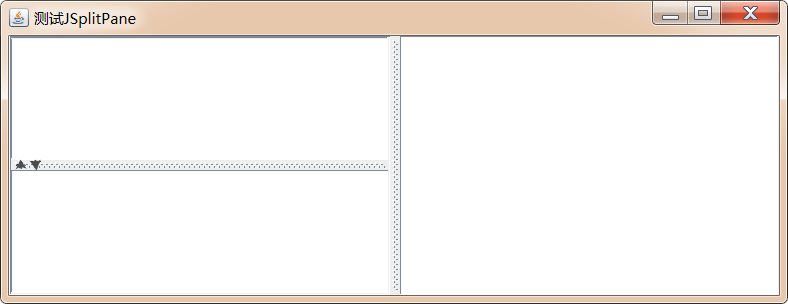
JSplitPane使用步骤:
- 创建JSplitPane对象
通过如下构造方法可以创建JSplitPane对象
JSplitPane(int newOrientation, Component newLeftComponent,Component newRightComponent)
newOrientation:指定JSplitPane容器的分割方向:
如果值为JSplitPane.VERTICAL_SPLIT,为纵向分割;
如果值为JSplitPane.HORIZONTAL_SPLIT,为横向分割;

newLeftComponent:左侧或者上侧的组件;
newRightComponent:右侧或者下侧的组件;- 设置是否开启连续布局的支持(可选)
setContinuousLayout(boolean newContinuousLayout):
默认是关闭的,如果设置为true,则打开连续布局的支持,但由于连续布局支持需要不断的重绘组件,所以效率会低一些- 设置是否支持"一触即展"的支持(可选)
setOneTouchExpandable(boolean newValue):
默认是关闭的,如果设置为true,则打开"一触即展"的支持- 其他设置
setDividerLocation(double proportionalLocation):设置分隔条的位置为JSplitPane的某个百分比
setDividerLocation(int location):通过像素值设置分隔条的位置
setDividerSize(int newSize):通过像素值设置分隔条的大小
setLeftComponent(Component comp)/setTopComponent(Component comp)/setRightComponent(Component comp)/setBottomComponent(Component comp):设置指定位置的组件
案例:
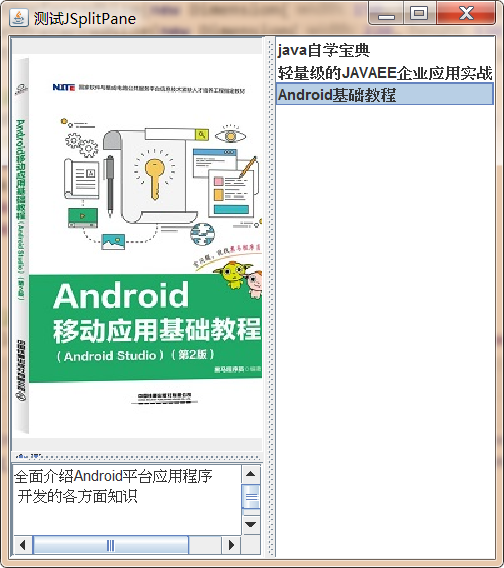
使用JSplitPane实现下图效果:
点击右侧的图书名称,在左上方显示该图书的图片,左下方显示该图书的描述
package swing.day02.book;

import javax.swing.*;

public class Book {

    private String name;

    private Icon icon;

    private String desc;

    public Book(String name, Icon icon,String desc) {
        this.name = name;
        this.icon = icon;
        this.desc = desc;
    }

    public String getName() {
        return name;
    }

    public void setName(String name) {
        this.name = name;
    }

    public Icon getIcon() {
        return icon;
    }

    public void setIcon(Icon icon) {
        this.icon = icon;
    }

    public String getDesc() {
        return desc;
    }

    public void setDesc(String desc) {
        this.desc = desc;
    }

    @Override
    public String toString() {
        return name;
    }
}
package swing.day02.book;
import awt.day01.Utils;
import javax.swing.*;
import java.awt.*;
import java.util.Objects;
public class SplitPaneTest {
Book[] books = {new Book("java自学宝典", new ImageIcon("src/swing/img/container/java.png"), "国内关于 Java 编程最全面的图书 \n 看得懂 , 学得会"),
new Book("轻量级的JAVAEE企业应用实战", new ImageIcon("src/swing/img/container/ee.png"), "SSM整合开发的经典图书,值的拥有"),
new Book("Android基础教程", new ImageIcon("src/swing/img/container/android.png"), "全面介绍Android平台应用程序\n 开发的各方面知识")
};
JFrame frame = new JFrame("JSplitPane");
JSplitPane yS;
JSplitPane xS;
//列表展示图书
JList<Book> bookList = new JList<>(books);
JLabel bookCover = new JLabel();
JTextArea bookDesc = new JTextArea();
public void init(){
//为三个组件设置最佳大小
bookList.setPreferredSize(new Dimension(150,400));
bookCover.setPreferredSize(new Dimension(220,330));
bookDesc.setPreferredSize(new Dimension(220,70));
yS = new JSplitPane(JSplitPane.VERTICAL_SPLIT, bookCover, bookDesc);
xS = new JSplitPane(JSplitPane.HORIZONTAL_SPLIT, yS, bookList);
frame.add(xS);
yS.setOneTouchExpandable(true);
xS.setOneTouchExpandable(true);
//设置分隔条的大小
yS.setDividerSize(20);
//设置分割面板根据组件的大小调整最佳布局
yS.resetToPreferredSizes();
//设置支持连续布局
xS.setContinuousLayout(true);
bookList.addListSelectionListener(e -> {
Book selectedValue = bookList.getSelectedValue();
if (Objects.nonNull(selectedValue)) {
bookCover.setIcon(selectedValue.getIcon());
bookDesc.setText(selectedValue.getDesc());
}
});
Utils.setJFrame(frame);
}
public static void main(String[] args) {
new SplitPaneTest().init();
}
}
使用JTabledPane
JTabbedPane可以很方便地在窗口上放置多个标签页,每个标签页相当于获得了一个与外部容器具有相同大小的组件摆放区域。通过这种方式, 就可以在一个容器里放置更多的组件 , 例如右击桌面上的" 我的电脑 "图标,在弹出的快捷菜单里单击"属性 " 菜单工页 , 就可以看 到 一个"系统属性 " 对话框 ,这个对话框里包含了 若干个标签页。
如果需要使用JTabbedPane在窗口上创建标签页 ,则可以按如下步骤进行:
- 创建JTabbedPane对象
JTabbedPane(int tabPlacement, int tabLayoutPolicy):
tabPlacement:
指定标签标题的放置位置,可以选择 SwingConstants中的四个常量:TOP、LEFT、BOTTOM、RIGHT
tabLaoutPolicy:
指定当窗口不能容纳标签页标题时的布局策略,可以选择JTabbedPane.WRAP_TAB_LAYOUT和JTabbedPane.SCROLL_TAB_LAYOUT- 通过JTabbedPane对象堆标签进行增删改查
addTab(String title, Icon icon, Component component, String tip):添加标签
title:标签的名称
icon:标签的图标
component:标签对应的组件
tip:光标放到标签上的提示

insertTab(String title, Icon icon, Component component, String tip, int index):插入标签页
title:标签的名称
icon:标签的图标
component:标签对应的组件
tip:光标放到标签上的提示
index:在哪个索引处插入标签页
setComponentAt(int index, Component component):修改标签页对应的组件
index:修改哪个索引处的标签
component:标签对应的组件
removeTabAt(int index):
index:删除哪个索引处的标签- 设置当前显示的标签页
setSelectedIndex(int index):设置哪个索引处的标签被选中
- 设置JTabbedPane的其他属性
setDisabledIconAt(int index, Icon disabledIcon): 将指定位置的禁用图标设置为 icon,该图标也可以是null表示不使用禁用图标。
setEnabledAt(int index, boolean enabled): 设置指定位置的标签页是否启用。
setTitleAt(int index, String title): 设置指定位置标签页的标题为 title,该title可以是null,这表明设置该标签页的标题为空。
setToolTipTextAt(int index, String toolTipText): 设置指定位置标签页的提示文本 。- 为JTabbedPane设置监听器
addChangeListener(ChangeListener l)案例:
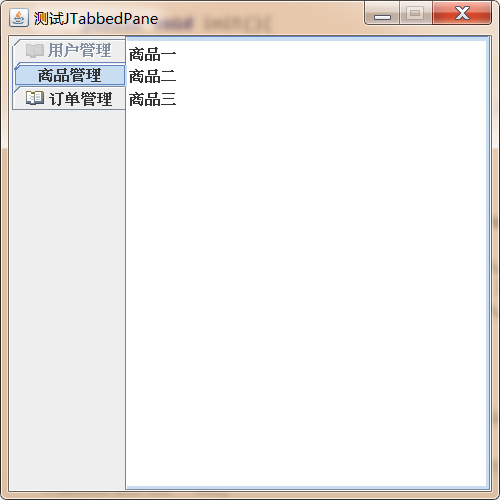
请使用JTabbedPane完成下图功能:
package swing.day02;

import awt.day01.Utils;

import javax.swing.*;
import javax.swing.event.ChangeEvent;
import javax.swing.event.ChangeListener;

public class JTabbedPaneTest {

    JFrame frame = new JFrame("测试JTabbedPane");
    JTabbedPane tabbedPane = new JTabbedPane(SwingConstants.LEFT,JTabbedPane.WRAP_TAB_LAYOUT);
    ImageIcon imageIcon = new ImageIcon("src/swing/img/container/open.gif");
    public void init(){

        //添加标签
        tabbedPane.addTab("用户管理",imageIcon, new JList<>(new String[]{"用户一", "用户二", "用户三"}));
        tabbedPane.addTab("商品管理", new JList<>(new String[]{"商品一", "商品二", "商品三"}));
        tabbedPane.addTab("订单管理",imageIcon, new JList<>(new String[]{"订单一", "订单二", "订单三"}));

        tabbedPane.setEnabledAt(0,false);
        tabbedPane.setSelectedIndex(1);
        tabbedPane.addChangeListener(new ChangeListener() {
            @Override
            public void stateChanged(ChangeEvent e) {
                int selectedIndex = tabbedPane.getSelectedIndex();
                JOptionPane.showMessageDialog(frame,"选中了第"+(selectedIndex+1)+"个标签");
            }
        });
        frame.setBounds(400,400,500,700);
        frame.setResizable(false);
        frame.add(tabbedPane);

        frame.setDefaultCloseOperation(JFrame.EXIT_ON_CLOSE);
        frame.setVisible(true);
    }

    public static void main(String[] args) {
        new JTabbedPaneTest().init();
    }
}


