🎬 岸边的风:个人主页
🔥 个人专栏 :《 VUE 》 《 javaScript 》
⛺️ 生活的理想,就是为了理想的生活 !

若使用相同的 Hello World! 应用 (通过 React 生成并通过 Visual Studio Code 更新的应用),让我们尝试添加 API 调用以显示某些数据。
-
首先,让我们删除 app.js 文件中的所有内容,并将其变成一个类组件。 我们首先从 React 导入 组件 ,然后使用该组件创建类组件。 (有两种类型的组件:类和函数)。 我们还将在
return()语句中添加一些自定义 JSX 代码。 可以重载页面以查看结果。app.js 文件现在应如下所示:
JavaScript复制
import React, { Component } from 'react';

class App extends Component {
  render() {
    return (
      <p>Hello world! This is my first React app.</p>
    );
  }
}
export default App;
-
接下来,设置一个本地状态,在该状态下,我们可以保存 API 中的数据。 状态对象是我们可以存储将在视图中使用的数据的位置。 视图呈现在
render()内部的页。要添加本地状态,我们首先需要添加构造函数。 实现 React.Component 子类的构造函数时,应在任何其他语句之前调用
super(props)。 否则this.props将不会在构造函数中定义,这会导致出现 bug。 Props 将数据向下传递到组件。我们还需初始化本地状态,并向
this.state分配一个对象。 使用 posts 作为一个空数组,我们可以使用 API 中的 post 数据对其进行填充。app.js 文件现在应如下所示:
JavaScript复制
import React, { Component } from 'react'; class App extends Component { constructor(props) { super(props); this.state = { posts: [] } } render() { return ( <p>Hello world!</p> ); } } export default App; -
要调用一个包含数据的 API 以便在 React 应用中使用,我们将使用 .fetch JavaScript 方法。 我们将调用的 API 是 JSONPlaceholder,它是用于测试和原型制作的免费 API,并提供 JSON 格式的虚假占位符数据。 componentDidMount 方法用于将
fetch装载到 React 组件。 API 中数据保存在我们的状态中(使用 setState 请求)。JavaScript复制
import React, { Component } from 'react'; class App extends Component { constructor(props) { super(props); this.state = { posts: [] } } componentDidMount() { const url = "https://jsonplaceholder.typicode.com/albums/1/photos"; fetch(url) .then(response => response.json()) .then(json => this.setState({ posts: json })) } render() { return ( <p>Hello world!</p> ); } } export default App; -
让我们查看一下 API 在我们的
posts状态中保存了哪些数据。 以下是虚假 JSON API 文件的一些内容。 我们可以使用以下类别查看列出的数据的格式:albumId、id、title、url 和 thumbnailUrl。JSON复制
[ { "albumId": 1, "id": 1, "title": "accusamus beatae ad facilis cum similique qui sunt", "url": "https://via.placeholder.com/600/92c952", "thumbnailUrl": "https://via.placeholder.com/150/92c952" }, { "albumId": 1, "id": 2, "title": "reprehenderit est deserunt velit ipsam", "url": "https://via.placeholder.com/600/771796", "thumbnailUrl": "https://via.placeholder.com/150/771796" } ] -
我们需要添加一些页面样式以显示 API 数据。 只使用 Bootstrap 来处理样式。 我们可以将 Bootstrap CDN 样式表参考复制和粘贴到 React 应用的
./public/index.html文件中。HTML复制
<!-- Bootstrap --> <link href="https://cdn.jsdelivr.net/npm/bootstrap@5.0.0-beta3/dist/css/bootstrap.min.css" rel="stylesheet" integrity="sha384-eOJMYsd53ii+scO/bJGFsiCZc+5NDVN2yr8+0RDqr0Ql0h+rP48ckxlpbzKgwra6" crossorigin="anonymous"> <title>React App</title> </head> <body> -
若要显示 API 数据,同时引用 Bootstrap 类进行样式设置,我们现在需要在呈现的
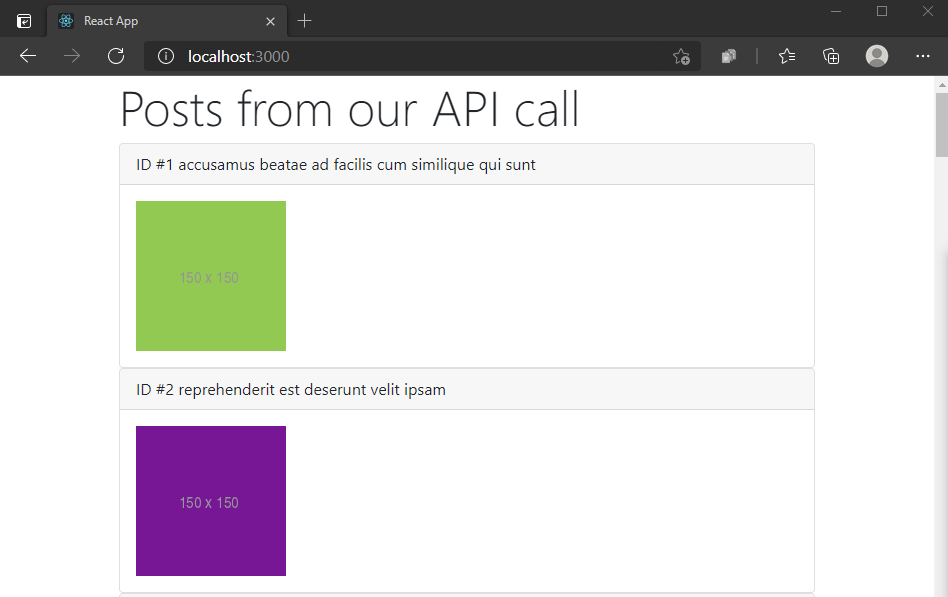
return()语句中添加一些 JSX 代码。 我们将添加一个容器和一个标头(Posts from our API call),并为 API 中每个数据块添加一张卡。 我们将使用 map() 方法显示存储为键的posts对象中的数据。 每张卡都将显示一个标头,其中包含 ID # ,随后是 JSON 数据中的键值 post.id 和 post.title。 然后是正文,其显示基于 thumbnailURL 键值的图像。JavaScript复制
render() { const { posts } = this.state; return ( <div className="container"> <div class="jumbotron"> <h1 class="display-4">Posts from our API call</h1> </div> {posts.map((post) => ( <div className="card" key={post.id}> <div className="card-header"> ID #{post.id} {post.title} </div> <div className="card-body"> <img src={post.thumbnailUrl}></img> </div> </div> ))} </div> ); } -
通过
npm start再次运行 React 应用,然后在localhost:3000上的本地 Web 浏览器中查看显示的 API 数据。