目录
- 1.Maven依赖
- 2. @DS注解
- 3.普通Hihari连接池
- 3.1 yml配置
- 4.Druid连接池
- 4.1 Druid依赖
- 4.2 yml配置
- 4.3 排除原生的Druid配置
- 5. UserController
- 6. UserServiceImpl
- 7.测试
- 7.1 新增数据
- 7.2 查询数据
- 7.3 测试结果
- 8.源码地址:
dynamic-datasource-spring-boot-starter是一个基于 springboot 的快速集成多数据源的启动器。
- 其支持
Jdk 1.7+、SpringBoot 1.5.x和2.x.x。
1.Maven依赖
<!-- Dynamic datasource -->
<dependency>
    <groupId>com.baomidou</groupId>
    <artifactId>dynamic-datasource-spring-boot-starter</artifactId>
    <version>2.4.2</version>
</dependency>
2. @DS注解
@DS 可以注解在方法上和类上,同时存在方法注解优先于类上注解。建议注解在serviceImpl类或mapper接口方法上。
注意:从2.0.0 不再支持@DS空注解 ,您 必须 指明你所需要的数据库 组名 或者 具体某个数据库名称 。
| 注解 | 结果 |
|---|---|
| 没有@DS注解 | 默认数据源 |
| @DS(“dsName”) | 数据源名称 |
3.普通Hihari连接池
SpringBoot 2.x默认是使用HikariCP的, 所以觉得HikariCP可以的不需要换Druid。
3.1 yml配置
server:
  port: 8081

spring:
  datasource:
    dynamic:
      primary: auth
      datasource:
        auth:
          url: jdbc:mysql://localhost:3306/auth?useUnicode=true&characterEncoding=utf-8&useSSL=true&serverTimezone=UTC
          username: root
          password: root
          driver-class-name: com.mysql.cj.jdbc.Driver
        mydb1:
          url: jdbc:mysql://localhost:3306/mydb1?useUnicode=true&characterEncoding=utf-8&useSSL=true&serverTimezone=UTC
          username: root
          password: root
          driver-class-name: com.mysql.cj.jdbc.Driver

mybatis:
  mapper-locations: "classpath:mapper/*.xml"

#showSql
logging:
  level:
    com:
      demo:
        auth:
          mapper : debug
4.Druid连接池
4.1 Druid依赖
<!-- Druid -->
<dependency>
    <groupId>com.alibaba</groupId>
    <artifactId>druid-spring-boot-starter</artifactId>
    <version>1.1.22</version>
</dependency>
4.2 yml配置
server:
  port: 8081

spring:
  datasource:
    dynamic:
      primary: auth
      datasource:
        auth:
          # JDBC 配置(驱动类自动从url的mysql识别,数据源类型自动识别)
          type: com.alibaba.druid.pool.DruidDataSource
          url: jdbc:mysql://localhost:3306/auth?useUnicode=true&characterEncoding=utf-8&useSSL=true&serverTimezone=UTC
          username: root
          password: root
          driver-class-name: com.mysql.cj.jdbc.Driver
          druid:
            #连接池配置(通常来说,只需要修改initialSize、minIdle、maxActive
            initial-size: 1
            max-active: 20
            min-idle: 1
            # 配置获取连接等待超时的时间
            max-wait: 60000
            #打开PSCache,并且指定每个连接上PSCache的大小
            pool-prepared-statements: true
            max-pool-prepared-statement-per-connection-size: 20
            validation-query: SELECT 'x'
            test-on-borrow: false
            test-on-return: false
            test-while-idle: true
            #配置间隔多久才进行一次检测,检测需要关闭的空闲连接,单位是毫秒
            time-between-eviction-runs-millis: 60000
            #配置一个连接在池中最小生存的时间,单位是毫秒
            min-evictable-idle-time-millis: 300000
            filters: stat,wall
            # WebStatFilter配置,说明请参考Druid Wiki,配置_配置WebStatFilter
            #是否启用StatFilter默认值true
            web-stat-filter.enabled: true
            web-stat-filter.url-pattern: /*
            web-stat-filter.exclusions: "*.js , *.gif ,*.jpg ,*.png ,*.css ,*.ico , /druid/*"
            web-stat-filter.session-stat-max-count: 1000
            web-stat-filter.profile-enable: true
            # StatViewServlet配置
            #展示Druid的统计信息,StatViewServlet的用途包括:1.提供监控信息展示的html页面2.提供监控信息的JSON API
            #是否启用StatViewServlet默认值true
            stat-view-servlet.enabled: true
            #根据配置中的url-pattern来访问内置监控页面,如果是上面的配置,内置监控页面的首页是/druid/index.html例如:
            #http://127.0.0.1:9000/druid/index.html
            #http://127.0.0.1:8080/mini-web/druid/index.html
            stat-view-servlet.url-pattern: /druid/*
            #允许清空统计数据
            stat-view-servlet.reset-enable: true
        mydb1:
          # JDBC 配置(驱动类自动从url的mysql识别,数据源类型自动识别)
          type: com.alibaba.druid.pool.DruidDataSource
          url: jdbc:mysql://localhost:3306/mydb1?useUnicode=true&characterEncoding=utf-8&useSSL=true&serverTimezone=UTC
          username: root
          password: root
          driver-class-name: com.mysql.cj.jdbc.Driver
          druid:
            #连接池配置(通常来说,只需要修改initialSize、minIdle、maxActive
            initial-size: 1
            max-active: 20
            min-idle: 1
            # 配置获取连接等待超时的时间
            max-wait: 60000
            #打开PSCache,并且指定每个连接上PSCache的大小
            pool-prepared-statements: true
            max-pool-prepared-statement-per-connection-size: 20
            validation-query: SELECT 'x'
            test-on-borrow: false
            test-on-return: false
            test-while-idle: true
            #配置间隔多久才进行一次检测,检测需要关闭的空闲连接,单位是毫秒
            time-between-eviction-runs-millis: 60000
            #配置一个连接在池中最小生存的时间,单位是毫秒
            min-evictable-idle-time-millis: 300000
            filters: stat,wall
            # WebStatFilter配置,说明请参考Druid Wiki,配置_配置WebStatFilter
            #是否启用StatFilter默认值true
            web-stat-filter.enabled: true
            web-stat-filter.url-pattern: /*
            web-stat-filter.exclusions: "*.js , *.gif ,*.jpg ,*.png ,*.css ,*.ico , /druid/*"
            web-stat-filter.session-stat-max-count: 1000
            web-stat-filter.profile-enable: true
            # StatViewServlet配置
            #展示Druid的统计信息,StatViewServlet的用途包括:1.提供监控信息展示的html页面2.提供监控信息的JSON API
            #是否启用StatViewServlet默认值true
            stat-view-servlet.enabled: true
            #根据配置中的url-pattern来访问内置监控页面,如果是上面的配置,内置监控页面的首页是/druid/index.html例如:
            #http://127.0.0.1:9000/druid/index.html
            #http://127.0.0.1:8080/mini-web/druid/index.html
            stat-view-servlet.url-pattern: /druid/*
            #允许清空统计数据
            stat-view-servlet.reset-enable: true

mybatis:
  mapper-locations: "classpath:mapper/*.xml"

#showSql
logging:
  level:
    com:
      demo:
        auth:
          mapper : debug
4.3 排除原生的Druid配置
import com.alibaba.druid.spring.boot.autoconfigure.DruidDataSourceAutoConfigure;
import org.springframework.boot.SpringApplication;
import org.springframework.boot.autoconfigure.SpringBootApplication;

@SpringBootApplication(exclude = DruidDataSourceAutoConfigure.class)
public class SpringbootDemoApplication {

    public static void main(String[] args) {
        SpringApplication.run(SpringbootDemoApplication.class, args);
    }

}
5. UserController
import com.demo.auth.entity.User;
import com.demo.auth.service.UserService;
import org.springframework.beans.factory.annotation.Autowired;
import org.springframework.web.bind.annotation.GetMapping;
import org.springframework.web.bind.annotation.RequestMapping;
import org.springframework.web.bind.annotation.RestController;

import java.util.List;

/**
 * 用户表(User)表控制层
 *
 * @author ACGkaka
 * @since 2021-06-18 16:49:55
 */
@RestController
@RequestMapping("/user")
public class UserController {

    @Autowired
    private UserService userService;

    /**
     * 插入单条数据
     *
     * @return 单条数据
     */
    @GetMapping("/insertOne")
    public User insertOne() {
        User user = new User();
        user.setUsername("ACGkaka1");
        user.setPassword("123456");
        user.setEmail("123@123.com");
        user.setPhone("15588888888");
        user.setDelFlag("0");
        return userService.insert(user);
    }

    /**
     * 插入单条数据
     *
     * @return 单条数据
     */
    @GetMapping("/insertOne2")
    public User insertOne2() {
        User user = new User();
        user.setUsername("ACGkaka2");
        user.setPassword("123456");
        user.setEmail("123@123.com");
        user.setPhone("15588888888");
        user.setDelFlag("0");
        return userService.insert2(user);
    }

    /**
     * 查询全部数据
     *
     * @return 全部数据
     */
    @GetMapping("/findAll")
    public List<User> findAll() {
        return userService.findAll();
    }

    /**
     * 查询全部数据
     *
     * @return 全部数据
     */
    @GetMapping("/findAll2")
    public List<User> findAll2() {
        return userService.findAll2();
    }

}
6. UserServiceImpl
import com.baomidou.dynamic.datasource.annotation.DS;
import com.demo.auth.entity.User;
import com.demo.auth.mapper.UserMapper;
import com.demo.auth.service.UserService;
import org.springframework.stereotype.Service;

import javax.annotation.Resource;
import java.util.List;

/**
 * 用户表(User)表服务实现类
 *
 * @author ACGkaka
 * @since 2021-06-18 16:49:55
 */
@Service
public class UserServiceImpl implements UserService {

    @Resource
    private UserMapper userMapper;

    @Override
    public List<User> findAll() {
        // 查询多条数据
        return this.userMapper.queryAllByLimit(1, -1);
    }

    @DS("mydb1")
    @Override
    public List<User> findAll2() {
        // 查询多条数据
        return this.userMapper.queryAllByLimit(1, -1);
    }

    @Override
    public User insert(User user) {
        // 新增数据
        this.userMapper.insert(user);
        return user;
    }

    @DS("mydb1")
    @Override
    public User insert2(User user) {
        // 新增数据
        this.userMapper.insert(user);
        return user;
    }
}
7.测试
7.1 新增数据
在auth数据库新增一条数据:http://localhost:8081/user/insertOne
在mydb1数据库新增一条数据:http://localhost:8081/user/insertOne2
7.2 查询数据
在auth数据库查询数据:http://localhost:8081/user/findAll
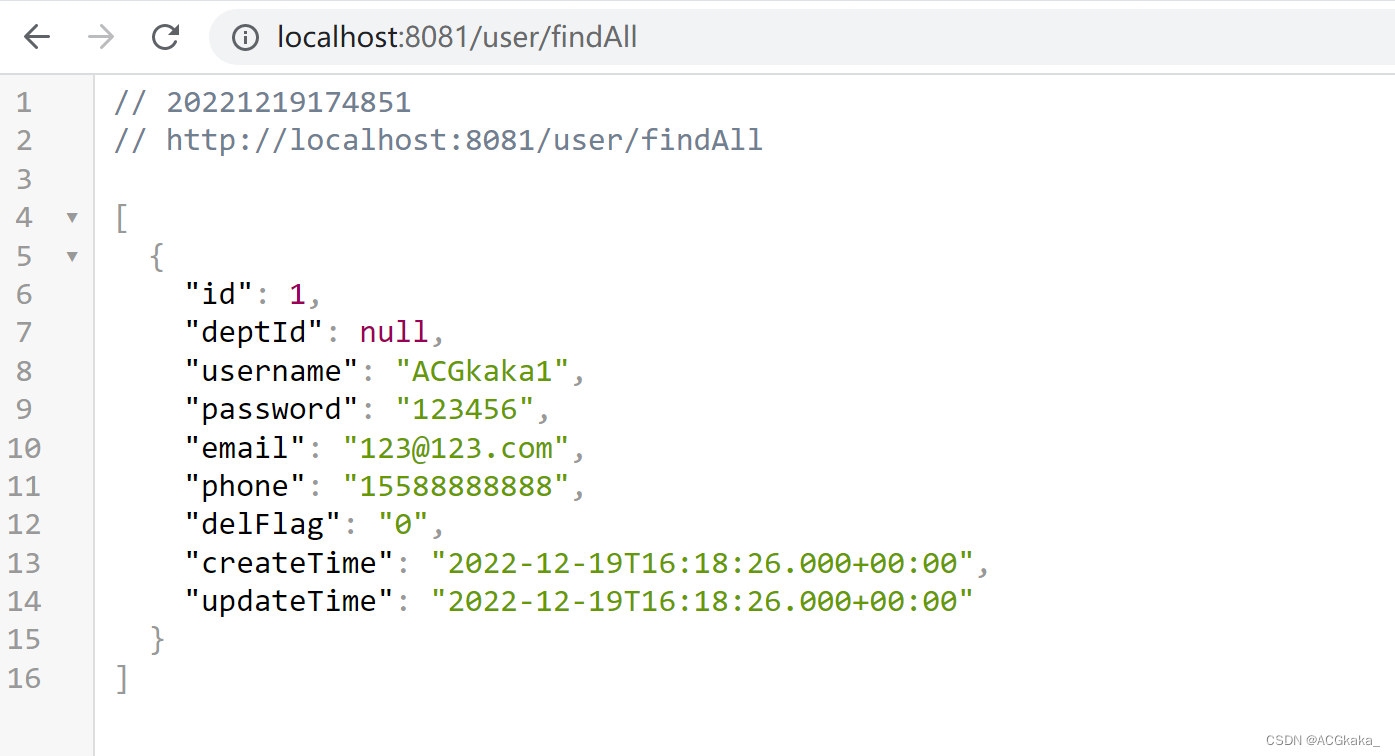
在mydb1数据库查询数据:http://localhost:8081/user/findAll2

7.3 测试结果
- /user/findAll 接口查询的是auth数据库中存储的“ACGkaka1”;
- /user/findAll2 接口查询的是mydb数据库中存储的“ACGkaka2”;
- 多数据源配置成功。
8.源码地址:
https://gitee.com/acgkaka/SpringBootExamples/tree/master/springboot-dynamic-datasource
整理完毕,完结撒花~
参考地址:
1.springBoot(六) 调用多数据源 dynamic-datasource,https://blog.csdn.net/Tang_5253/article/details/101095855
2.dynamic-datasource SpringBoot 多数据源快速启动器,https://www.oschina.net/p/dynamic-datasource-spring-boot-starter?hmsr=aladdin1e1



![[附源码]Nodejs计算机毕业设计健身房管理系统设计Express(程序+LW)](https://img-blog.csdnimg.cn/0f0372b2f0b440d6a82882ed92badeef.png)


