secret
参考文档:使用 Secret 安全地分发凭证 | Kubernetes
使用 Secret 安全地分发凭证
创建 Secret: (secret.yaml)
apiVersion: v1
kind: Secret
metadata:
  name: test-secret
data:
  username: bXktYXBw
  password: Mzk1MjgkdmRnN0pi
[root@master secrect]# kubectl apply -f secret.yaml
secret/test-secret created
查看 Secret 相关信息:
[root@master secrect]# kubectl get secret test-secret
NAME          TYPE     DATA   AGE
test-secret   Opaque   2      30s
[root@master secrect]#
查看 Secret 相关的更多详细信息:
kubectl describe secret test-secret输出:
[root@master secrect]# kubectl describe secret test-secret
Name:         test-secret
Namespace:    default
Labels:       <none>
Annotations:  <none>

Type:  Opaque

Data
====
password:  12 bytes
username:  6 bytes
[root@master secrect]#
直接用 kubectl 创建 Secret
如果你希望略过 Base64 编码的步骤,你也可以使用 kubectl create secret 命令直接创建 Secret。例如:
kubectl create secret generic test-secret --from-literal='username=my-app' --from-literal='password=39528$vdg7Jb'创建一个可以通过卷访问 Secret 数据的 Pod
[root@master secrect]# cat secret-pod.yaml
apiVersion: v1
kind: Pod
metadata:
  name: secret-test-pod
spec:
  containers:
    - name: test-container
      image: nginx
      volumeMounts:
        # name 必须与下面的卷名匹配
        - name: secret-volume
          mountPath: /etc/secret-volume
          readOnly: true
  # Secret 数据通过一个卷暴露给该 Pod 中的容器
  volumes:
    - name: secret-volume
      secret:
        secretName: test-secret
[root@master secrect]#
创建 Pod:
[root@master secrect]# kubectl apply -f secret-pod.yaml
pod/secret-test-pod created
[root@master secrect]#
确认 Pod 正在运行:
[root@master secrect]# kubectl get pod -o wide
NAME                                READY   STATUS              RESTARTS   AGE     IP            NODE    NOMINATED NODE   READINESS GATES
redis                               1/1     Running             0          80m     10.244.1.18   node1   <none>           <none>
secret-test-pod                     1/1     Running             0          2m14s   10.244.1.19   node1   <none>           <none>
test                                1/1     Running             0          29h     10.244.2.7    node2   <none>           <none>
[root@master secrect]#
获取一个 Shell 进入 Pod 中运行的容器:
[root@master secrect]# kubectl exec -i -t secret-test-pod -- /bin/bash
root@secret-test-pod:/#
查看卷所在地:
root@secret-test-pod:/# cd /etc/secret-volume/
root@secret-test-pod:/etc/secret-volume# ls
password  username
root@secret-test-pod:/etc/secret-volume#
在 Shell 中,显示 username 和 password 文件的内容:
root@secret-test-pod:/etc/secret-volume# echo "$(cat password)"
39528$vdg7Jb
root@secret-test-pod:/etc/secret-volume# echo "$(cat username)"
my-app
root@secret-test-pod:/etc/secret-volume#
上述步骤拓扑图: (Pod使用Secret的流程)
案例:secret + configmap + nginx的例子
准备SSL证书(用于验证HTTPS协议)和 nginx.conf配置文件
目的是:启动nginx的pod,使用configmap投射nginx.conf配置文件到pod里面
使用secret然后投射SSL证书(https证书)到Pod里,让pod支持https协议的访问
1、使用configmap投射nginx,conf配置文件到pod里
1.1需要准备nginx.conf的配置文件
内容:
可以选择简单的nginx配置文件
worker_processes  4;
events {
    worker_connections  2048;
}
http {
    include       mime.types;
    default_type  application/octet-stream;
    sendfile        on;
    keepalive_timeout  65;
    server {
	listen  80;
	server_name localhost;
        location / {
            root   html;
            index  index.html index.htm;
        }
        error_page   500 502 503 504  /50x.html;
        location = /50x.html {
            root   html;
        }
    }
}
1.2、将nginx.conf的内容投射到configmap上去
[root@master nginx]#  kubectl create configmap sc-nginx-1 --from-file=nginx.conf
configmap/sc-nginx-1 created
查看详细内容:
[root@master nginx]# kubectl get cm
NAME                   DATA   AGE
example-redis-config   1      9h
kube-root-ca.crt       1      41h
sc-nginx-1             1      56s
[root@master nginx]#
配置secret
[root@master nginx]# cat nginx_secret.yaml
apiVersion: apps/v1
kind: Deployment
metadata:
  name: sanchuang-nginx
spec:
  replicas: 3
  selector:
    matchLabels:
      app: sanchuang-nginx
  template:
    metadata:
      labels:
        app: sanchuang-nginx
    spec:
      containers:
        - name: nginx
          image: "nginx:latest"
          imagePullPolicy: IfNotPresent
          ports:
          - containerPort: 80
          volumeMounts:
          - name: sanchuang-nginx-config
            mountPath: /etc/nginx/nginx.conf
            subPath: nginx.conf
      volumes:
        - name: sanchuang-nginx-config
          configMap:
            name: sc-nginx-1
            items:
            - key: nginx.conf
              path: nginx.conf
创建Pod启动secret
[root@master nginx]# kubectl get pod -o wide
NAME                                READY   STATUS              RESTARTS   AGE     IP            NODE    NOMINATED NODE   READINESS GATES
sanchuang-nginx-77cdd449c-fs6s6     1/1     Running             0          2m39s   10.244.3.11   node3   <none>           <none>
sanchuang-nginx-77cdd449c-ht2hr     1/1     Running             0          2m39s   10.244.1.20   node1   <none>           <none>
sanchuang-nginx-77cdd449c-zxx2c     1/1     Running             0          2m39s   10.244.2.10   node2   <none>           <none>
secret-test-pod                     1/1     Running             0          9h      10.244.1.19   node1   <none>           <none>
test                                1/1     Running             0          38h     10.244.2.7    node2   <none>           <none>
[root@master nginx]#
然后去查看容器里启动的nginx是否有4个worker进程
root@sanchuang-nginx-77cdd449c-fs6s6:/etc/nginx# cat nginx.conf
worker_processes  4;
events {
    worker_connections  2048;
}
http {
    include       mime.types;
    default_type  application/octet-stream;
    sendfile        on;
    keepalive_timeout  65;
    server {
	listen  80;
	server_name localhost;
        location / {
            root   html;
            index  index.html index.htm;
        }
        error_page   500 502 503 504  /50x.html;
        location = /50x.html {
            root   html;
        }
    }
}
root@sanchuang-nginx-77cdd449c-fs6s6:/etc/nginx#
详细请看:(137条消息) 使用nginx搭建http和https环境_nginx搭建http服务器_Claylpf的博客-CSDN博客
将证书传给master
![]()

下载unzip进行解压
[root@master conf]# yum install unzip -y
解压:
[root@master conf]# unzip 9581058_claylpf.xyz_nginx.zip
Archive:  9581058_claylpf.xyz_nginx.zip
Aliyun Certificate Download
  inflating: claylpf.xyz.pem
  inflating: claylpf.xyz.key
nginx.conf配置文件也需要提前上传到服务器之中
[root@master conf]# cat nginx.conf

#user  nobody;
worker_processes  4;

#error_log  logs/error.log;
#error_log  logs/error.log  notice;
#error_log  logs/error.log  info;

#pid        logs/nginx.pid;


events {
    worker_connections  2048;
}


#HTTP协议的配置
http {
    include       mime.types;
    default_type  application/octet-stream;
    #(定义访问日志的格式  日志保存在/usr/local/scnginx/logs/access.log文件中)
    log_format  main  '$remote_addr - $remote_user [$time_local] "$request" '
                      '$status $body_bytes_sent "$http_referer" '
                      '"$http_user_agent" "$http_x_forwarded_for"';

    access_log  logs/access.log  main;   #--》日志保存的地址

    sendfile        on;
    #tcp_nopush     on;

    #keepalive_timeout  0;
    keepalive_timeout  65;      #--》65秒后用户和web服务器建立的连接就会断开、 保持连接65秒的时间、 连接的超时时间

    #gzip  on;

    limit_conn_zone $binary_remote_addr  zone=addr:10m;    #创建一个连接区域(开辟了一个名叫addr的内存空间、像一个字典)
    limit_req_zone $binary_remote_addr  zone=one:10m rate=1r/s;    #创建一个连接区域(开辟了一个名叫one的内存空间、像一个字典)、每一秒产生1个可以访问的请求

    server {
        listen       80;
        server_name  www.claylpf.xyz;           #目的是直接从http协议跳转到https协议去
        return       301        https://www.claylpf.xyz;  #永久重定向
    }

    server {
        listen       80;
        server_name  www.feng.com;      #可以自己定义域名

        access_log  logs/feng.com.access.log  main;

        limit_rate_after 100k;  #下载速度达到100k每秒的时候、进行限制
        limit_rate 10k;         #限制每秒10k的速度

        limit_req zone=one burst=5;  #同一时间同一ip最多5人同时访问 峰值是5 每一秒通过one的设定、产生一个空位 1r/s

        location / {
            root   html/feng;
            index  index.html index.htm;
        }

        error_page  404              /404.html;   #无法找到

        error_page   500 502 503 504  /50x.html;  #一般是nginx内部出现问题才会出现的提示
        location = /50x.html {
            root   html;
        }

        location = /info {
        stub_status;    #返回你的nginx的状态统计信息
        #access_log off; #在访问的时候不计入访问日志里面去
        auth_basic      "sanchuang website";
        auth_basic_user_file htpasswd;
        #allow  172.20.10.2;    #允许172.20.10.2的ip地址访问
        #deny   all;            #拒绝所有用户访问
        }

        }

    }
    # HTTPS server

    server {
        listen       443 ssl;
        server_name  www.claylpf.xyz;     #证书上对应的域名

        ssl_certificate      claylpf.xyz.pem;   #自己在阿里云上申请的免费的CA证书
        ssl_certificate_key  claylpf.xyz.key;

        ssl_session_cache    shared:SSL:1m;
        ssl_session_timeout  5m;

        ssl_ciphers  HIGH:!aNULL:!MD5;
        ssl_prefer_server_ciphers  on;

        location / {
            root   html;
            index  index.html index.htm;
        }
    }
}
[root@master conf]#
2、根据nginx.conf的内容生成configmap(在存放nginx.conf目录下/usr/local/scnginx66/conf)
查看效果
[root@master conf]# kubectl get cm
NAME                   DATA   AGE
example-redis-config   1      8h
kube-root-ca.crt       1      40h
nginxconfigmap         1      3m10s
[root@master conf]#
查看详细内容
[root@master conf]# kubectl describe cm nginxconfigmap
Name:         nginxconfigmap
Namespace:    default
Labels:       <none>
Annotations:  <none>

Data
====
nginx.conf:
----

#user  nobody;
worker_processes  4;

#error_log  logs/error.log;
#error_log  logs/error.log  notice;
#error_log  logs/error.log  info;

#pid        logs/nginx.pid;


events {
    worker_connections  2048;
}


#HTTP协议的配置
http {
    include       mime.types;
    default_type  application/octet-stream;
    #(定义访问日志的格式  日志保存在/usr/local/scnginx/logs/access.log文件中)
    log_format  main  '$remote_addr - $remote_user [$time_local] "$request" '
                      '$status $body_bytes_sent "$http_referer" '
                      '"$http_user_agent" "$http_x_forwarded_for"';

    access_log  logs/access.log  main;   #--》日志保存的地址

    sendfile        on;
    #tcp_nopush     on;

    #keepalive_timeout  0;
    keepalive_timeout  65;      #--》65秒后用户和web服务器建立的连接就会断开、 保持连接65秒的时间、 连接的超时时间

    #gzip  on;

    limit_conn_zone $binary_remote_addr  zone=addr:10m;    #创建一个连接区域(开辟了一个名叫addr的内存空间、像一个字典)
    limit_req_zone $binary_remote_addr  zone=one:10m rate=1r/s;    #创建一个连接区域(开辟了一个名叫one的内存空间、像一个字典)、每一秒产生1个可以访问的请求

    server {
        listen       80;
        server_name  www.claylpf.xyz;           #目的是直接从http协议跳转到https协议去
        return       301        https://www.claylpf.xyz;  #永久重定向
    }

    server {
        listen       80;
        server_name  www.feng.com;      #可以自己定义域名

        access_log  logs/feng.com.access.log  main;

        limit_rate_after 100k;  #下载速度达到100k每秒的时候、进行限制
        limit_rate 10k;         #限制每秒10k的速度

        limit_req zone=one burst=5;  #同一时间同一ip最多5人同时访问 峰值是5 每一秒通过one的设定、产生一个空位 1r/s

        location / {
            root   html/feng;
            index  index.html index.htm;
        }

        error_page  404              /404.html;   #无法找到

        error_page   500 502 503 504  /50x.html;  #一般是nginx内部出现问题才会出现的提示
        location = /50x.html {
            root   html;
        }

        location = /info {
        stub_status;    #返回你的nginx的状态统计信息
        #access_log off; #在访问的时候不计入访问日志里面去
        auth_basic      "sanchuang website";
        auth_basic_user_file htpasswd;
        #allow  172.20.10.2;    #允许172.20.10.2的ip地址访问
        #deny   all;            #拒绝所有用户访问
        }

        }

    }
    # HTTPS server

    server {
        listen       443 ssl;
        server_name  www.claylpf.xyz;     #证书上对应的域名

        ssl_certificate      claylpf.xyz.pem;   #自己在阿里云上申请的免费的CA证书
        ssl_certificate_key  claylpf.xyz.key;

        ssl_session_cache    shared:SSL:1m;
        ssl_session_timeout  5m;

        ssl_ciphers  HIGH:!aNULL:!MD5;
        ssl_prefer_server_ciphers  on;

        location / {
            root   html;
            index  index.html index.htm;
        }
    }
}


BinaryData
====

Events:  <none>
[root@master conf]#
3、根据证书(文件)创建secret
[root@master conf]# kubectl create secret tls nginxsecret --key claylpf.xyz.key --cert claylpf.xyz.pem
secret/nginxsecret created
[root@master conf]#
查看效果:
[root@master conf]# kubectl describe secret nginxsecret
Name:         nginxsecret
Namespace:    default
Labels:       <none>
Annotations:  <none>

Type:  kubernetes.io/tls

Data
====
tls.crt:  3818 bytes
tls.key:  1675 bytes
[root@master conf]#
实验拓扑图:
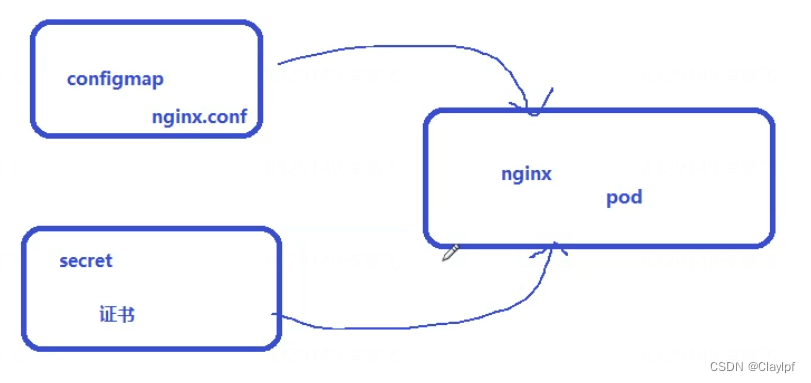
创建svc_pod_secret_configmap.yaml


