HAlcon例子

news2024/9/20 18:44:26

气泡思想

* This example shows the use of the operator dyn_threshold for
* the segmentation of the raised dots of braille chharacters.
* The operator dyn_threshold is especially usefull if the
* background is inhomogeneously illuminated. In this example,
* the segmentation with a simple threshold is not possible
* because the brightness of the background increases from
* left to right.
* 
dev_update_off ()
* 
* Preparation
read_image (Image, 'photometric_stereo/embossed_01')
get_image_size (Image, Width, Height)
dev_get_window (WindowHandle)
if (is_handle_elem(WindowHandle) == true)
    * valid window handle
    dev_resize_window_fit_image (Image, 0, 0, -1, -1)
else
    dev_open_window_fit_image (Image, 0, 0, -1, -1, WindowHandle)
endif
set_display_font (WindowHandle, 16, 'mono', 'true', 'false')
dev_set_line_width (2)
* 
dev_display (Image)
Message := 'Original image'
disp_message (WindowHandle, Message, 'window', 12, 12, 'black', 'true')
disp_continue_message (WindowHandle, 'black', 'true')
stop ()
* 
* Use a strong mean filter on the image to blur out the braille points
*使用均值滤镜模糊盲文点,因为图像上的点有这不同光亮的
mean_image (Image, ImageMean, 59, 59)
* 
dev_display (ImageMean)
Message := 'Mean filtered image'
disp_message (WindowHandle, Message, 'window', 12, 12, 'black', 'true')
disp_continue_message (WindowHandle, 'black', 'true')
stop ()
* 
* Compare the original image with the blurred one and determine the
* region where the gray values of the two images differ by more than 15
*因只有小点点的光亮色彩不同,设定一个阈值,跟平均值相比交超出15的进行选中
dyn_threshold (Image, ImageMean, RegionDynThresh, 15, 'not_equal')
* 
dev_display (Image)
dev_display (RegionDynThresh)
Message := 'Regions segmented with dyn_threshold'
disp_message (WindowHandle, Message, 'window', 12, 12, 'black', 'true')
disp_continue_message (WindowHandle, 'black', 'true')
stop ()
* 
* Post-process the found regions
*先膨胀后收缩
closing_circle (RegionDynThresh, RegionClosing, 8.5)
*进行了开运算
opening_circle (RegionClosing, RegionOpening, 6.5)
*进行的打散
connection (RegionOpening, ConnectedRegions)
*在进行外接圆
smallest_circle (ConnectedRegions, Row, Column, Radius)

gen_circle_contour_xld (ContCircle, Row, Column, Radius, 0, 6.28318, 'positive', 1)
* 
* Show the results
dev_display (Image)
dev_set_color ('green')
dev_display (ContCircle)
Message := 'Results of braille segmentation after morphology'
disp_message (WindowHandle, Message, 'window', 12, 12, 'black', 'true')
* 
dev_update_on ()

在这里插入图片描述

查找适合的圆及圆的面积和中心点

* ball.hdev: Inspection of Ball Bonding
* 窗口关闭
dev_update_window ('off')
dev_close_window ()
*开窗口
dev_open_window (0, 0, 728, 512, 'black', WindowID)
*读取图片
read_image (Bond, 'die/die_03')
*图像显示
dev_display (Bond)
*设置字体
set_display_font (WindowID, 14, 'mono', 'true', 'false')
*显示字体右下角
disp_continue_message (WindowID, 'black', 'true')
*停止
stop ()
*像素值范围找出来
threshold (Bond, Bright, 100, 255)
*装换成矩形
shape_trans (Bright, Die, 'rectangle2')
*设置一下颜色
dev_set_color ('green')
*设置一下宽度
dev_set_line_width (3)
*边缘
dev_set_draw ('margin')
*
dev_display (Die)
*显示边缘
disp_continue_message (WindowID, 'black', 'true')
stop ()
*减少范围,找出感兴趣区域
reduce_domain (Bond, Die, DieGrey)
*找到的0,到50区域
threshold (DieGrey, Wires, 0, 50)
*进行边缘提取
fill_up_shape (Wires, WiresFilled, 'area', 1, 100)
dev_display (Bond)
dev_set_draw ('fill')
dev_set_color ('red')
dev_display (WiresFilled)
*进行填充
disp_continue_message (WindowID, 'black', 'true')
stop ()
*形态学开运算,范围面积为15.5的圆进行放,放进去的
opening_circle (WiresFilled, Balls, 15.5)
dev_set_color ('green')
dev_display (Balls)
*能放进去的区域保留
disp_continue_message (WindowID, 'black', 'true')
stop ()
*找出圆形的区域
connection (Balls, SingleBalls)
*这些区域是不是特别的圆,不是特别的圆进行去掉
select_shape (SingleBalls, IntermediateBalls, 'circularity', 'and', 0.85, 1.0)
*对区域进行排序,在通过颜色排序
sort_region (IntermediateBalls, FinalBalls, 'first_point', 'true', 'column')
dev_display (Bond)
dev_set_colored (12)
dev_display (FinalBalls)
disp_continue_message (WindowID, 'black', 'true')
stop ()
*经外界圆得到中心点,半径
smallest_circle (FinalBalls, Row, Column, Radius)
*对变量进行赋值
NumBalls := |Radius|
*得到直径
Diameter := 2 * Radius
*所有的和除于个数得到平局
meanDiameter := mean(Diameter)
*找出数值最小的值
minDiameter := min(Diameter)
dev_display (Bond)
*进行显示面积,但是以像素为单位
disp_circle (WindowID, Row, Column, Radius)
dev_set_color ('white')
disp_message (WindowID, 'D: ' + Diameter$'.4', 'image', Row - 2 * Radius, Column, 'white', 'false')
dev_update_window ('on')

在这里插入图片描述

设置ROI金属凸轮正反位置判断

read_image(Image, 'D:/c++/image/6')

*画ROI感兴趣区域
dev_open_window (0, 0, 512, 512, 'black', WindowHandle)
dev_display (Image)
Row1:=30
Column1:=31
Row2:=210
Column2:=212
draw_rectangle1_mod (WindowHandle, 100, 100, 200, 200, Row1, Column1, Row2, Column2)
*显示ROI区域 
gen_rectangle1(Rectangle, Row1, Column1, Row2, Column2)
*截取了ROI区域的
reduce_domain(Image, Rectangle, ImageReduced)
*提取亮度阈值
binary_threshold(ImageReduced, Region, 'max_separability', 'light', UsedThreshold)
*做开运算吧小的去掉
opening_rectangle1(Region, RegionOpening, 10, 10)
*有两个连到一起,运用腐蚀进行分开
erosion_circle(RegionOpening, RegionErosion, 7.5)
*进行打散
connection(RegionErosion, ConnectedRegions)


dilation_circle(ConnectedRegions, ObjectSelected, 5.5)


*设置字体
set_display_font ( WindowHandle, 44, 'mono', 'true', 'false')


connection(ObjectSelected, ConnectedRegions1)
*得到roi区域面积,宽和高
area_center(Rectangle, Area, Row, Column)
*只找到上面的分割图,就可以
select_shape(ConnectedRegions1, SelectedRegions, 'row', 'and', 0, Row)
*找到一整个原件的宽度符合阈值
select_shape(SelectedRegions, SelectedRegions1, 'width', 'and', 100, 99999)
*查看有几个分割区域
count_obj(SelectedRegions1, Number)

*循环判断是否有正反
for Index := 1 to Number  by 1
    *选中SelectedRegions1中的循环第几个 
    select_obj(SelectedRegions1, ObjectSelected, Index)
    
    *进行类接矩形,得到的矩形的左上和右下坐标位置
    inner_rectangle1(ObjectSelected, Row11, Column11, Row21, Column21)
    *inner_rectangle1(RegionDilation, Row11, Column11, Row21, Column21)
    
    *进行画图填充
    gen_rectangle1(Rectangle1, Row11, Column11, Row21, Column21)
    
    *进行了开运算
    opening_rectangle1(ObjectSelected, RegionOpeningTOU, 10,Row21-Row11+10 )
    *进行打散
    connection(RegionOpeningTOU, ConnectedRegionsT)
    *找到面积最大的
    select_shape_std(ConnectedRegionsT, SelectedRegionsT, 'max_area', 1)
    
    
    *把大的减去就是小头
    difference(ObjectSelected, SelectedRegionsT, RegionDifference)
    *进行打散
    connection(RegionDifference, ConnectedRegionsW)
    *找到最大的那个
    select_shape_std(ConnectedRegionsW, SelectedRegions2, 'max_area', 1)
    
    *找到了两头
    area_center(SelectedRegionsT, Area1, Row3, Column3)
    area_center(SelectedRegions2, Area2, Row4, Column4)
    
    *判断如果是前面的矩形大于后面的矩形就是NG,否则不是
    if(Column3 < Column4)
        *设置光标位置set_tposition(:: 窗口句柄,行坐标,列坐标:)set_tposition(WindowHandle, Row4, Column4)
        *在窗口打印字符串write_string( : : 窗口句柄, 字符串: )write_string(WindowHandle, 'NG')
        stop()
    else
        set_tposition(WindowHandle, Row4, Column4)
        write_string(WindowHandle, 'OK')
        stop()
    endif
endfor

在这里插入图片描述

read_image(Image, 'D:/c++/image/5')

*读取图像大小
get_image_size(Image, Width, Height)
*使用窗口
dev_clear_window()
dev_open_window(0, 0, Width/2, Height/2, 'black', WindowHandle)
dev_display(Image)

*创建roi区域
draw_rectangle1(WindowHandle, Row1, Column1, Row2, Column2)

*显示出来
gen_rectangle1(Rectangle, Row1, Column1, Row2, Column2)

*roi区域剪辑出来
reduce_domain(Image, Rectangle, ImageReduced)

*动态阈值处理,均值滤波
mean_image(ImageReduced, ImageMean, 3, 3)
dyn_threshold(ImageReduced, ImageMean, RegionDynThresh, 2, 'light')
*进行打散操作
connection(RegionDynThresh, ConnectedRegions)
*面积筛选
select_shape(ConnectedRegions, SelectedRegions, 'area', 'and', 350, 99999)
*进行找出边缘
fill_up(SelectedRegions, RegionFillUp)

*进行开运算
opening_circle(RegionFillUp, RegionOpening, 40.5)
*进行外接圆过滤
select_shape(RegionOpening, SelectedRegions1, 'outer_radius', 'and', 80, 99999)
*有几个分割区域
count_obj(SelectedRegions1, Number)
*进行判断,有一个区域正常,否者不是
if(Number # 1)
    stop()
endif

*进行膨胀变大
dilation_circle(SelectedRegions1, RegionDilation, 17.5)
*在进行裁剪得到想要的特征位置
reduce_domain(ImageMean, RegionDilation, ImageReduced1)
*显示边缘检测
binary_threshold(ImageReduced1, Region, 'max_separability', 'light', UsedThreshold)
*进行打散
connection(Region, ConnectedRegions1)

count_obj(ConnectedRegions1, Number1)
*外界圆半径
select_shape(ConnectedRegions1, SelectedRegions2, 'outer_radius', 'and', 80, 99999)

count_obj(SelectedRegions2, Number2)

if(Number2 # 1)
    stop()
endif

*用面积,和圆度进行区分筛选
select_shape(ConnectedRegions1, SelectedRegions3, ['area','circularity'], 'and', [180,0.8 ], [220,1])

count_obj(SelectedRegions3, Number3)

if(Number3 # 1)
    stop()
endif

dev_display(SelectedRegions3)
dev_display(SelectedRegions2)
*找出圆的中心点
smallest_circle(SelectedRegions3, Row, Column, Radius)
*用中心点进行画圆
gen_circle(Circle, Row, Column, Radius)
*外边
fill_up(SelectedRegions2, RegionFillUp1)
*生成矩形
boundary(RegionFillUp1, RegionBorder, 'inner')
*外接矩形的参数
smallest_rectangle2(RegionFillUp1, Row3, Column3, Phi, Length1, Length2)
*生成一个矩形
gen_rectangle2(Rectangle1, Row, Column, Phi,  Radius,40)

*一个矩形和第二生成的矩形进行相交的得到外面的矩形短线
intersection(Rectangle1, RegionBorder, RegionIntersection)


*求出圆的中心点到矩形的位置
distance_pr(RegionIntersection, Row, Column, DistanceMin, DistanceMax)

*第二种求出中心点算法
*画出中心点
gen_region_points(Region1, Row, Column)

*求出中心点到直线的距离
distance_rr_min(RegionIntersection, Region1, MinDistance, Row11, Column11, Row21, Column21)

*生成点到直线的距离
gen_region_line(RegionLines, Row11, Column11,Row21, Column21)

在这里插入图片描述

笛卡尔和条形码

* Read circularly printed bar codes.
* 
dev_update_off ()
get_system ('clip_region', Information)
set_system ('clip_region', 'true')
read_image (Image, 'circular_barcode')
get_image_size (Image, Width, Height)
dev_close_window ()
dev_open_window (0, 0, Width / 2, Height / 2, 'black', WindowHandle)
dev_set_colored (12)
dev_display (Image)
set_display_font (WindowHandle, 14, 'mono', 'true', 'false')
stop ()
* 
* Segment the ring on the CD that contains the bar code.
*找出0100内的
threshold (Image, Region, 0, 100)
*做闭区间
closing_circle (Region, Region, 3.5) 
*进行打散
connection (Region, ConnectedRegions)
*进行圆的宽和高进行过滤
select_shape (ConnectedRegions, Ring, ['width','height'], 'and', [550,550], [750,750])
*进行变成圆
shape_trans (Ring, OuterCircle, 'outer_circle')
*补齐,除去之前的圆环
complement (Ring, RegionComplement)
*进行打散
connection (RegionComplement, ConnectedRegions)
*在进行过滤
select_shape (ConnectedRegions, InnerCircle, ['width','height'], 'and', [450,450], [650,650])


* Determine the parameters of the ring that contains the bar code.
*得到外圆的中心和半径
smallest_circle (Ring, Row, Column, OuterRadius)

*得到内圆的中心和半径
smallest_circle (InnerCircle, InnerRow, InnerColumn, InnerRadius)
dev_set_color ('green')
dev_set_draw ('margin')
dev_set_line_width (3)
dev_display (Image)
dev_display (OuterCircle)
dev_display (InnerCircle)
stop ()
* 
* Now read the bar code. This is done by computing the polar transformation
* of the ring in the image that contains the bar code.
*自己设置的宽度
WidthPolar := 1440

*高度是外圆减去内圆,再减去10
HeightPolar := round(OuterRadius - InnerRadius - 10)

*进行笛卡尔转换,前面描述的是圆的坐标宽和高,后面描述的就是笛卡尔
polar_trans_image_ext (Image, PolarTransImage, Row, Column, rad(360), 0, OuterRadius - 5, InnerRadius + 5, WidthPolar, HeightPolar, 'bilinear')

*黑变白,反转
invert_image (PolarTransImage, ImageInvert)
* 
* Since the bar code region is quite flat the image height is doubled.
*按给定因子缩放图像
zoom_image_factor (ImageInvert, ImageZoomed, 1, 2, 'weighted')

*创建bar conde reder的模型
create_bar_code_model ([], [], BarCodeHandle)
* 
* Bars are small and the contrast is low; therefore the threshold is raised from 0.05 to 0.1.
*设置解码参数
set_bar_code_param (BarCodeHandle, 'element_size_min', 1.5)
set_bar_code_param (BarCodeHandle, 'meas_thresh', 0.3)

*查找条码,进行解成128
find_bar_code (ImageZoomed, SymbolRegions, BarCodeHandle, 'Code 128', DecodedDataStrings)
dev_set_window_extents (-1, -1, WidthPolar / 2, HeightPolar)
dev_display (ImageZoomed)
dev_display (SymbolRegions)
set_system ('clip_region', Information)

*设置文字
disp_message (WindowHandle, DecodedDataStrings, 'image', 10, 180, 'black', 'true')
stop ()
* 
* Transform the code region back to the original image and display it.
zoom_region (SymbolRegions, SymbolRegions, 1, 0.5)

*将极坐标中的一个区域变换回笛卡尔坐标。
polar_trans_region_inv (SymbolRegions, CodeRegionCircular, Row, Column, rad(360), 0, OuterRadius - 5, InnerRadius + 5, WidthPolar, HeightPolar, Width, Height, 'nearest_neighbor')
dev_set_window_extents (-1, -1, Width / 2, Height / 2)
dev_display (Image)
dev_display (CodeRegionCircular)
disp_message (WindowHandle, DecodedDataStrings, 'window', 12, 12, 'black', 'true')

在这里插入图片描述

极坐标,光度立体,ocr

* This program demonstrates the use of the photometric stereo technique
* to read imprinted letters on a tire with a low cost setup.
* Even if the light sources are not very homogeneous and their
* orientation is only very roughly known, the text can be
* read robustly.
* 
* Initialization
PolarTransWidth := 512
PolarTransHeight := 80
* 
dev_close_window ()
dev_update_off ()
read_image (Images, 'photometric_stereo/tire_0' + [1:4])
select_obj (Images, ObjectSelected, 1)
dev_open_window_fit_image (ObjectSelected, 0, 0, -1, -1, WindowHandle)
set_display_font (WindowHandle, 16, 'mono', 'true', 'false')
for Index := 1 to 4 by 1
    select_obj (Images, ObjectSelected, Index)
    dev_display (ObjectSelected)
    disp_message (WindowHandle, 'Image ' + Index + '/4', 'window', 12, 12, 'black', 'true')
    wait_seconds (0.5)
endfor
* 
* We do not know the exact orientations of the light sources
* and therefore use only very rough estimates.
Tilts := [180,270,0,90]
Slants := [45,45,45,45]
* 
* Apply photometric stereo to determine the surface gradient
*用不同的光拍一张照片,使用光度立体
photometric_stereo (Images, HeightField, Gradient, Albedo, Slants, Tilts, 'gradient', 'poisson', [], [])
* 
* Calculate the surface curvature for easy segmentation of the letters
*计算曲面曲率以便于字母分割 
derivate_vector_field (Gradient, Result, 3, 'mean_curvature')

* Display surface curvature,显示曲面曲率
dev_display (Result)
disp_message (WindowHandle, 'Surface curvature image', 'window', 12, 12, 'black', 'true')
disp_continue_message (WindowHandle, 'black', 'true')
stop ()
* 


* Segment text and base line
* The base line of the text is used to align
* the text horizontally (to simplify the OCR)


*分段文本和基线

*文本的基线用于对齐

*文本水平显示(简化OCR
*基本的阈值处理
threshold (Result, Region, -0.2, -0.01)
connection (Region, ConnectedRegions)
*宽度和行进行过滤
select_shape (ConnectedRegions, BaseLine, ['width','row'], 'and', [600,280], [99999,350])


* The base line is converted to an XLD contour
* to determine the radius of the line by fitting
* a circle to the contour
*基线将转换为XLD轮廓
*通过拟合确定直线半径的步骤
*与等高线成圆
gen_contour_region_xld (BaseLine, Contours, 'center')
*轮廓分割
segment_contours_xld (Contours, ContoursSplit, 'lines_circles', 8, 14, 12)

*选取多种特征要求的XLD轮廓或多边形
select_contours_xld (ContoursSplit, SelectedContours, 'contour_length', 500, 1e10, -0.5, 0.5)

*用圆近似XLD轮廓;
fit_circle_contour_xld (ContoursSplit, 'ahuber', -1, 0, 0, 3, 1, Row, Column, Radius, StartPhi, EndPhi, PointOrder)
* Generate circle contours for debugging (not used)
* gen_circle_contour_xld (ContCircle, Row, Column, Radius, StartPhi, EndPhi, PointOrder, 1)
* If more than 1 contour have been selected,
* choose the one with the largest radius
I := sort_index(Radius)[|Radius| - 1]
* If the point order of the fitted circle is 'positive',
* start and end angle have to be swapped for the polar transform
if (PointOrder[I] == 'positive')
    Tmp := StartPhi[I]
    StartPhi[I] := EndPhi[I]
    EndPhi[I] := Tmp
endif
* Perform a polar transform on the region
* to align the text with the base line
*极坐标通过圆进行拉直
polar_trans_region (Region, RegionPolarTrans, Row[I], Column[I], StartPhi[I], EndPhi[I], Radius[I] + PolarTransHeight, Radius[I], PolarTransWidth, PolarTransHeight, 'nearest_neighbor')
* Select characters from the transformed region
connection (RegionPolarTrans, ConnectedTransRegions)
select_shape (ConnectedTransRegions, Letters, ['height','width'], 'and', [40,20], [60,50])

*进行相关位置排序
sort_region (Letters, SortedLetters, 'character', 'true', 'row')
* Create a black & white image from the region for the OCR,从OCR区域创建黑白图像

* 将区域转换为二进制字节图像。
region_to_bin (SortedLetters, BinImage, 0, 255, 512, 100)
* Read text using a pre-trained classifier

*从文件中读取OCR的.omc分类器,链接:https://www.cnblogs.com/xh6300/p/13392610.html
read_ocr_class_mlp ('Industrial_NoRej', OCRHandle)

*使用 OCR 分类器对多个字符进行分类。 
do_ocr_multi_class_mlp (SortedLetters, BinImage, OCRHandle, Class, Confidence)
* 
* Display results
dev_display (ObjectSelected)
area_center (SortedLetters, Area, Row, Column)
dev_open_window (60, 12, PolarTransWidth, PolarTransHeight + 50, 'black', WindowHandle1)
set_display_font (WindowHandle1, 16, 'mono', 'true', 'false')
dev_set_part (-30, 0, PolarTransHeight - 1 + 20, PolarTransWidth - 1)
dev_display (SortedLetters)
DispRow := mean(Row) + 30
disp_message (WindowHandle1, 'OCR result after polar transform', 'window', 12, 12, 'black', 'true')
disp_message (WindowHandle1, Class, 'image', DispRow, Column - 18, 'black', 'true')

在这里插入图片描述

使用另一种能过滤区域

* ball_seq.hdev: Inspection of Ball Bonding
* 
dev_update_off ()

*4张图
ImageNames := 'die/' + ['die_02','die_03','die_04','die_07']
dev_set_colored (12)
read_image (Bond, ImageNames[0])
get_image_size (Bond, Width, Height)
dev_close_window ()
dev_open_window (0, 0, Width, Height, 'black', WindowHandle)
set_display_font (WindowHandle, 16, 'mono', 'true', 'false')
dev_set_draw ('margin')
dev_set_line_width (3)
NumImages := |ImageNames|
for I := 0 to NumImages - 1 by 1
    read_image (Bond, ImageNames[I])
    dev_display (Bond)
    *找出灰色的最小和最大的,
    min_max_gray (Bond, Bond, 0, Min, Max, Range)
    
    *用最大的灰度值减去80
    threshold (Bond, Bright, Max - 80, 255)
    shape_trans (Bright, Die, 'rectangle2')
    dev_display (Die)
    reduce_domain (Bond, Die, DieGrey)
    min_max_gray (Die, Bond, 0, Min, Max, Range)
    threshold (DieGrey, Wires, 0, Min + 30)
    *1100的进行填充
    fill_up_shape (Wires, WiresFilled, 'area', 1, 100)
 *进行开运算
    opening_circle (WiresFilled, Balls, 9.5)
    
    connection (Balls, SingleBalls)
    
    *选出矩形
    select_shape_std (SingleBalls, Rect, 'rectangle1', 90)
    *在把矩形给去掉
    difference (SingleBalls, Rect, IntermediateBalls)
    gen_empty_region (Forbidden)
    expand_gray (IntermediateBalls, Bond, Forbidden, RegionExpand, 4, 'image', 6)
    
    *开运算变成了圆
    opening_circle (RegionExpand, RoundBalls, 15.5)
    sort_region (RoundBalls, FinalBalls, 'first_point', 'true', 'column')
    smallest_circle (FinalBalls, Row, Column, Radius)
    NumBalls := |Radius|
    Diameter := 2 * Radius
    meanDiameter := sum(Diameter) / NumBalls
    mimDiameter := min(Diameter)
    dev_display (RoundBalls)
    if (I != NumImages)
        disp_continue_message (WindowHandle, 'black', 'true')
    endif
    stop ()
endfor

在这里插入图片描述

使用放射变换让图片确定位置,在进行,面积和灰度进行判断

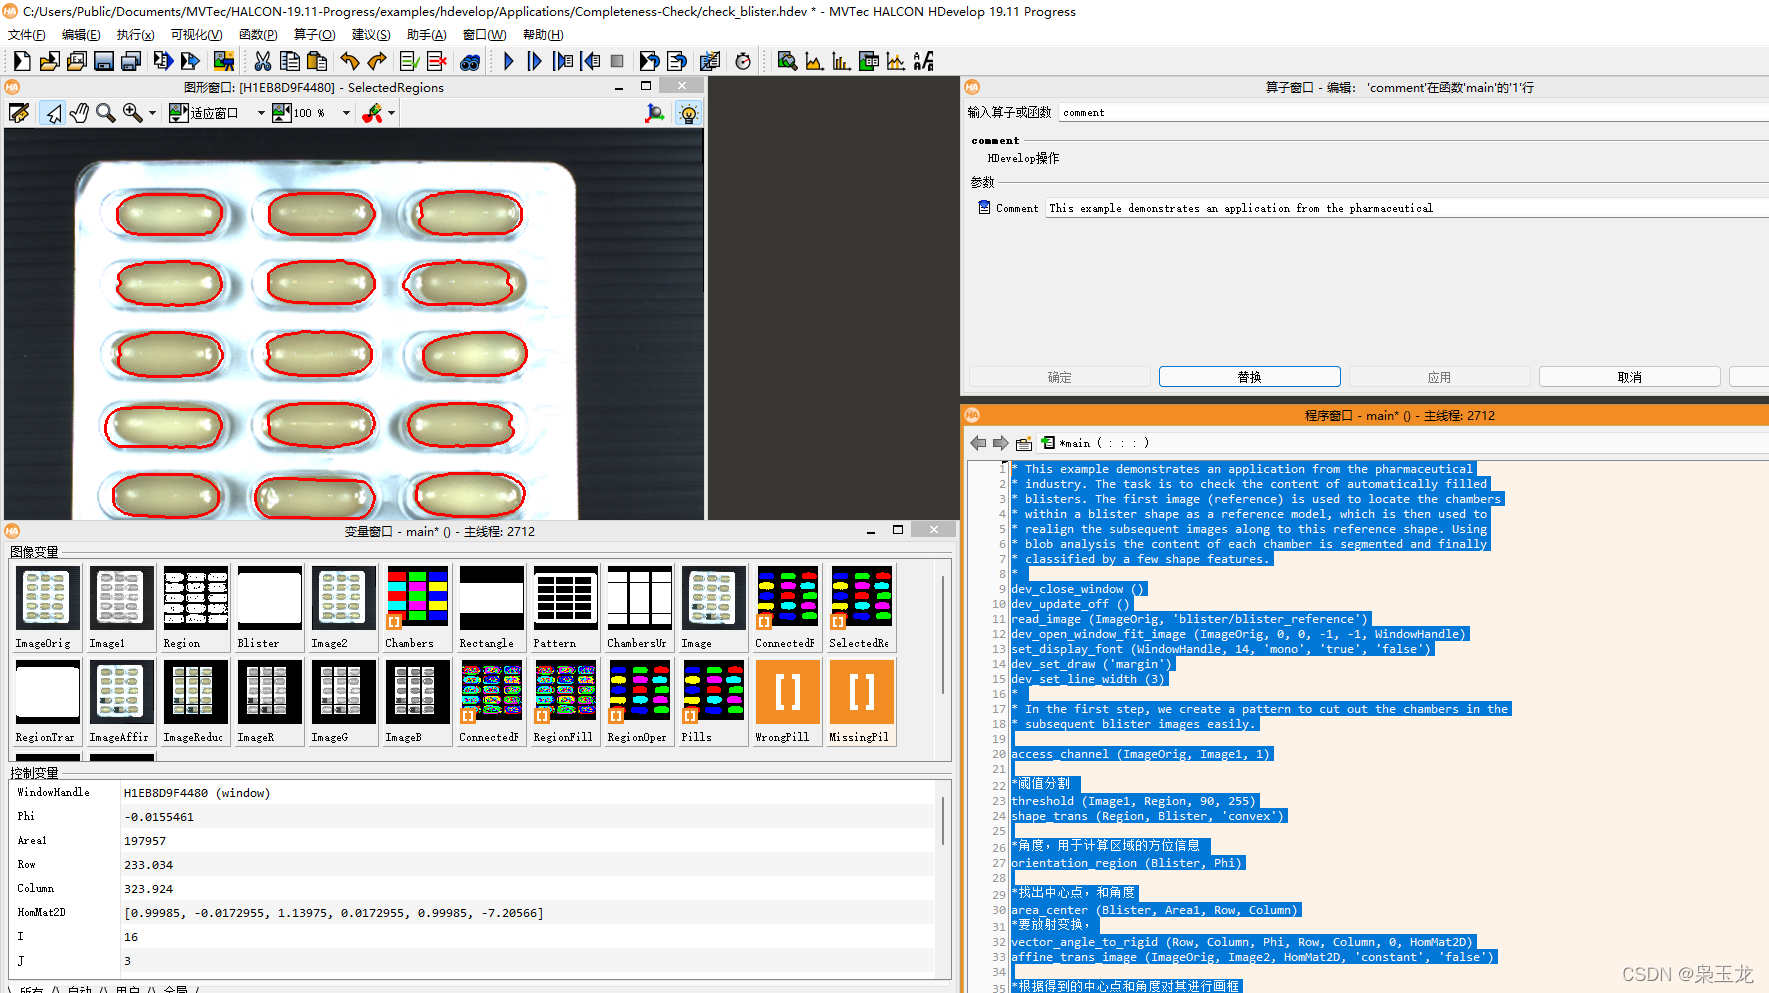
* This example demonstrates an application from the pharmaceutical
* industry. The task is to check the content of automatically filled
* blisters. The first image (reference) is used to locate the chambers
* within a blister shape as a reference model, which is then used to
* realign the subsequent images along to this reference shape. Using
* blob analysis the content of each chamber is segmented and finally
* classified by a few shape features.
* 
dev_close_window ()
dev_update_off ()
read_image (ImageOrig, 'blister/blister_reference')
dev_open_window_fit_image (ImageOrig, 0, 0, -1, -1, WindowHandle)
set_display_font (WindowHandle, 14, 'mono', 'true', 'false')
dev_set_draw ('margin')
dev_set_line_width (3)
* 
* In the first step, we create a pattern to cut out the chambers in the
* subsequent blister images easily.

access_channel (ImageOrig, Image1, 1)

*阈值分割 
threshold (Image1, Region, 90, 255)
shape_trans (Region, Blister, 'convex')

*角度,用于计算区域的方位信息 
orientation_region (Blister, Phi)

*找出中心点,和角度
area_center (Blister, Area1, Row, Column)
*要放射变换,
vector_angle_to_rigid (Row, Column, Phi, Row, Column, 0, HomMat2D)
affine_trans_image (ImageOrig, Image2, HomMat2D, 'constant', 'false')

*根据得到的中心点和角度对其进行画框
gen_empty_obj (Chambers)
for I := 0 to 4 by 1
    Row := 88 + I * 70
    for J := 0 to 2 by 1
        Column := 163 + J * 150
        gen_rectangle2 (Rectangle, Row, Column, 0, 64, 30)
        concat_obj (Chambers, Rectangle, Chambers)
    endfor
endfor
affine_trans_region (Blister, Blister, HomMat2D, 'nearest_neighbor')
*与原的矩形进行相减得到,
difference (Blister, Chambers, Pattern)
union1 (Chambers, ChambersUnion)
orientation_region (Blister, PhiRef)
PhiRef := rad(180) + PhiRef
area_center (Blister, Area2, RowRef, ColumnRef)
* 
* 
* Each image read will be aligned to this pattern and reduced to the area of interest,
* which is the chambers of the blister
Count := 6
for Index := 1 to Count by 1
    read_image (Image, 'blister/blister_' + Index$'02')
    threshold (Image, Region, 90, 255)
    connection (Region, ConnectedRegions)
    select_shape (ConnectedRegions, SelectedRegions, 'area', 'and', 5000, 9999999)
    shape_trans (SelectedRegions, RegionTrans, 'convex')
    * 
    * Align pattern along blister of image
    orientation_region (RegionTrans, Phi)
    area_center (RegionTrans, Area3, Row, Column)
    vector_angle_to_rigid (Row, Column, Phi, RowRef, ColumnRef, PhiRef, HomMat2D)
    affine_trans_image (Image, ImageAffineTrans, HomMat2D, 'constant', 'false')
    * 
    * Segment pills
    reduce_domain (ImageAffineTrans, ChambersUnion, ImageReduced)
    decompose3 (ImageReduced, ImageR, ImageG, ImageB)
    var_threshold (ImageB, Region, 7, 7, 0.2, 2, 'dark')
    connection (Region, ConnectedRegions0)
    closing_rectangle1 (ConnectedRegions0, ConnectedRegions, 3, 3)
    fill_up (ConnectedRegions, RegionFillUp)
    select_shape (RegionFillUp, SelectedRegions, 'area', 'and', 1000, 99999)
    opening_circle (SelectedRegions, RegionOpening, 4.5)
    connection (RegionOpening, ConnectedRegions)
    select_shape (ConnectedRegions, SelectedRegions, 'area', 'and', 1000, 99999)
    shape_trans (SelectedRegions, Pills, 'convex')
    * 
    * Classify segmentation results and display statistics
    count_obj (Chambers, Number)
    gen_empty_obj (WrongPill)
    gen_empty_obj (MissingPill)
    for I := 1 to Number by 1
        select_obj (Chambers, Chamber, I)
        intersection (Chamber, Pills, Pill)
        area_center (Pill, Area, Row1, Column1)
        if (Area > 0)
            min_max_gray (Pill, ImageB, 0, Min, Max, Range)
            if (Area < 3800 or Min < 60)
                concat_obj (WrongPill, Pill, WrongPill)
            endif
        else
            concat_obj (MissingPill, Chamber, MissingPill)
        endif
    endfor
    * 
    dev_clear_window ()
    dev_display (ImageAffineTrans)
    dev_set_color ('forest green')
    count_obj (Pills, NumberP)
    count_obj (WrongPill, NumberWP)
    count_obj (MissingPill, NumberMP)
    dev_display (Pills)
    if (NumberMP > 0 or NumberWP > 0)
        disp_message (WindowHandle, 'Not OK', 'window', 12, 12 + 600, 'red', 'true')
    else
        disp_message (WindowHandle, 'OK', 'window', 12, 12 + 600, 'forest green', 'true')
    endif
    * 
    Message := '# Correct pills: ' + (NumberP - NumberWP)
    Message[1] := '# Wrong pills  :  ' + NumberWP
    Message[2] := '# Missing pills:  ' + NumberMP
    * 
    Colors := gen_tuple_const(3,'black')
    if (NumberWP > 0)
        Colors[1] := 'red'
    endif
    if (NumberMP > 0)
        Colors[2] := 'red'
    endif
    disp_message (WindowHandle, Message, 'window', 12, 12, Colors, 'true')
    dev_set_color ('red')
    dev_display (WrongPill)
    dev_display (MissingPill)
    if (Index < Count)
        disp_continue_message (WindowHandle, 'black', 'true')
    endif
    stop ()
endfor

在这里插入图片描述

本文来自互联网用户投稿,该文观点仅代表作者本人,不代表本站立场。本站仅提供信息存储空间服务,不拥有所有权,不承担相关法律责任。如若转载,请注明出处:http://www.coloradmin.cn/o/1005792.html

如若内容造成侵权/违法违规/事实不符,请联系多彩编程网进行投诉反馈,一经查实,立即删除!

相关文章

开源日报 0830 | 免费计算机科学自学路径:系统化教育与全球支持

ossu/computer-science Stars: 141.9k License: MIT 这个开源项目是一个自学计算机科学的免费路径。它提供了一套完整的在线教育材料&#xff0c;旨在为那些希望获得全面、扎实基础和良好习惯的人们提供支持。该课程按照本科计算机专业要求设计&#xff0c;并且选取了来自哈佛…

抖音小游戏运营攻略:运营能力、用户获取和用户留存

抖音小游戏运营攻略&#xff1a;运营能力、用户获取和用户留存 前言一&#xff0c;运营能力1.1 录屏分享1.2 分享设置 二&#xff0c;用户获取2.1 新游冷启计划2.2 游戏中心推广素材2.3 搜索关键词2.4 搜索结果图2.5 游戏特征2.6 剪映视频模板 三&#xff0c;用户留存3.1 游戏加…

Redis哨兵集群的介绍及搭建

Redis 是一款开源的、内存中的数据结构存储系统&#xff0c;它可以用作数据库、缓存和消息中间件。然而&#xff0c;作为一个单点服务&#xff0c;Redis 在面临硬件故障或者网络问题时可能会导致服务不可用。为了解决这个问题&#xff0c;Redis 提供了哨兵模式&#xff0c;一个…

【玩玩Vue】使用elementui页面布局和控制页面的滚动

原文作者&#xff1a;我辈李想 版权声明&#xff1a;文章原创&#xff0c;转载时请务必加上原文超链接、作者信息和本声明。 文章目录 前言一、页面布局二、页面滚动1.禁用body的滑动2.禁用el-aside的滚动3.启动el-main的滚动 前言 一、页面布局 这里布局使用vueelementui&…

如何对安卓设备执行免Root设置?免Root后如何远程控制?

使用AirDroid个人版的远程控制功能时&#xff0c;对被控的安卓设备执行免Root设置是比较常用的一种方式&#xff08;安卓7.0及以上系统的设备可以选择通过辅助权限&#xff08;无障碍&#xff09;控制安卓设备&#xff09; 如何执行免Root设置&#xff1f; 前提条件 1&#…

每日一博 - Stack OveFlow Arch In Reality

文章目录 概述猜测 &#xff1f;Truth 概述 Stack Overflow 是一个与程序相关的 IT 技术问答网站&#xff0c;其技术架构主要采用微软的技术栈&#xff0c;包括 C#、ASP.NET、SQL Server 等。此外&#xff0c;Stack Overflow 还使用了一些开源框架&#xff0c;例如 HAProxy、R…

SpringBoot-logback不同业务模块输出不同的日志文件

工作中有些业务模块日志输出比较频繁&#xff0c;影响其他业务模块问题排查&#xff0c;可以使用logback实现根据不同的业务输出到不同的日志文件 1、在resource下创建文件logback-spring.xml 2、在logback.xml中添加如下配置 <?xml version"1.0" encoding"…

GIS入门:GIS到底是什么,GIS的概念、构成结构、功能和应用

地理信息系统&#xff08;Geographic Information System, 简称GIS&#xff09; GIS从广义上讲&#xff0c;是一门集地理学与地图学以及遥感和计算机科学等众多学科于一体的综合性前沿交叉学科&#xff1b; 从狭义上说&#xff0c;它是在计算机硬、软件系统支持下&#xff0c;对…

Java笔记041-反射/类加载、通过反射获取类的结构信息、通过反射创建对象、通过反射访问类中的成员

反射 类加载 基本说明 ClassLoad_ 反射机制是Java实现动态语言的关键&#xff0c;也就是通过反射实现类动态加载。 静态加载&#xff1a;编译时加载相关的类&#xff0c;如果没有则报错&#xff0c;依赖性太强动态加载&#xff1a;运行时加载需要的类&#xff0c;如果运行时…

C语言_指针进阶(下)

文章目录 前言一、函数指针数组二、指向函数指针数组的指针三. 回调函数四. qsort 函数五. 数组名的理解 sizeof5.1 数组名的理解&#xff08;二维数组)5.1.1 数组名的理解 strlen5.1.2 例题&#xff1a;例一.例二.例三.例四. 前言 一、函数指针数组 数组是一个存放相同类型数…

LVS负载均衡群集(NAT模式、IP隧道模式、DR模式)

目录 一、集群 1.1 含义即特点 1.2 群集的类型 1.3 LVS 的三种工作模式&#xff1a; 1.4 LVS 调度算法 1.5 负载均衡群集的结构 1.6 ipvsadm 工具 二、NAT模式 LVS-NAT模式配置步骤&#xff1a; 实例&#xff1a; 配置NFS服务器192.168.20.100 配置web1服务器192.168…

C++ istringstream类学习

istringstream类用于执行C风格的串流的输入操作&#xff1b; ostringstream类用于执行C风格的串流的输出操作&#xff1b; strstream类同时可以支持C风格的串流的输入输出操作&#xff1b; istringstream的构造函数原形如下&#xff1a; istringstream::istringstream(strin…

Tomcat Arbitrary Write-file Vulnerability through PUT Method (CVE-2017-12615)

漏洞描述 CVE-2017-12615 对应的漏洞为任意文件写入&#xff0c;由于配置不当&#xff08;非默认配置&#xff09;&#xff0c;导致可以使用 PUT 方法上传任意文件 。Tomcat设置了写权限&#xff08;readonlyfalse&#xff09;&#xff0c;导致可以使用PUT方法上传任意文件 影…

mysql 快速上传数据

快速上传数据 这个应该是比inset into values更快的插入数据的办法了。 不过要求挺苛刻的&#xff0c;数据要整理成和表格一致&#xff0c;也就是说每条数据都是完整的一条&#xff0c;而不是一部分。 下面的示例我以***为分割符划分字段&#xff0c;以 \n来分割每条数据。 LO…

代码随想录笔记--贪心算法篇

1--贪心算法 主要思路&#xff1a; 通过局部最优推导全局最优&#xff1b; 2--分发饼干 主要思路&#xff1a; 基于贪心算法&#xff0c;每次都尽可能用大的饼干去喂胃口大的孩子&#xff0c;贪心地节省饼干&#xff1b; #include <iostream> #include <vector> #i…

5.后端·新建子模块与开发(自动模式)

文章目录 学习资料自动生成模式创建后端三层 学习资料 https://www.bilibili.com/video/BV13g411Y7GS?p11&spm_id_frompageDriver&vd_sourceed09a620bf87401694f763818a31c91e 自动生成模式创建后端三层 首先&#xff0c;运行起来若依的前后端整个项目&#xff0c;…

【Java 基础篇】Java 自然排序:使用 Comparable 接口详解

在 Java 编程中&#xff0c;我们经常需要对对象进行排序。为了实现排序&#xff0c;Java 提供了 java.lang.Comparable 接口&#xff0c;它允许我们定义对象之间的自然顺序。本篇博客将深入探讨如何使用 Comparable 接口来进行自然排序&#xff0c;包括接口的基本概念、使用示例…

【2023年11月第四版教材】第12章《质量管理》(第三部分)

第12章《质量管理》&#xff08;第三部分&#xff09; 5 管理质量5.1 管理质量★★★ &#xff08;17下9&#xff09;5.2 数据分析★★★5.3 数据表现★★★5.4 审计★★★ 6 控制质量6.1 控制质量6.2 数据收集★★★6.3 数据分析 ★★★6.4 数据表现★★★ 5 管理质量 组过程…

《gRPC vs REST:何时选择哪一个》

&#x1f337;&#x1f341; 博主猫头虎&#xff08;&#x1f405;&#x1f43e;&#xff09;带您 Go to New World✨&#x1f341; &#x1f405;&#x1f43e;猫头虎建议程序员必备技术栈一览表&#x1f4d6;&#xff1a; &#x1f6e0;️ 全栈技术 Full Stack: &#x1f4da…

C++--day5

实现一个图形类&#xff08;Shape&#xff09;&#xff0c;包含受保护成员属性&#xff1a;周长、面积&#xff0c; 公共成员函数&#xff1a;特殊成员函数书写 定义一个圆形类&#xff08;Circle&#xff09;&#xff0c;继承自图形类&#xff0c;包含私有属性&#xff1a;半…