1、要点及功能描述
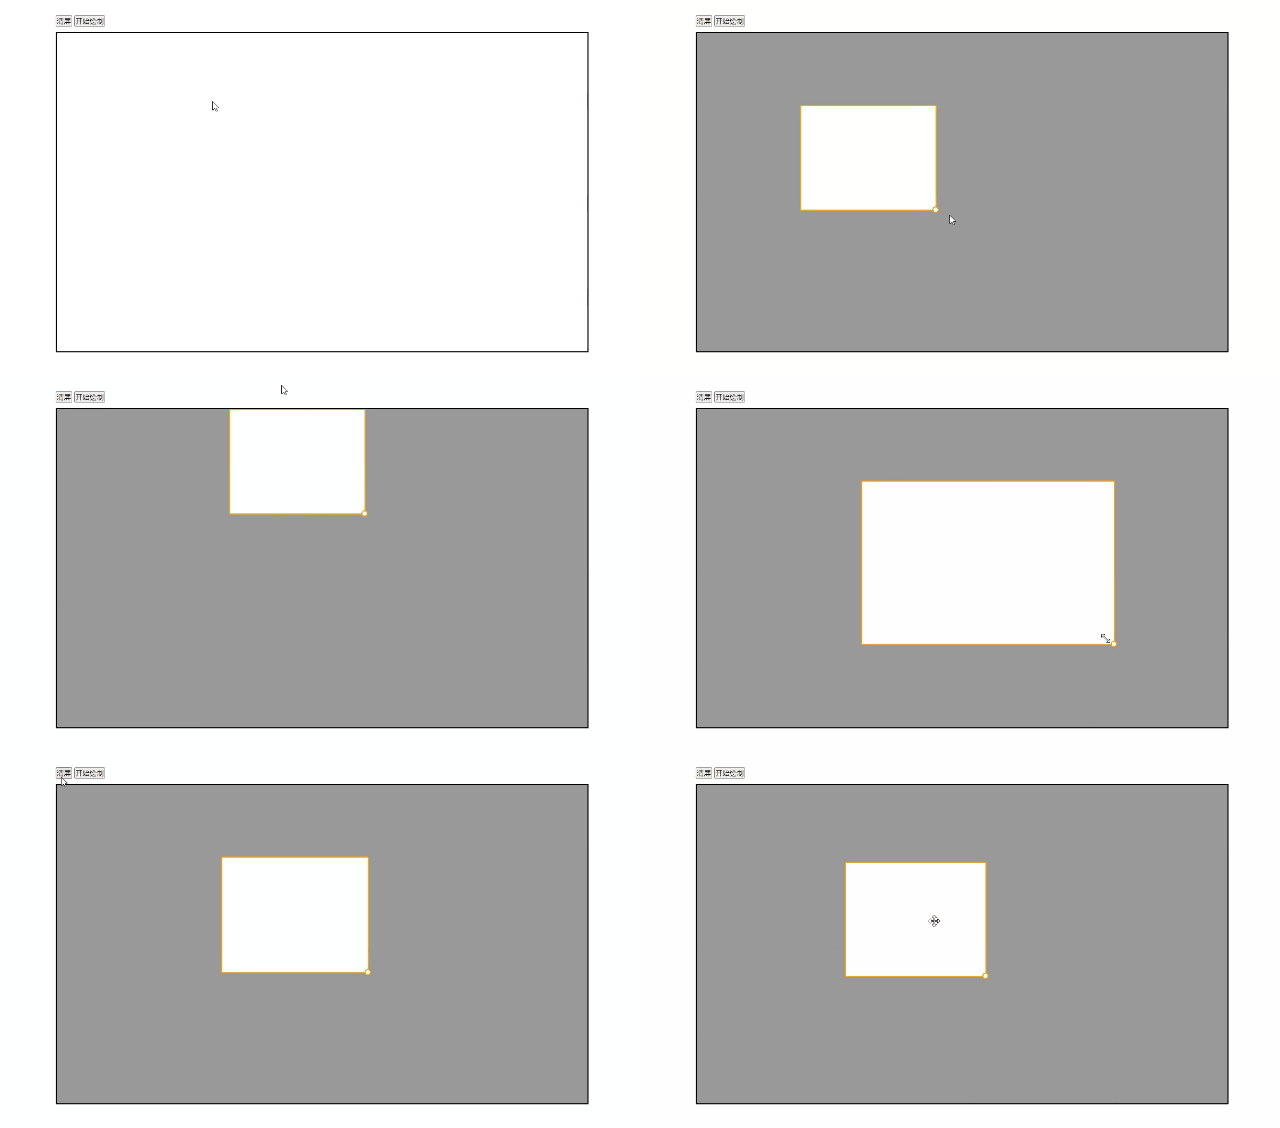
通过js监听mouse事件来实现矩形框的绘制,再通过区分点击的是边角还是其他位置来实现矩形框的拉伸和拖动,并且在拖动和拉伸时,都做了边界限制,当拉伸或拖动 到边界时,就不能继续拉伸拖动了。当然在相关开发时,还是需要你对一些常规的offsetLeft,offsetX等的dom属性了解哟~
现在这种主要用来做canvas截图部分的矩形框展示,想要了解canvas截图的可以看我另外两篇博客,分别是pdf的截图绘制和图片的截图绘制。当然本篇博客主要侧重于对矩形框的实现喔~
【PDF】Canvas绘制PDF及截图
canvas图像绘制(图像放大、缩小、拖动和截图)
2、效果图展示
3、原理讲解
3.1、变量详解
    const dom = document.getElementById('out-box')
    const rect  = document.getElementById('rect')
    const origin = dom.getBoundingClientRect()
    const parentBorder = Number(getComputedStyle(dom, null).borderWidth.split('px')[0]) // 父元素边框 如果你明确知道边框宽度,就不需要这行,直接赋值就行
const childBorder = Number(getComputedStyle(rect, null).borderWidth.split('px')[0]) // 子元素边框 如果你明确知道边框宽度,就不需要这行,直接赋值就行dom:外层盒子,鼠标下手开始绘制的地方
rect: 矩形框,其实矩形框并不是凭空绘制出来的,只是先将其宽高置为0,并且定位到负无限处,所以在页面上看不到,在绘制时,通过控制矩形框的定位及宽高来进行展示,这也是我进行绘制/拖动/拉伸的核心思想
    .rect{
      position: absolute;
      box-shadow: 0 0 0 1999px rgba(0, 0, 0, .4);
      left: -9999px;
      top: 0;
      width: 0;
      height: 0;
      border: 2px solid orange;
      cursor: move;
}origin: 其实就是外层盒子的相对于页面的属性,有用处
parentBorder和childBorder就是你外层盒子和矩形盒子的边框,其实可要可不要,但是主要为了好看(你可以直接赋值就行,这跟影响不大)
3.2、绘制方法讲解
startMouse:这里left和top,就是在onmousedown开始下笔时,就确定了当前矩形框的定位,用本身下笔时的clientX,clientY去减去外层盒子的偏移,就能得到矩形在外层盒子的定位(类似于offsetLeft,offsetTop,但是这里不能用offsetLeft,offsetTop,不过你也可以自己去试试)
        const left = e.clientX - origin.x
        const top = e.clientY - origin.y
        rect.style.left = left + 'px'
        rect.style.top = top + 'px'
3.3、判断当前是拖动还是拉伸讲解
mousedownHandle:当点击矩形框边角时,你肯定是想要拉伸矩形框,当点击其他位置时,你肯定想要拖动矩形框。
在矩形框内部点击,就可以使用offset相关属性,你所点击的位置,就是offsetX,offsetY,这俩属性是相对于当前dom内部的点击位置的,而offsetWidth,offsetHeight是当前dom的宽高,differenec是模糊距离,有时候你得设置一个点击的范围,只要点击点在那个范围内,就是拉伸,反之亦然。
      const startX = e.offsetX
      const startY = e.offsetY
      const width = e.target.offsetWidth
      const height = e.target.offsetHeight
const difference = 10 // 点击四边角10 px范围为拉伸,其他为拖动,这个值可以根据你需要的来调整当然,最好的方式就是有八个拉伸点,除了这八个拉伸点,其余位置都是被拖拽的地方,下面方法就是判断是哪个拉伸点的(这个也蛮好理解,不信你打开你的截图软件,是不是有8个能被拉伸的小方块),除去这八个点以外,其他都是返回[-1, -1],以来标识拖动
      let left = 0 // 0 => left, 1 => middle, 2 => right, -1 => 点击的位置不能被拖动
      let top = 0 // 0 => top, 1 => middle, 2 => bottom, -1 => 点击的位置不能被拖动
      if (startX < difference && startX > 0) { // 点击的位置为矩形左侧0 ~ 6px
        left = 0
      } else if (startX > width / 2 - difference && startX < width / 2 + difference) { // 点击的位置为矩形中间 width/2 - 6px ~ width/2 + 6px
        left = 1
      } else if (startX < width && startX > width - difference){ // 点击的位置为矩形右侧 width - 6px ~ width
        left = 2
      } else {
        left = -1
      }

      if (startY < difference && startY > 0) { // 点击的位置为矩形上侧0 ~ 6px
        top = 0
      } else if (startY > height / 2 - difference && startY < height / 2 + difference) { // 点击的位置为矩形中间 height/2 - 6px ~ height/2 + 6px
        top = 1
      } else if (startY < height && startY > height - difference){ // 点击的位置为矩形下侧 height - 6px ~ height
        top = 2
      } else {
        top = -1
      }
3.4、实现拖动和拉伸的方法详解
拖动还是拉伸?
当mousedownHandle返回的是[-1, -1]时,那就说明是拖动,拖动的话,只需要改变矩形框的left,top定位即可。
        const flag = mousedownHandle(e)
        let left = e.clientX
        let top = e.clientY
        const width = rect.offsetWidth
        const height = rect.offsetHeight
        const [dragX, dragY] = flag
        // 拖动
        if (dragX === -1 && dragY === -1) {
          left -= rect.offsetLeft // 要保持之前矩形框的坐标值
          top -= rect.offsetTop
        }
        document.onmousemove = e => {
          // 取消浏览器因回流导致的默认事件及冒泡事件
          e.preventDefault()
          if (e.stopPropagation) {
            e.stopPropagation()
          } else {
            e.cancelable = true
          }
          if (dragX === -1 && dragY === -1) {
            const rightArea = dom.offsetWidth - rect.offsetWidth - (childBorder * 2) // 右边界
            const bottomArea = dom.offsetHeight - rect.offsetHeight - (childBorder * 2) // 下边界
            const leftArea = 0 // 左边界
            const topArea = 0 // 上边界
            const moveLeft = e.clientX - left > rightArea ? rightArea : (e.clientX - left< leftArea ? leftArea : e.clientX - left)
            const moveTop = e.clientY - top > bottomArea ? bottomArea : (e.clientY - top < topArea ? topArea : e.clientY - top)
            rect.style.left = moveLeft + 'px'
            rect.style.top = moveTop + 'px'
          }
        }
当mousedownHandle返回的不是[-1, -1]时,例如[2, 2],那就说明是向右下角拉伸(目前实现了向右下角拉伸,其余拉伸童鞋们可以自己思考喔,同理可参考我的来写哟~)
    document.onmousemove = e => {
          // 取消浏览器因回流导致的默认事件及冒泡事件
          e.preventDefault()
          if (e.stopPropagation) {
            e.stopPropagation()
          } else {
            e.cancelable = true
          }
          if (dragX === 2 && dragY === 2) { // 右下角拉伸
            rect.style.width = (e.clientX - left + width > dom.offsetWidth - rect.offsetLeft - (parentBorder * 2 + childBorder * 2) ? dom.offsetWidth - rect.offsetLeft - (parentBorder * 2 + childBorder * 2) : e.clientX - left + width) + 'px'
            rect.style.height = (e.clientY- top + height > dom.offsetHeight - rect.offsetTop - (parentBorder * 2 + childBorder * 2) ? dom.offsetHeight - rect.offsetTop - (parentBorder * 2 + childBorder * 2) : e.clientY- top + height) + 'px'
          }
    }
4、源码展示
可直接运行展示
<!DOCTYPE html>
<html lang="en">
<head>
  <meta charset="UTF-8">
  <meta http-equiv="X-UA-Compatible" content="IE=edge">
  <meta name="viewport" content="width=device-width, initial-scale=1.0">
  <title>drawRectangle</title>
  <style>
    *{
      margin: 0;
      padding: 0;
    }
    .container{
      width: 1000px;
      height: 700px;
      margin: 10% auto;
    }
    .control{
      margin-bottom: 10px;
    }
    #out-box{
      width: 100%;
      height: 600px;
      border: 2px solid #000;
      position: relative;
      overflow: hidden;
    }
    .rect{
      position: absolute;
      box-shadow: 0 0 0 1999px rgba(0, 0, 0, .4);
      left: -9999px;
      top: 0;
      width: 0;
      height: 0;
      border: 2px solid orange;
      cursor: move;
    }
    .rect::after{
      content: '';
      position: absolute;
      right: -6px;
      bottom: -6px;
      width: 6px;
      height: 6px;
      border-radius: 50%;
      border: 2px solid orange;
      background-color: #fff;
      cursor: nwse-resize;
    }
  </style>
</head>
<body>
  <div class="container">
    <div class="control">
      <button id="clear">清屏</button>
      <button id="start-paint">开始绘制</button>
    </div>
    <div id="out-box">
      <div id="rect" class="rect"></div>
    </div>
  </div>

  <script>
    const dom = document.getElementById('out-box')
    const rect  = document.getElementById('rect')
    const origin = dom.getBoundingClientRect()
    const parentBorder = Number(getComputedStyle(dom, null).borderWidth.split('px')[0]) // 父元素边框 如果你明确知道边框宽度,就不需要这行,直接赋值就行
    const childBorder = Number(getComputedStyle(rect, null).borderWidth.split('px')[0]) // 子元素边框 如果你明确知道边框宽度,就不需要这行,直接赋值就行
    /**
     * 开始绘制
     */
    const startMouse = () => {
      dom.style.cursor = 'crosshair'
      dom.onmousedown = e => {
        if (e.target !== dom) return
        const left = e.clientX - origin.x
        const top = e.clientY - origin.y
        rect.style.left = left + 'px'
        rect.style.top = top + 'px'
        document.onmousemove = e => {
          // 取消浏览器因回流导致的默认事件及冒泡事件
          e.preventDefault()
          if (e.stopPropagation) {
            e.stopPropagation()
          } else {
            e.cancelable = true
          }
          // 宽高边界限制
          const widthArea = e.clientX - origin.x > dom.offsetWidth - (parentBorder * 2 + childBorder * 2) ? dom.offsetWidth - (parentBorder * 2 + childBorder * 2) : e.clientX - origin.x
          const heightArea = e.clientY - origin.y > dom.offsetHeight - (parentBorder * 2 + childBorder * 2) ? dom.offsetHeight - (parentBorder * 2 + childBorder * 2) : e.clientY - origin.y
          rect.style.width = widthArea - left + 'px'
          rect.style.height = heightArea - top + 'px'
        }
        document.onmouseup = e => {
          dom.onmousedown = null
          document.onmousemove = null
          document.onmouseup = null
          dom.style.cursor = ''
          editMouse()
        }
      }
    }
    const editMouse = () => {
      rect.onmousedown = e => {
        if (e.target !== rect) return
        const flag = mousedownHandle(e)
        let left = e.clientX
        let top = e.clientY
        const width = rect.offsetWidth
        const height = rect.offsetHeight
        const [dragX, dragY] = flag
        // 拖动
        if (dragX === -1 && dragY === -1) {
          left -= rect.offsetLeft // 要保持之前矩形框的坐标值
          top -= rect.offsetTop
        }
        document.onmousemove = e => {
          // 取消浏览器因回流导致的默认事件及冒泡事件
          e.preventDefault()
          if (e.stopPropagation) {
            e.stopPropagation()
          } else {
            e.cancelable = true
          }
          if (dragX === -1 && dragY === -1) {
            const rightArea = dom.offsetWidth - rect.offsetWidth - (childBorder * 2) // 右边界
            const bottomArea = dom.offsetHeight - rect.offsetHeight - (childBorder * 2) // 下边界
            const leftArea = 0 // 左边界
            const topArea = 0 // 上边界
            const moveLeft = e.clientX - left > rightArea ? rightArea : (e.clientX - left< leftArea ? leftArea : e.clientX - left)
            const moveTop = e.clientY - top > bottomArea ? bottomArea : (e.clientY - top < topArea ? topArea : e.clientY - top)
            rect.style.left = moveLeft + 'px'
            rect.style.top = moveTop + 'px'
          } else if (dragX === 2 && dragY === 2) { // 右下角拉伸
            rect.style.width = (e.clientX - left + width > dom.offsetWidth - rect.offsetLeft - (parentBorder * 2 + childBorder * 2) ? dom.offsetWidth - rect.offsetLeft - (parentBorder * 2 + childBorder * 2) : e.clientX - left + width) + 'px'
            rect.style.height = (e.clientY- top + height > dom.offsetHeight - rect.offsetTop - (parentBorder * 2 + childBorder * 2) ? dom.offsetHeight - rect.offsetTop - (parentBorder * 2 + childBorder * 2) : e.clientY- top + height) + 'px'
          }
        }
        document.onmouseup = e => {
          document.onmousemove = null
          document.onmouseup = null
        }
      }
    }
    /**
     * mousedown逻辑处理
     */
    const mousedownHandle = (e) => {
      const startX = e.offsetX
      const startY = e.offsetY
      const width = e.target.offsetWidth
      const height = e.target.offsetHeight
      const difference = 10 // 点击四边角10 px范围为拉伸,其他为拖动,这个值可以根据你需要的来调整
      let left = 0 // 0 => left, 1 => middle, 2 => right, -1 => 点击的位置不能被拖动
      let top = 0 // 0 => top, 1 => middle, 2 => bottom, -1 => 点击的位置不能被拖动
      if (startX < difference && startX > 0) { // 点击的位置为矩形左侧0 ~ 6px
        left = 0
      } else if (startX > width / 2 - difference && startX < width / 2 + difference) { // 点击的位置为矩形中间 width/2 - 6px ~ width/2 + 6px
        left = 1
      } else if (startX < width && startX > width - difference){ // 点击的位置为矩形右侧 width - 6px ~ width
        left = 2
      } else {
        left = -1
      }

      if (startY < difference && startY > 0) { // 点击的位置为矩形上侧0 ~ 6px
        top = 0
      } else if (startY > height / 2 - difference && startY < height / 2 + difference) { // 点击的位置为矩形中间 height/2 - 6px ~ height/2 + 6px
        top = 1
      } else if (startY < height && startY > height - difference){ // 点击的位置为矩形下侧 height - 6px ~ height
        top = 2
      } else {
        top = -1
      }
      if (left === -1 || top === -1 || (left === 1 && top === 1)) {
        return [-1, -1]
      }
      return [left, top] // 只会有八个位置能被准确返回,其余都是返回[-1, -1]
    }

    const clear = document.querySelector('#clear') // 清屏
    const startPaint = document.querySelector('#start-paint') // 开始绘制
    clear.onclick = e => {
      rect.style.left = '-9999px'
      rect.style.top = 0
      rect.style.width = 0
      rect.style.height = 0
    }
    startPaint.onclick = e => {
      startMouse()
    }
  </script>
</body>
</html>
5、问题答疑?
1、在onmousedown里为啥要加上 if (e.target !== dom) return 这行代码呢?
dom.onmousedown = e => {
        if (e.target !== dom) return
}因为我在多次写的时候发现呀,很多时候矩形框的下面就会有类似截图软件下的涂鸦功能,当你点击涂鸦按钮时,其实这个时候你也是点击dom的(可理解为事件穿透),但是我们写逻辑的时候不想要涂鸦按钮和dom一起绑定住想区分开,所以这个时候判断onmousedown的对象和dom是否一致,不一致的话,就不执行后续操作。
2、在onmousemove里为啥要加 e.preventDefault() ... 这段代码呢?
    document.onmousemove = e => {
          e.preventDefault()
          if (e.stopPropagation) {
            e.stopPropagation()
          } else {
            e.cancelable = true
          }
    }
注意哦,只在绑定对象为document才加这一段代码,其他的不加~
加上这段代码是因为在mousemove来回移动到当前矩形框时,会出现浏览器的黑色拒绝符号并会卡顿,导致操作不流畅,所以加上这段代码可以取消浏览器因回流导致的默认事件及冒泡事件
3、 矩形框周围的黑色半透明蒙层是如何实现的?
box-shadow: 0 0 0 1999px rgba(0, 0, 0, .4);是通过这行样式实现的喔,其中1999px基本满足大部分屏幕的要求,当然也可以根据你的需求来设置哦,但是一定要切记,外层盒子要设置overflow,不然矩形框的阴影将会溢出去
overflow: hidden;4、绘制矩形框时的边界范围限制?
其实可以看到,绘制时,矩形框的left和top都是已经确定好的,只是在mousemove时候改变宽高,但是宽高不能超过外层盒子的范围呀,所以就是在你mousemove时,将计算出来的宽高与父级offsetWidth,offsetHeight进行比较(记住为了更好看,我这里是将边框宽度也一起计算进来的喔,如果你不想计算的话,影响也不大~)(内部变量找不到的可以到上面源码里查看全部喔~)
          // 宽高边界限制
          const widthArea = e.clientX - origin.x > dom.offsetWidth - (parentBorder * 2 + childBorder * 2) ? dom.offsetWidth - (parentBorder * 2 + childBorder * 2) : e.clientX - origin.x
          const heightArea = e.clientY - origin.y > dom.offsetHeight - (parentBorder * 2 + childBorder * 2) ? dom.offsetHeight - (parentBorder * 2 + childBorder * 2) : e.clientY - origin.y
          rect.style.width = widthArea - left + 'px'
          rect.style.height = heightArea - top + 'px'
5、拖动矩形框时的边界范围限制?
这里给出了上下左右四个边界范围限制,当移动left,top超过这个范围时,都将给予处理,使矩形框不会超过外层盒子的边界范围(内部变量找不到的可以到上面源码里查看全部喔~)
            const rightArea = dom.offsetWidth - rect.offsetWidth - (childBorder * 2) // 右边界
            const bottomArea = dom.offsetHeight - rect.offsetHeight - (childBorder * 2) // 下边界
            const leftArea = 0 // 左边界
            const topArea = 0 // 上边界
            const moveLeft = e.clientX - left > rightArea ? rightArea : (e.clientX - left< leftArea ? leftArea : e.clientX - left)
            const moveTop = e.clientY - top > bottomArea ? bottomArea : (e.clientY - top < topArea ? topArea : e.clientY - top)
            rect.style.left = moveLeft + 'px'
            rect.style.top = moveTop + 'px'
6、拉伸矩形框时的边界范围限制?
拉伸的时候,其实矩形框的left,top,width和height都可能需要改变,不过具体要看你拉伸的是哪个边角,下面我代码里是拉伸的右下角,所以只需要改变矩形框宽高即可。当宽高的长度等于或超过外层盒子的offsetWidth,offsetHeight减去矩形框的offsetLeft,offsetTop时,就说明已经到范围边界了,这个长度不能再被增加了。(内部变量找不到的可以到上面源码里查看全部喔~)
            rect.style.width = (e.clientX - left + width > dom.offsetWidth - rect.offsetLeft - (parentBorder * 2 + childBorder * 2) ? dom.offsetWidth - rect.offsetLeft - (parentBorder * 2 + childBorder * 2) : e.clientX - left + width) + 'px'
            rect.style.height = (e.clientY- top + height > dom.offsetHeight - rect.offsetTop - (parentBorder * 2 + childBorder * 2) ? dom.offsetHeight - rect.offsetTop - (parentBorder * 2 + childBorder * 2) : e.clientY- top + height) + 'px'
---不了解的可以评论哟,林大大哟原创---






![[附源码]java毕业设计家校通信息管理系统](https://img-blog.csdnimg.cn/fd1eacda3e3e4a9da6abbf9b9df004e5.png)
