今天是教师节,恭祝全体老师们节日快乐!😊
一、ChatGLM2-6B
在本专栏前面文章中实验了使用 ChatYuan-large-v2 Freeze 微调训练医疗问答任务,训练后效果整体还可以,这篇文章继续探索使用最近比较火的 ChatGLM 官方推出的 p-tuning-v2 的方式训练医疗问答任务。而对于 ChatGLM 模型则使用新出不久的 ChatGLM2-6B 。
ChatGLM2-6B 是 ChatGLM-6B 的第二代版本,在保留了初代模型对话流畅、部署门槛较低等众多优秀特性的基础之上,同时引入了许多新特性,如:更强大的性能、更长的上下文、更高效的推理、更开放的协议 等。
更多详细的介绍可参考官方 github :
官方 github 地址:https://github.com/THUDM/ChatGLM2-6B
P-tuning v2 微调技术利用 deep prompt tuning,即对预训练 Transformer 的每一层输入应用 continuous prompts 。deep prompt tuning 增加了 continuo us prompts 的能力,并缩小了跨各种设置进行微调的差距,特别是对于小型模型和困难任务。

上图左边为 P-Tuning,右边为P-Tuning v2。P-Tuning v2 层与层之间的 continuous prompt 是相互独立的。
论文地址:https://arxiv.org/pdf/2110.07602.pdf
github地址:https://github.com/THUDM/P-tuning-v2
二、ChatGLM2-6B 模型下载
huggingface 地址:https://huggingface.co/THUDM/chatglm2-6b/tree/main

三、数据集处理
数据集还是使用 GitHub 上的 Chinese-medical-dialogue-data 中文医疗对话数据集。
GitHub 地址如下:
https://github.com/Toyhom/Chinese-medical-dialogue-data
数据分了 6 个科目类型:
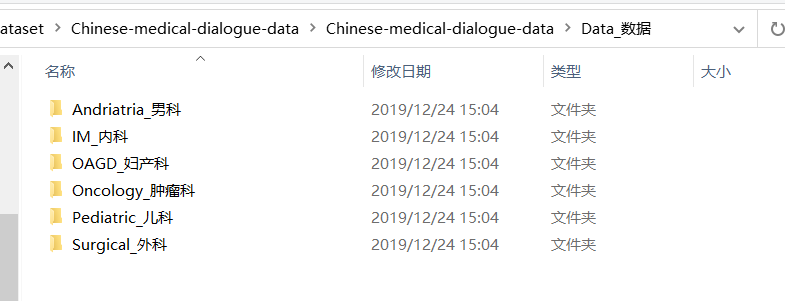
数据格式如下所示:

其中 ask 为病症的问题描述,answer 为病症的回答。
整体加起来数据比较多,这里为了演示效果,只训练 内科、肿瘤科、儿科、外科 四个科目的数据,并且每个科目取前 10000 条数据进行训练、2000 条数据进行验证:
import json
import pandas as pd

data_path = [
    "./data/Chinese-medical-dialogue-data-master/Data_数据/IM_内科/内科5000-33000.csv",
    "./data/Chinese-medical-dialogue-data-master/Data_数据/Oncology_肿瘤科/肿瘤科5-10000.csv",
    "./data/Chinese-medical-dialogue-data-master/Data_数据/Pediatric_儿科/儿科5-14000.csv",
    "./data/Chinese-medical-dialogue-data-master/Data_数据/Surgical_外科/外科5-14000.csv",
]

train_json_path = "./data/train.json"
val_json_path = "./data/val.json"
# 每个数据取 10000 条作为训练
train_size = 10000
# 每个数据取 2000 条作为验证
val_size = 2000


def doHandler():
    train_f = open(train_json_path, "a", encoding='utf-8')
    val_f = open(val_json_path, "a", encoding='utf-8')
    for path in data_path:
        data = pd.read_csv(path, encoding='ANSI')
        train_count = 0
        val_count = 0
        for index, row in data.iterrows():
            ask = row["ask"]
            answer = row["answer"]
            line = {
                "content": ask,
                "summary": answer
            }
            line = json.dumps(line, ensure_ascii=False)
            if train_count < train_size:
                train_f.write(line + "\n")
                train_count = train_count + 1
            elif val_count < val_size:
                val_f.write(line + "\n")
                val_count = val_count + 1
            else:
                break
    print("数据处理完毕!")
    train_f.close()
    val_f.close()


if __name__ == '__main__':
    doHandler()
处理之后可以看到两个生成的文件:

四、P-Tuning v2 训练
拉取官网训练脚本:
git clone https://github.com/THUDM/ChatGLM2-6B
下载相应依赖:
pip install -r requirements.txt -i https://pypi.tuna.tsinghua.edu.cn/simple
此外还需安装:
pip install rouge_chinese nltk jieba datasets -i https://pypi.tuna.tsinghua.edu.cn/simple
修改 ptuning 下的 train.sh 文件:
PRE_SEQ_LEN=300
LR=2e-2
NUM_GPUS=1

torchrun --standalone --nnodes=1 --nproc-per-node=$NUM_GPUS main.py \
    --do_train \
    --train_file data/train.json \
    --validation_file data/val.json \
    --preprocessing_num_workers 10 \
    --prompt_column content \
    --response_column summary \
    --overwrite_cache \
    --model_name_or_path /home/chatglm2/chatglm-6b \
    --output_dir output/adgen-chatglm2-6b-pt-$PRE_SEQ_LEN-$LR \
    --overwrite_output_dir \
    --max_source_length 300 \
    --max_target_length 1024 \
    --per_device_train_batch_size 1 \
    --per_device_eval_batch_size 1 \
    --gradient_accumulation_steps 16 \
    --predict_with_generate \
    --max_steps 3000 \
    --logging_steps 10 \
    --save_steps 1000 \
    --learning_rate $LR \
    --pre_seq_len $PRE_SEQ_LEN \
    --quantization_bit 4
其中 参数解释如下:
–standalone` 以单机模式训练。
–nnodes` 节点数。这里只有一个节点,设置为 1。
–nproc-per-node` 每个节点上的进程数。
–do_train` 执行训练任务。
–train_file` 训练数据文件路径, 上面生成的 train.json 文件。
–validation_file` 验证数据文件路径, 上面生成的 val.json 文件。
–preprocessing_num_workers` 指定数据预处理时的 workers 数。
–prompt_column` 输入信息的字段名称。
–response_column` 输出信息的字段名称。
–overwrite_cache` 覆盖缓存文件。
–model_name_or_path` 预训练模型的名称或路径,注意这里我是用的下载后的模型存放地址,需要修改为你的。
–output_dir` 模型保存目录。
–overwrite_output_dir` 覆盖输出目录。
–max_source_length` 输入文本的最大长度。
–max_target_length` 输出文本的最大长度。
–per_device_train_batch_size` 训练时的批次大小。
–per_device_eval_batch_size` 验证时的批次大小。
–gradient_accumulation_steps` 累积多少个梯度之后再进行一次反向传播。
–predict_with_generate` 预测时使用生成模式。
–max_steps` 最大训练轮数。
–logging_steps` 多少轮打印一次日志。
–save_steps` 多少轮保存一次模型。
–learning_rate` 初始学习率。
–pre_seq_len` 预处理时选取的序列长度。
–quantization_bit` 量化位大小。
执行后可以看到如下打印日志:

训练过程:

训练结束:

最后在 output 目录下可以看到每 1000 步保存的模型。
五、模型测试
5.1 单独调用测试:
from fastapi import FastAPI, Request
from fastapi.middleware.cors import CORSMiddleware
from transformers import AutoTokenizer, AutoModel, AutoConfig
import uvicorn, json, datetime
import torch
import os


def main():
    pre_seq_len = 300
    # 训练权重地址
    checkpoint_path = "ptuning/output/adgen-chatglm2-6b-pt-300-2e-2/checkpoint-3000"

    tokenizer = AutoTokenizer.from_pretrained("chatglm-6b", trust_remote_code=True)
    config = AutoConfig.from_pretrained("chatglm-6b", trust_remote_code=True, pre_seq_len=pre_seq_len)
    model = AutoModel.from_pretrained("chatglm-6b", config=config, device_map="auto", trust_remote_code=True)
    prefix_state_dict = torch.load(os.path.join(checkpoint_path, "pytorch_model.bin"))
    new_prefix_state_dict = {}
    for k, v in prefix_state_dict.items():
        if k.startswith("transformer.prefix_encoder."):
            new_prefix_state_dict[k[len("transformer.prefix_encoder."):]] = v
    model.transformer.prefix_encoder.load_state_dict(new_prefix_state_dict)
    # 量化
    model = model.quantize(4)
    model.eval()

    # 问题
    question = "突然感到了不适,去检查后竟然得了这个病,请问:宝宝白天爱磨牙会是哪些情况呢"

    response, history = model.chat(tokenizer,
                                   question,
                                   history=[],
                                   max_length=2048,
                                   top_p=0.7,
                                   temperature=0.95)

    print("回答:", response)

    if torch.backends.mps.is_available():
        torch.mps.empty_cache()


if __name__ == '__main__':
    main()

回答: 孩子磨牙可能会是缺钙引来的,建议带孩子去医院仔细检查下微量元素,明确病因后有针对性的治疗。平时要留意孩子的饮食卫生,防止排便辛辣刺激性食物,多给孩子喝温开水,多吃蔬菜水果,消化维生素,增进胃肠道扭动。对于家长朋友们来说,要尽可能的帮助孩子及时治疗疾病,另外宝宝在日常生活中饮食也要注意,要营养的均衡,不要过度进补也不要营养不良哦。
5.2 封装成 Api 测试
from fastapi import FastAPI, Request
from fastapi.middleware.cors import CORSMiddleware
from transformers import AutoTokenizer, AutoModel, AutoConfig
import uvicorn, json, datetime
import torch
import os

app = FastAPI()

# 允许所有域的请求
app.add_middleware(
    CORSMiddleware,
    allow_origins=["*"],
    allow_credentials=True,
    allow_methods=["*"],
    allow_headers=["*"],
)


@app.post("/")
async def create_item(request: Request):
    global model, tokenizer
    json_post_raw = await request.json()
    json_post = json.dumps(json_post_raw)
    json_post_list = json.loads(json_post)
    prompt = json_post_list.get('prompt')
    history = json_post_list.get('history')
    max_length = json_post_list.get('max_length')
    top_p = json_post_list.get('top_p')
    temperature = json_post_list.get('temperature')
    response, history = model.chat(tokenizer,
                                   prompt,
                                   history=history,
                                   max_length=max_length if max_length else 2048,
                                   top_p=top_p if top_p else 0.7,
                                   temperature=temperature if temperature else 0.95)
    now = datetime.datetime.now()
    time = now.strftime("%Y-%m-%d %H:%M:%S")
    answer = {
        "response": response,
        "history": history,
        "status": 200,
        "time": time
    }
    log = "[" + time + "] " + '", prompt:"' + prompt + '", response:"' + repr(response) + '"'
    print(log)
    if torch.backends.mps.is_available():
        torch.mps.empty_cache()
    return answer


if __name__ == '__main__':
    pre_seq_len = 300
    checkpoint_path = "ptuning/output/adgen-chatglm2-6b-pt-300-2e-2/checkpoint-3000"

    tokenizer = AutoTokenizer.from_pretrained("chatglm-6b", trust_remote_code=True)
    config = AutoConfig.from_pretrained("chatglm-6b", trust_remote_code=True, pre_seq_len=pre_seq_len)
    model = AutoModel.from_pretrained("chatglm-6b", config=config, device_map="auto", trust_remote_code=True)
    prefix_state_dict = torch.load(os.path.join(checkpoint_path, "pytorch_model.bin"))
    new_prefix_state_dict = {}
    for k, v in prefix_state_dict.items():
        if k.startswith("transformer.prefix_encoder."):
            new_prefix_state_dict[k[len("transformer.prefix_encoder."):]] = v
    model.transformer.prefix_encoder.load_state_dict(new_prefix_state_dict)
    ## 量化
    model = model.quantize(4)
    model = model.cuda()
    model.eval()
    uvicorn.run(app, host='0.0.0.0', port=8103, workers=1)
使用 postMan 测试:

最后测试下原有知识的影响:


