系列文章目录
记录CV领域大模型的学习历程,欢迎大家一起讨论,互相学习。
ViT,DETR(一),DETR(二)DETR(三)
文章目录
- 系列文章目录
- 前言
- 一、整体框架
- 1.Patch Embedding
- 2.Patch Merging
- 3.Swin Transformer Block
- 3.1 Window Partition/Reverse
- 3.2 Window-MSA
- 3.3 Relative Position Bias
- 3.4 Shifted Window Attention
前言
Swin Transformer是2021年微软亚洲研究院发表在ICCV(ICCV 2021 best paper)上的一篇文章。Swin Transformer是继ViT之后,Transformer模型在视觉领域的又一次碰撞。该论文一经发表就已在多项视觉任务中霸榜,值得大家仔细研读。
Swin Transformer可能是CNN的完美替代方案。作者分析表明,Transformer从NLP迁移到CV上没有大放异彩主要有两点原因:1. 同样语义的词但是他们的尺寸不同,比如智能驾驶的实例分割任务中,摄像机拍到图片中的车大小不一。2. CV比起NLP需要更大的分辨率,而且CV中使用Transformer的计算复杂度是图像尺度的平方,这会导致计算量过于庞大。
相比于ViT,Swin Transfomer具有以下优点:
1.使用层级式结构(dawnsaple),可以提供各个尺度的特征信息。
2.自注意力是在小窗口计算,所以计算复杂度是线性关系而不是平方关系。
3.移动窗口的操作使得相邻的窗口有了交互。

论文地址:https://arxiv.org/abs/2103.14030
代码地址:mmcls
一、整体框架
 首先,我们看一下Swin的整体框架,整个模型采取层次化的设计,一共包含4个Stage,每个stage都会对输入下采样降低特征图的分辨率。流程总结如下:
- 在输入开始的时候,做了一个Patch Embedding(与VIT相同,用CNN做下采样),将图片切成一个个图块,并嵌入到Embedding。
- 继而进入stages,每个stage由Patch Merging和多个Swin Transformer Block组成。其中Patch Merging模块主要在每个Stage一开始降低图片分辨率。
- Swin Transformer Block具体结构如上图(b)所示,主要是LayerNorm,MLP,Window Attention 和 Shifted Window Attention组成 。之所以Swin Transformer Block个数是2的倍数,是因为Swin Transformer Block由Window Attention和 Shifted Window Attention两个attention模块组成。
- 最后,可以根据不同任务,分别进入各自head,如分类,就会经过池化形成one-hot特征与GT做loss。
class SwinTransformer(BaseBackbone):
    arch_zoo = {
        **dict.fromkeys(['t', 'tiny'],
                        {'embed_dims': 96,
                         'depths':     [2, 2,  6,  2],
                         'num_heads':  [3, 6, 12, 24]}),
     }  # yapf: disable

    def __init__(self,
                 arch='tiny',
                 img_size=224,
                 patch_size=4,
                 in_channels=3,
                 window_size=7,
                 drop_rate=0.,
                 drop_path_rate=0.1,
                 out_indices=(3, ),
                 use_abs_pos_embed=False,
                 interpolate_mode='bicubic',
                 with_cp=False,
                 frozen_stages=-1,
                 norm_eval=False,
                 pad_small_map=False,
                 norm_cfg=dict(type='LN'),
                 stage_cfgs=dict(),
                 patch_cfg=dict(),
                 init_cfg=None):
        super(SwinTransformer, self).__init__(init_cfg=init_cfg)

        self.embed_dims = self.arch_settings['embed_dims']
        self.depths = self.arch_settings['depths']
        self.num_heads = self.arch_settings['num_heads']
        self.num_layers = len(self.depths)
        self.out_indices = out_indices
        self.use_abs_pos_embed = use_abs_pos_embed
        self.interpolate_mode = interpolate_mode
        self.frozen_stages = frozen_stages

        _patch_cfg = dict(
            in_channels=in_channels,
            input_size=img_size,
            embed_dims=self.embed_dims,
            conv_type='Conv2d',
            kernel_size=patch_size,
            stride=patch_size,
            norm_cfg=dict(type='LN'),
        )
        _patch_cfg.update(patch_cfg)
        self.patch_embed = PatchEmbed(**_patch_cfg)
        self.patch_resolution = self.patch_embed.init_out_size

        for i, (depth,
                num_heads) in enumerate(zip(self.depths, self.num_heads)):
            if isinstance(stage_cfgs, Sequence):
                stage_cfg = stage_cfgs[i]
            else:
                stage_cfg = deepcopy(stage_cfgs)
            downsample = True if i < self.num_layers - 1 else False
            _stage_cfg = {
                'embed_dims': embed_dims[-1],
                'depth': depth,
                'num_heads': num_heads,
                'window_size': window_size,
                'downsample': downsample,
                'drop_paths': dpr[:depth],
                'with_cp': with_cp,
                'pad_small_map': pad_small_map,
                **stage_cfg
            }

            stage = SwinBlockSequence(**_stage_cfg)
            self.stages.append(stage)

            dpr = dpr[depth:]
            embed_dims.append(stage.out_channels)

        for i in out_indices:
            if norm_cfg is not None:
                norm_layer = build_norm_layer(norm_cfg, embed_dims[i + 1])[1]
            else:
                norm_layer = nn.Identity()

            self.add_module(f'norm{i}', norm_layer)

    def forward(self, x):
        x, hw_shape = self.patch_embed(x)
        if self.use_abs_pos_embed:
            x = x + resize_pos_embed(
                self.absolute_pos_embed, self.patch_resolution, hw_shape,
                self.interpolate_mode, self.num_extra_tokens)
        x = self.drop_after_pos(x)

        outs = []
        for i, stage in enumerate(self.stages):
            x, hw_shape = stage(x, hw_shape)
            if i in self.out_indices:
                norm_layer = getattr(self, f'norm{i}')
                out = norm_layer(x)
                out = out.view(-1, *hw_shape,
                               stage.out_channels).permute(0, 3, 1,
                                                           2).contiguous()
                outs.append(out)

        return tuple(outs)
1.Patch Embedding
在输入stages之前,我们需要将图片切成一个个patch,形成tokens。这里直接使用kernel=stride=4的conv来将x:[6, 3, 224, 224]下采样生成[6, 128, 56, 56]的特征,其中128是嵌入向量的大小(即一个token的长度),6表示batch-size。最后将H,W维度展开,并移动到第一维度形成[6, 3136, 128]的tokens。
class PatchEmbed(BaseModule):
    def __init__(self,
                 in_channels=3,
                 embed_dims=768,
                 conv_type='Conv2d',
                 kernel_size=16,
                 stride=16,
                 padding='corner',
                 dilation=1,
                 bias=True,
                 norm_cfg=None,
                 input_size=None,
                 init_cfg=None):
        super(PatchEmbed, self).__init__(init_cfg=init_cfg)

        self.embed_dims = embed_dims
        if isinstance(padding, str):
            self.adaptive_padding = AdaptivePadding(
                kernel_size=kernel_size,
                stride=stride,
                dilation=dilation,
                padding=padding)
            # disable the padding of conv
            padding = 0
        else:
            self.adaptive_padding = None
        padding = to_2tuple(padding)

        self.projection = build_conv_layer(
            dict(type=conv_type),
            in_channels=in_channels,
            out_channels=embed_dims,
            kernel_size=kernel_size,
            stride=stride,
            padding=padding,
            dilation=dilation,
            bias=bias)

        if norm_cfg is not None:
            self.norm = build_norm_layer(norm_cfg, embed_dims)[1]
        else:
            self.norm = None

        if input_size:
            input_size = to_2tuple(input_size)
            # `init_out_size` would be used outside to
            # calculate the num_patches
            # e.g. when `use_abs_pos_embed` outside
            self.init_input_size = input_size
            if self.adaptive_padding:
                pad_h, pad_w = self.adaptive_padding.get_pad_shape(input_size)
                input_h, input_w = input_size
                input_h = input_h + pad_h
                input_w = input_w + pad_w
                input_size = (input_h, input_w)

            # https://pytorch.org/docs/stable/generated/torch.nn.Conv2d.html
            h_out = (input_size[0] + 2 * padding[0] - dilation[0] *
                     (kernel_size[0] - 1) - 1) // stride[0] + 1
            w_out = (input_size[1] + 2 * padding[1] - dilation[1] *
                     (kernel_size[1] - 1) - 1) // stride[1] + 1
            self.init_out_size = (h_out, w_out)
        else:
            self.init_input_size = None
            self.init_out_size = None

    def forward(self, x):
        if self.adaptive_padding:   ## x:[6, 3, 224, 224]
            x = self.adaptive_padding(x)   ## x:[6, 3, 224, 224]

        x = self.projection(x)  ## x:[6, 128, 56, 56]
        out_size = (x.shape[2], x.shape[3])
        x = x.flatten(2).transpose(1, 2)   ## x:[6, 3136, 128]
        if self.norm is not None:
            x = self.norm(x)
        return x, out_size
2.Patch Merging
Swin采用PatchMerging的方式对输入进行下采样(除了stage1不做PatchMerging)。如下图所示,x是一个4x4的单通道特征,PatchMerging会使用一个kernel=2,stride=2,dilation=1的滑动窗口去取值。因此,就形成了4张2x2的单通道特征,将其cat完成下采样(一个4x4的特征变为2x2x4的特征),w,h维度降低为原来的1/2,channel变为原来4倍。
为了加速这个过程,mmcls使用self.sampler = nn.Unfold,原理如上所述,使用一个kernel=2,stride=2,dilation=1的滑动窗口去取值,并cat。然后,通过self.reduction(Linear(in_features=512, out_features=256, bias=False))将chennel维度降低,输出x:[6, 784, 256] (其中784=28*28,PatchMerging将56x56下采样至28x28)。

class PatchMerging(BaseModule):
    def __init__(self,
                 in_channels,
                 out_channels,
                 kernel_size=2,
                 stride=None,
                 padding='corner',
                 dilation=1,
                 bias=False,
                 norm_cfg=dict(type='LN'),
                 init_cfg=None):
        super().__init__(init_cfg=init_cfg)
        self.in_channels = in_channels
        self.out_channels = out_channels

        if isinstance(padding, str):
            self.adaptive_padding = AdaptivePadding(
                kernel_size=kernel_size,
                stride=stride,
                dilation=dilation,
                padding=padding)
            # disable the padding of unfold
            padding = 0
        else:
            self.adaptive_padding = None

        padding = to_2tuple(padding)
        self.sampler = nn.Unfold(
            kernel_size=kernel_size,
            dilation=dilation,
            padding=padding,
            stride=stride)

        sample_dim = kernel_size[0] * kernel_size[1] * in_channels

        if norm_cfg is not None:
            self.norm = build_norm_layer(norm_cfg, sample_dim)[1]
        else:
            self.norm = None

        self.reduction = nn.Linear(sample_dim, out_channels, bias=bias)

    def forward(self, x, input_size):

        B, L, C = x.shape  ## x:[6, 3136, 128]
        H, W = input_size ## (56,56)
        x = x.view(B, H, W, C).permute([0, 3, 1, 2])  # B, C, H, W [6, 128, 56, 56]
        if self.adaptive_padding:
            x = self.adaptive_padding(x)  ## x:[6, 128, 56, 56]
            H, W = x.shape[-2:]

        # Use nn.Unfold to merge patch. About 25% faster than original method,
        # but need to modify pretrained model for compatibility
        # if kernel_size=2 and stride=2, x should has shape (B, 4*C, H/2*W/2)
        x = self.sampler(x)  ## x:[6, 512, 784]

        out_h = (H + 2 * self.sampler.padding[0] - self.sampler.dilation[0] *
                 (self.sampler.kernel_size[0] - 1) -
                 1) // self.sampler.stride[0] + 1
        out_w = (W + 2 * self.sampler.padding[1] - self.sampler.dilation[1] *
                 (self.sampler.kernel_size[1] - 1) -
                 1) // self.sampler.stride[1] + 1

        output_size = (out_h, out_w)  ## (28,28)
        x = x.transpose(1, 2)  # B, H/2*W/2, 4*C [6, 784, 512]
        x = self.norm(x) if self.norm else x
        x = self.reduction(x)  ## x:[6, 784, 256]
        return x, output_size
3.Swin Transformer Block

Swin Transformer Block是该论文最核心的module,其中每个Block至少包含一个W-MSA(Window-MSA)与一个SW-MSA(ShiftWindow-MSA)。代码如下所示:
流程总结:
- 通过self.shift_size决定是否需要对query进行shift
- 通过self.get_attn_mask利用shift_size计算attn_mask
- 将query切成一个个窗口([6, 784, 256]->[6, 28, 28, 256]->[96, 7, 7, 256]->[96, 49, 256])
- 将query_windows与attn_mask送入self.w_msa计算多头注意力
- 将各个窗口合并回来如果之前有做shift操作,此时进行reverse shift
class ShiftWindowMSA(BaseModule):
    def __init__(self,
                 embed_dims,
                 num_heads,
                 window_size,
                 shift_size=0,
                 qkv_bias=True,
                 qk_scale=None,
                 attn_drop=0,
                 proj_drop=0,
                 dropout_layer=dict(type='DropPath', drop_prob=0.),
                 pad_small_map=False,
                 input_resolution=None,
                 auto_pad=None,
                 init_cfg=None):
        super().__init__(init_cfg)

        if input_resolution is not None or auto_pad is not None:
            warnings.warn(
                'The ShiftWindowMSA in new version has supported auto padding '
                'and dynamic input shape in all condition. And the argument '
                '`auto_pad` and `input_resolution` have been deprecated.',
                DeprecationWarning)

        self.shift_size = shift_size
        self.window_size = window_size
        assert 0 <= self.shift_size < self.window_size

        self.w_msa = WindowMSA(
            embed_dims=embed_dims,
            window_size=to_2tuple(self.window_size),
            num_heads=num_heads,
            qkv_bias=qkv_bias,
            qk_scale=qk_scale,
            attn_drop=attn_drop,
            proj_drop=proj_drop,
        )

        self.drop = build_dropout(dropout_layer)
        self.pad_small_map = pad_small_map

    def forward(self, query, hw_shape):
        B, L, C = query.shape  ##[6, 784, 256]
        H, W = hw_shape  ##(28,28)
        assert L == H * W, f"The query length {L} doesn't match the input "\
            f'shape ({H}, {W}).'
        query = query.view(B, H, W, C)  ## [6, 28, 28, 256]

        window_size = self.window_size  ## 7
        shift_size = self.shift_size  ## 0 or 3, 0->W-MSA,3->SW-MSA

        if min(H, W) == window_size:
            # If not pad small feature map, avoid shifting when the window size
            # is equal to the size of feature map. It's to align with the
            # behavior of the original implementation.
            shift_size = shift_size if self.pad_small_map else 0
        elif min(H, W) < window_size:
            # In the original implementation, the window size will be shrunk
            # to the size of feature map. The behavior is different with
            # swin-transformer for downstream tasks. To support dynamic input
            # shape, we don't allow this feature.
            assert self.pad_small_map, \
                f'The input shape ({H}, {W}) is smaller than the window ' \
                f'size ({window_size}). Please set `pad_small_map=True`, or ' \
                'decrease the `window_size`.'

        pad_r = (window_size - W % window_size) % window_size
        pad_b = (window_size - H % window_size) % window_size
        query = F.pad(query, (0, 0, 0, pad_r, 0, pad_b))

        H_pad, W_pad = query.shape[1], query.shape[2]

        # cyclic shift
        if shift_size > 0:
            query = torch.roll(
                query, shifts=(-shift_size, -shift_size), dims=(1, 2))

        attn_mask = self.get_attn_mask((H_pad, W_pad),
                                       window_size=window_size,
                                       shift_size=shift_size,
                                       device=query.device)

         # nW*B, window_size, window_size, C
        query_windows = self.window_partition(query, window_size) ## [96, 7, 7, 256] 96=6x4x4
        # nW*B, window_size*window_size, C
        query_windows = query_windows.view(-1, window_size**2, C) ## [96, 49, 256]

        # W-MSA/SW-MSA (nW*B, window_size*window_size, C)
        attn_windows = self.w_msa(query_windows, mask=attn_mask) ##[96, 49, 256]

        # merge windows
        attn_windows = attn_windows.view(-1, window_size, window_size, C) ##[96, 7, 7, 256]

        # B H' W' C
        shifted_x = self.window_reverse(attn_windows, H_pad, W_pad,  ## [6, 28, 28, 256]
                                        window_size)
        # reverse cyclic shift
        if self.shift_size > 0:
            x = torch.roll(
                shifted_x, shifts=(shift_size, shift_size), dims=(1, 2))
        else:
            x = shifted_x

        if H != H_pad or W != W_pad:
            x = x[:, :H, :W, :].contiguous()

        x = x.view(B, H * W, C)

        x = self.drop(x)

        return x
3.1 Window Partition/Reverse
Swin为了降低self-attention的计算量,利用Window Partition对特征[6, 28, 28, 256]
划分窗口(window_size=7),将其变换为维度为[96, 7, 7, 256]的特征,其中4x4个窗口合并到第一维度(6x4x4=96),并把窗口拉直([96, 49, 256]),送入self.w_msa中计算attention。
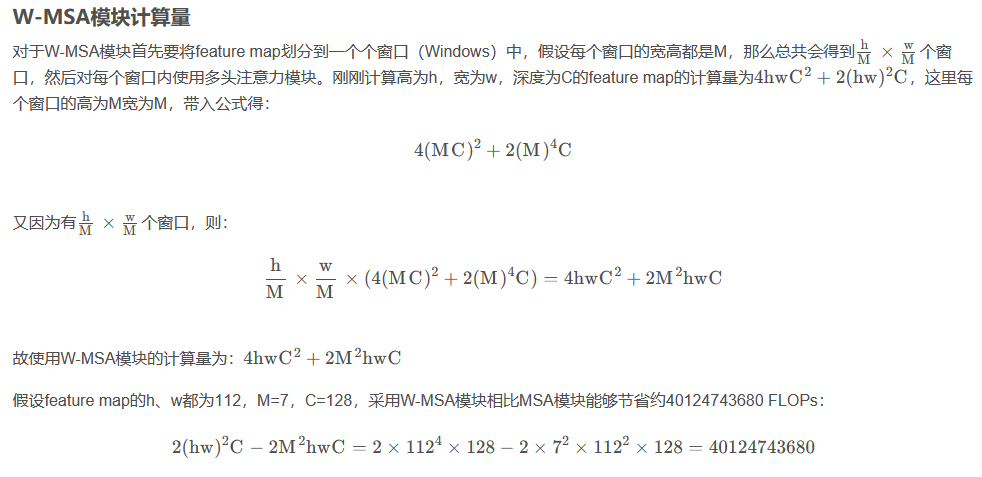
如下图所示,原本MSA需要对4x4的feature计算attention,通过Window Partition后,只需要对4个2x2的feature做attention。论文给出了MSA与W-MSA两者的计算量:

这个公式是咋来的,原论文中并没有细讲,这里直接引用博客。首先回忆下单头Self-Attention的公式,这个公式我们在ViT中详细介绍过。


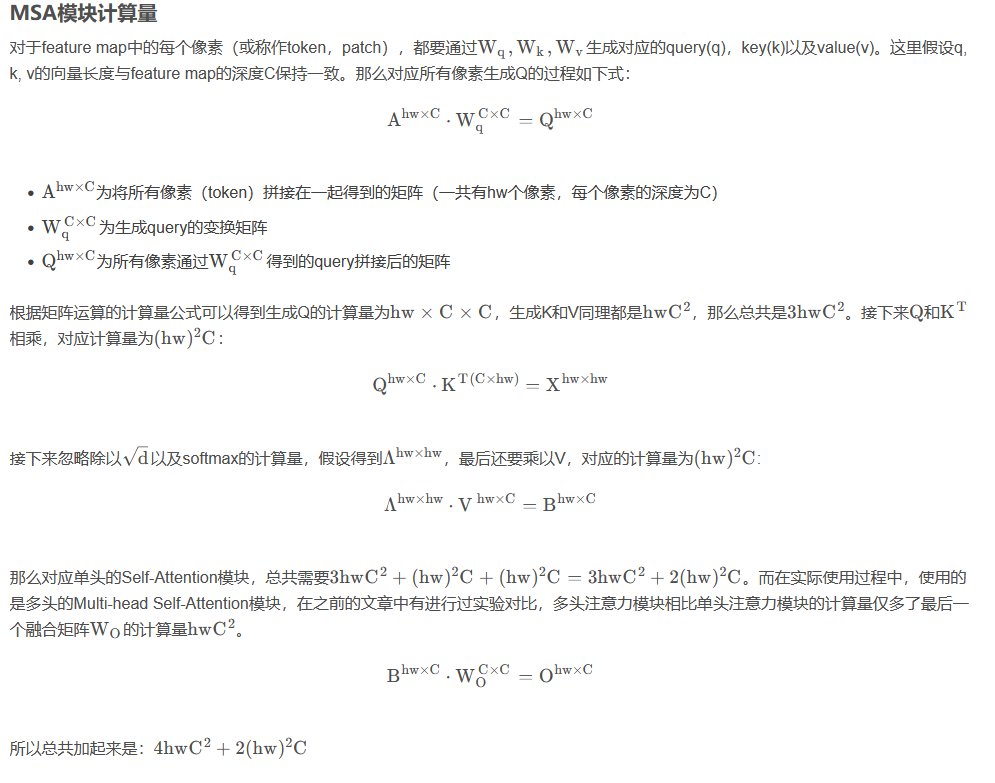
 window_reverse则是window_partition的逆变换。
 @staticmethod
    def window_reverse(windows, H, W, window_size):
        B = int(windows.shape[0] / (H * W / window_size / window_size))
        x = windows.view(B, H // window_size, W // window_size, window_size,
                         window_size, -1)
        x = x.permute(0, 1, 3, 2, 4, 5).contiguous().view(B, H, W, -1)
        return x

    @staticmethod
    def window_partition(x, window_size):
        B, H, W, C = x.shape
        x = x.view(B, H // window_size, window_size, W // window_size,
                   window_size, C)
        windows = x.permute(0, 1, 3, 2, 4, 5).contiguous()
        windows = windows.view(-1, window_size, window_size, C)
        return windows
3.2 Window-MSA
W-MSA与SW-MSA区别在于是否对query进行cyclic shift以及reverse cyclic shift,不管是W-MSA还是SW-MSA,程序都会进入WindowMSA中进行自注意力运算,与VIT不同的是,Swin加入了relative_position_bias相对位移偏执来计算attention。
class WindowMSA(BaseModule):
    def __init__(self,
                 embed_dims,
                 window_size,
                 num_heads,
                 qkv_bias=True,
                 qk_scale=None,
                 attn_drop=0.,
                 proj_drop=0.,
                 init_cfg=None):

        super().__init__(init_cfg)
        self.embed_dims = embed_dims
        self.window_size = window_size  # Wh, Ww
        self.num_heads = num_heads
        head_embed_dims = embed_dims // num_heads
        self.scale = qk_scale or head_embed_dims**-0.5

        # define a parameter table of relative position bias
        self.relative_position_bias_table = nn.Parameter(
            torch.zeros((2 * window_size[0] - 1) * (2 * window_size[1] - 1),
                        num_heads))  # 2*Wh-1 * 2*Ww-1, nH 这里为什么是13*13这个维度

        # About 2x faster than original impl
        Wh, Ww = self.window_size #(7,7)
        rel_index_coords = self.double_step_seq(2 * Ww - 1, Wh, 1, Ww) #tensor([[ 0,  1,  2,  3,  4,  5,  6, 13, 14, 15, 16, 17, 18, 19, 26, 27, 28, 29,
                                                                                #30, 31, 32, 39, 40, 41, 42, 43, 44, 45, 52, 53, 54, 55, 56, 57, 58, 65,
                                                                                #66, 67, 68, 69, 70, 71, 78, 79, 80, 81, 82, 83, 84]])
        rel_position_index = rel_index_coords + rel_index_coords.T
        rel_position_index = rel_position_index.flip(1).contiguous()
        self.register_buffer('relative_position_index', rel_position_index)

        self.qkv = nn.Linear(embed_dims, embed_dims * 3, bias=qkv_bias)
        self.attn_drop = nn.Dropout(attn_drop)
        self.proj = nn.Linear(embed_dims, embed_dims)
        self.proj_drop = nn.Dropout(proj_drop)

        self.softmax = nn.Softmax(dim=-1)

    def init_weights(self):
        super(WindowMSA, self).init_weights()

        trunc_normal_(self.relative_position_bias_table, std=0.02)

    def forward(self, x, mask=None):
        """
        Args:

            x (tensor): input features with shape of (num_windows*B, N, C)
            mask (tensor, Optional): mask with shape of (num_windows, Wh*Ww,
                Wh*Ww), value should be between (-inf, 0].
        """
        B_, N, C = x.shape
        qkv = self.qkv(x).reshape(B_, N, 3, self.num_heads,
                                  C // self.num_heads).permute(2, 0, 3, 1, 4)
        q, k, v = qkv[0], qkv[1], qkv[
            2]  # make torchscript happy (cannot use tensor as tuple)

        q = q * self.scale
        attn = (q @ k.transpose(-2, -1)) #49windows的query与key求相似度系数,attn=[-1,num_heads,49,49]

        relative_position_bias = self.relative_position_bias_table[   ##在self.relative_position_bias_table中挑选self.relative_position_index个元素
            self.relative_position_index.view(-1)].view(
                self.window_size[0] * self.window_size[1],
                self.window_size[0] * self.window_size[1],
                -1)  # Wh*Ww,Wh*Ww,nH
        relative_position_bias = relative_position_bias.permute(
            2, 0, 1).contiguous()  # nH, Wh*Ww, Wh*Ww
        attn = attn + relative_position_bias.unsqueeze(0)

        if mask is not None:
            nW = mask.shape[0]
            attn = attn.view(B_ // nW, nW, self.num_heads, N,
                             N) + mask.unsqueeze(1).unsqueeze(0)
            attn = attn.view(-1, self.num_heads, N, N)
            attn = self.softmax(attn)
        else:
            attn = self.softmax(attn)

        attn = self.attn_drop(attn)

        x = (attn @ v).transpose(1, 2).reshape(B_, N, C)
        x = self.proj(x)
        x = self.proj_drop(x)
        return x

    @staticmethod
    def double_step_seq(step1, len1, step2, len2):
        seq1 = torch.arange(0, step1 * len1, step1)
        seq2 = torch.arange(0, step2 * len2, step2)
        return (seq1[:, None] + seq2[None, :]).reshape(1, -1)
3.3 Relative Position Bias

在Swin Transformer中,将特征图按7x7 的窗口大小划分为多个小窗格,单独在每个小窗格内进行Attention计算。这样一来,窗口内就相当于有 49个Token即49个像素值,这些像素是有一定的位置关系的,故在Attention计算时,需要考虑这些像素的位置关系,故提出了相对位置编码,其与NLP 中的PE是有异曲同工之妙的。
首先我们需要知道代码中的relative_position_bias_table和relative_position_index,其中前者的数据类型为Parameter为可学习参数而,后者为buffer不可学习参数。实际上参与Attention计算的B(Attention公式中) 是relative_position_bias_table这个可学习的参数,而relative_position_index则是作为一个index去取relative_position_bias_table中的值来参与运算。
代码如下所示,Attention公式中的B是指self.relative_position_bias_table,里面存放着(2Wh-1)*(2Ww-1)(Ww=Wh=7)个可学习参数。相对位置偏执作用于
Q
K
T
QK^T
QKT之后,因此,相对位置偏执(49x49)与
Q
K
T
QK^T
QKT(49x49)的相似度是一一对应的。query中的第一个元素与k所有元素求相似度(第一个q与第一个k匹配作为中心),其相对位置索引可以从(0,0)排至(6,6),若以最后一个元素为中心那么相对索引可以从(-6,-6)排至(0,0)。这里想说明一下为什么相对位置索引需要用7x7的矩阵排列,因为窗口内的特征虽然被强行拉直变为49个元素,但它其实对应着7x7的语义信息(图片是具有宽高的二维结构),所以相对位置索引就是为了保留图片像素的位置关系而设置的,对[-6,6]13个数字排序,所有排序可能就存在13x13=169种,即在
Q
K
T
QK^T
QKT(维度49x49)矩阵中存在169个相对位置偏执索引。为了方便索引表示,将2维索引坐标拉直成1维,即通过(0-168)个数字来表示相对位置偏执的索引。通过self.double_step_seq生成0-84连续间隔为7的tensor(引用中显示了tensor)。
tensor([[ 0, 1, 2, 3, 4, 5, 6, 13, 14, 15, 16, 17, 18, 19, 26, 27, 28, 29,
30, 31, 32, 39, 40, 41, 42, 43, 44, 45, 52, 53, 54, 55, 56, 57, 58, 65,
66, 67, 68, 69, 70, 71, 78, 79, 80, 81, 82, 83, 84]])
最后根据广播机制构建49x49维度的相对位置偏执索引,tensor如下图所示。为什么这样可以构建相对位置偏执索引呢,我们来看下面的例子。

如果特征图的大小为2x2xN(N表示每个像素点的channels),那么经过拉直之后Q、K、V的维度都为4xN,那么QK.T 的维度就是4x4,其中第一个4表示4个像素点,第二个4表示对于每个像素点相对(包括自己在内的)四个像素点的重要程度;而相对位置编码要得到的结果也需要是4x4,其每行表示四个像素相对于某个固定像素的位置编码值。
以蓝色像素为参考点。然后用蓝色像素的绝对位置索引与其他位置索引进行相减,就得到其他位置相对蓝色像素的相对位置索引。例如黄色像素的绝对位置索引是 (0,1),则它相对蓝色像素的相对位置索引为 (0,0) − (0,1) = (0,−1) 。
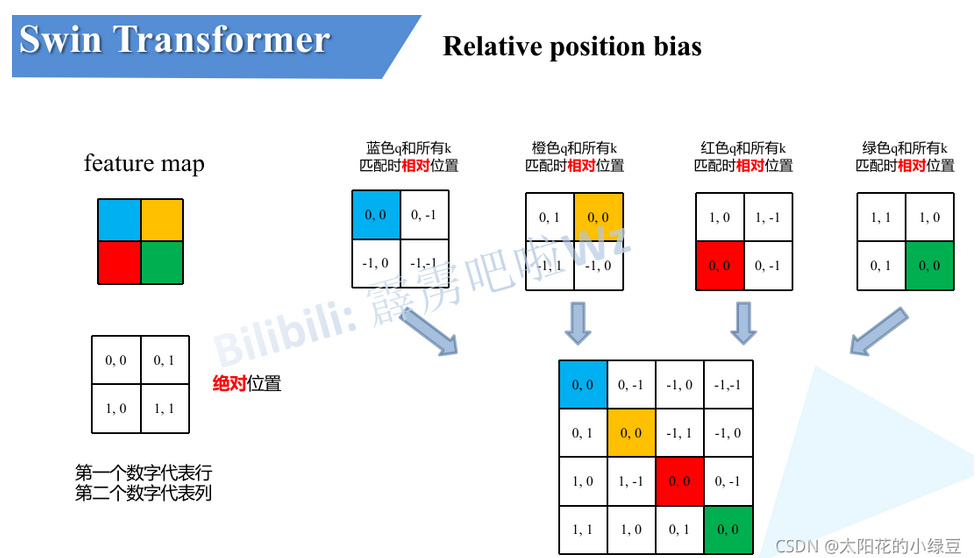 我们将黄色,红色,绿色为中心点的矩阵与蓝色中心点矩阵(蓝色q和所有k匹配时相对位置下的2x2矩阵)重合,可以得到一个3x3的矩阵(即下图第一个矩阵),只需要用0-8,9个数字就可以唯一表示它们,并以此作为相对位置偏移的索引。具体做法如下图所示,得到矩阵后先对行列分别+1,在对行元素x3,最后将行列元素分别相加。获得9个索引后,需要将蓝黄红绿4个2x2矩阵用对应位置的索引填充,并重新拉直组成4x4相对位置偏执索引。

# define a parameter table of relative position bias
        self.relative_position_bias_table = nn.Parameter(
            torch.zeros((2 * window_size[0] - 1) * (2 * window_size[1] - 1),
                        num_heads))  # 2*Wh-1 * 2*Ww-1, nH 这里为什么是13*13这个维度

        # About 2x faster than original impl
        Wh, Ww = self.window_size #(7,7)
        rel_index_coords = self.double_step_seq(2 * Ww - 1, Wh, 1, Ww) #tensor([[ 0,  1,  2,  3,  4,  5,  6, 13, 14, 15, 16, 17, 18, 19, 26, 27, 28, 29,
                                                                                #30, 31, 32, 39, 40, 41, 42, 43, 44, 45, 52, 53, 54, 55, 56, 57, 58, 65,
                                                                                #66, 67, 68, 69, 70, 71, 78, 79, 80, 81, 82, 83, 84]])
        rel_position_index = rel_index_coords + rel_index_coords.T
        rel_position_index = rel_position_index.flip(1).contiguous()
        self.register_buffer('relative_position_index', rel_position_index)
在 Q K T QK^T QKT相似度算完后需要加上B(self.relative_position_bias_table[self.relative_position_index]),其余部分均与MSA一样,不再赘述。
3.4 Shifted Window Attention
首先,看下Swin是怎么做位移和循环填充的:
如下图所示,我们将左边的矩阵分成9块,先把左边的ADE移至右侧,再将上边的BCA移至下册,就完成了shift操作,shift的尺寸是window_size/2。

在程序中直接使用torch.roll完成。但是roll后,出现了问题,图片语义发生了变化(原来在左上角的元素,现在变换到右下角了,因此不能在一个窗口计算attention),原来通过4个窗口(左图可以分为蓝红绿黄4个窗口)可以完成attention计算,现在需要分别计算ABCDEFGHI。为了降低计算量,Swin提出了attn_mask。
if shift_size > 0:
            query = torch.roll(
                query, shifts=(-shift_size, -shift_size), dims=(1, 2))
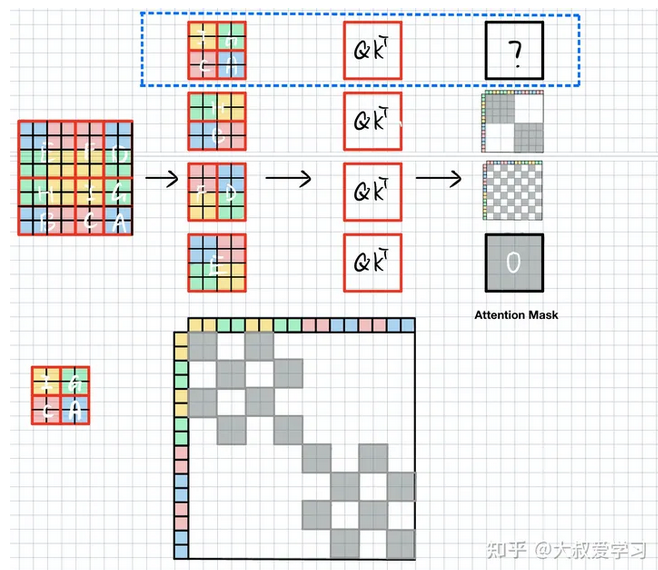
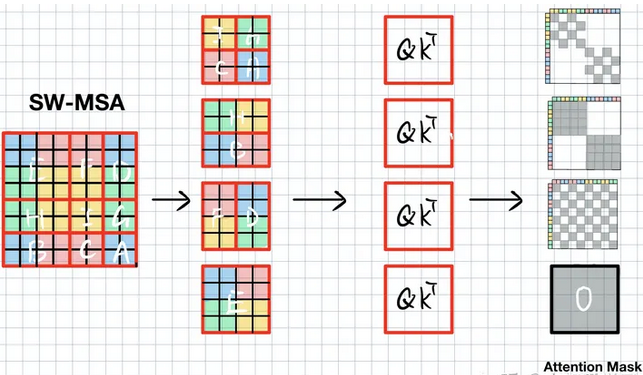
如下图所示,SW-WSA仍用4个窗口划分该特征,这4个窗口分别包含元素E,FD,HB,IGCA。

可以看到,这样排布之后,由于E的语义没有被破坏,E和W-MSA的window是没有区别的,E的att_mask直接赋值0。F和D是切了2块。我们算F的时候,不能算D。H和B同理。IGCA需要分别计算4块attention。
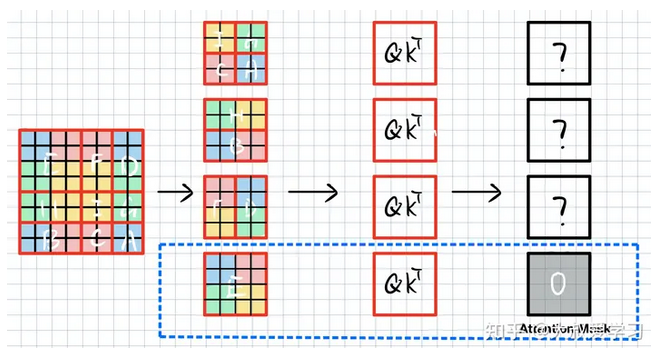
当计算F时,我们不希望右边D的信息干扰。首先将FD拉直(Swin中window_size=7,即7x7x32->49x32),如下图所示,将其沿xy轴排列,并计算self-attention(
Q
K
T
QK_T
QKT是逐个元素对应求相似度,QK是相同特征,其维度=[49x49])。由于F由红色黄色块组成,因此att_mask(维度[49x49])需要把左下图中白色块mask掉,填上-100,而灰色块是F需要的,填0,D块与F块类似。
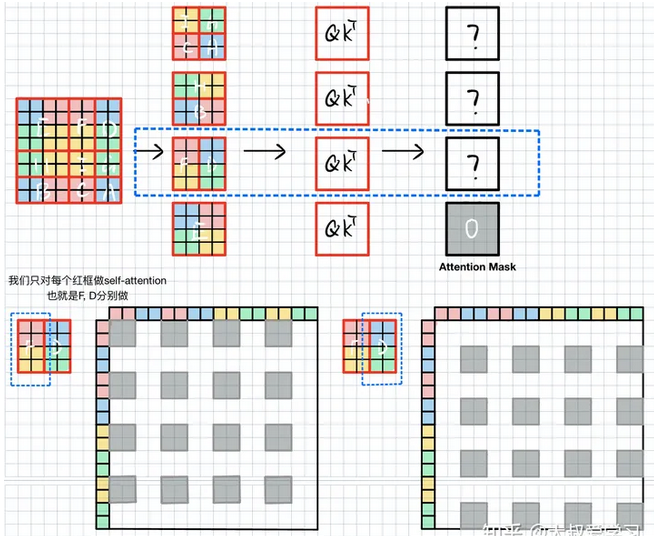
当计算HB块时,由于H,B拉直后,H占拉直后特征的前半段,B是后半段特征,因此att_mask很简单,只需要将两块灰色块填0其余-100就ok。

IGCA块则需要把对应颜色块分别用att_mask激活即可。
最终att_mask就如下图所示,灰色块给0,其余白色块为-100,将其与
Q
K
T
QK^T
QKT相加,softmax激活后可以把-100区域至0。这样我们就把原本需要9个window计算的self-attention,用4个window解决了。
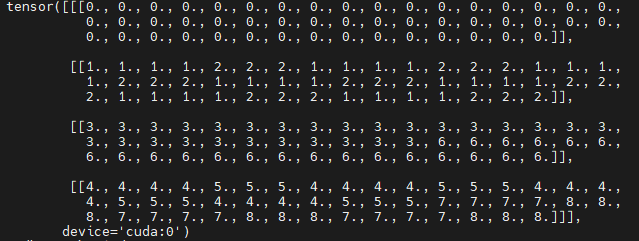
代码如下所示,window_size=7,shift_size=3,hw_shape可以是56x56,28x28,14x14,其中14x14就如上面介绍的例子类似,通过7x7的window将其分成2x2块,分别在4个window中计算self-attention,并roll reverse回去。由于roll的尺度是固定的,所以代码中直接用h_slices,w_slices绘制img_mask,如下所示。ShiftWindowMSA.window_partition将img_mask(维度[1,14,14,1])维度变成[4,7,7,1].

mask_windows 如下所示,我们将其沿xy拉直(如上面例子所述),并相减,这样获得的attn_mask 中为0的部分就是我们需要激活的部分,所有不等于0的部分则需要mask掉。
def get_attn_mask(hw_shape, window_size, shift_size, device=None):
        if shift_size > 0:
            img_mask = torch.zeros(1, *hw_shape, 1, device=device)
            h_slices = (slice(0, -window_size), slice(-window_size,
                                                      -shift_size),
                        slice(-shift_size, None))
            w_slices = (slice(0, -window_size), slice(-window_size,
                                                      -shift_size),
                        slice(-shift_size, None))
            cnt = 0
            for h in h_slices:
                for w in w_slices:
                    img_mask[:, h, w, :] = cnt
                    cnt += 1

            # nW, window_size, window_size, 1
            mask_windows = ShiftWindowMSA.window_partition(
                img_mask, window_size)
            mask_windows = mask_windows.view(-1, window_size * window_size)
            attn_mask = mask_windows.unsqueeze(1) - mask_windows.unsqueeze(2)
            attn_mask = attn_mask.masked_fill(attn_mask != 0, -100.0)
            attn_mask = attn_mask.masked_fill(attn_mask == 0, 0.0)
        else:
            attn_mask = None
        return attn_mask
28x28,56x56与14x14类似,只是多了中间很多值为0的att_mask。至此Swin就讲解完毕了。




![[NLP]LLM---大模型指令微调中的“Prompt”](https://img-blog.csdnimg.cn/30633f862e0e4de8ba02fe17f604cd46.png)
