文章目录
- 0. 注
- 1. 使用环境
- 2. OpenVINO
- 1. 安装OpenVINO
- 1. 安装虚拟环境平台
- 2. 创建虚拟环境
- 3. 下载OpenVINO notebook
- 4. 安装依赖
- 2. 重训练
- 1. 下载yolov7源码
- 2. 修改配置文件
- 2.1 weights
- 2.2 cfg
- 2.3 data
- 2.4 epochs
- 2.5 img-size
- 2.6 batch-size
- 2.7 device
- 2.8 可能出现的错误
- 2.8.1 raise RuntimeError(‘DataLoader worker (pid(s) {}) exited unexpectedly‘.format(pids_str))
- 2.8.2 Hint: This means that multiple copies of the OpenMP runtime have been linked into the program.
- 2.9 改动一览
- 3. 重训练
- 3. 量化提优
- 1. 准备工作
- 2. 226-yolov7-optimization.ipynb部分
- 2.1 Prerequisite
- 2.2 Check model inferences
- 3. Export to ONNX
- 4. Convert ONNX Model to OpenVINO Intermediate Representation (IR)
- 5. Verify model inference
- 6. Select inference device
- 7. Verify model accuracy
- 8. Optimize model using NNCF Post-training Quantization API
- 9. Validate Quantized model inference
- 10. Validate quantized model accuracy
- 4. 性能比对
0. 注
本文档用于2023年8月22日OpenVINO实验演示说明,以Windows为例
1. 使用环境
OS:Windows10
CPU:13th Gen Intel® Core™ i9-13900HX
GPU:NVIDIA GeForce RTX 4080 Laptop GPU
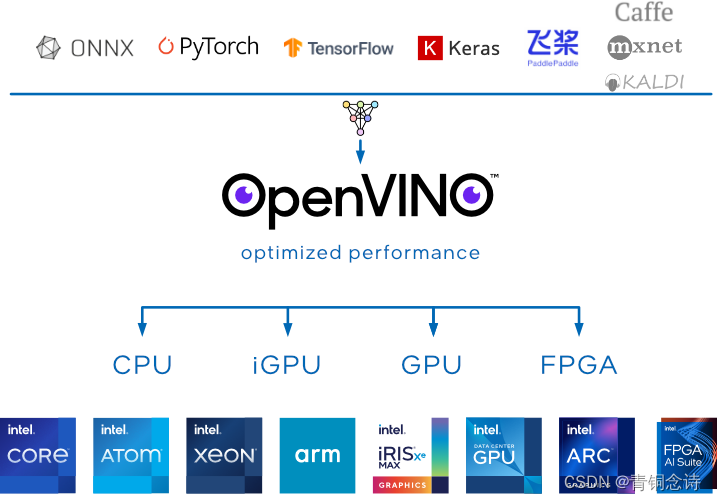
2. OpenVINO
OpenVINO是英特尔推出的一款深度学习工具套件,兼容多种框架训练好的模型
轻松实现“一次写入,处处部署”的开源工具套件
OpenVINO notebook仓库https://github.com/openvinotoolkit/openvino_notebooks
1. 安装OpenVINO
1. 安装虚拟环境平台
本次实验使用Anaconda虚拟环境平台,便于项目运行环境的部署
Anaconda下载地址https://www.anaconda.com/download#downloads
按照自己机器情况选择版本下载

2. 创建虚拟环境
# 打开anaconda prompt,输入命令
conda create -n openvino python=3.9 # 此处的openvino为新建虚拟环境的环境名,可自行取名

# 环境创建完成后,输入命令,进入虚拟环境
conda activate openvino
3. 下载OpenVINO notebook
# 在虚拟环境中,输入命令,下载openvino notebook
git clone --depth=1 https://github.com/openvinotoolkit/openvino_notebooks.git

# 进入openvino notebook
cd openvino_notebooks
4. 安装依赖
python -m pip install --upgrade pip wheel setuptools
pip install -r requirements.txt # 注:requirements文件中使用的是CPU版本torch

# 若需要GPU版本,在上面命令基础上,再使用下面命令,否则跳过下面命令(cuda11.7,按需)
pip3 install torch torchvision torchaudio --index-url https://download.pytorch.org/whl/cu117
至此,OpenVINO notebook及其环境部分,已处理完毕
2. 重训练
1. 下载yolov7源码
# 在你想要放置项目的目录下
git clone https://github.com/WongKinYiu/yolov7.git

# 接着cd进入项目,安装依赖
pip install -r requirements.txt
2. 修改配置文件
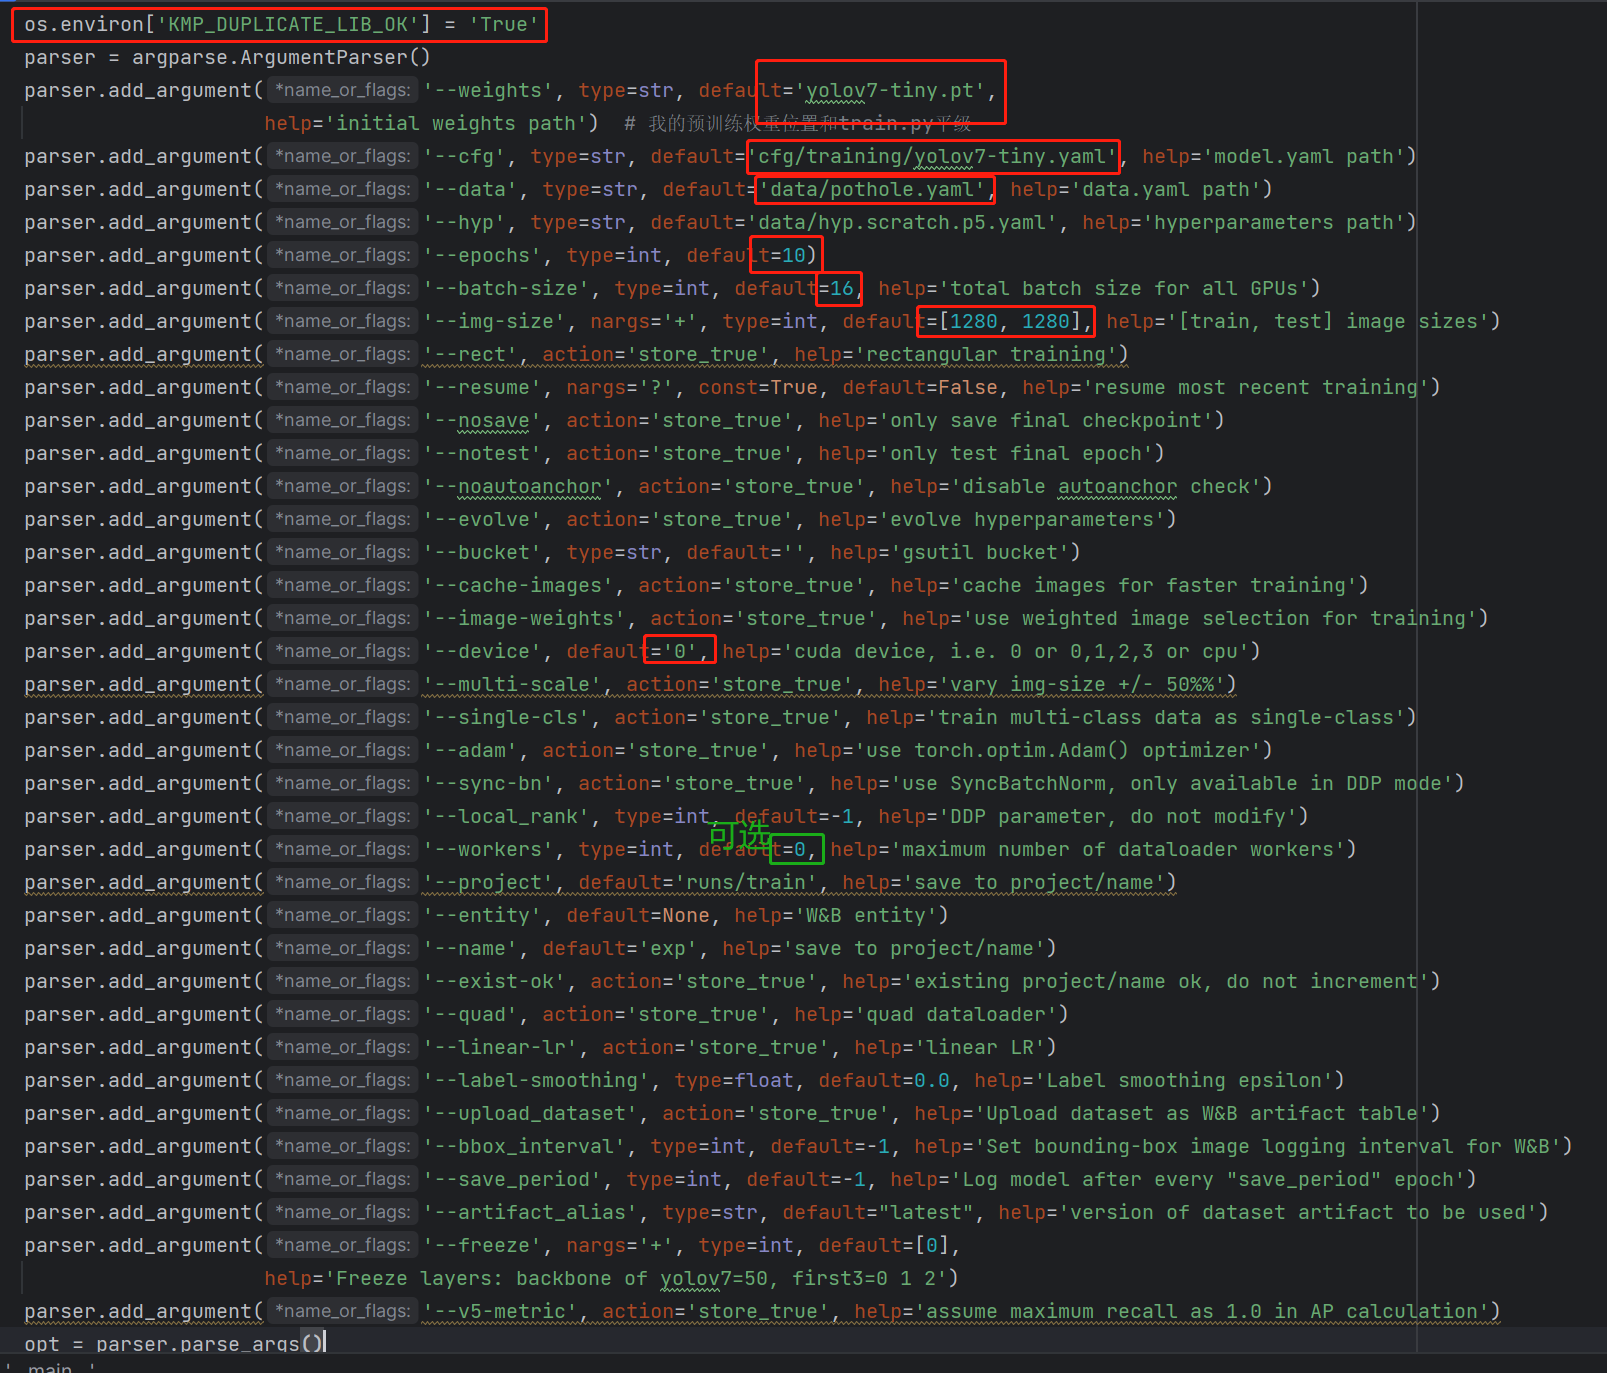
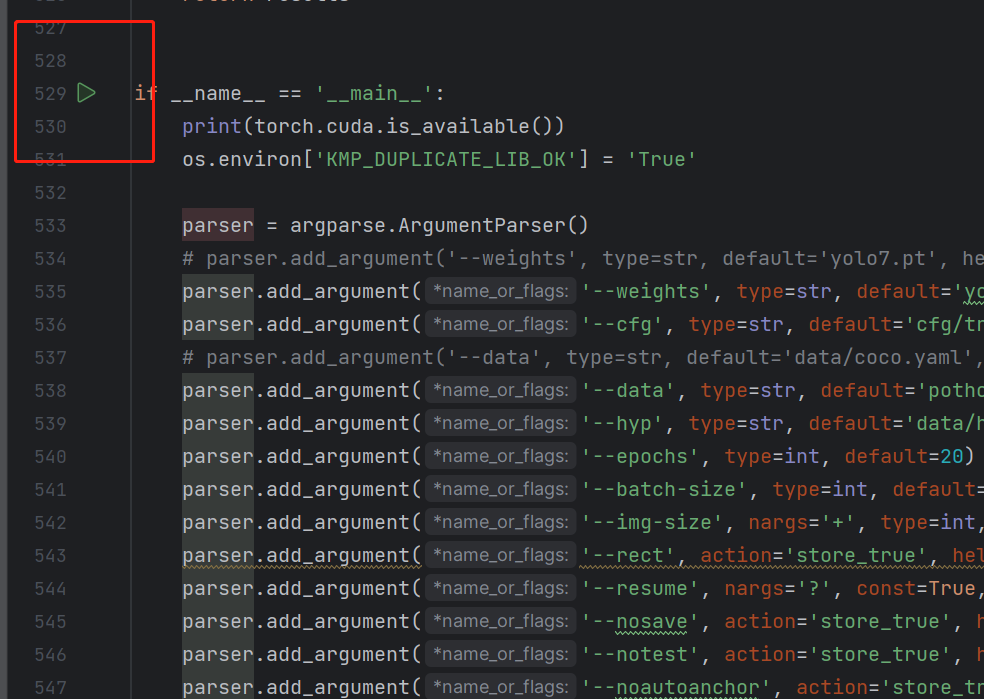
打开项目中的train.py,下拉到if __name__ == '__main__':部分
2.1 weights
修改weights参数:将parser.add_argument('--weights', type=str, default='',help='initial weights path')的default部分引号内填入你的预训练权重yolov7-tiny.pt位置
2.2 cfg
修改cfg参数:使用如下设置
parser.add_argument('--cfg', type=str, default='cfg/training/yolov7-tiny.yaml', help='model.yaml path')
2.3 data
此处是数据部分配置,将pothole整个数据集和pothole.yaml复制进项目中(与train.py平级)
修改data参数:使用如下配置
parser.add_argument('--data', type=str, default='pothole.yaml', help='data.yaml path')
2.4 epochs
此处修改重训练的轮数,为10即可(当然在准确度可提升的情况下多多益善)
parser.add_argument('--epochs', type=int, default=10)
2.5 img-size
此处修改输入图像的尺寸,通常以输入图像的最长为标准,且是32的倍数,如本实验有一部分(尺寸较大图片)分辨率为1104x828,我设置的尺寸为1280(取了个整)
parser.add_argument('--img-size', nargs='+', type=int, default=[1280, 1280], help='[train, test] image sizes')
注:default处下标为0 的1280指的是训练输入图像的尺寸是1280 x 1280,下标为1的1280指的是验证图像的尺寸是1280 x 1280,输入到模型中都是正方形
2.6 batch-size
batch-size的设置需要考虑到GPU的显存大小,性能较好或者是显存较大的显卡,如12G以上等,可以将batch-size设置为16,如果报错显存不足,可以考虑设置为8、4或者是2
parser.add_argument('--batch-size', type=int, default=16, help='total batch size for all GPUs')
2.7 device
此处设置你选择训练的设备,是选择CPU训练还是GPU的单卡或者多卡训练
我选择的是GPU训练(GPU训练通常都比CPU快得多)且只有一块GPU,所以设置为
parser.add_argument('--device', default='0', help='cuda device, i.e. 0 or 0,1,2,3 or cpu')
注:default中填入0表示使用cuda:0来训练,cuda:0是指第一块GPU,序号从0开始
如果选择使用CPU训练,可以这样设置
parser.add_argument('--device', default='cpu', help='cuda device, i.e. 0 or 0,1,2,3 or cpu')
2.8 可能出现的错误
2.8.1 raise RuntimeError(‘DataLoader worker (pid(s) {}) exited unexpectedly‘.format(pids_str))
将parser.add_argument('--workers', type=int, default=0, help='maximum number of dataloader workers')的default设置为0即可
2.8.2 Hint: This means that multiple copies of the OpenMP runtime have been linked into the program.
在if __name__ == '__main__':内添加一行os.environ['KMP_DUPLICATE_LIB_OK']='True'即可,如

2.9 改动一览
根据自己的情况微调即可
3. 重训练
训练方式多选一即可:
可以直接点击main左边的运行,开始训练
或者点击右上角开始训练

或者开启终端,进入虚拟环境,使用命令开始训练

训练情况如下所示:

每轮训练30s左右
训练完毕后,窗口会提示训练后的模型所在位置

3. 量化提优
1. 准备工作
# 准备jupyter:anaconda prompt打开虚拟环境
pip install jupyter

# 将openvivo中第226节复制进yolo项目中(与detect.py平级)
# 使用jupyter打开yolo项目
jupyter notebook
2. 226-yolov7-optimization.ipynb部分
226-yolov7-optimization.ipynb部分不全是需要运行的,只需要运行优化相关代码即可
2.1 Prerequisite
只需执行from pathlib import Path
2.2 Check model inferences
检查模型推理:
!python -W ignore detect.py --weights yolov7.pt --conf 0.25 --img-size 1280 --source img1.jpg
运行完成后提示:The image with the result is saved in: runs\detect\exp10\img1.jpg
查看推理结果:
from PIL import Image

# visualize prediction result
Image.open('runs/detect/exp10/img1.jpg')
3. Export to ONNX
转换模型格式,从pytorch的pt格式转换为onnx格式
!python -W ignore export.py --weights yolov7.pt --grid

4. Convert ONNX Model to OpenVINO Intermediate Representation (IR)
将onnx转换为IR可以更好地使用OpenVINO来进行优化
from openvino.tools import mo
from openvino.runtime import serialize

model = mo.convert_model('yolov7.onnx')
# serialize model for saving IR
serialize(model, 'yolov7.xml')
5. Verify model inference
验证模型推理
preprossessing部分直接使用即可(执行)
import numpy as np
import torch
from PIL import Image
from utils.datasets import letterbox
from utils.plots import plot_one_box


def preprocess_image(img0: np.ndarray):
    """
    Preprocess image according to YOLOv7 input requirements.
    Takes image in np.array format, resizes it to specific size using letterbox resize, converts color space from BGR (default in OpenCV) to RGB and changes data layout from HWC to CHW.

    Parameters:
      img0 (np.ndarray): image for preprocessing
    Returns:
      img (np.ndarray): image after preprocessing
      img0 (np.ndarray): original image
    """
    # resize
    img = letterbox(img0, auto=False)[0]

    # Convert
    img = img.transpose(2, 0, 1)
    img = np.ascontiguousarray(img)
    return img, img0


def prepare_input_tensor(image: np.ndarray):
    """
    Converts preprocessed image to tensor format according to YOLOv7 input requirements.
    Takes image in np.array format with unit8 data in [0, 255] range and converts it to torch.Tensor object with float data in [0, 1] range

    Parameters:
      image (np.ndarray): image for conversion to tensor
    Returns:
      input_tensor (torch.Tensor): float tensor ready to use for YOLOv7 inference
    """
    input_tensor = image.astype(np.float32)  # uint8 to fp16/32
    input_tensor /= 255.0  # 0 - 255 to 0.0 - 1.0

    if input_tensor.ndim == 3:
        input_tensor = np.expand_dims(input_tensor, 0)
    return input_tensor


# label names for visualization
NAMES = ['person', 'bicycle', 'car', 'motorcycle', 'airplane', 'bus', 'train', 'truck', 'boat', 'traffic light',
         'fire hydrant', 'stop sign', 'parking meter', 'bench', 'bird', 'cat', 'dog', 'horse', 'sheep', 'cow',
         'elephant', 'bear', 'zebra', 'giraffe', 'backpack', 'umbrella', 'handbag', 'tie', 'suitcase', 'frisbee',
         'skis', 'snowboard', 'sports ball', 'kite', 'baseball bat', 'baseball glove', 'skateboard', 'surfboard',
         'tennis racket', 'bottle', 'wine glass', 'cup', 'fork', 'knife', 'spoon', 'bowl', 'banana', 'apple',
         'sandwich', 'orange', 'broccoli', 'carrot', 'hot dog', 'pizza', 'donut', 'cake', 'chair', 'couch',
         'potted plant', 'bed', 'dining table', 'toilet', 'tv', 'laptop', 'mouse', 'remote', 'keyboard', 'cell phone',
         'microwave', 'oven', 'toaster', 'sink', 'refrigerator', 'book', 'clock', 'vase', 'scissors', 'teddy bear',
         'hair drier', 'toothbrush']

# colors for visualization
COLORS = {name: [np.random.randint(0, 255) for _ in range(3)]
          for i, name in enumerate(NAMES)}
postprocessing部分直接使用即可(执行)
from typing import List, Tuple, Dict
from utils.general import scale_coords, non_max_suppression
from openvino.runtime import Model


def detect(model: Model, image_path: Path, conf_thres: float = 0.25, iou_thres: float = 0.45, classes: List[int] = None, agnostic_nms: bool = False):
    """
    OpenVINO YOLOv7 model inference function. Reads image, preprocess it, runs model inference and postprocess results using NMS.
    Parameters:
        model (Model): OpenVINO compiled model.
        image_path (Path): input image path.
        conf_thres (float, *optional*, 0.25): minimal accpeted confidence for object filtering
        iou_thres (float, *optional*, 0.45): minimal overlap score for remloving objects duplicates in NMS
        classes (List[int], *optional*, None): labels for prediction filtering, if not provided all predicted labels will be used
        agnostic_nms (bool, *optiona*, False): apply class agnostinc NMS approach or not
    Returns:
       pred (List): list of detections with (n,6) shape, where n - number of detected boxes in format [x1, y1, x2, y2, score, label]
       orig_img (np.ndarray): image before preprocessing, can be used for results visualization
       inpjut_shape (Tuple[int]): shape of model input tensor, can be used for output rescaling
    """
    output_blob = model.output(0)
    img = np.array(Image.open(image_path))
    preprocessed_img, orig_img = preprocess_image(img)
    input_tensor = prepare_input_tensor(preprocessed_img)
    predictions = torch.from_numpy(model(input_tensor)[output_blob])
    pred = non_max_suppression(predictions, conf_thres, iou_thres, classes=classes, agnostic=agnostic_nms)
    return pred, orig_img, input_tensor.shape


def draw_boxes(predictions: np.ndarray, input_shape: Tuple[int], image: np.ndarray, names: List[str], colors: Dict[str, int]):
    """
    Utility function for drawing predicted bounding boxes on image
    Parameters:
        predictions (np.ndarray): list of detections with (n,6) shape, where n - number of detected boxes in format [x1, y1, x2, y2, score, label]
        image (np.ndarray): image for boxes visualization
        names (List[str]): list of names for each class in dataset
        colors (Dict[str, int]): mapping between class name and drawing color
    Returns:
        image (np.ndarray): box visualization result
    """
    if not len(predictions):
        return image
    # Rescale boxes from input size to original image size
    predictions[:, :4] = scale_coords(input_shape[2:], predictions[:, :4], image.shape).round()

    # Write results
    for *xyxy, conf, cls in reversed(predictions):
        label = f'{names[int(cls)]} {conf:.2f}'
        plot_one_box(xyxy, image, label=label, color=colors[names[int(cls)]], line_thickness=1)
    return image
读取模型:
from openvino.runtime import Core
core = Core()
# read converted model
model = core.read_model('yolov7.xml')
6. Select inference device
选择设备(选择使用cpu还是核显还是自动)
import ipywidgets as widgets

device = widgets.Dropdown(
    options=core.available_devices + ["AUTO"],
    value='AUTO',
    description='Device:',
    disabled=False,
)

device
# load model on CPU device
compiled_model = core.compile_model(model, device.value)
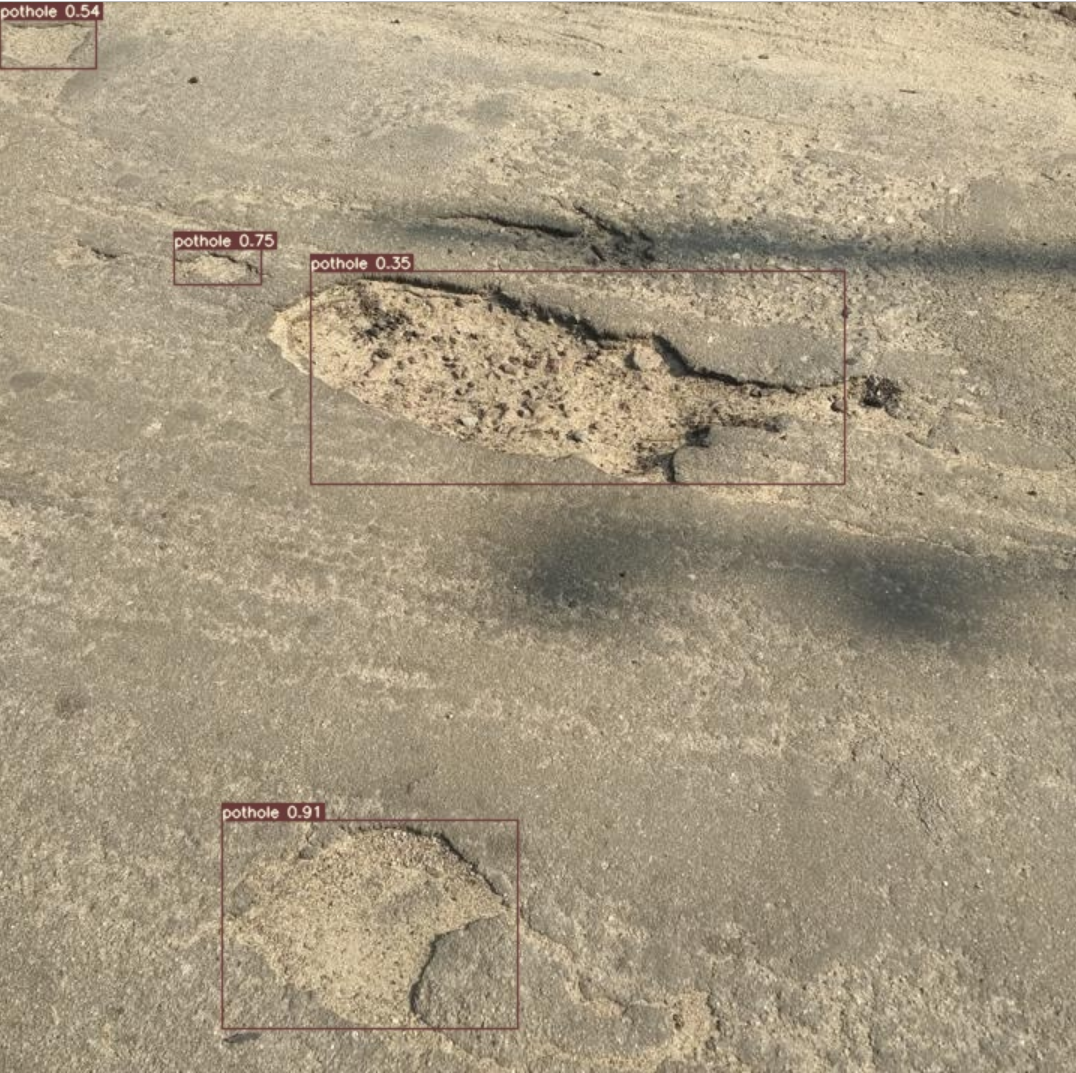
boxes, image, input_shape = detect(compiled_model, 'inference/images/img.jpg')
image_with_boxes = draw_boxes(boxes[0], input_shape, image, NAMES, COLORS)
# visualize results
Image.fromarray(image_with_boxes)

7. Verify model accuracy
验证模型精度
from collections import namedtuple
import yaml
from utils.datasets import create_dataloader
from utils.general import check_dataset, box_iou, xywh2xyxy, colorstr

# read dataset config
DATA_CONFIG = 'data/pothole.yaml'
with open(DATA_CONFIG) as f:
    data = yaml.load(f, Loader=yaml.SafeLoader)

# Dataloader
TASK = 'val'  # path to train/val/test images
Option = namedtuple('Options', ['single_cls'])  # imitation of commandline provided options for single class evaluation
opt = Option(False)
dataloader = create_dataloader(
    data[TASK], 640, 1, 32, opt, pad=0.5,
    prefix=colorstr(f'{TASK}: ')
)[0]
import numpy as np
from tqdm.notebook import tqdm
from utils.metrics import ap_per_class
from openvino.runtime import Tensor


def test(data,
         model: Model,
         dataloader: torch.utils.data.DataLoader,
         conf_thres: float = 0.001,
         iou_thres: float = 0.65,  # for NMS
         single_cls: bool = False,
         v5_metric: bool = False,
         names: List[str] = None,
         num_samples: int = None
        ):
    """
    YOLOv7 accuracy evaluation. Processes validation dataset and compites metrics.

    Parameters:
        model (Model): OpenVINO compiled model.
        dataloader (torch.utils.DataLoader): validation dataset.
        conf_thres (float, *optional*, 0.001): minimal confidence threshold for keeping detections
        iou_thres (float, *optional*, 0.65): IOU threshold for NMS
        single_cls (bool, *optional*, False): class agnostic evaluation
        v5_metric (bool, *optional*, False): use YOLOv5 evaluation approach for metrics calculation
        names (List[str], *optional*, None): names for each class in dataset
        num_samples (int, *optional*, None): number samples for testing
    Returns:
        mp (float): mean precision
        mr (float): mean recall
        map50 (float): mean average precision at 0.5 IOU threshold
        map (float): mean average precision at 0.5:0.95 IOU thresholds
        maps (Dict(int, float): average precision per class
        seen (int): number of evaluated images
        labels (int): number of labels
    """

    model_output = model.output(0)
    check_dataset(data)  # check
    nc = 1 if single_cls else int(data['nc'])  # number of classes
    iouv = torch.linspace(0.5, 0.95, 10)  # iou vector for mAP@0.5:0.95
    niou = iouv.numel()

    if v5_metric:
        print("Testing with YOLOv5 AP metric...")

    seen = 0
    p, r, mp, mr, map50, map = 0., 0., 0., 0., 0., 0.
    stats, ap, ap_class = [], [], []
    for sample_id, (img, targets, _, shapes) in enumerate(tqdm(dataloader)):
        if num_samples is not None and sample_id == num_samples:
            break
        img = prepare_input_tensor(img.numpy())
        targets = targets
        height, width = img.shape[2:]

        with torch.no_grad():
            # Run model
            out = torch.from_numpy(model(Tensor(img))[model_output])  # inference output
            # Run NMS
            targets[:, 2:] *= torch.Tensor([width, height, width, height])  # to pixels

            out = non_max_suppression(out, conf_thres=conf_thres, iou_thres=iou_thres, labels=None, multi_label=True)
        # Statistics per image
        for si, pred in enumerate(out):
            labels = targets[targets[:, 0] == si, 1:]
            nl = len(labels)
            tcls = labels[:, 0].tolist() if nl else []  # target class
            seen += 1

            if len(pred) == 0:
                if nl:
                    stats.append((torch.zeros(0, niou, dtype=torch.bool), torch.Tensor(), torch.Tensor(), tcls))
                continue
            # Predictions
            predn = pred.clone()
            scale_coords(img[si].shape[1:], predn[:, :4], shapes[si][0], shapes[si][1])  # native-space pred
            # Assign all predictions as incorrect
            correct = torch.zeros(pred.shape[0], niou, dtype=torch.bool, device='cpu')
            if nl:
                detected = []  # target indices
                tcls_tensor = labels[:, 0]
                # target boxes
                tbox = xywh2xyxy(labels[:, 1:5])
                scale_coords(img[si].shape[1:], tbox, shapes[si][0], shapes[si][1])  # native-space labels
                # Per target class
                for cls in torch.unique(tcls_tensor):
                    ti = (cls == tcls_tensor).nonzero(as_tuple=False).view(-1)  # prediction indices
                    pi = (cls == pred[:, 5]).nonzero(as_tuple=False).view(-1)  # target indices
                    # Search for detections
                    if pi.shape[0]:
                        # Prediction to target ious
                        ious, i = box_iou(predn[pi, :4], tbox[ti]).max(1)  # best ious, indices
                        # Append detections
                        detected_set = set()
                        for j in (ious > iouv[0]).nonzero(as_tuple=False):
                            d = ti[i[j]]  # detected target
                            if d.item() not in detected_set:
                                detected_set.add(d.item())
                                detected.append(d)
                                correct[pi[j]] = ious[j] > iouv  # iou_thres is 1xn
                                if len(detected) == nl:  # all targets already located in image
                                    break
            # Append statistics (correct, conf, pcls, tcls)
            stats.append((correct.cpu(), pred[:, 4].cpu(), pred[:, 5].cpu(), tcls))
    # Compute statistics
    stats = [np.concatenate(x, 0) for x in zip(*stats)]  # to numpy
    if len(stats) and stats[0].any():
        p, r, ap, f1, ap_class = ap_per_class(*stats, plot=True, v5_metric=v5_metric, names=names)
        ap50, ap = ap[:, 0], ap.mean(1)  # AP@0.5, AP@0.5:0.95
        mp, mr, map50, map = p.mean(), r.mean(), ap50.mean(), ap.mean()
        nt = np.bincount(stats[3].astype(np.int64), minlength=nc)  # number of targets per class
    else:
        nt = torch.zeros(1)
    maps = np.zeros(nc) + map
    for i, c in enumerate(ap_class):
        maps[c] = ap[i]
    return mp, mr, map50, map, maps, seen, nt.sum()
mp, mr, map50, map, maps, num_images, labels = test(data=data, model=compiled_model, dataloader=dataloader, names=NAMES)
# Print results
s = ('%20s' + '%12s' * 6) % ('Class', 'Images', 'Labels', 'Precision', 'Recall', 'mAP@.5', 'mAP@.5:.95')
print(s)
pf = '%20s' + '%12i' * 2 + '%12.3g' * 4  # print format
print(pf % ('all', num_images, labels, mp, mr, map50, map))

8. Optimize model using NNCF Post-training Quantization API
优化过程三步走:
- Create a Dataset for quantization.创建量化数据集
- Run
nncf.quantizefor getting an optimized model.使用nncf.quantize获得量化模型 - Serialize an OpenVINO IR model, using the
openvino.runtime.serializefunction.使用openvino.runtime.serialize序列化IR模型
使用nncf接口优化模型:
import nncf  # noqa: F811


def transform_fn(data_item):
    """
    Quantization transform function. Extracts and preprocess input data from dataloader item for quantization.
    Parameters:
       data_item: Tuple with data item produced by DataLoader during iteration
    Returns:
        input_tensor: Input data for quantization
    """
    img = data_item[0].numpy()
    input_tensor = prepare_input_tensor(img)
    return input_tensor


quantization_dataset = nncf.Dataset(dataloader, transform_fn)
quantized_model = nncf.quantize(model, quantization_dataset, preset=nncf.QuantizationPreset.MIXED)

serialize(quantized_model, 'yolov7-tiny_int8.xml')
9. Validate Quantized model inference
验证量化后模型推理
选择设备:
device
int8_compiled_model = core.compile_model(quantized_model, device.value)
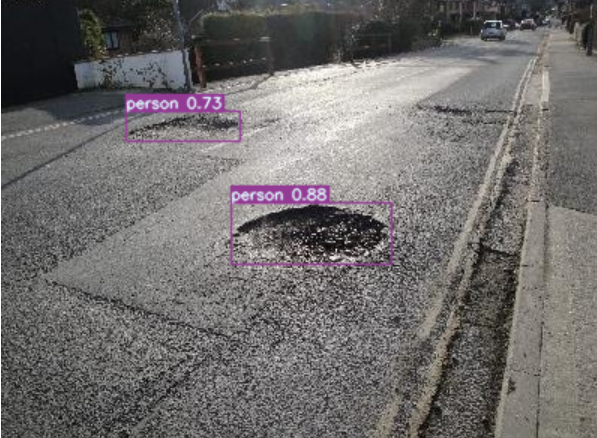
boxes, image, input_shape = detect(int8_compiled_model, 'inference/images/img.jpg')
image_with_boxes = draw_boxes(boxes[0], input_shape, image, NAMES, COLORS)
Image.fromarray(image_with_boxes)
10. Validate quantized model accuracy
验证量化后模型精度
int8_result = test(data=data, model=int8_compiled_model, dataloader=dataloader, names=NAMES)
mp, mr, map50, map, maps, num_images, labels = int8_result
# Print results
s = ('%20s' + '%12s' * 6) % ('Class', 'Images', 'Labels', 'Precision', 'Recall', 'mAP@.5', 'mAP@.5:.95')
print(s)
pf = '%20s' + '%12i' * 2 + '%12.3g' * 4  # print format
print(pf % ('all', num_images, labels, mp, mr, map50, map))

可见精度几乎不变
4. 性能比对
将原模型和量化后的模型进行性能比较
选择设备:
device
原模型benchmark:
# Inference FP32 model (OpenVINO IR)

!benchmark_app -m yolov7.xml -d $device.value -api async
量化后模型benchmark:
# Inference INT8 model (OpenVINO IR)

!benchmark_app -m yolov7-tiny_int8.xml -d $device.value -api async
结果显示:
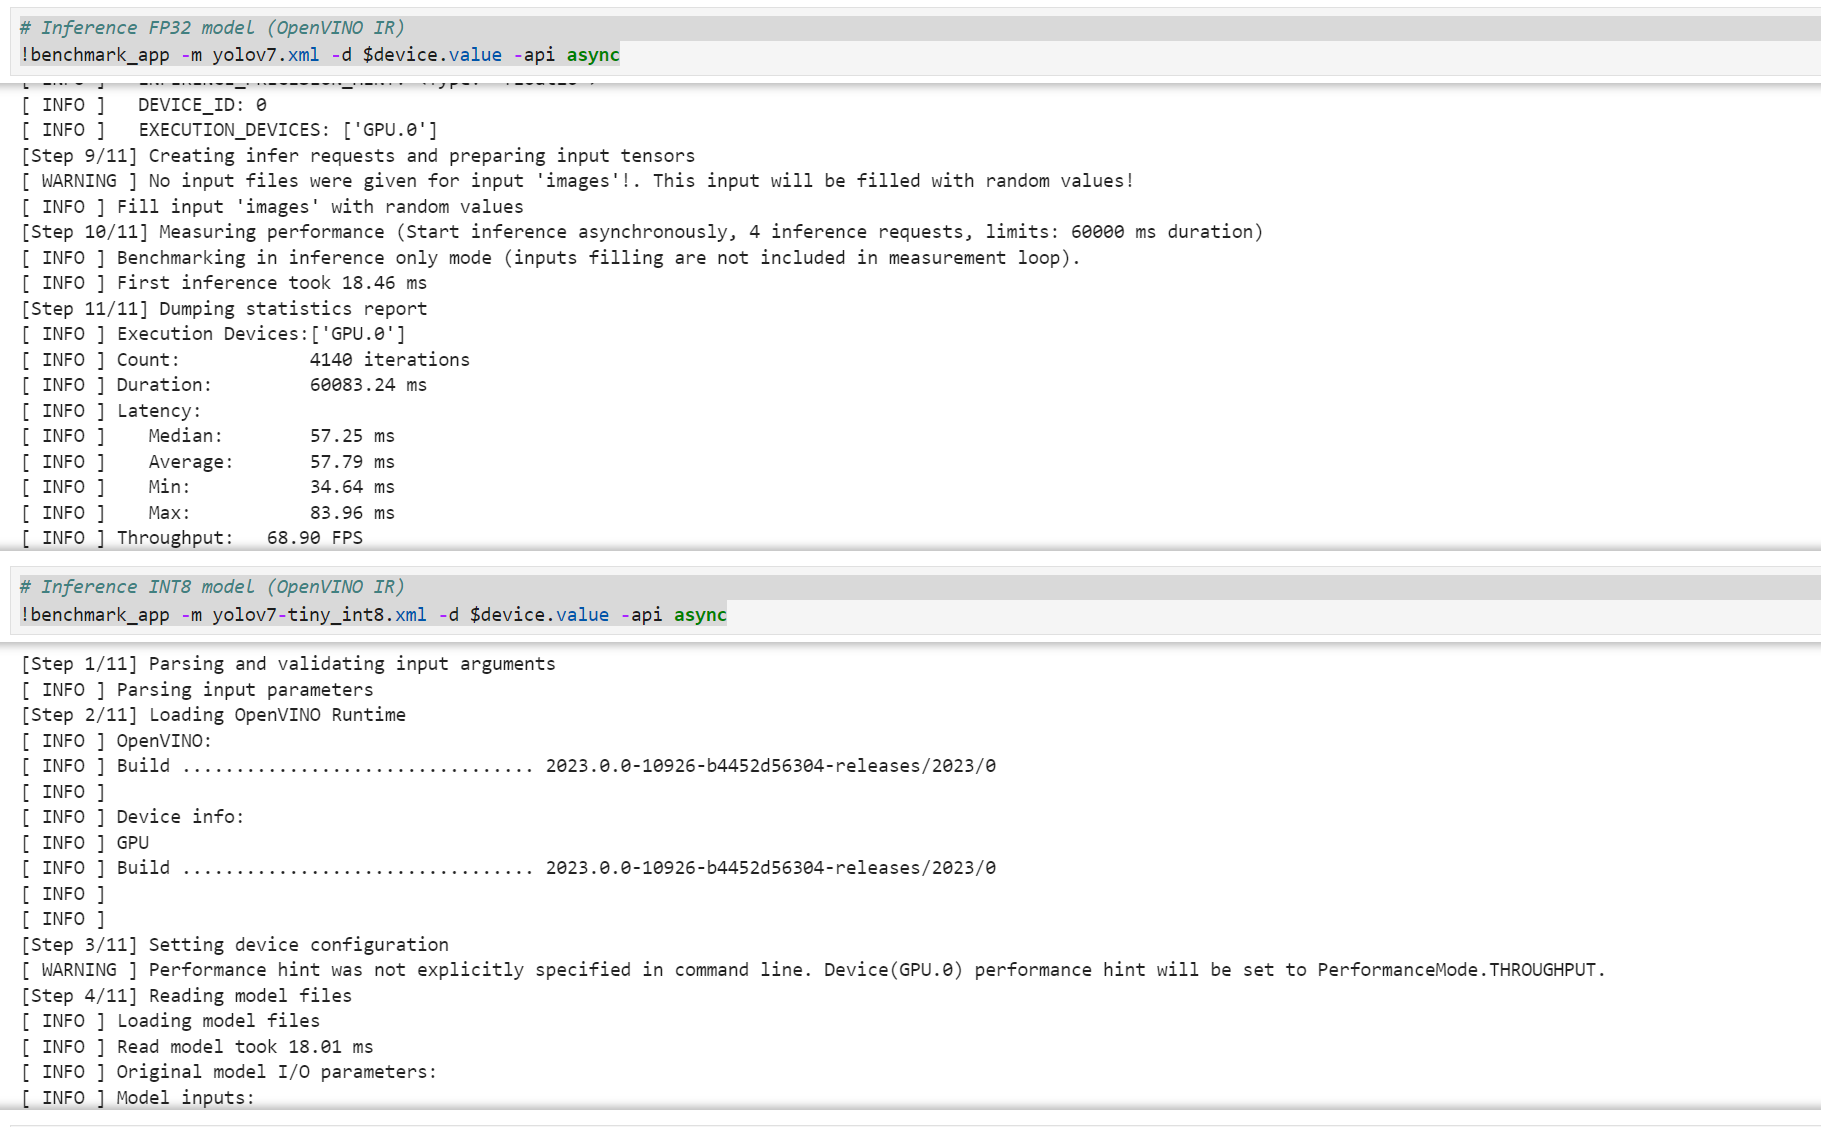
| Performance Comparison | Precision | Recall | mAP@.5 | mAP@.5:.95 | Throughput |
|---|---|---|---|---|---|
| Original Models | 0.685 | 0.532 | 0.556 | 0.259 | 68.90 FPS |
| Quantized Models | 0.703 | 0.522 | 0.557 | 0.259 | 103.89 FPS |
可见openvino优化是很有效果的,在精度差不多的情况下能够大幅提升推理速度