Android在线文字识别可以调阿里云的接口Android文字识别-阿里云OCR调用__花花的博客-CSDN博客
需要离线文字识别的话,可以调tesseract4android。个人测试效果不是特别理想,但是速度真的很快,VIVO S10后摄照片,80ms内识别完成。现有的蛮多资料都写的是调用tess-two,但是这个库,已经慢慢不维护了,最新版本是tesseract4android。这是一个开源库,源码路径:https://github.com/adaptech-cz/Tesseract4Android
这个库的调用非常简单,官方readme也有介绍。
1,在build.gradle中增加
allprojects {
    repositories {
        ...
        maven { url 'https://jitpack.io' }
    }
}
dependencies {
// To use Standard variant:
implementation 'cz.adaptech.tesseract4android:tesseract4android:4.5.0'
}2,代用也很简单,官方示例代码如下。主要就是给个训练库,然后就可以给照片,最后取结果就行。
// Create TessBaseAPI instance (this internally creates the native Tesseract instance)
TessBaseAPI tess = new TessBaseAPI();

// Given path must contain subdirectory `tessdata` where are `*.traineddata` language files
// The path must be directly readable by the app
String dataPath = new File(context.getFilesDir(), "tesseract").getAbsolutePath();

// Initialize API for specified language
// (can be called multiple times during Tesseract lifetime)
if (!tess.init(dataPath, "eng")) { // could be multiple languages, like "eng+deu+fra"
    // Error initializing Tesseract (wrong/inaccessible data path or not existing language file(s))
    // Release the native Tesseract instance
    tess.recycle();
    return;
}

// Load the image (file path, Bitmap, Pix...)
// (can be called multiple times during Tesseract lifetime)
tess.setImage(image);

// Start the recognition (if not done for this image yet) and retrieve the result
// (can be called multiple times during Tesseract lifetime)
String text = tess.getUTF8Text();

// Release the native Tesseract instance when you don't want to use it anymore
// After this call, no method can be called on this TessBaseAPI instance
tess.recycle();
3,训练数据库路径:GitHub - tesseract-ocr/tessdata at 4.0.0
我只需要做英文识别所以下载eng.traineddata即可,需要做多语言识别的按自己的需求下载多个语训练数据库。这些数据库下下来后,需要放到一个规定名称为tessdata的子目录下,调用init的时候需要提供它的父目录。
4,训练数据库的提取这里要注意权限问题,否则会初始化失败,错误就一个ERROR。我的处理办法是把训练数据库打包到APP,APP启动后释放到内部目录,然后再使用。
1)训练数据库放到raw目录下

2)文件释放类
import static androidx.camera.core.impl.utils.ContextUtil.getApplicationContext;

import android.content.Context;
import android.net.Uri;
import android.util.Log;

import java.io.File;
import java.io.FileOutputStream;
import java.io.IOException;
import java.io.InputStream;
import java.io.UnsupportedEncodingException;
import java.util.Arrays;

public class FileManager {
    String TAG = "FILE";
    Context context = null;

    public FileManager(Context context)
    {
        this.context = context;
    }

    private File getFilePtr(String outName, String subFolder) throws IOException {
        //找到目录
        File filesDir = context.getFilesDir();
        if (!filesDir.exists()) {
            filesDir.mkdirs();
        }
        //创建专属目录
        File outFileFolder = new File(filesDir.getAbsolutePath()+"/target/"+subFolder);
        if(!outFileFolder.exists()) {
            outFileFolder.mkdirs();
        }
        //创建输出文件
        File outFile=new File(outFileFolder,outName);
        String outFilename = outFile.getAbsolutePath();
        Log.i(TAG, "outFile is " + outFilename);
        if (!outFile.exists()) {
            boolean res = outFile.createNewFile();
            if (!res) {
                Log.e(TAG, "outFile not exist!(" + outFilename + ")");
                return null;
            }
        }
        return outFile;
    }
    private int copyData(File outFile, InputStream is){
        try {
            FileOutputStream fos = new FileOutputStream(outFile);
            //分段读取文件,并写出到输出文件,完成拷贝操作。
            byte[] buffer = new byte[1024];
            int byteCount;
            while ((byteCount = is.read(buffer)) != -1) {
                fos.write(buffer, 0, byteCount);
            }
            fos.flush();
            is.close();
            fos.close();
            return 0;
        } catch (Exception e) {
            e.printStackTrace();
        }
        return -1;
    }

    public String getFilePathAfterCopy(Uri uri, String outName, String subFolder, boolean ifReturnParent){
        try {
            File outFile=getFilePtr(outName,subFolder);
            //创建输入文件流
            InputStream is= context.getContentResolver().openInputStream(uri);
            if(0!=copyData(outFile,is)) {
                return null;
            }
            //返回路径
            if(ifReturnParent) {
                return  outFile.getParent();
            } else {
                return outFile.getPath();
            }
        } catch (Exception e) {
            e.printStackTrace();
        }
        return null;
    }
    public String getFilePathAfterCopy(int resId,String outName,String subFolder,boolean ifReturnParent) {
        try {
            //找到目录
            File outFile=getFilePtr(outName,subFolder);
            //创建输入文件流
            InputStream is = context.getResources().openRawResource(resId);
            if(0!=copyData(outFile,is)) {
                return null;
            }
            //返回路径
            if(ifReturnParent) {
                return  outFile.getParent();
            } else {
                return outFile.getPath();
            }
        } catch (IOException e) {
            e.printStackTrace();
        }
        return null;
    }
    public String byteToString(byte[] data) {
        int index = data.length;
        for (int i = 0; i < data.length; i++) {
            if (data[i] == 0) {
                index = i;
                break;
            }
        }
        byte[] temp = new byte[index];
        Arrays.fill(temp, (byte) 0);
        System.arraycopy(data, 0, temp, 0, index);
        String str;
        try {
            str = new String(temp, "ISO-8859-1");//ISO-8859-1//GBK
        } catch (UnsupportedEncodingException e) {
            // TODO Auto-generated catch block
            e.printStackTrace();
            return "";
        }
        return str;
    }

}
3)APP启动释放文件
        //release ocr data file
        FileManager fileManager = new FileManager(this);
        String filePath = fileManager.getFilePathAfterCopy(R.raw.eng, "eng.traineddata", "tessdata", true);
        Log.e("OCR", "datapath + " +filePath);
4)init接口调用的文件路径:
filePath.substring(0, filePath.length() - 8)5,加上摄像头调用后测试效果
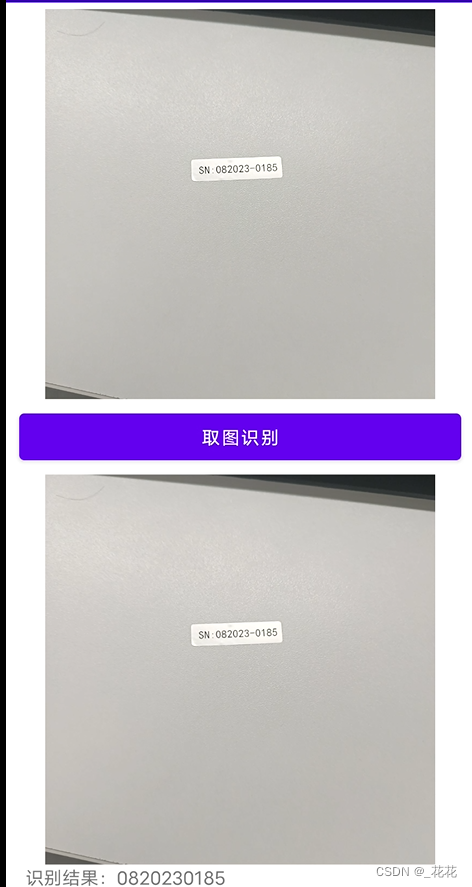
摄像头调用,请看下篇。
新人入行,经验分享,如有所误,欢迎指出~
版权归属:深圳市琪智科技有限公司-花花


