YOLOv5:解读metrics.py
- 前言
- 前提条件
- 相关介绍
- metrics.py
- fitness
- smooth
- box_iou
- ConfusionMatrix ★ ★ \bigstar\bigstar ★★
- bbox_iou ★ ★ \bigstar\bigstar ★★
- compute_ap
- ap_per_class(难度: ⋆ ⋆ ⋆ ⋆ ⋆ \star\star\star\star\star ⋆⋆⋆⋆⋆)
- 未完待续
- 参考
前言
- 记录一下自己阅读metrics.py代码的一些重要点,方便自己查阅。特别感谢,在参考里,列举的博文链接,写得很好,对本人阅读理解yolo.py代码,有很大帮助。
- 由于本人水平有限,难免出现错漏,敬请批评改正。
- 更多精彩内容,可点击进入YOLO系列专栏、自然语言处理
专栏或我的个人主页查看- 基于DETR的人脸伪装检测
- YOLOv7训练自己的数据集(口罩检测)
- YOLOv8训练自己的数据集(足球检测)
- YOLOv5:TensorRT加速YOLOv5模型推理
- YOLOv5:IoU、GIoU、DIoU、CIoU、EIoU
- 玩转Jetson Nano(五):TensorRT加速YOLOv5目标检测
- YOLOv5:添加SE、CBAM、CoordAtt、ECA注意力机制
- YOLOv5:yolov5s.yaml配置文件解读、增加小目标检测层
- Python将COCO格式实例分割数据集转换为YOLO格式实例分割数据集
- YOLOv5:使用7.0版本训练自己的实例分割模型(车辆、行人、路标、车道线等实例分割)
- 使用Kaggle GPU资源免费体验Stable Diffusion开源项目
前提条件
- 熟悉Python
相关介绍
- Python是一种跨平台的计算机程序设计语言。是一个高层次的结合了解释性、编译性、互动性和面向对象的脚本语言。最初被设计用于编写自动化脚本(shell),随着版本的不断更新和语言新功能的添加,越多被用于独立的、大型项目的开发。
- PyTorch 是一个深度学习框架,封装好了很多网络和深度学习相关的工具方便我们调用,而不用我们一个个去单独写了。它分为 CPU 和 GPU 版本,其他框架还有 TensorFlow、Caffe 等。PyTorch 是由 Facebook 人工智能研究院(FAIR)基于 Torch 推出的,它是一个基于 Python 的可续计算包,提供两个高级功能:1、具有强大的 GPU 加速的张量计算(如 NumPy);2、构建深度神经网络时的自动微分机制。
- YOLOv5是一种单阶段目标检测算法,该算法在YOLOv4的基础上添加了一些新的改进思路,使其速度与精度都得到了极大的性能提升。它是一个在COCO数据集上预训练的物体检测架构和模型系列,代表了Ultralytics对未来视觉AI方法的开源研究,其中包含了经过数千小时的研究和开发而形成的经验教训和最佳实践。
metrics.py
fitness
- fitness函数用来计算最终的mAP,通过对P、R、mAP@0.5、mAP@0.5:0.95的加权平均计算mAP
- 即 m A P = 0.0 ∗ P + 0.0 ∗ R + 0.1 ∗ ( m A P @ 0.5 ) + 0.9 ∗ ( m A P @ 0.5 : 0.95 ) mAP=0.0*P+0.0*R+0.1*(mAP@0.5)+0.9*(mAP@0.5:0.95) mAP=0.0∗P+0.0∗R+0.1∗(mAP@0.5)+0.9∗(mAP@0.5:0.95)
def fitness(x):
    # Model fitness as a weighted combination of metrics
    w = [0.0, 0.0, 0.1, 0.9]  # weights for [P, R, mAP@0.5, mAP@0.5:0.95]
    return (x[:, :4] * w).sum(1)
smooth
- smooth函数用来计算预测框和真实框之间的差异的平滑值。
- 具体来说,它通过将每个预测框的置信度与与其重叠度最高的真实框的重叠度进行加权平均来计算平滑值。这个平滑值可以用来评估模型的性能。
- 例如,它可以用来计算模型在检测任务中的平均准确度和召回率等指标。在训练过程中,平滑值可以作为损失函数的一部分,帮助模型更好地学习预测框和真实框之间的差异。
def smooth(y, f=0.05):
    # Box filter of fraction f
    nf = round(len(y) * f * 2) // 2 + 1  # number of filter elements (must be odd)
    p = np.ones(nf // 2)  # ones padding
    yp = np.concatenate((p * y[0], y, p * y[-1]), 0)  # y padded
    return np.convolve(yp, np.ones(nf) / nf, mode='valid')  # y-smoothed
box_iou
- loU,英文全称为Intersection of Union,中文称作交并比。对于目标检测识别而言它是一种用来衡量真实框与预测框的贴合程度的方法。
- 假设真实框为 A A A,预测框为 B B B, A ∩ B A\cap B A∩B表示真实框与预测框的交集, A ∪ B A\cup B A∪B表示真实框与预测框的并集loU具体的计算方式,如图所示。
- 使用 unsqueeze(1) 和 unsqueeze(0) 扩展了 box1 和 box2 的维度,这样我们就可以在第二个维度上进行分割。
- 使用 chunk(2, 2) 将扩展后的张量在第二个维度上分割成两个部分。这样,我们得到了两个元组 (a1, a2) 和 (b1, b2),每个元组都包含两个元素。
- 计算两个矩形的交集面积。这里使用了两个矩形的对角线坐标:torch.min(a2, b2) 和 torch.max(a1, b1),然后计算它们的差值的乘积。如果交集面积为负,则使用 clamp(0) 将其限制为 0。
- .prod(2) 是对张量的第二个维度进行元素乘法运算,并返回一个标量或一维张量。对于一个形状为 (batch_size, n) 的张量,.prod(2) 将返回一个形状为 (batch_size,) 的标量,其中每个元素是该张量中对应行的所有元素的乘积。

def box_iou(box1, box2, eps=1e-7):
    # https://github.com/pytorch/vision/blob/master/torchvision/ops/boxes.py
    """
    Return intersection-over-union (Jaccard index) of boxes.
    Both sets of boxes are expected to be in (x1, y1, x2, y2) format.
    Arguments:
        box1 (Tensor[N, 4])
        box2 (Tensor[M, 4])
    Returns:
        iou (Tensor[N, M]): the NxM matrix containing the pairwise
            IoU values for every element in boxes1 and boxes2
    注: N表示预测框数,M表示真实框数,计算预测框与真实框IoU值
    """

    # inter(N,M) = (rb(N,M,2) - lt(N,M,2)).clamp(0).prod(2)
    (a1, a2), (b1, b2) = box1.unsqueeze(1).chunk(2, 2), box2.unsqueeze(0).chunk(2, 2)
    inter = (torch.min(a2, b2) - torch.max(a1, b1)).clamp(0).prod(2)

    # IoU = inter / (area1 + area2 - inter)
    return inter / ((a2 - a1).prod(2) + (b2 - b1).prod(2) - inter + eps)
ConfusionMatrix ★ ★ \bigstar\bigstar ★★
class ConfusionMatrix:
# Updated version of https://github.com/kaanakan/object_detection_confusion_matrix
def __init__(self, nc, conf=0.25, iou_thres=0.45):
self.matrix = np.zeros((nc + 1, nc + 1))
self.nc = nc # number of classes
self.conf = conf
self.iou_thres = iou_thres
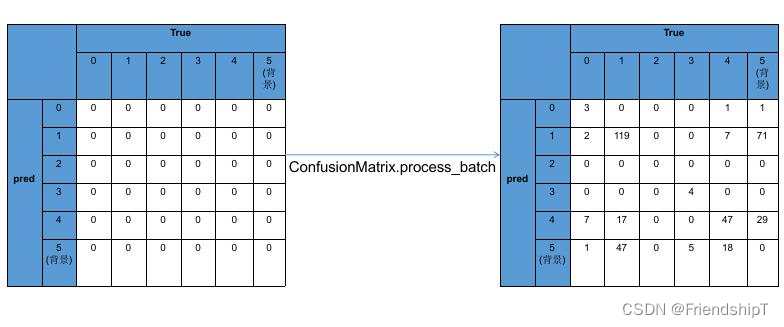
def process_batch(self, detections, labels):
"""
Return intersection-over-union (Jaccard index) of boxes.
Both sets of boxes are expected to be in (x1, y1, x2, y2) format.
Arguments:
detections (Array[N, 6]), x1, y1, x2, y2, conf, class
labels (Array[M, 5]), class, x1, y1, x2, y2
Returns:
None, updates confusion matrix accordingly
"""
if detections is None: # 预测为背景,即negative
gt_classes = labels.int() # 实际为某一目标类别
for gc in gt_classes:
self.matrix[self.nc, gc] += 1 # background FN
return
detections = detections[detections[:, 4] > self.conf] # 获取到>conf的预测框
gt_classes = labels[:, 0].int() # 真实框类别
detection_classes = detections[:, 5].int() # 预测框类别
iou = box_iou(labels[:, 1:], detections[:, :4]) # 计算真实框与预测框IoU值,shape:(Tensor[N, M]),表示N个真实框与M个预测框的IoU值(二维数组表示)
x = torch.where(iou > self.iou_thres) # 在张量(tensor)中执行条件语句iou > self.iou_thres并返回满足条件的元素的位置。
if x[0].shape[0]:
matches = torch.cat((torch.stack(x, 1), iou[x[0], x[1]][:, None]), 1).cpu().numpy() # array([[ 0, 1, 0.85],[1, 2, 0.6],]) # [0, 1, 0.85]表示第0个真实框与第1个预测框的置信度为0.85
if x[0].shape[0] > 1:
matches = matches[matches[:, 2].argsort()[::-1]] # 以置信度为条件基准,排序,这里-1为降序
matches = matches[np.unique(matches[:, 1], return_index=True)[1]] # 去重(列维度)
matches = matches[matches[:, 2].argsort()[::-1]] # 降序
matches = matches[np.unique(matches[:, 0], return_index=True)[1]] # 去重(行维度)
else: # x为空的情况
matches = np.zeros((0, 3))
n = matches.shape[0] > 0 # 判断真实和预测框匹配数是否>0
# transpose()是NumPy数组的一个方法,用于转置数组。它会返回一个转置后的新数组,而不会在原地修改原始数组。
# astype(int)是NumPy数组的另一个方法,用于将数组中的元素转换为整数类型。它会返回一个新的数组,其中所有元素都转换为整数类型。
# 注意的是,transpose()和astype(int)都会返回一个新的数组,不会修改原始数组。如果需要修改原始数组,可以将返回值赋值给原始数组。
m0, m1, _ = matches.transpose().astype(int) # m0表示第m0[i]个真实框,m1表示第m1[i]个预测框
for i, gc in enumerate(gt_classes): # 遍历真实框
j = m0 == i # array([False, False])
sumj = sum(j)
if n and sum(j) == 1: # (真实框和预测框匹配数不为0) 且 (当前遍历真实框与matches记录的m0一致)
self.matrix[detection_classes[m1[j]], gc] += 1 # correct # 预测框与真实框一致
else: # 预测为背景,真实为gc
self.matrix[self.nc, gc] += 1 # true background
if n:
for i, dc in enumerate(detection_classes):# 遍历预测框
if not any(m1 == i): # 预测为dc,真实为背景
self.matrix[dc, self.nc] += 1 # predicted background
def tp_fp(self):
tp = self.matrix.diagonal() # true positives # 获取混淆矩阵对角线元素
fp = self.matrix.sum(1) - tp # false positives # atrix.sum(1) 用于计算混淆矩阵的每一列元素之和
# fn = self.matrix.sum(0) - tp # false negatives (missed detections)
return tp[:-1], fp[:-1] # remove background class
@TryExcept('WARNING ⚠️ ConfusionMatrix plot failure')
def plot(self, normalize=True, save_dir='', names=()):
import seaborn as sn
array = self.matrix / ((self.matrix.sum(0).reshape(1, -1) + 1E-9) if normalize else 1) # normalize columns
array[array < 0.005] = np.nan # don't annotate (would appear as 0.00)
fig, ax = plt.subplots(1, 1, figsize=(12, 9), tight_layout=True)
nc, nn = self.nc, len(names) # number of classes, names
sn.set(font_scale=1.0 if nc < 50 else 0.8) # for label size
labels = (0 < nn < 99) and (nn == nc) # apply names to ticklabels
ticklabels = (names + ['background']) if labels else 'auto'
with warnings.catch_warnings():
warnings.simplefilter('ignore') # suppress empty matrix RuntimeWarning: All-NaN slice encountered
sn.heatmap(array,
ax=ax,
annot=nc < 30,
annot_kws={
'size': 8},
cmap='Blues',
fmt='.2f',
square=True,
vmin=0.0,
xticklabels=ticklabels,
yticklabels=ticklabels).set_facecolor((1, 1, 1))
ax.set_xlabel('True')
ax.set_ylabel('Predicted')
ax.set_title('Confusion Matrix')
fig.savefig(Path(save_dir) / 'confusion_matrix.png', dpi=250)
plt.close(fig)
def print(self):
for i in range(self.nc + 1):
print(' '.join(map(str, self.matrix[i])))
bbox_iou ★ ★ \bigstar\bigstar ★★
- 在yolov5中,bbox_iou函数会用于预测框回归损失的计算,比如IoU_loss、GIoU_loss、DIoU_loss、CIoU_loss
- 详细可查阅YOLOv5:IoU、GIoU、DIoU、CIoU、EIoU:https://blog.csdn.net/FriendshipTang/article/details/129969044
def bbox_iou(box1, box2, xywh=True, GIoU=False, DIoU=False, CIoU=False, eps=1e-7):
    # Returns Intersection over Union (IoU) of box1(1,4) to box2(n,4)

    # Get the coordinates of bounding boxes
    if xywh:  # transform from xywh to xyxy
        (x1, y1, w1, h1), (x2, y2, w2, h2) = box1.chunk(4, -1), box2.chunk(4, -1)
        w1_, h1_, w2_, h2_ = w1 / 2, h1 / 2, w2 / 2, h2 / 2
        b1_x1, b1_x2, b1_y1, b1_y2 = x1 - w1_, x1 + w1_, y1 - h1_, y1 + h1_
        b2_x1, b2_x2, b2_y1, b2_y2 = x2 - w2_, x2 + w2_, y2 - h2_, y2 + h2_
    else:  # x1, y1, x2, y2 = box1
        b1_x1, b1_y1, b1_x2, b1_y2 = box1.chunk(4, -1)
        b2_x1, b2_y1, b2_x2, b2_y2 = box2.chunk(4, -1)
        w1, h1 = b1_x2 - b1_x1, (b1_y2 - b1_y1).clamp(eps)
        w2, h2 = b2_x2 - b2_x1, (b2_y2 - b2_y1).clamp(eps)

    # Intersection area
    inter = (b1_x2.minimum(b2_x2) - b1_x1.maximum(b2_x1)).clamp(0) * \
            (b1_y2.minimum(b2_y2) - b1_y1.maximum(b2_y1)).clamp(0)

    # Union Area
    union = w1 * h1 + w2 * h2 - inter + eps

    # IoU
    iou = inter / union
    if CIoU or DIoU or GIoU:
        cw = b1_x2.maximum(b2_x2) - b1_x1.minimum(b2_x1)  # convex (smallest enclosing box) width
        ch = b1_y2.maximum(b2_y2) - b1_y1.minimum(b2_y1)  # convex height
        if CIoU or DIoU:  # Distance or Complete IoU https://arxiv.org/abs/1911.08287v1
            c2 = cw ** 2 + ch ** 2 + eps  # convex diagonal squared
            rho2 = ((b2_x1 + b2_x2 - b1_x1 - b1_x2) ** 2 + (b2_y1 + b2_y2 - b1_y1 - b1_y2) ** 2) / 4  # center dist ** 2
            if CIoU:  # https://github.com/Zzh-tju/DIoU-SSD-pytorch/blob/master/utils/box/box_utils.py#L47
                v = (4 / math.pi ** 2) * (torch.atan(w2 / h2) - torch.atan(w1 / h1)).pow(2)
                with torch.no_grad():
                    alpha = v / (v - iou + (1 + eps))
                return iou - (rho2 / c2 + v * alpha)  # CIoU
            return iou - rho2 / c2  # DIoU
        c_area = cw * ch + eps  # convex area
        return iou - (c_area - union) / c_area  # GIoU https://arxiv.org/pdf/1902.09630.pdf
    return iou  # IoU
compute_ap
- compute_ap函数用于计算单个类别的AP值
def compute_ap(recall, precision):
    """ Compute the average precision, given the recall and precision curves
    # Arguments
        recall:    The recall curve (list)
        precision: The precision curve (list)
    # Returns
        Average precision, precision curve, recall curve

    计算某个类别在某个iou阈值下的mAP
    """

    # Append sentinel values to beginning and end
    mrec = np.concatenate(([0.0], recall, [1.0]))
    mpre = np.concatenate(([1.0], precision, [0.0]))

    # Compute the precision envelope
    mpre = np.flip(np.maximum.accumulate(np.flip(mpre)))

    # Integrate area under curve
    method = 'interp'  # methods: 'continuous', 'interp'
    if method == 'interp':
        x = np.linspace(0, 1, 101)  # 101-point interp (COCO)
        ap = np.trapz(np.interp(x, mrec, mpre), x)  # integrate
    else:  # 'continuous'
        i = np.where(mrec[1:] != mrec[:-1])[0]  # points where x axis (recall) changes
        ap = np.sum((mrec[i + 1] - mrec[i]) * mpre[i + 1])  # area under curve

    return ap, mpre, mrec
ap_per_class(难度: ⋆ ⋆ ⋆ ⋆ ⋆ \star\star\star\star\star ⋆⋆⋆⋆⋆)
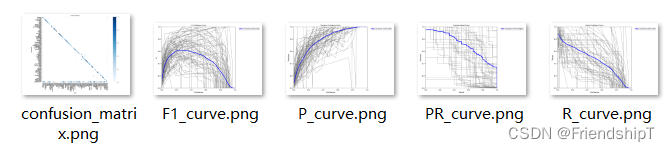
- ap_per_class函数,用于计算每一个类的平均precision并绘制P-R曲线
- 下面这些图,就是这个函数计算来的。
def ap_per_class(tp, conf, pred_cls, target_cls, plot=False, save_dir='.', names=(), eps=1e-16, prefix=''):
    """ Compute the average precision, given the recall and precision curves.
    Source: https://github.com/rafaelpadilla/Object-Detection-Metrics.
    # Arguments
        tp:  True positives (nparray, nx1 or nx10).
        conf:  Objectness value from 0-1 (nparray).
        pred_cls:  Predicted object classes (nparray).
        target_cls:  True object classes (nparray).
        plot:  Plot precision-recall curve at mAP@0.5
        save_dir:  Plot save directory
    # Returns
        The average precision as computed in py-faster-rcnn.

        计算每一个类的平均precision并绘制P-R曲线

参数:
    tp:true positive
    conf:预测框的conf
    pred_cls:预测框的class
    target_cls:GT的class
    plot:是否绘制PR曲线
    save_dir:保存路径

返回值:
    p:最大平均f1时每个类别的precision
    r:最大平均f1时每个类别的recall
    ap:每个类别在10个iou阈值下的mAP
    f1:最大平均f1时每个类别的f1
    unique_classes:数据集中所有的类别index
    """

    # Sort by objectness
    i = np.argsort(-conf) # 对 conf 数组从大到小排序
    tp, conf, pred_cls = tp[i], conf[i], pred_cls[i] # 使tp,conf,pred_cls对应从大到小排序

    # Find unique classes
    unique_classes, nt = np.unique(target_cls, return_counts=True) # 独一的类别,去掉重复
    nc = unique_classes.shape[0]  # number of classes, number of detections # 这一批真实框对应的类别数

    # Create Precision-Recall curve and compute AP for each class
    px, py = np.linspace(0, 1, 1000), []  # for plotting
    ap, p, r = np.zeros((nc, tp.shape[1])), np.zeros((nc, 1000)), np.zeros((nc, 1000))
    # 计算每个类别的指标
    for ci, c in enumerate(unique_classes): # 遍历真实框类别
        i = pred_cls == c
        n_l = nt[ci]  # number of labels # 每一类的类别个数
        n_p = i.sum()  # number of predictions #
        if n_p == 0 or n_l == 0:
            continue

        # Accumulate FPs and TPs
        # 统计随着预测目标的增多,TP与FP数量的变化
        fpc = (1 - tp[i]).cumsum(0) # 计算累积总和
        tpc = tp[i].cumsum(0) # 计算累积总和

        # 统计精确率与召回率曲线,这里的曲线是指精确率与召回率随着样本数增加的变化
        # p与r是iou阈值为0.5的精确率与召回率曲线(所有类别的,每类对应一条曲线)
        # recall与precision则是所有iou阈值下的精确率与召回率曲线
        # Recall
        recall = tpc / (n_l + eps)  # recall curve # 计算召回率
        r[ci] = np.interp(-px, -conf[i], recall[:, 0], left=0)  # negative x, xp because xp decreases

        # Precision
        precision = tpc / (tpc + fpc)  # precision curve # 计算精确率
        p[ci] = np.interp(-px, -conf[i], precision[:, 0], left=1)  # p at pr_score

        # AP from recall-precision curve
        # 计算每个iou阈值下的ap-->(num_cls, niou)
        for j in range(tp.shape[1]):
            ap[ci, j], mpre, mrec = compute_ap(recall[:, j], precision[:, j])
            if plot and j == 0:
                py.append(np.interp(px, mrec, mpre))  # precision at mAP@0.5

    # Compute F1 (harmonic mean of precision and recall)
    f1 = 2 * p * r / (p + r + eps)
    names = [v for k, v in names.items() if k in unique_classes]  # list: only classes that have data
    names = dict(enumerate(names))  # to dict
    if plot:# 绘制曲线
        plot_pr_curve(px, py, ap, Path(save_dir) / f'{prefix}PR_curve.png', names)
        plot_mc_curve(px, f1, Path(save_dir) / f'{prefix}F1_curve.png', names, ylabel='F1')
        plot_mc_curve(px, p, Path(save_dir) / f'{prefix}P_curve.png', names, ylabel='Precision')
        plot_mc_curve(px, r, Path(save_dir) / f'{prefix}R_curve.png', names, ylabel='Recall')

    i = smooth(f1.mean(0), 0.1).argmax()  # max F1 index
    p, r, f1 = p[:, i], r[:, i], f1[:, i]
    tp = (r * nt).round()  # true positives
    fp = (tp / (p + eps) - tp).round()  # false positives
    return tp, fp, p, r, f1, ap, unique_classes.astype(int)
未完待续
在metrics.py中,不止上面提到的类和函数,但上面提及的类和函数是metrics.py中最关键的部分。其余函数,有兴趣者,可自行查阅。如果有空,我也会继续补充。
参考
[1] https://github.com/ultralytics/yolov5
[2] https://blog.csdn.net/qq_38253797/article/details/119904518
[3] https://blog.csdn.net/xjunjin/article/details/121475009
[4] https://blog.csdn.net/weixin_51322383/article/details/130454335
- 记录一下自己阅读YOLOv5:解读metrics.py代码的一些重要点,方便自己查阅。特别感谢,在参考里,列举的博文链接,写得很好,对本人阅读理解yolo.py代码,有很大帮助。
- 由于本人水平有限,难免出现错漏,敬请批评改正。
- 更多精彩内容,可点击进入YOLO系列专栏、自然语言处理
专栏或我的个人主页查看- 基于DETR的人脸伪装检测
- YOLOv7训练自己的数据集(口罩检测)
- YOLOv8训练自己的数据集(足球检测)
- YOLOv5:TensorRT加速YOLOv5模型推理
- YOLOv5:IoU、GIoU、DIoU、CIoU、EIoU
- 玩转Jetson Nano(五):TensorRT加速YOLOv5目标检测
- YOLOv5:添加SE、CBAM、CoordAtt、ECA注意力机制
- YOLOv5:yolov5s.yaml配置文件解读、增加小目标检测层
- Python将COCO格式实例分割数据集转换为YOLO格式实例分割数据集
- YOLOv5:使用7.0版本训练自己的实例分割模型(车辆、行人、路标、车道线等实例分割)
- 使用Kaggle GPU资源免费体验Stable Diffusion开源项目