程序示例精选
Python+QT美颜工具源码
如需安装运行环境或远程调试,见文章底部微信名片,由专业技术人员远程协助!
前言
这篇博客针对《Python+QT美颜》编写代码,功能包括了亮度,磨皮,风格化,铅笔化等多种特征修饰,代码整洁,规则,易读。 学习与应用推荐首选。
文章目录
一、所需工具软件
二、使用步骤
1. 引入库
2. 显示图片
3. 美颜特征函数定义
4. 运行结果
三、在线协助
一、所需工具软件
1. Python3.6以上
2. Pycharm代码编辑器
3. PyQt, OpenCV库
二、使用步骤
1.引入库
代码如下(示例):
from PyQt5 import Qt
from PyQt5 import QtCore,QtWidgets,QtGui
import sys
import PyQt5
from PyQt5.QtWidgets import QApplication, QWidget, QLabel, QFileDialog, QGraphicsRectItem, QGraphicsScene
from PyQt5.QtCore import QSize
import cv2
import numpy as np
from matplotlib import pyplot as plt
2.显示图片
代码如下(示例):
# 显示图片
    def show_image(self):
        img_cv = cv2.cvtColor(self.current_img, cv2.COLOR_RGB2BGR)
        img_width, img_height, a = img_cv.shape
        ratio_img = img_width/img_height
        ratio_scene = self.ui.graphicsView.width()/self.ui.graphicsView.height()
        if ratio_img > ratio_scene:
            width = int(self.ui.graphicsView.width())
            height = int(self.ui.graphicsView.width() / ratio_img)
        else:
            width = int(self.ui.graphicsView.height() * ratio_img)
            height = int(self.ui.graphicsView.height())
        img_resize = cv2.resize(img_cv, (height-5, width-5), interpolation=cv2.INTER_AREA)
        h, w, c = img_resize.shape
        bytesPerLine = w * 3
        qimg = QImage(img_resize.data, w, h, bytesPerLine, QImage.Format_RGB888)
        self.scene = QGraphicsScene()
        pix = QPixmap(qimg)
        self.scene.addPixmap(pix)
        self.ui.graphicsView.setScene(self.scene)
3.美颜特征函数定义:
代码如下(示例):
# 饱和度
def change_saturation(self):
if self.raw_image is None:
return 0
value = self.ui.horizontalSlider.value()
img_hsv = cv2.cvtColor(self.current_img, cv2.COLOR_BGR2HLS)
if value > 2:
img_hsv[:, :, 2] = np.log(img_hsv[:, :, 2] /255* (value - 1)+1) / np.log(value + 1) * 255
if value < 0:
img_hsv[:, :, 2] = np.uint8(img_hsv[:, :, 2] / np.log(- value + np.e))
self.current_img = cv2.cvtColor(img_hsv, cv2.COLOR_HLS2BGR)
# 明度调节
def change_darker(self):
if self.raw_image is None:
return 0
value = self.ui.horizontalSlider_4.value()
img_hsv = cv2.cvtColor(self.current_img, cv2.COLOR_BGR2HLS)
if value > 3:
img_hsv[:, :, 1] = np.log(img_hsv[:, :, 1] /255* (value - 1)+1) / np.log(value + 1) * 255
if value < 0:
img_hsv[:, :, 1] = np.uint8(img_hsv[:, :, 1] / np.log(- value + np.e))
self.last_image = self.current_img
self.current_img = cv2.cvtColor(img_hsv, cv2.COLOR_HLS2BGR)
# 人脸识别
def detect_face(self):
img = self.raw_image
face_cascade = cv2.CascadeClassifier('./haarcascade_frontalface_default.xml')
gray = cv2.cvtColor(img, cv2.COLOR_BGR2GRAY)
faces = face_cascade.detectMultiScale(gray, 1.3, 5)
return faces
# 皮肤识别
def detect_skin(self):
img = self.raw_image
rows, cols, channals = img.shape
for r in range(rows):
for c in range(cols):
B = img.item(r, c, 0)
G = img.item(r, c, 1)
R = img.item(r, c, 2)
if (abs(R - G) > 15) and (R > G) and (R > B):
if (R > 95) and (G > 40) and (B > 20) and (max(R, G, B) - min(R, G, B) > 15):
self.imgskin[r, c] = (1, 1, 1)
elif (R > 220) and (G > 210) and (B > 170):
self.imgskin[r, c] = (1, 1, 1)
# 皮肤磨皮(value1精细度,value2程度)
def dermabrasion(self, value1=3, value2=2):
value1 = self.ui.horizontalSlider_14.value()
value2 = 11 - self.ui.horizontalSlider_11.value()
if value1 == 0 and value2 == 0:
return 0
if value2 == 0:
value2 = 2
if value1 == 0:
value1 = 3
img = self.current_img
dx = value1 * 5
fc = value1 * 12.5
p = 50
temp1 = cv2.bilateralFilter(img, dx, fc, fc)
temp2 = (temp1 - img + 128)
temp3 = cv2.GaussianBlur(temp2, (2 * value2 - 1, 2 * value2 - 1), 0, 0)
temp4 = img + 2 * temp3 - 255
dst = np.uint8(img * ((100 - p) / 100) + temp4 * (p / 100))
imgskin_c = np.uint8(-(self.imgskin - 1))
dst = np.uint8(dst * self.imgskin + img * imgskin_c)
self.current_img = dst
# 美白算法(皮肤识别)
def whitening_skin(self, value=30):
# value = 30
value = self.ui.horizontalSlider_13.value()
img = self.current_img
imgw = np.zeros(img.shape, dtype='uint8')
imgw = img.copy()
midtones_add = np.zeros(256)
for i in range(256):
midtones_add[i] = 0.667 * (1 - ((i - 127.0) / 127) * ((i - 127.0) / 127))
lookup = np.zeros(256, dtype="uint8")
for i in range(256):
red = i
red += np.uint8(value * midtones_add[red])
red = max(0, min(0xff, red))
lookup[i] = np.uint8(red)
rows, cols, channals = img.shape
for r in range(rows):
for c in range(cols):
if self.imgskin[r, c, 0] == 1:
imgw[r, c, 0] = lookup[imgw[r, c, 0]]
imgw[r, c, 1] = lookup[imgw[r, c, 1]]
imgw[r, c, 2] = lookup[imgw[r, c, 2]]
self.current_img = imgw
# 美白算法(人脸识别)
def whitening_face(self, value=30):
# value = 30
value = self.ui.horizontalSlider_8.value()
img = self.current_img
imgw = np.zeros(img.shape, dtype='uint8')
imgw = img.copy()
midtones_add = np.zeros(256)
for i in range(256):
midtones_add[i] = 0.667 * (1 - ((i - 127.0) / 127) * ((i - 127.0) / 127))
lookup = np.zeros(256, dtype="uint8")
for i in range(256):
red = i
red += np.uint8(value * midtones_add[red])
red = max(0, min(0xff, red))
lookup[i] = np.uint8(red)
# faces可全局变量
faces = self.faces
if faces == ():
rows, cols, channals = img.shape
for r in range(rows):
for c in range(cols):
imgw[r, c, 0] = lookup[imgw[r, c, 0]]
imgw[r, c, 1] = lookup[imgw[r, c, 1]]
imgw[r, c, 2] = lookup[imgw[r, c, 2]]
else:
x, y, w, h = faces[0]
rows, cols, channals = img.shape
x = max(x - (w * np.sqrt(2) - w) / 2, 0)
y = max(y - (h * np.sqrt(2) - h) / 2, 0)
w = w * np.sqrt(2)
h = h * np.sqrt(2)
rows = min(rows, y + h)
cols = min(cols, x + w)
for r in range(int(y), int(rows)):
for c in range(int(x), int(cols)):
imgw[r, c, 0] = lookup[imgw[r, c, 0]]
imgw[r, c, 1] = lookup[imgw[r, c, 1]]
imgw[r, c, 2] = lookup[imgw[r, c, 2]]
processWidth = int(max(min(rows - y, cols - 1) / 8, 2))
for i in range(1, processWidth):
alpha = (i - 1) / processWidth
for r in range(int(y), int(rows)):
imgw[r, int(x) + i - 1] = np.uint8(
imgw[r, int(x) + i - 1] * alpha + img[r, int(x) + i - 1] * (1 - alpha))
imgw[r, int(cols) - i] = np.uint8(
imgw[r, int(cols) - i] * alpha + img[r, int(cols) - i] * (1 - alpha))
for c in range(int(x) + processWidth, int(cols) - processWidth):
imgw[int(y) + i - 1, c] = np.uint8(
imgw[int(y) + i - 1, c] * alpha + img[int(y) + i - 1, c] * (1 - alpha))
imgw[int(rows) - i, c] = np.uint8(
imgw[int(rows) - i, c] * alpha + img[int(rows) - i, c] * (1 - alpha))
self.current_img = imgw
# Gamma矫正
def gamma_trans(self):
gamma = (self.ui.horizontalSlider_5.value() + 10) / 10
img = self.current_img
gamma_table = [np.power(x / 255.0, gamma) * 255.0 for x in range(256)]
gamma_table = np.round(np.array(gamma_table)).astype(np.uint8)
self.current_img = cv2.LUT(img, gamma_table)
self.show_image()
self.show_histogram()
# 响应滑动条的变化
def slider_change(self):
if self.raw_image is None:
return 0
self.current_img = self.raw_image
# 伽马变换
if self.ui.horizontalSlider_5.value() != 0:
self.gamma_trans()
# 饱和度
if self.ui.horizontalSlider.value() != 0:
self.change_saturation()
if self.ui.horizontalSlider_2.value() != 0:
pass
# 边缘保持
if self.ui.horizontalSlider_3.value() != 0:
self.edge_preserve()
# 亮度
if self.ui.horizontalSlider_4.value() != 0:
self.change_darker()
# 美白(人脸识别)
if self.ui.horizontalSlider_8.value() != 0:
self.whitening_face()
# 美白(皮肤识别)
if self.ui.horizontalSlider_13.value() != 0:
self.whitening_skin()
# 风格化
if self.ui.horizontalSlider_2.value() != 0:
self.stylize()
# 细节增强
if self.ui.horizontalSlider_6.value() != 0:
self.detail_enhance()
# 铅笔画
if self.ui.horizontalSlider_12.value() != 0:
self.pencil_color()
self.show_image()
# 计算人脸识别和皮肤识别的基本参数
def calculate(self):
if self.raw_image is None:
return 0
if self.calculated is False:
self.faces = self.detect_face()
if self.faces != ():
self.detect_skin()
self.calculated = True
# 怀旧滤镜
def reminiscene(self):
if self.raw_image is None:
return 0
if self.ui.horizontalSlider_10.value() == 0:
self.current_img = self.raw_image
self.show_image()
return 0
img = self.raw_image.copy()
rows, cols, channals = img.shape
for r in range(rows):
for c in range(cols):
B = img.item(r, c, 0)
G = img.item(r, c, 1)
R = img.item(r, c, 2)
img[r, c, 0] = np.uint8(min(max(0.272 * R + 0.534 * G + 0.131 * B, 0), 255))
img[r, c, 1] = np.uint8(min(max(0.349 * R + 0.686 * G + 0.168 * B, 0), 255))
img[r, c, 2] = np.uint8(min(max(0.393 * R + 0.769 * G + 0.189 * B, 0), 255))
self.current_img = img
self.show_image()
# 木刻滤镜
def woodcut(self):
if self.raw_image is None:
return 0
if self.ui.horizontalSlider_9.value() == 0:
# self.current_img = self.raw_image
self.show_image()
return 0
self.gray_image = cv2.cvtColor(self.raw_image, cv2.COLOR_BGR2GRAY)
gray = self.gray_image
value = 70 + self.ui.horizontalSlider_9.value()
rows, cols = gray.shape
for r in range(rows):
for c in range(cols):
if gray[r, c] > value:
gray[r, c] = 255
else:
gray[r, c] = 0
self.gray_image = gray
self.show_grayimage()
# 铅笔画(灰度)
def pencil_gray(self):
if self.raw_image is None:
return 0
if self.ui.horizontalSlider_7.value() == 0:
# self.current_img = self.raw_image
self.show_image()
return 0
value = self.ui.horizontalSlider_7.value() * 0.05
dst1_gray, dst1_color = cv2.pencilSketch(self.current_img, sigma_s=50, sigma_r=value, shade_factor=0.04)
self.gray_image = dst1_gray
self.show_grayimage()
# 铅笔画(彩色)
def pencil_color(self):
if self.raw_image is None:
return 0
if self.ui.horizontalSlider_12.value() == 0:
self.current_img = self.raw_image
self.show_image()
return 0
value = self.ui.horizontalSlider_12.value() * 0.05
dst1_gray, dst1_color = cv2.pencilSketch(self.current_img, sigma_s=50, sigma_r=value, shade_factor=0.04)
self.current_img = dst1_color
# 风格化
def stylize(self):
if self.raw_image is None:
return 0
if self.ui.horizontalSlider_2.value() == 0:
self.current_img = self.raw_image
self.show_image()
return 0
value = self.ui.horizontalSlider_2.value() * 0.05
self.current_img = cv2.stylization(self.current_img, sigma_s=50, sigma_r=value)
# 细节增强
def detail_enhance(self):
if self.raw_image is None:
return 0
if self.ui.horizontalSlider_6.value() == 0:
self.current_img = self.raw_image
self.show_image()
return 0
value = self.ui.horizontalSlider_6.value() * 0.05
self.current_img = cv2.detailEnhance(self.current_img, sigma_s=50, sigma_r=value)
# 边缘保持
def edge_preserve(self):
if self.raw_image is None:
return 0
if self.ui.horizontalSlider_3.value() == 0:
self.current_img = self.raw_image
self.show_image()
return 0
value = self.ui.horizontalSlider_3.value() * 0.05
self.current_img = cv2.edgePreservingFilter(self.current_img, flags=1, sigma_s=50, sigma_r=value)
# 显示摄像照片
def show_camera(self):
flag, self.camera_image = self.cap.read()
show = cv2.resize(self.image, (640, 480))
show = cv2.cvtColor(show, cv2.COLOR_BGR2RGB)
showImage = QtGui.QImage(show.data, show.shape[1], show.shape[0], QtGui.QImage.Format_RGB888)
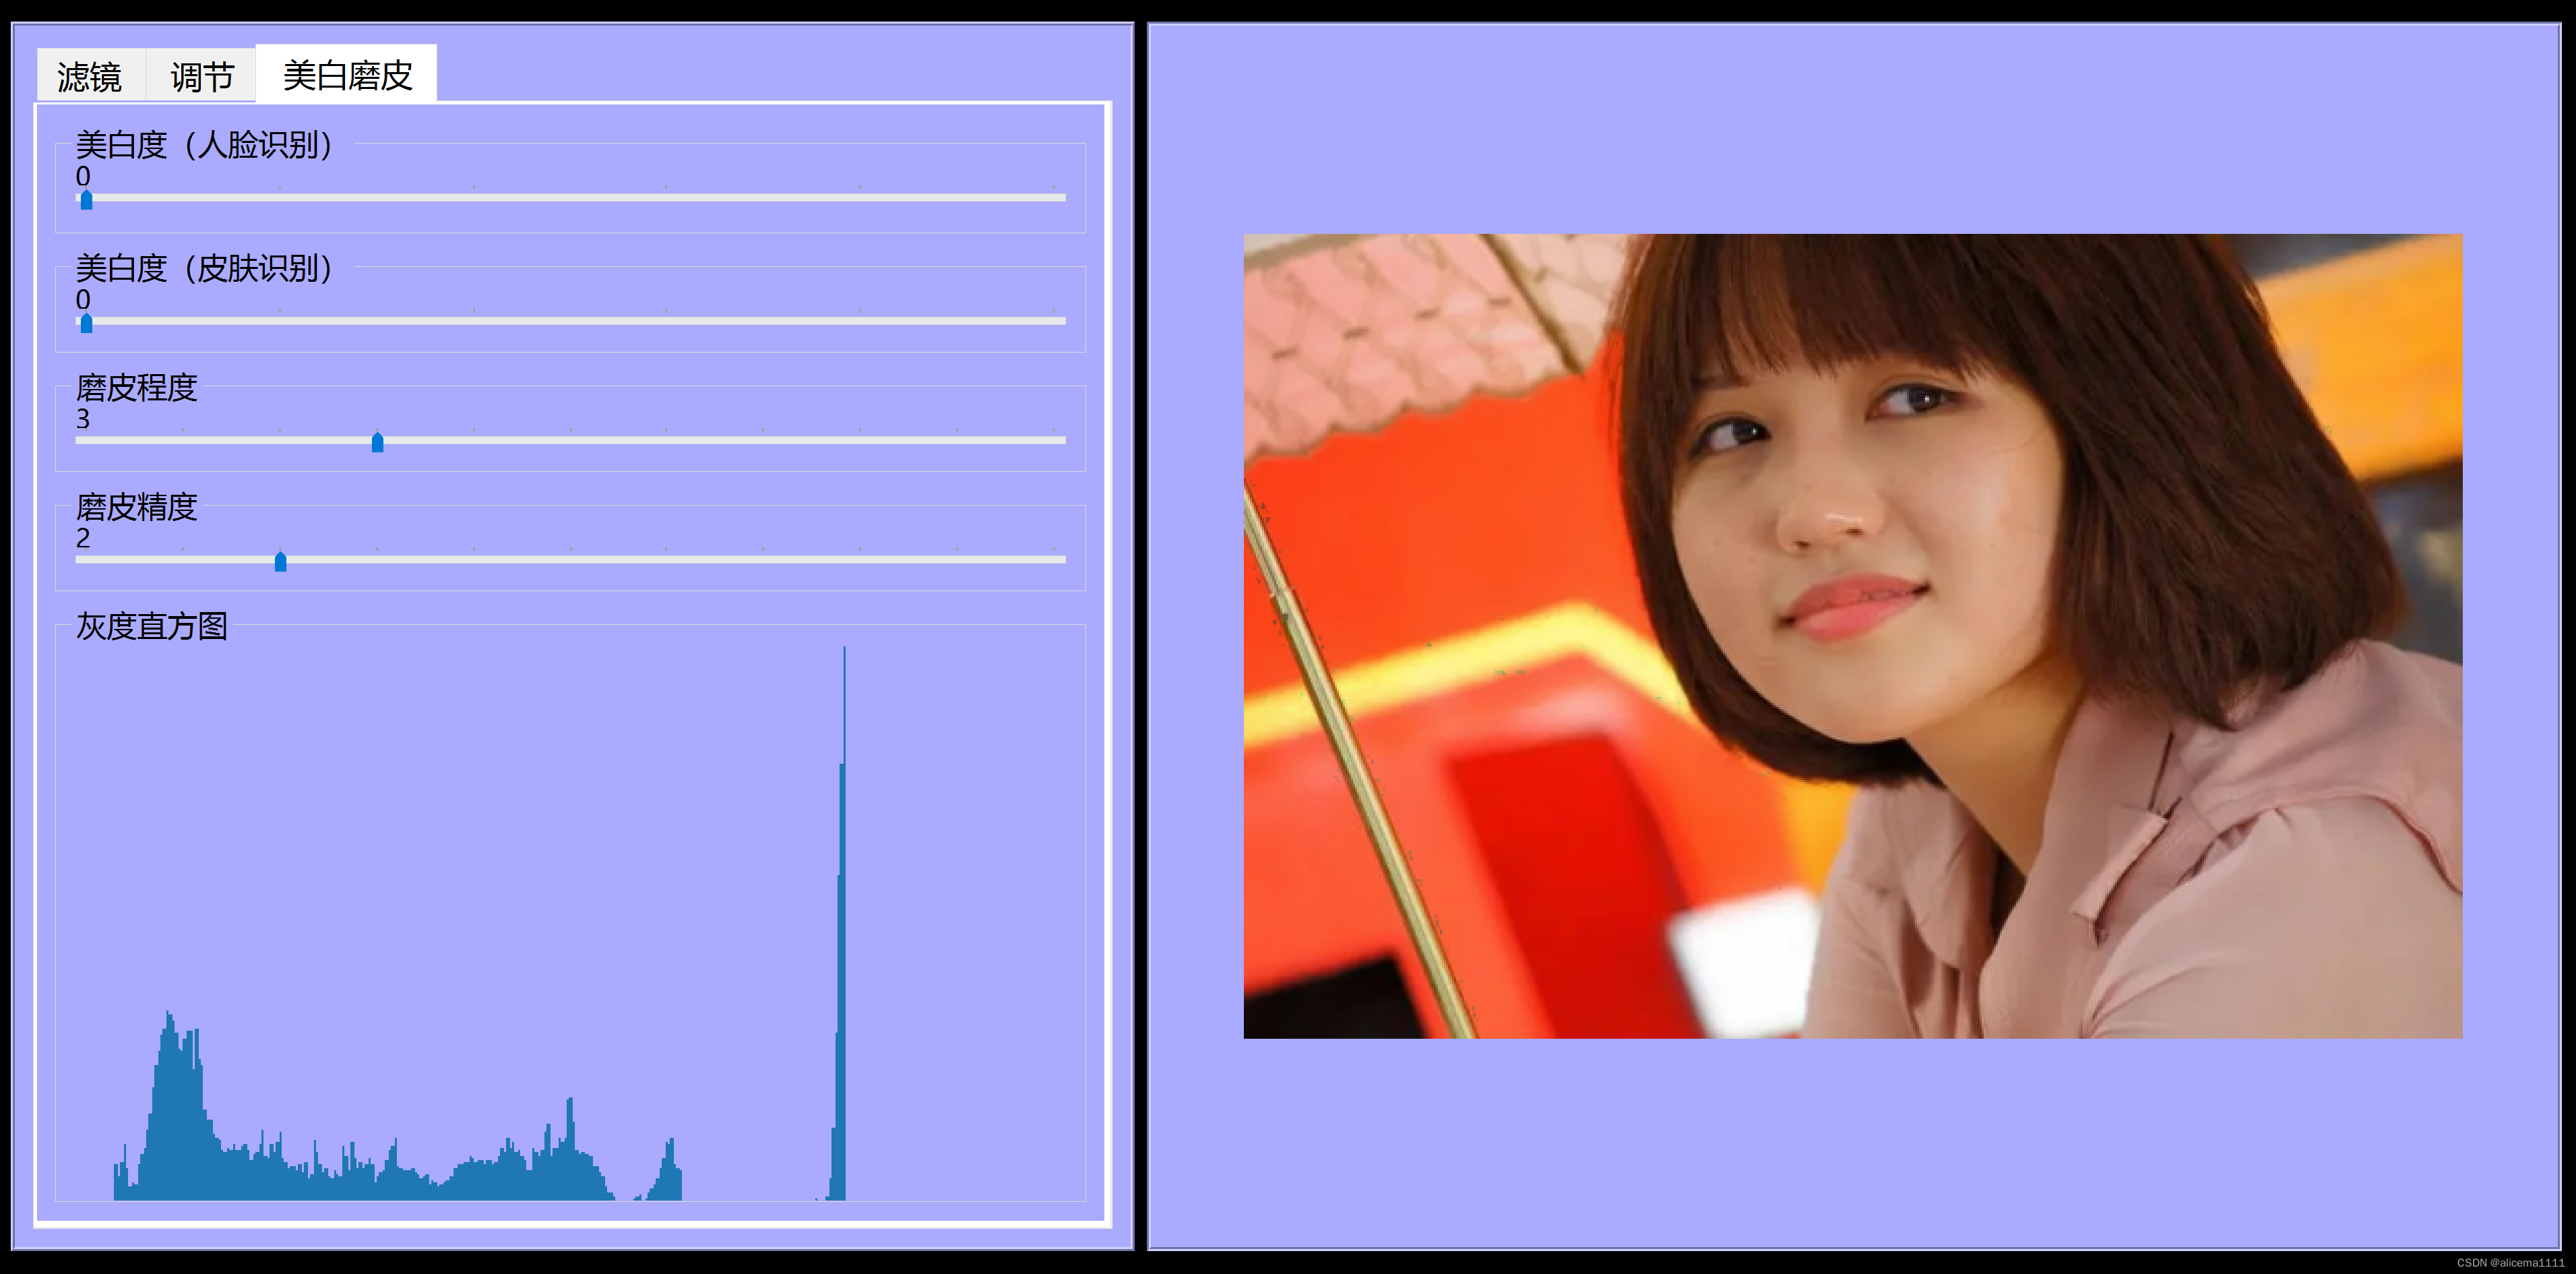
self.label_show_camera.setPixmap(QtGui.QPixmap.fromImage(showImage))4.运行结果如下:
三、在线协助:
如需安装运行环境或远程调试,见文章底部微信名片,由专业技术人员远程协助!


![[附源码]Python计算机毕业设计广西助农平台Django(程序+LW)](https://img-blog.csdnimg.cn/9d84dd080dc945f7a671ffda69c26318.png)