运行有问题或需要源码请点赞关注收藏后评论区留言~~~
一、版本设置
每个App都有三个基础信息,第一个是App的图标,第二个是App的名称,第三个是App的版本号。
一旦安装了某个版本的App,那么之后只能安装版本更新的同名App,不能安装版本更低的App,
每次App升级重新导出APK的时候,versionCode与versionName都要一起更改,不能只改其中一个,而且两者升级后只能比原来大,不能比原来小,如果没有按照规范修改版本号就会出现问题
下面是获取App基础信息的例子 效果如下
可见我的图标也进行了修改 具体怎么修改可以参见我之前的博客

代码如下
Java类
package com.example.chapter15;

import android.annotation.SuppressLint;
import android.os.Bundle;
import android.widget.ImageView;
import android.widget.TextView;

import androidx.appcompat.app.AppCompatActivity;

@SuppressLint("DefaultLocale")
public class AppVersionActivity extends AppCompatActivity {

    @Override
    protected void onCreate(Bundle savedInstanceState) {
        super.onCreate(savedInstanceState);
        setContentView(R.layout.activity_app_version);
        ImageView iv_icon = findViewById(R.id.iv_icon);
        iv_icon.setImageResource(R.mipmap.ic_launcher); // 应用图标取自ic_launcher
        TextView tv_desc = findViewById(R.id.tv_desc);
        // 应用名称取自app_name,应用包名、版本号、版本名称均来自BuildConfig
        String desc = String.format("App名称为:%s\nApp包名为:%s\n" +
                        "App版本号为:%d\nApp版本名称为:%s",
                getString(R.string.app_name), BuildConfig.APPLICATION_ID,
                BuildConfig.VERSION_CODE, BuildConfig.VERSION_NAME);
        tv_desc.setText(desc);
    }

}
XML文件
<LinearLayout xmlns:android="http://schemas.android.com/apk/res/android"
    android:layout_width="match_parent"
    android:layout_height="match_parent"
    android:orientation="vertical"
    android:padding="5dp" >

    <LinearLayout
        android:layout_width="match_parent"
        android:layout_height="wrap_content"
        android:orientation="horizontal" >

        <TextView
            android:layout_width="wrap_content"
            android:layout_height="match_parent"
            android:gravity="center"
            android:text="App图标为:"
            android:textColor="@color/black"
            android:textSize="17sp" />

        <ImageView
            android:id="@+id/iv_icon"
            android:layout_width="wrap_content"
            android:layout_height="wrap_content"
            android:scaleType="fitCenter"
            android:src="@mipmap/ic_launcher" />
    </LinearLayout>

    <TextView
        android:id="@+id/tv_desc"
        android:layout_width="wrap_content"
        android:layout_height="match_parent"
        android:textColor="@color/black"
        android:textSize="17sp" />

</LinearLayout>
二、发布模式
为了调试编码方便,开发者经常在代码里添加日志,还在页面上弹出各种提示,这样固然有利于发现BUG,但是调试信息过多往往容易泄漏敏感信息,从保密角度考虑,App在上线前必须去掉多余的调试信息,也就是生成发布模式的安装包 建立发布模式有以下两个优点
1:保护用户的敏感账户信息不被泄漏
2:保护业务逻辑与流程处理的交互数据不被泄漏
控制调试信息的工具类主要有两种,Log工具和Toast工具
1:日志Log
Log工具用于打印调试日志,App运行过程中,日志信息会输出到logcat窗口,因为最终用户不关心App日志,所以除非特殊情况,发布上线的App应该屏蔽掉所有日志信息
2:提示Toast
Toast工具在界面下方弹出小窗,给用户一两句话的提示,小窗短暂停留一会然后消失,由于Toast窗口无交互动作,样式也基本固定,因此除了少数弹窗应该保留,其他弹窗应该在发布时屏蔽
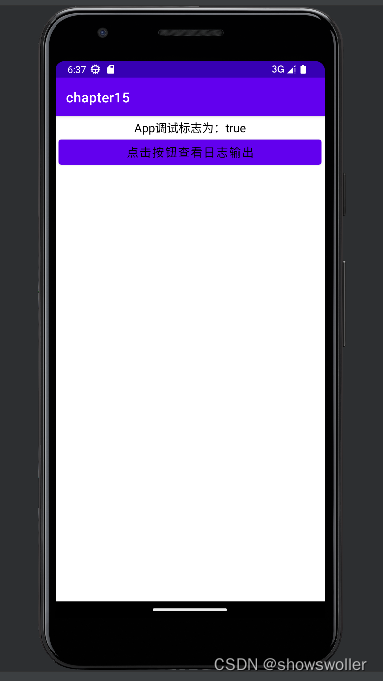
效果如下
日志控制台输出如下

代码如下
Java类
package com.example.chapter15;

import android.os.Bundle;
import android.util.Log;
import android.view.View;
import android.view.View.OnClickListener;
import android.widget.EditText;
import android.widget.TextView;
import android.widget.Toast;

import androidx.appcompat.app.AppCompatActivity;

import com.example.chapter15.util.LogUtil;

public class LogDebugActivity extends AppCompatActivity implements OnClickListener {
    private final static String TAG = "LogDebugActivity";
    private TextView tv_debug;

    @Override
    protected void onCreate(Bundle savedInstanceState) {
        super.onCreate(savedInstanceState);
        setContentView(R.layout.activity_log_debug);
        tv_debug = findViewById(R.id.tv_debug);
        findViewById(R.id.btn_debug).setOnClickListener(this);
        // 应用名称取自app_name,应用包名、版本号、版本名称均来自BuildConfig
        String desc = String.format("App调试标志为:%b", BuildConfig.DEBUG);
        tv_debug.setText(desc);
    }

    @Override
    public void onClick(View v) {
        if (v.getId() == R.id.btn_debug) {
            Toast.makeText(this, "已点击按钮,请注意观察日志", Toast.LENGTH_SHORT).show();
            LogUtil.d(TAG, "您点击了测试按钮,只有在调试模式之下才能看到本日志");
            Log.d(TAG, "这条日志无论是否调试模式都能看到");
        }
    }

}
XML文件
<LinearLayout xmlns:android="http://schemas.android.com/apk/res/android"
    android:layout_width="match_parent"
    android:layout_height="match_parent"
    android:orientation="vertical"
    android:padding="5dp" >

    <TextView
        android:id="@+id/tv_debug"
        android:layout_width="match_parent"
        android:layout_height="wrap_content"
        android:gravity="center"
        android:text="App调试标志为:"
        android:textColor="@color/black"
        android:textSize="17sp" />

    <Button
        android:id="@+id/btn_debug"
        android:layout_width="match_parent"
        android:layout_height="wrap_content"
        android:gravity="center"
        android:text="点击按钮查看日志输出"
        android:textColor="@color/black"
        android:textSize="17sp" />

</LinearLayout>
三、给数据库SQLite加密
App的业务数据大多保存在SQLite数据库中,但是该数据库的保密性不太强,很容易一被盗取数据,为了增强SQLite的安保措施,可以考虑以下两种技术方案
1:对于写操作,先把数据加密,再把加密后的数据写入数据库,读操作则先解密再处理,但是如此业务量巨大
2:加密整个数据库,此时要用到第三方的加密开源库,比如常见的开源框架SQLCipher,该方案封装了加密算法,性能高且使用方便,便于开发者迅速切换加密数据库
App中引入SQLCipher步骤如下
1:打开模块的build.gradle 引入如下代码
implementation'net.zetetic:android-database-sqlcipher:4.4.0'2:把代码中的SQLite相关类路径更换为SQLCipher对应类的路径
3:初始化SQLCipher的依赖库
4:在读写数据库的时候传入密匙
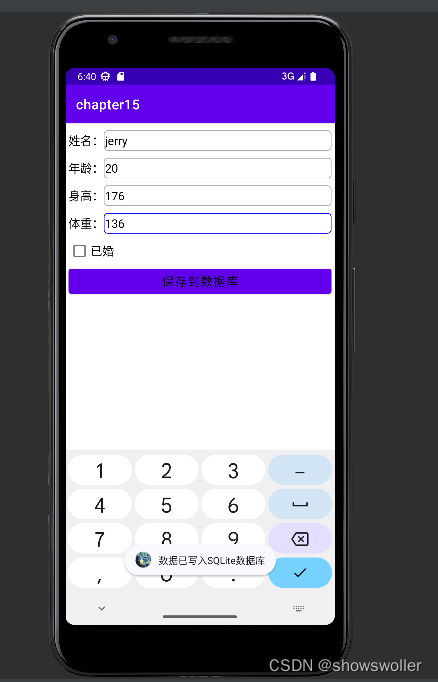
效果如下 可以实现数据库的读写操作

代码如下
Java类
package com.example.chapter15;

import android.os.Bundle;
import android.text.TextUtils;
import android.view.View;
import android.view.View.OnClickListener;
import android.widget.CheckBox;
import android.widget.CompoundButton;
import android.widget.EditText;

import androidx.appcompat.app.AppCompatActivity;

import com.example.chapter15.bean.UserInfo;
import com.example.chapter15.database.UserDBHelper;
import com.example.chapter15.util.DateUtil;
import com.example.chapter15.util.ToastUtil;

public class SQLiteWriteActivity extends AppCompatActivity implements OnClickListener, CompoundButton.OnCheckedChangeListener {
    private UserDBHelper mHelper; // 声明一个用户数据库帮助器的对象
    private EditText et_name;
    private EditText et_age;
    private EditText et_height;
    private EditText et_weight;
    private boolean bMarried = false;

    @Override
    protected void onCreate(Bundle savedInstanceState) {
        super.onCreate(savedInstanceState);
        setContentView(R.layout.activity_sqlite_write);
        et_name = findViewById(R.id.et_name);
        et_age = findViewById(R.id.et_age);
        et_height = findViewById(R.id.et_height);
        et_weight = findViewById(R.id.et_weight);
        CheckBox ck_married = findViewById(R.id.ck_married);
        ck_married.setOnCheckedChangeListener(this);
        findViewById(R.id.btn_save).setOnClickListener(this);
    }

    @Override
    public void onCheckedChanged(CompoundButton buttonView, boolean isChecked) {
        bMarried = isChecked;
    }

    @Override
    protected void onStart() {
        super.onStart();
        // 获得数据库帮助器的实例
        mHelper = UserDBHelper.getInstance(this, 1);
        mHelper.openWriteLink(); // 打开数据库帮助器的写连接
    }

    @Override
    protected void onStop() {
        super.onStop();
        mHelper.closeLink(); // 关闭数据库连接
    }

    @Override
    public void onClick(View v) {
        if (v.getId() == R.id.btn_save) {
            String name = et_name.getText().toString();
            String age = et_age.getText().toString();
            String height = et_height.getText().toString();
            String weight = et_weight.getText().toString();
            if (TextUtils.isEmpty(name)) {
                ToastUtil.show(this, "请先填写姓名");
                return;
            } else if (TextUtils.isEmpty(age)) {
                ToastUtil.show(this, "请先填写年龄");
                return;
            } else if (TextUtils.isEmpty(height)) {
                ToastUtil.show(this, "请先填写身高");
                return;
            } else if (TextUtils.isEmpty(weight)) {
                ToastUtil.show(this, "请先填写体重");
                return;
            }
            // 以下声明一个用户信息对象,并填写它的各字段值
            UserInfo info = new UserInfo();
            info.name = name;
            info.age = Integer.parseInt(age);
            info.height = Long.parseLong(height);
            info.weight = Float.parseFloat(weight);
            info.married = bMarried;
            info.update_time = DateUtil.getNowDateTime("yyyy-MM-dd HH:mm:ss");
            mHelper.insert(info); // 执行数据库帮助器的插入操作
            ToastUtil.show(this, "数据已写入SQLite数据库");
        }
    }

}
读数据库类
package com.example.chapter15;

import android.annotation.SuppressLint;
import android.os.Bundle;
import android.view.View;
import android.view.View.OnClickListener;
import android.widget.TextView;

import androidx.appcompat.app.AppCompatActivity;

import com.example.chapter15.bean.UserInfo;
import com.example.chapter15.database.UserDBHelper;
import com.example.chapter15.util.ToastUtil;

import java.util.List;

@SuppressLint("DefaultLocale")
public class SQLiteReadActivity extends AppCompatActivity implements OnClickListener {
    private UserDBHelper mHelper; // 声明一个用户数据库帮助器的对象
    private TextView tv_sqlite;

    @Override
    protected void onCreate(Bundle savedInstanceState) {
        super.onCreate(savedInstanceState);
        setContentView(R.layout.activity_sqlite_read);
        tv_sqlite = findViewById(R.id.tv_sqlite);
        findViewById(R.id.btn_delete).setOnClickListener(this);
    }

    @Override
    protected void onStart() {
        super.onStart();
        // 获得数据库帮助器的实例
        mHelper = UserDBHelper.getInstance(this, 1);
        mHelper.openReadLink(); // 打开数据库帮助器的读连接
        readSQLite(); // 读取数据库中保存的所有用户记录
    }

    @Override
    protected void onStop() {
        super.onStop();
        mHelper.closeLink(); // 关闭数据库连接
    }

    // 读取数据库中保存的所有用户记录
    private void readSQLite() {
        if (mHelper == null) {
            ToastUtil.show(this, "数据库连接为空");
            return;
        }
        // 执行数据库帮助器的查询操作
        List<UserInfo> userList = mHelper.query("1=1");
        String desc = String.format("数据库查询到%d条记录,详情如下:", userList.size());
        for (int i = 0; i < userList.size(); i++) {
            UserInfo info = userList.get(i);
            desc = String.format("%s\n第%d条记录信息如下:", desc, i + 1);
            desc = String.format("%s\n 姓名为%s", desc, info.name);
            desc = String.format("%s\n 年龄为%d", desc, info.age);
            desc = String.format("%s\n 身高为%d", desc, info.height);
            desc = String.format("%s\n 体重为%f", desc, info.weight);
            desc = String.format("%s\n 婚否为%b", desc, info.married);
            desc = String.format("%s\n 更新时间为%s", desc, info.update_time);
        }
        if (userList.size() <= 0) {
            desc = "数据库查询到的记录为空";
        }
        tv_sqlite.setText(desc);
    }

    @Override
    public void onClick(View v) {
        if (v.getId() == R.id.btn_delete) {
            mHelper.closeLink(); // 关闭数据库连接
            mHelper.openWriteLink(); // 打开数据库帮助器的写连接
            mHelper.deleteAll(); // 删除所有记录
            mHelper.closeLink(); // 关闭数据库连接
            mHelper.openReadLink(); // 打开数据库帮助器的读连接
            readSQLite(); // 读取数据库中保存的所有用户记录
        }
    }

}
XML文件
<LinearLayout xmlns:android="http://schemas.android.com/apk/res/android"
    android:layout_width="match_parent"
    android:layout_height="match_parent"
    android:orientation="vertical"
    android:padding="5dp" >

    <RelativeLayout
        android:layout_width="match_parent"
        android:layout_height="40dp" >

        <TextView
            android:id="@+id/tv_name"
            android:layout_width="wrap_content"
            android:layout_height="match_parent"
            android:layout_alignParentLeft="true"
            android:gravity="center"
            android:text="姓名:"
            android:textColor="@color/black"
            android:textSize="17sp" />

        <EditText
            android:id="@+id/et_name"
            android:layout_width="match_parent"
            android:layout_height="match_parent"
            android:layout_marginBottom="5dp"
            android:layout_marginTop="5dp"
            android:layout_toRightOf="@+id/tv_name"
            android:background="@drawable/editext_selector"
            android:gravity="left|center"
            android:hint="请输入姓名"
            android:inputType="text"
            android:maxLength="12"
            android:textColor="@color/black"
            android:textSize="17sp" />
    </RelativeLayout>

    <RelativeLayout
        android:layout_width="match_parent"
        android:layout_height="40dp" >

        <TextView
            android:id="@+id/tv_age"
            android:layout_width="wrap_content"
            android:layout_height="match_parent"
            android:layout_alignParentLeft="true"
            android:gravity="center"
            android:text="年龄:"
            android:textColor="@color/black"
            android:textSize="17sp" />

        <EditText
            android:id="@+id/et_age"
            android:layout_width="match_parent"
            android:layout_height="match_parent"
            android:layout_marginBottom="5dp"
            android:layout_marginTop="5dp"
            android:layout_toRightOf="@+id/tv_age"
            android:background="@drawable/editext_selector"
            android:gravity="left|center"
            android:hint="请输入年龄"
            android:inputType="number"
            android:maxLength="2"
            android:textColor="@color/black"
            android:textSize="17sp" />
    </RelativeLayout>

    <RelativeLayout
        android:layout_width="match_parent"
        android:layout_height="40dp" >

        <TextView
            android:id="@+id/tv_height"
            android:layout_width="wrap_content"
            android:layout_height="match_parent"
            android:layout_alignParentLeft="true"
            android:gravity="center"
            android:text="身高:"
            android:textColor="@color/black"
            android:textSize="17sp" />

        <EditText
            android:id="@+id/et_height"
            android:layout_width="match_parent"
            android:layout_height="match_parent"
            android:layout_marginBottom="5dp"
            android:layout_marginTop="5dp"
            android:layout_toRightOf="@+id/tv_height"
            android:background="@drawable/editext_selector"
            android:gravity="left|center"
            android:hint="请输入身高"
            android:inputType="number"
            android:maxLength="3"
            android:textColor="@color/black"
            android:textSize="17sp" />
    </RelativeLayout>

    <RelativeLayout
        android:layout_width="match_parent"
        android:layout_height="40dp" >

        <TextView
            android:id="@+id/tv_weight"
            android:layout_width="wrap_content"
            android:layout_height="match_parent"
            android:layout_alignParentLeft="true"
            android:gravity="center"
            android:text="体重:"
            android:textColor="@color/black"
            android:textSize="17sp" />

        <EditText
            android:id="@+id/et_weight"
            android:layout_width="match_parent"
            android:layout_height="match_parent"
            android:layout_marginBottom="5dp"
            android:layout_marginTop="5dp"
            android:layout_toRightOf="@+id/tv_weight"
            android:background="@drawable/editext_selector"
            android:gravity="left|center"
            android:hint="请输入体重"
            android:inputType="numberDecimal"
            android:maxLength="5"
            android:textColor="@color/black"
            android:textSize="17sp" />
    </RelativeLayout>

    <RelativeLayout
        android:layout_width="match_parent"
        android:layout_height="40dp" >

        <CheckBox
            android:id="@+id/ck_married"
            android:layout_width="wrap_content"
            android:layout_height="match_parent"
            android:layout_alignParentLeft="true"
            android:gravity="center"
            android:checked="false"
            android:text="已婚"
            android:textColor="@color/black"
            android:textSize="17sp" />
    </RelativeLayout>

    <Button
        android:id="@+id/btn_save"
        android:layout_width="match_parent"
        android:layout_height="wrap_content"
        android:text="保存到数据库"
        android:textColor="@color/black"
        android:textSize="17sp" />

</LinearLayout>
创作不易 觉得有帮助请点赞关注收藏~~~
![[公派访问学者]申请条件及选拔方法](https://img-blog.csdnimg.cn/ae62d1b5dca549cd9526f68bc852bf34.jpeg)