Publish/Subscribe(发布订阅模式)
官方文档: https://www.rabbitmq.com/tutorials/tutorial-three-python.html
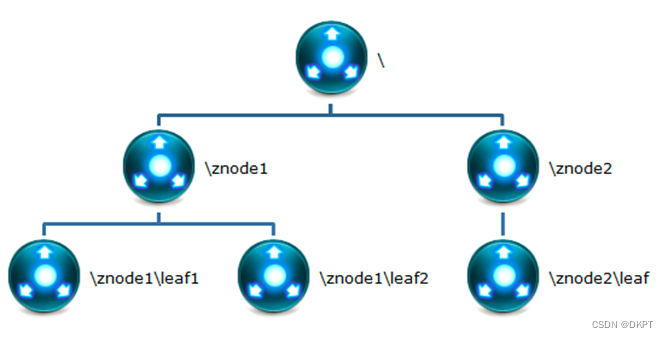
使用fanout类型类型的交换器,routingKey忽略。每个消费者定义生成一个队列关绑定到同一个Exchange,每个消费者都可以消费完整的消息。
消息广播给所有订阅该消息的消费者。
在RabbitMQ中,生产者不是将消息直接发送给消息消息队列,实际上生产者根本不知道一个消息被发送到哪个队列。
生产者将消息发送给交换器。交换器非常简单,从生成者接收消息,将消息推送给消息队列。交换器必须清楚的知道要怎么处理接收到的消息。应该是追加到一个指定的队列,还是追加到多个队列,还是丢弃。规则就是交换器的类型。

发布订阅使用fanout的交换器,创建交换器,名称为test
channel.exchangeDeclare("test","fanout");
fanout交换器很简单,从名称就可以看出来(用风扇吹出去),将所有的收到的消息发给它的知道的所有队列。
存在一个默认的交换器。
此样例使用的是临时队列,即消费都实现将自动创建此队列,当消费都退出后,此队列也将自动删除。
队列名称如
amq.gen-gjKBgQ9PSmoj2YQGMOdPfA
样例代码
消费者1的代码:
import com.rabbitmq.client.BuiltinExchangeType;
import com.rabbitmq.client.CancelCallback;
import com.rabbitmq.client.Channel;
import com.rabbitmq.client.Connection;
import com.rabbitmq.client.ConnectionFactory;
import com.rabbitmq.client.DeliverCallback;
import com.rabbitmq.client.Delivery;

import java.io.IOException;
import java.nio.charset.StandardCharsets;

public class OneConsumer {

  public static void main(String[] args) throws Exception {
    ConnectionFactory factory = new ConnectionFactory();

    factory.setUri("amqp://root:123456@node1:5672/%2f");

    Connection connection = factory.newConnection();
    Channel channel = connection.createChannel();

    // 声明的临时队列,名称由rabbitMQ自动生成
    String queueName = channel.queueDeclare().getQueue();
    System.out.println("临时队列的名称:" + queueName);

    // 定义交换机
    channel.exchangeDeclare("ex.testfan", BuiltinExchangeType.FANOUT, true, false, null);

    // 消息队列与交换机的绑定
    channel.queueBind(queueName, "ex.testfan", "");

    channel.basicConsume(
        queueName,
        new DeliverCallback() {
          @Override
          public void handle(String consumerTag, Delivery message) throws IOException {
            System.out.println(
                "one 获取到的消息:" + new String(message.getBody(), StandardCharsets.UTF_8));
          }
        },
        new CancelCallback() {
          @Override
          public void handle(String consumerTag) throws IOException {}
        });
  }
}
消费者2
import com.rabbitmq.client.BuiltinExchangeType;
import com.rabbitmq.client.CancelCallback;
import com.rabbitmq.client.Channel;
import com.rabbitmq.client.Connection;
import com.rabbitmq.client.ConnectionFactory;
import com.rabbitmq.client.DeliverCallback;
import com.rabbitmq.client.Delivery;

import java.io.IOException;
import java.nio.charset.StandardCharsets;

public class TwoConsumer {

  public static void main(String[] args) throws Exception {
    ConnectionFactory factory = new ConnectionFactory();

    factory.setUri("amqp://root:123456@node1:5672/%2f");

    Connection connection = factory.newConnection();
    Channel channel = connection.createChannel();

    // 生成的临时队列
    String queueName = channel.queueDeclare().getQueue();
    System.out.println("临时队列的名称:" + queueName);

    // 定义交换机
    channel.exchangeDeclare("ex.testfan", BuiltinExchangeType.FANOUT, true, false, null);

    // 消息队列与交换机的绑定
    channel.queueBind(queueName, "ex.testfan", "");

    channel.basicConsume(
        queueName,
        new DeliverCallback() {
          @Override
          public void handle(String consumerTag, Delivery message) throws IOException {
            System.out.println(
                "two 获取到的消息:" + new String(message.getBody(), StandardCharsets.UTF_8));
          }
        },
        new CancelCallback() {
          @Override
          public void handle(String consumerTag) throws IOException {}
        });
  }
}
消费者3
import com.rabbitmq.client.BuiltinExchangeType;
import com.rabbitmq.client.CancelCallback;
import com.rabbitmq.client.Channel;
import com.rabbitmq.client.Connection;
import com.rabbitmq.client.ConnectionFactory;
import com.rabbitmq.client.DeliverCallback;
import com.rabbitmq.client.Delivery;

import java.io.IOException;
import java.nio.charset.StandardCharsets;

public class ThirdConsumer {

  public static void main(String[] args) throws Exception {
    ConnectionFactory factory = new ConnectionFactory();

    factory.setUri("amqp://root:123456@node1:5672/%2f");

    Connection connection = factory.newConnection();
    Channel channel = connection.createChannel();

    // 生成的临时队列
    String queueName = channel.queueDeclare().getQueue();
    System.out.println("临时队列的名称:" + queueName);

    // 定义交换机
    channel.exchangeDeclare("ex.testfan", BuiltinExchangeType.FANOUT, true, false, null);

    // 消息队列与交换机的绑定
    channel.queueBind(queueName, "ex.testfan", "");

    channel.basicConsume(
        queueName,
        new DeliverCallback() {
          @Override
          public void handle(String consumerTag, Delivery message) throws IOException {
            System.out.println(
                "third 获取到的消息:" + new String(message.getBody(), StandardCharsets.UTF_8));
          }
        },
        new CancelCallback() {
          @Override
          public void handle(String consumerTag) throws IOException {}
        });
  }
}
生产者
import com.rabbitmq.client.Channel;
import com.rabbitmq.client.Connection;
import com.rabbitmq.client.ConnectionFactory;

import java.io.IOException;
import java.nio.charset.StandardCharsets;

public class Product {

  public static void main(String[] args) throws Exception {
    ConnectionFactory factory = new ConnectionFactory();
    factory.setUri("amqp://root:123456@node1:5672/%2f");

    Connection connection = factory.newConnection();
    Channel channel = connection.createChannel();

    try {
      // 声明fanout类型交换机
      channel.exchangeDeclare("ex.testfan", "fanout", true, false, false, null);

      for (int i = 0; i < 20; i++) {
        channel.basicPublish(
            "ex.testfan",
            // 路由key
            "",
            // 属性
            null,
            // 信息
            ("hello world fan " + i).getBytes(StandardCharsets.UTF_8));
      }
    } catch (IOException e) {
      throw new RuntimeException(e);
    } finally {
      channel.close();
      connection.close();
    }
  }
}
观察下队列的绑定的情况:
在未启动消费都队列之前:
[root@nullnull-os ~]# rabbitmqctl list_exchanges --formatter pretty_table
Listing exchanges for vhost / ...
┌────────────────────┬─────────┐
│ name               │ type    │
├────────────────────┼─────────┤
│ amq.fanout         │ fanout  │
├────────────────────┼─────────┤
│ amq.rabbitmq.trace │ topic   │
├────────────────────┼─────────┤
│ amq.headers        │ headers │
├────────────────────┼─────────┤
│ amq.topic          │ topic   │
├────────────────────┼─────────┤
│ amq.direct         │ direct  │
├────────────────────┼─────────┤
│                    │ direct  │
├────────────────────┼─────────┤
│ amq.match          │ headers │
└────────────────────┴─────────┘
[root@nullnull-os ~]# rabbitmqctl list_bindings --formatter pretty_table
Listing bindings for vhost /...
[root@nullnull-os ~]#
在未启动消费者之前,只有看到几个默认的生产者。绑定的队列为空。
启动三个消费者:
[root@nullnull-os ~]# rabbitmqctl list_exchanges --formatter pretty_table
Listing exchanges for vhost / ...
┌────────────────────┬─────────┐
│ name               │ type    │
├────────────────────┼─────────┤
│ amq.fanout         │ fanout  │
├────────────────────┼─────────┤
│ amq.rabbitmq.trace │ topic   │
├────────────────────┼─────────┤
│ amq.headers        │ headers │
├────────────────────┼─────────┤
│ amq.topic          │ topic   │
├────────────────────┼─────────┤
│ ex.testfan         │ fanout  │
├────────────────────┼─────────┤
│ amq.direct         │ direct  │
├────────────────────┼─────────┤
│                    │ direct  │
├────────────────────┼─────────┤
│ amq.match          │ headers │
└────────────────────┴─────────┘
[root@nullnull-os ~]# rabbitmqctl list_bindings --formatter pretty_table
Listing bindings for vhost /...
┌─────────────┬─────────────┬────────────────────────────────┬──────────────────┬────────────────────────────────┬───────────┐
│ source_name │ source_kind │ destination_name               │ destination_kind │ routing_key                    │ arguments │
├─────────────┼─────────────┼────────────────────────────────┼──────────────────┼────────────────────────────────┼───────────┤
│             │ exchange    │ amq.gen-VbV63vwAn0IBzC7n6I--vQ │ queue            │ amq.gen-VbV63vwAn0IBzC7n6I--vQ │           │
├─────────────┼─────────────┼────────────────────────────────┼──────────────────┼────────────────────────────────┼───────────┤
│             │ exchange    │ amq.gen-UG67rAw03FGbBupHX6o18g │ queue            │ amq.gen-UG67rAw03FGbBupHX6o18g │           │
├─────────────┼─────────────┼────────────────────────────────┼──────────────────┼────────────────────────────────┼───────────┤
│             │ exchange    │ amq.gen-HnQLeaOB1YOEJXXfXP5_Mg │ queue            │ amq.gen-HnQLeaOB1YOEJXXfXP5_Mg │           │
├─────────────┼─────────────┼────────────────────────────────┼──────────────────┼────────────────────────────────┼───────────┤
│ ex.testfan  │ exchange    │ amq.gen-HnQLeaOB1YOEJXXfXP5_Mg │ queue            │                                │           │
├─────────────┼─────────────┼────────────────────────────────┼──────────────────┼────────────────────────────────┼───────────┤
│ ex.testfan  │ exchange    │ amq.gen-UG67rAw03FGbBupHX6o18g │ queue            │                                │           │
├─────────────┼─────────────┼────────────────────────────────┼──────────────────┼────────────────────────────────┼───────────┤
│ ex.testfan  │ exchange    │ amq.gen-VbV63vwAn0IBzC7n6I--vQ │ queue            │                                │           │
└─────────────┴─────────────┴────────────────────────────────┴──────────────────┴────────────────────────────────┴───────────┘
[root@nullnull-os ~]#
当启动生产者后,可以发现已经产生了3个默认的交换机及队列的绑定关系。以及手动绑定的3个队列的关系。
启动生产者,查看消费情况:
消费者1
临时队列的名称:amq.gen-VbV63vwAn0IBzC7n6I--vQ
one 获取到的消息:hello world fan 0
one 获取到的消息:hello world fan 1
one 获取到的消息:hello world fan 2
one 获取到的消息:hello world fan 3
one 获取到的消息:hello world fan 4
one 获取到的消息:hello world fan 5
one 获取到的消息:hello world fan 6
one 获取到的消息:hello world fan 7
one 获取到的消息:hello world fan 8
one 获取到的消息:hello world fan 9
one 获取到的消息:hello world fan 10
one 获取到的消息:hello world fan 11
one 获取到的消息:hello world fan 12
one 获取到的消息:hello world fan 13
one 获取到的消息:hello world fan 14
one 获取到的消息:hello world fan 15
one 获取到的消息:hello world fan 16
one 获取到的消息:hello world fan 17
one 获取到的消息:hello world fan 18
one 获取到的消息:hello world fan 19
消费者2:
临时队列的名称:amq.gen-KadV2OsCRLb84p2k_ijuww
two 获取到的消息:hello world fan 0
two 获取到的消息:hello world fan 1
two 获取到的消息:hello world fan 2
two 获取到的消息:hello world fan 3
two 获取到的消息:hello world fan 4
two 获取到的消息:hello world fan 5
two 获取到的消息:hello world fan 6
two 获取到的消息:hello world fan 7
two 获取到的消息:hello world fan 8
two 获取到的消息:hello world fan 9
two 获取到的消息:hello world fan 10
two 获取到的消息:hello world fan 11
two 获取到的消息:hello world fan 12
two 获取到的消息:hello world fan 13
two 获取到的消息:hello world fan 14
two 获取到的消息:hello world fan 15
two 获取到的消息:hello world fan 16
two 获取到的消息:hello world fan 17
two 获取到的消息:hello world fan 18
two 获取到的消息:hello world fan 19
消息者3:
临时队列的名称:amq.gen-TcqXVnoS2mjOpfCw1o1CZw
third 获取到的消息:hello world fan 0
third 获取到的消息:hello world fan 1
third 获取到的消息:hello world fan 2
third 获取到的消息:hello world fan 3
third 获取到的消息:hello world fan 4
third 获取到的消息:hello world fan 5
third 获取到的消息:hello world fan 6
third 获取到的消息:hello world fan 7
third 获取到的消息:hello world fan 8
third 获取到的消息:hello world fan 9
third 获取到的消息:hello world fan 10
third 获取到的消息:hello world fan 11
third 获取到的消息:hello world fan 12
third 获取到的消息:hello world fan 13
third 获取到的消息:hello world fan 14
third 获取到的消息:hello world fan 15
third 获取到的消息:hello world fan 16
third 获取到的消息:hello world fan 17
third 获取到的消息:hello world fan 18
third 获取到的消息:hello world fan 19
再停止几个消费者查看队列信息
[root@nullnull-os ~]# rabbitmqctl list_exchanges --formatter pretty_table
Listing exchanges for vhost / ...
┌────────────────────┬─────────┐
│ name               │ type    │
├────────────────────┼─────────┤
│ amq.fanout         │ fanout  │
├────────────────────┼─────────┤
│ amq.rabbitmq.trace │ topic   │
├────────────────────┼─────────┤
│ amq.headers        │ headers │
├────────────────────┼─────────┤
│ amq.topic          │ topic   │
├────────────────────┼─────────┤
│ ex.testfan         │ fanout  │
├────────────────────┼─────────┤
│ amq.direct         │ direct  │
├────────────────────┼─────────┤
│                    │ direct  │
├────────────────────┼─────────┤
│ amq.match          │ headers │
└────────────────────┴─────────┘
[root@nullnull-os ~]# rabbitmqctl list_bindings --formatter pretty_table
Listing bindings for vhost /...
[root@nullnull-os ~]#
可以看到,当客户端退出之后,临时队列也就消失了。