背景
希望实现批量删除和复制节点,因为bpmn-js是canvas画的,所以不能像平时页面上的复制一样直接选择范围,会变成移动画布。
思路是:
绘制一个选择的效果框,这样才可以看出来选的节点有哪些。
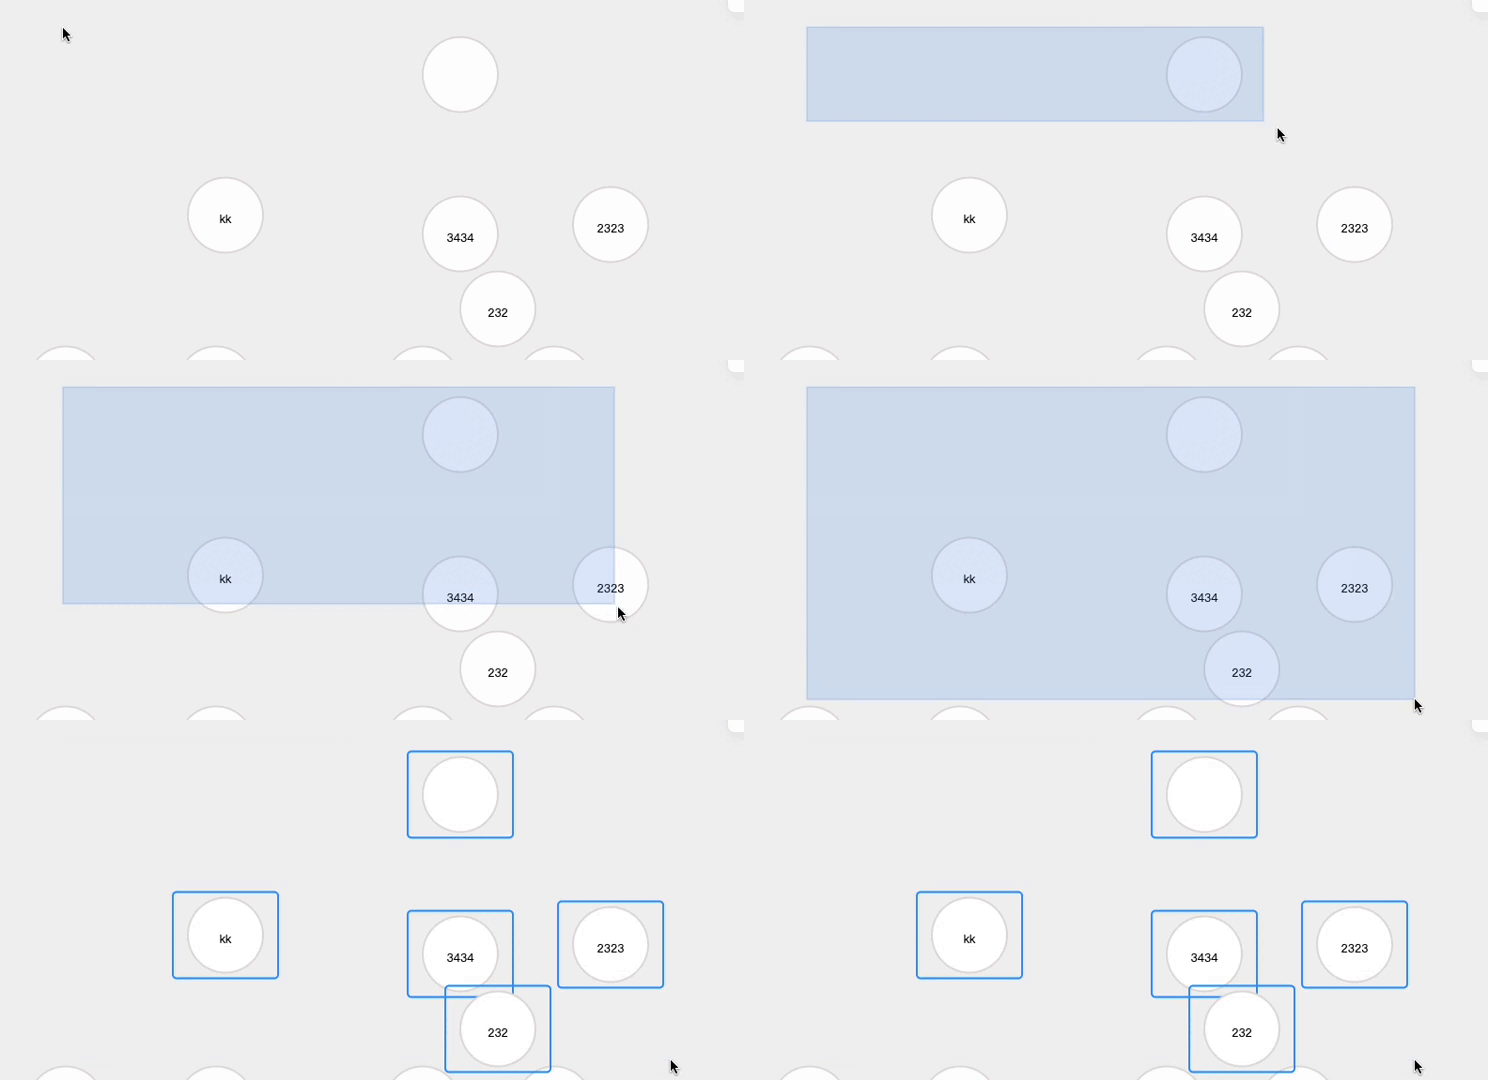
上面的选中范围框效果也是用canvas画出来的
因为bpmn-js对鼠标直接选取范围进行了拦截。所以我加了一个辅助按键进行选择
一、 以下是绘制选择框范围的代码:
     * @param {MouseEvent} e
     */
    onMousedown(e) {
      this.removeActiveClass()
      this.batchSelectedList = []
      if (!e.metaKey && !e.altKey && !e.ctrlKey) {
        return
      }
      e.target.addEventListener('mouseup', this.onMouseup)

      if (!this.rectSelect) {
        const rect = this.$refs.canvas.getBoundingClientRect()
        this.startX = e.clientX - rect.left
        this.startY = e.clientY - rect.top

        const g = this.$el.getElementsByTagName('svg')[1]
        this.rectSelect = document.createElementNS('http://www.w3.org/2000/svg', 'rect')
        this.rectSelect.setAttribute('fill', 'rgba(93,148,231,0.2)')
        this.rectSelect.setAttribute('stroke-width', '2px')
        this.rectSelect.setAttribute('stroke', 'rgba(93,148,231,0.2)')
        g.append(this.rectSelect)
      }
    },
    /**
     * @param {MouseEvent} e
     */
    onMousemove(e) {
      if (!this.enableBatchSelect) return
      this.currentMouseEvent = e

      if (!this.rectSelect) {
        return
      }
      e.stopPropagation()
      const canvasRect = this.$refs.canvas.getBoundingClientRect()
      const w = e.clientX - this.startX - canvasRect.left
      const h = e.clientY - this.startY - canvasRect.top
      const x = this.startX
      const y = this.startY
      this.rectSelect.setAttribute('x', w < 0 ? e.clientX - canvasRect.left : this.startX)
      this.rectSelect.setAttribute('y', h < 0 ? e.clientY - canvasRect.top : this.startY)
      this.rectSelect.setAttribute('width', `${Math.abs(w)}`)
      this.rectSelect.setAttribute('height', `${Math.abs(h)}`)

      const elementRegistry = this.bpmnModeler.get('elementRegistry')
      const canvas = this.bpmnModeler.get('canvas')
      const box = canvas.viewbox()

      const elementList = elementRegistry.getAll()
      const nodeList = elementList.filter(f => f.type === 'bpmn:Task')

      this.connectLineList = elementList.filter(f => f.type === 'bpmn:SequenceFlow')
      const boxX = box.x
      const boxY = box.y
      this.batchSelectedList = nodeList.filter(item => {
        const x1 = -(boxX - item.x) * box.scale
        const y1 = -(boxY - item.y) * box.scale

        const pointers = [
          { x: x, y: y },
          { x: x + w, y: y },
          { x: x + w, y: y + h },
          { x: x, y: y + h }
        ]
        return inRect(x1, y1, pointers)
      })
    },
    onMouseup(e) {
      if (this.rectSelect) {
        this.rectSelect.remove()
      }
      this.rectSelect = null
      e.target.removeEventListener('mouseup', this.onMouseup)
      const elementRegistry = this.bpmnModeler.get('elementRegistry')
      this.batchSelectedList.forEach(item => {
        const id = item.id
        const el = elementRegistry._elements[id]?.gfx
        if (el) {
          el.classList.add('batch-selected')
          this.activeIdList.push(id)
        }
      })
    },
    removeActiveClass() {
      const elementRegistry = this.bpmnModeler.get('elementRegistry')
      this.activeIdList.forEach(id => {
        const el = elementRegistry._elements[id]?.gfx
        if (el) {
          el.classList.remove('batch-selected')
        }
      })
      this.activeIdList = []
    }
<style>
.djs-element.batch-selected .djs-outline {
  stroke: rgb(54, 147, 255) !important;
  visibility: visible !important;
}
</style>
二、然后是把选中的数据放入剪贴板
 async onCopy(isShowMessage = true) {
      if (this.copyData.length === 0) return
      try {
        await navigator.clipboard.writeText(JSON.stringify(copyData))
        isShowMessage && this.$message.success(`已复制${copyData.length}个节点`)
      } catch (e) {
        this.$message.error('写入剪切板失败')
        console.error(e)
      }
    },
三、粘贴的操作
    /**
     * 粘贴
     * @param {KeyboardEvent} e
     */
    async onPaste(e) {
      const text = await navigator.clipboard.readText()
      try {
        const copyData = JSON.parse(text)
        const canvas = this.bpmnModeler.get('canvas')
        const box = canvas.viewbox()
        const elementFactory = this.bpmnModeler.get('elementFactory')
        const elementRegistry = this.bpmnModeler.get('elementRegistry')
        const parent = elementRegistry.find(el => el.type === 'bpmn:Process')
        const modeling = this.bpmnModeler.get('modeling')

        if (!copyData.nodes.length) return

        const rect = this.$el.getBoundingClientRect()
        const mouseX = this.currentMouseEvent.clientX - rect.x
        const mouseY = this.currentMouseEvent.clientY - rect.y

        // 计算第0个元素和当前鼠标所在位置的差值
        const first = copyData.nodes[0]
        const diffX = first.x - mouseX
        const diffY = first.y - mouseY

        copyData.nodes.forEach(item => {
          const x = item.x + box.x - diffX
          const y = item.y + box.y - diffY

          const shape = elementFactory.createShape({
            type: 'bpmn:Task',
            x: x,
            y: y
          })
          modeling.createShape(shape, { x: x, y: y }, parent)
          shape.data = item.data
          if (item.data.name) {
            this.createLabel(shape, item.data.name)
          }
          this.pateShapeMap[item.id] = shape
        })

        copyData.lines.forEach(line => {
          const startShape = this.pateShapeMap[line.sourceId]
          const targetShape = this.pateShapeMap[line.targetId]
          if (startShape && targetShape) {
            const lines = modeling.connect(startShape, targetShape)
            lines.data = line.data
            if (lines.data.name) {
              this.createLabel(lines, lines.data.name)
            }
            this.pateLineMap[lines.id] = lines
          }
        })
       } catch (e) {
        console.error(e)
      }
    },
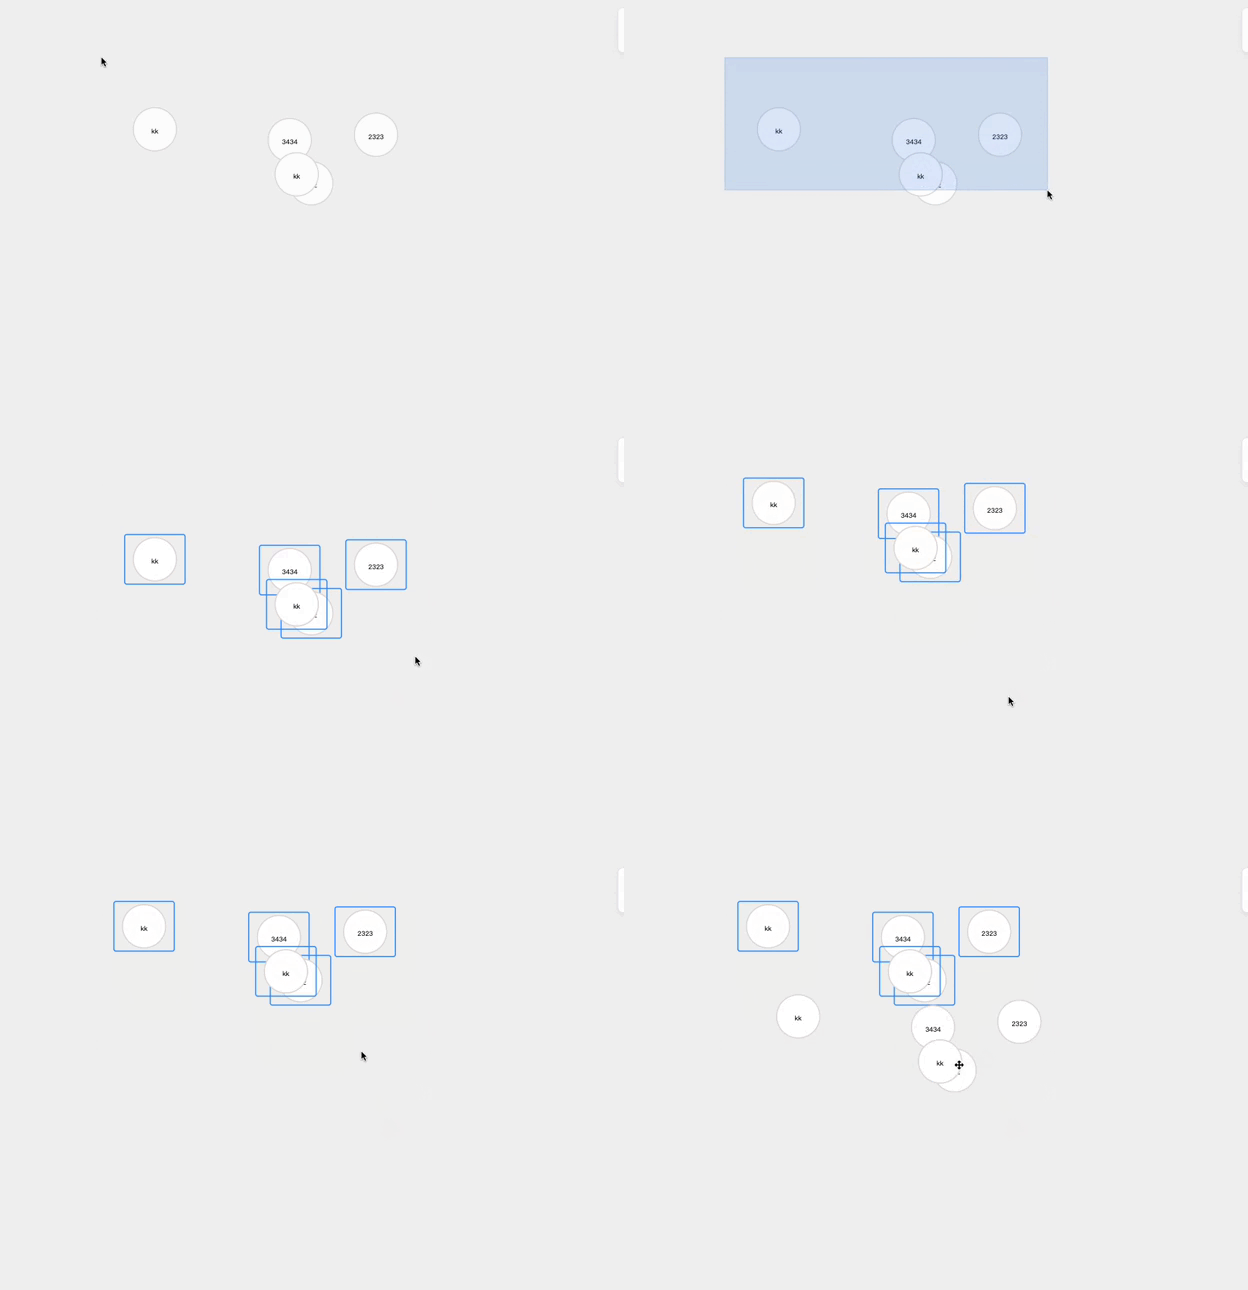
以上就是批量复制的步骤
批量删除
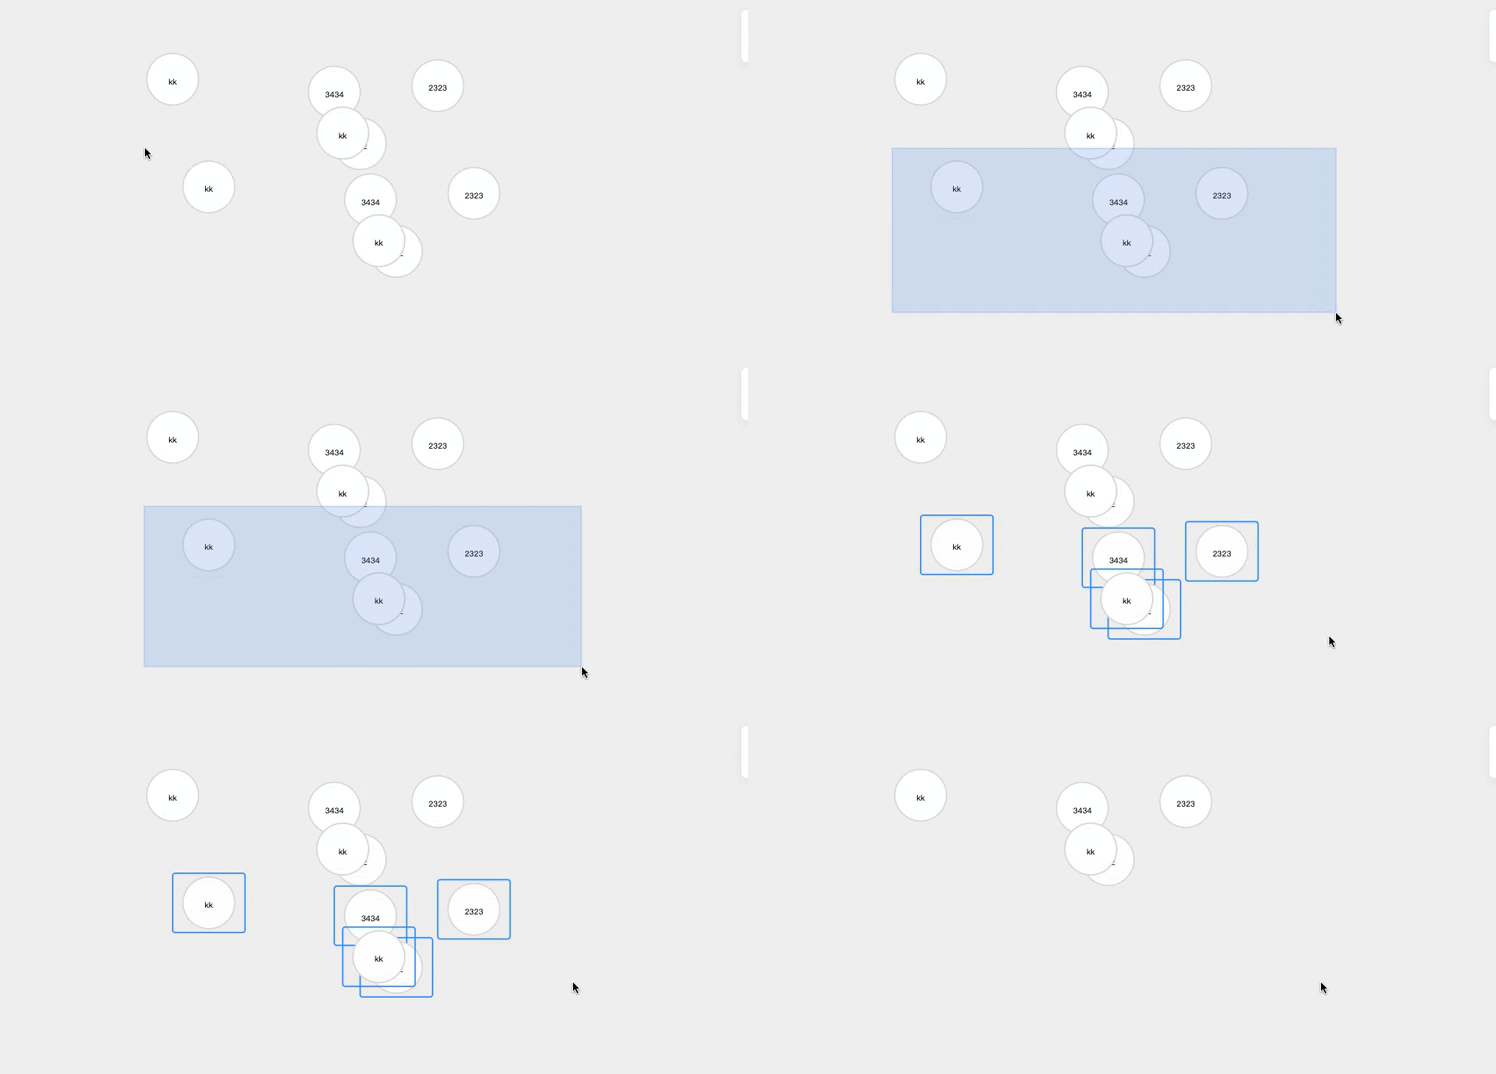
  batchDelete() {
      const bpmnModeling = this.bpmnModeler.get('modeling')
      this.activeIdList.forEach(nodeId => {
        const element = this.bpmnModeler.get('elementRegistry').get(nodeId)
        bpmnModeling.removeElements([element])
      })
   },

