记述python中关于数据库的基本操作。
一、数据库编程接口
1.连接对象
数据库连接对象(Connection Object)提供获取数据库游标对象、回滚事物的方法,以及连接、关闭数据库连接。
1.1 获取连接对象
使用connect()方法获得连接对象,不同的数据库有不同的参数。
| 参数 | 说明 |
|---|---|
| dsn | 数据源名称,给出该参数表示数据库依赖 |
| user | 用户名 |
| password | 用户密码 |
| host | 主机名 |
| database | 数据库名称 |
1.2 连接对象方法
| 方法 | 说明 |
|---|---|
| close() | 关闭数据库 |
| commit() | 提交事务 主要用于处理数据量大,复杂度搞的数据,如一些列的操作,使用事务可以保证操作全部执行,要么全部不执行。 |
| rollback() | 回滚事务 |
| cursor() | 获取游标对象,操作数据库,如执行DML操作,调用存储过程等 |
2. 游标对象
游标对象(Cursor Object)代表数据库中的游标,用于进行数据库操作,执行sql语句,调用存储过程,增删改查等。
- 通过连接对象的cursor()方法获取游标对象,需要先连接
- description:数据库列类型和值的描述信息
- rowcount:返回结果的行数统计信息,如SELECT、UPDATE、CALLPROC等
| 方法 | 说明 |
|---|---|
| callproc(procname[,parameter]) | 调用存储过程,需要数据库支持 |
| close() | 关闭当前游标 |
| execute(operation[,parameter]) | 执行数据库操作,sql语句或者数据库命令 |
| executemany(operation,seq_of_params) | 用于批量操作,如批量更新 |
| fetchone() | 获取查询结果集中的吓一条记录 |
| fetchmany(size) | 获取指定数量的记录 |
| fetchall() | 获取结果集中的所有记录 |
| nextset() | 跳到下一个可用的结果集 |
| arraysize | 指定使用fetchmany获取的行数,默认为1 |
| setinputsize(sizes) | 设置在调用execute()方法时分配的内存区域大小 |
| setoutputsize(sizes) | 设置列缓冲区大小,对大数据列(如long和blobs)尤其有用 |
二、使用SQLite数据库
SQLite是一个数据库文件可以直接操作,体积小,可以直接嵌入到软件中。Python中内置了SQLite3,可以使用import3直接导入SQLite3模块。

1.创建SQLite数据库文件
使用import直接导入sqlite3模块然后进行数据库操作。
connect()方法参数直接写sqlite文件名即可,若文件不存在时会自动创建数据库文件。
示例:
# _*_ coding:utf-8 _*_


import sqlite3      #导入SQLie3数据库模块


# 创建连接对象
sqlite3conn = sqlite3.connect("demo.db")

# 获取光标对象
cursor = sqlite3conn.cursor()

# 执行sql语句
sql = r"create table if not exists user (id int primary key,name varchar,age int)"

cursor.execute(sql)

# 关闭光标
cursor.close()

# 关闭连接对象
sqlite3conn.close()
结果:
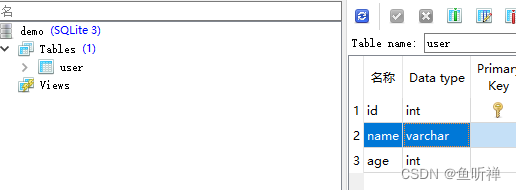
在统一目录下创建了"demo.db"数据库文件,然后添加了表user
2.操作SQLite
2.1 新增数据
insert into 表名(字段1,字段2,...,字段n) values (字段值1,字段值2,...,字段值n)使用insert插入数据。
示例:
# _*_ coding:utf-8 _*_


import sqlite3      #导入SQLie3数据库模块


# 创建连接对象
sqlite3conn = sqlite3.connect("demo.db")

# 获取光标对象
cursor = sqlite3conn.cursor()

# 执行sql语句
sql1 = r"insert into user (id, name, age) values (1,'小明',18)"
sql2 = r"insert into user (id, name, age) values (2,'小李',20)"

cursor.execute(sql1)
cursor.execute(sql2)

# 关闭光标
cursor.close()

# 提交事务,将数据变更保存到数据库中。
sqlite3conn.commit()

# 关闭连接对象
sqlite3conn.close()
结果:
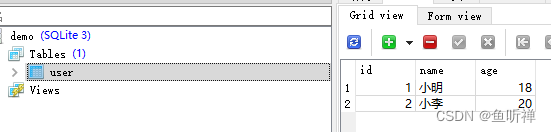
成功在标准插入了2条数据。
2.2 查看数据
select * from table where ...- fetchone():获取查询结果集的下一条记录
- fetchmany(size):获取指定数量的记录
- fetchall():获取所有就
- 结果集取出的数据会自动从结果集中删除。
- where可以使用“?”当占位符,然后后面添加元组做判定条件。
示例:
# _*_ coding:utf-8 _*_


import sqlite3      #导入SQLie3数据库模块


# 创建连接对象
sqlite3conn = sqlite3.connect("demo.db")

# 获取光标对象
cursor = sqlite3conn.cursor()

# 执行sql语句
sql = r"select * from user"

cursor.execute(sql)

print("fetchone():{}".format(cursor.fetchone()))
print("fetchmany():{}".format(cursor.fetchmany(2)))
print("fetchall():{}".format(cursor.fetchall()))

# 使用?当占位符,execute语句中用元组替换符号
sql = r"select * from user where id>?"

cursor.execute(sql,(2,))
print("fetchall():{}".format(cursor.fetchall()))

# 关闭光标
cursor.close()

# 提交事务,将数据变更保存到数据库中。
sqlite3conn.commit()

# 关闭连接对象
sqlite3conn.close()
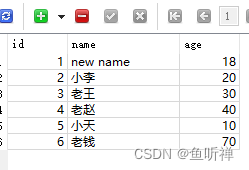
结果:
========================== RESTART: D:\Desktop\Demo.py =========================
fetchone():(1, '小明', 18)
fetchmany():[(2, '小李', 20), (3, '老王', 30)]
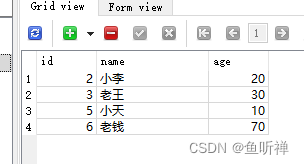
fetchall():[(4, '老赵', 40), (5, '小天', 10), (6, '老钱', 70)]
fetchall():[(3, '老王', 30), (4, '老赵', 40), (5, '小天', 10), (6, '老钱', 70)]
>>> 2.3 修改数据
update table set 字段名=字段值 where 查询条件示例:
# _*_ coding:utf-8 _*_


import sqlite3      #导入SQLie3数据库模块


# 创建连接对象
sqlite3conn = sqlite3.connect("demo.db")

# 获取光标对象
cursor = sqlite3conn.cursor()

# 执行sql语句
sql = r"update user set name = ? where id = ?"
cursor.execute(sql,("new name",1))

# 关闭光标
cursor.close()

# 提交事务,将数据变更保存到数据库中。
sqlite3conn.commit()

# 关闭连接对象
sqlite3conn.close()
结果:
2.4 删除数据
delete from table where 查询条件示例:
# _*_ coding:utf-8 _*_


import sqlite3      #导入SQLie3数据库模块


# 创建连接对象
sqlite3conn = sqlite3.connect("demo.db")

# 获取光标对象
cursor = sqlite3conn.cursor()

# 执行sql语句
sql = r"delete from user where id = ?"
cursor.execute(sql,(1,))
cursor.execute(sql,(4,))

# 关闭光标
cursor.close()

# 提交事务,将数据变更保存到数据库中。
sqlite3conn.commit()

# 关闭连接对象
sqlite3conn.close()
结果:
三、使用MySQL
1.下载安装MySql模块
参考:MySQL 8.0 安装、卸载教程(图文+说明)_鱼听禅的博客-CSDN博客
2.安装PyMySQL
PyMySQL在python的基本库中,可直接在cmd中使用pip指令安装。
pip install PyMySQLC:\Users\LJM>pip install PyMySQL
Collecting PyMySQL
Downloading PyMySQL-1.0.2-py3-none-any.whl (43 kB)
|████████████████████████████████| 43 kB 1.1 MB/s
Installing collected packages: PyMySQL
Successfully installed PyMySQL-1.0.2
WARNING: You are using pip version 20.1.1; however, version 22.3.1 is available.
You should consider upgrading via the 'c:\users\ljm\appdata\local\programs\python\python37\python.exe -m pip install --upgrade pip' command.
C:\Users\LJM>注意:
pip指令如果无效时需要在环境变量中添加pip.exe的目录路径。
3.连接数据库
PyMySQL的connect()信息:
    Connect = class Connection(builtins.object)
     |  Connect(*, user=None, password='', host=None, database=None, unix_socket=None, port=0, charset='', sql_mode=None, read_default_file=None, conv=None, use_unicode=True, client_flag=0, cursorclass=<class 'pymysql.cursors.Cursor'>, init_command=None, connect_timeout=10, read_default_group=None, autocommit=False, local_infile=False, max_allowed_packet=16777216, defer_connect=False, auth_plugin_map=None, read_timeout=None, write_timeout=None, bind_address=None, binary_prefix=False, program_name=None, server_public_key=None, ssl=None, ssl_ca=None, ssl_cert=None, ssl_disabled=None, ssl_key=None, ssl_verify_cert=None, ssl_verify_identity=None, compress=None, named_pipe=None, passwd=None, db=None)
     |
     |  Representation of a socket with a mysql server.
     |
     |  The proper way to get an instance of this class is to call
     |  connect().
     |
     |  Establish a connection to the MySQL database. Accepts several
     |  arguments:
     |
     |  :param host: Host where the database server is located
     |  :param user: Username to log in as
     |  :param password: Password to use.
     |  :param database: Database to use, None to not use a particular one.
     |  :param port: MySQL port to use, default is usually OK. (default: 3306)
     |  :param bind_address: When the client has multiple network interfaces, specify
     |      the interface from which to connect to the host. Argument can be
     |      a hostname or an IP address.
     |  :param unix_socket: Optionally, you can use a unix socket rather than TCP/IP.
     |  :param read_timeout: The timeout for reading from the connection in seconds (default: None - no timeout)
     |  :param write_timeout: The timeout for writing to the connection in seconds (default: None - no timeout)
     |  :param charset: Charset you want to use.
     |  :param sql_mode: Default SQL_MODE to use.
     |  :param read_default_file:
     |      Specifies  my.cnf file to read these parameters from under the [client] section.
     |  :param conv:
     |      Conversion dictionary to use instead of the default one.
     |      This is used to provide custom marshalling and unmarshalling of types.
     |      See converters.
     |  :param use_unicode:
     |      Whether or not to default to unicode strings.
     |      This option defaults to true.
     |  :param client_flag: Custom flags to send to MySQL. Find potential values in constants.CLIENT.
     |  :param cursorclass: Custom cursor class to use.
     |  :param init_command: Initial SQL statement to run when connection is established.
     |  :param connect_timeout: Timeout before throwing an exception when connecting.
     |      (default: 10, min: 1, max: 31536000)
     |  :param ssl:
     |      A dict of arguments similar to mysql_ssl_set()'s parameters.
     |  :param ssl_ca: Path to the file that contains a PEM-formatted CA certificate
     |  :param ssl_cert: Path to the file that contains a PEM-formatted client certificate
     |  :param ssl_disabled: A boolean value that disables usage of TLS
     |  :param ssl_key: Path to the file that contains a PEM-formatted private key for the client certificate
     |  :param ssl_verify_cert: Set to true to check the validity of server certificates
     |  :param ssl_verify_identity: Set to true to check the server's identity
     |  :param read_default_group: Group to read from in the configuration file.
     |  :param autocommit: Autocommit mode. None means use server default. (default: False)
     |  :param local_infile: Boolean to enable the use of LOAD DATA LOCAL command. (default: False)
     |  :param max_allowed_packet: Max size of packet sent to server in bytes. (default: 16MB)
     |      Only used to limit size of "LOAD LOCAL INFILE" data packet smaller than default (16KB).
     |  :param defer_connect: Don't explicitly connect on construction - wait for connect call.
     |      (default: False)
     |  :param auth_plugin_map: A dict of plugin names to a class that processes that plugin.
     |      The class will take the Connection object as the argument to the constructor.
     |      The class needs an authenticate method taking an authentication packet as
     |      an argument.  For the dialog plugin, a prompt(echo, prompt) method can be used
     |      (if no authenticate method) for returning a string from the user. (experimental)
     |  :param server_public_key: SHA256 authentication plugin public key value. (default: None)
     |  :param binary_prefix: Add _binary prefix on bytes and bytearray. (default: False)
     |  :param compress: Not supported
     |  :param named_pipe: Not supported
     |  :param db: **DEPRECATED** Alias for database.
     |  :param passwd: **DEPRECATED** Alias for password.
     |
     |  See `Connection <https://www.python.org/dev/peps/pep-0249/#connection-objects>`_ in the
     |  specification.
示例:
# _*_ coding:utf-8 _*_


import pymysql      #导入数据库模块


# 创建连接对象
mysqlconn = pymysql.connect(host = "127.0.0.1",port = 3306 ,user = "root",passwd = "root", database = "demo")

# 获取光标对象
cursor = mysqlconn.cursor()

# 执行sql语句
sql = r"select version()"
cursor.execute(sql)

data = cursor.fetchone()
print("Database Version:{}".format(data))

# 关闭光标
cursor.close()

# 关闭连接对象
mysqlconn.close()
print("Closed database.")
结果:
Database Version:('8.0.18',)
Closed database.


![[附源码]Nodejs计算机毕业设计基于的数字图书馆系统Express(程序+LW)](https://img-blog.csdnimg.cn/73894086b37d4608968a198ab68f8010.png)