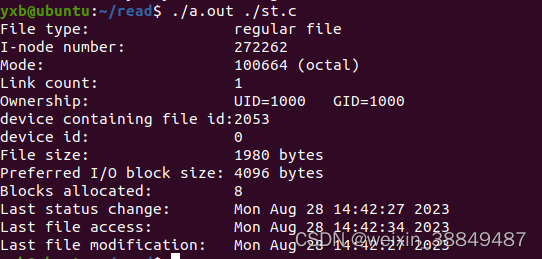
[root@localhost ~]# vim /etc/httpd/conf.d/vhosts.conf
<Virtualhost 192.168.101.200:80> #虚拟主机IP及端口
DocumentRoot /www/openlab #网页文件存放目录
ServerName www.openlab.com #服务器域名
</VirtualHost>
<Directory /www>
AllowOverride none #不允许覆盖
Require all granted #允许访问
</Directory>
#利用本机的/etc/hosts文件做域名解析
[root@localhost ~]# vim /etc/hosts
192.168.101.200 www.openlab.com
#创建网页根目录
[root@localhost ~]# mkdir -p /www/openlab
#编辑网页内容
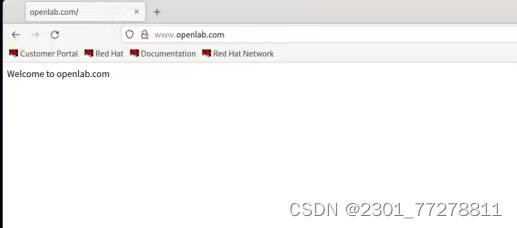
[root@localhost ~]# echo 'welcome to openlab!!!' > /www/openlab/index.html
#重启hppd服务
[root@localhost ~]# systemctl restart httpd
[root@localhost ~]# setenforce 0
#Client主机测试
[root@localhost ~]# curl www.openlab.com
welcome to openlab!!!
[root@server ~]# mkdir -p /www/openlab
[root@server ~]# systemctl restart httpd
[root@server ~]# vim /etc/hosts
[root@server ~]# vim /etc/httpd/conf.d/userdir.conf
[root@server ~]# vim /etc/httpd/conf.d/userdir.conf
[root@server ~]# mkdir -p /www/openlab/student
[root@server ~]# mkdir -p /www/openlab/data
[root@server ~]# mkdir -p /www/openlab/money
[root@server ~]# vim /etc/hosts
[root@server ~]# vim /etc/hosts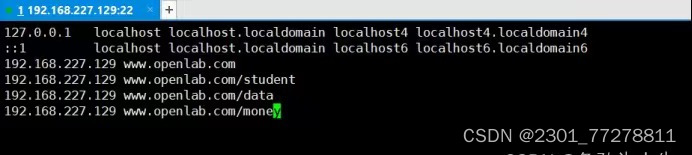
[root@server ~]# vim /etc/httpd/conf/httpd.conf
[root@server ~]# systemctl restart httpd
[root@server ~]# systemctl restart httpd
[root@server ~]# vim /etc/hosts
[root@server ~]# vim /etc/httpd/conf/httpd.conf

[root@server ~]# vim /etc/httpd/conf/httpd.conf
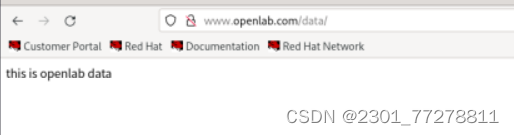
[root@server ~]# echo 'this is openlab data' > /www/openlab/data/index.html
[root@server ~]# echo 'this is openlab student' > /www/openlab/student/index.html
[root@server ~]# systemctl restart httpd
[root@server ~]# systemctl restart httpd
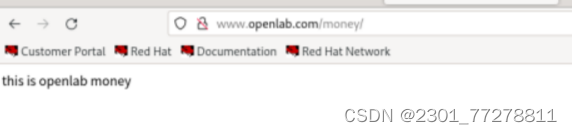
[root@server ~]# echo 'this is openlab money' > /www/openlab/money/index.html
[root@server ~]# vim /etc/httpd/conf/httpd.conf
[root@server ~]# systemctl restart httpd
[root@server ~]#

学生信息网站只有song和tian两人可以访问,其他用户不能访问。
[root@server ~]# vim /etc/httpd/conf.d/userdir.conf
#UserDir disabled # 此行增加#,注释掉,表示开放个人用户主页功能
UserDir /www/openlab/student # 此行去掉#,表示网站数据保存在/www/openlab/student
[root@server ~]# useradd song
[root@server ~]# passwd song
更改用户 song 的密码 。
新的密码: # 密码123456
无效的密码: 密码少于 8 个字符
重新输入新的密码:
passwd:所有的身份验证令牌已经成功更新。
[root@server ~]# useradd tian
[root@server ~]# passwd tian
更改用户 tian 的密码 。
新的密码: # 密码654321
无效的密码: 密码少于 8 个字符
重新输入新的密码:
passwd:所有的身份验证令牌已经成功更新。
[root@server ~]$ chmod -Rf 755 /www/openlab/student # 设置访问权限
[root@server ~]# systemctl restart httpd
[root@server ~]# htpasswd -c /etc/httpd/passwd song
New password: # 123456
Re-type new password:
Adding password for user song
# htpasswd : 生成密码数据的命令
# -c : 表示第一次生成,第二次给账户创建密码不能使用
# /etc/httpd/passwd : 存储密码的数据库文件
# song : 需要验证密码访问的账户名称
# 给tian账户这只访问控制,密码
[root@server ~]# htpasswd /etc/httpd/passwd tian
New password:
Re-type new password:
Adding password for user tian
# 注意:第二次给tian账户设置密码,不能加-c参数,否则会覆盖
[root@server ~]# vim /etc/httpd/conf/httpd.conf
#dd删除这里
#<VirtualHost 192.168.119.138>
# DocumentRoot /www/openlab/student
# ServerName 'www.openlab.com/student'
# alias /data /www/openlab/student
# <Directory /www/openlab/student>
# AllowOverride None
# require all granted
# </Directory>
# </VirtualHost>
[root@server ~]# vim /etc/httpd/conf.d/userdir.conf
# 定位第31-35行,删除后增加如下内容:
<Directory "/www/openlab/student">
authuserfile "/etc/httpd/passwd"
authname "My privately website"
authtype basic
require user song
</Directory>
<Directory "/www/openlab/student">
authuserfile "/etc/httpd/passwd"
authname "My privately website"
authtype basic
require user tian
</Directory>
[root@server ~]# systemctl restart httpd
# windows端打开浏览器,输入www.openlab.com/student,此时会有对话框出现需要输入密码


https服务
[root@server ~]# yum install mod_ssl -y
[root@server ~]# cd /etc/pki/tls/private/
[root@server private]# openssl genrsa -aes128 2048 > money.key
Enter PEM pass phrase: # 设置私钥文件的加密密码 ,123456
Verifying - Enter PEM pass phrase: # 重输密码,123456
[root@server private]# cd /etc/pki/tls/certs/
[root@server certs]# openssl req -utf8 -new -key /etc/pki/tls/private/money.key -x509 -days 365 -out money.crt
Enter pass phrase for /etc/pki/tls/private/zy.key: # 输入私钥加密的密码123456
You are about to be asked to enter information that will be incorporated
into your certificate request.
What you are about to enter is what is called a Distinguished Name or a DN.
There are quite a few fields but you can leave some blank
For some fields there will be a default value,
If you enter '.', the field will be left blank.
-----
Country Name (2 letter code) [XX]:86
State or Province Name (full name) []:shacnxi
Locality Name (eg, city) [Default City]:xi'an
Organization Name (eg, company) [Default Company Ltd]:OpenLab
Organizational Unit Name (eg, section) []:Finance
Common Name (eg, your name or your server's hostname) []:server
Email Address []:2297373285@qq.com
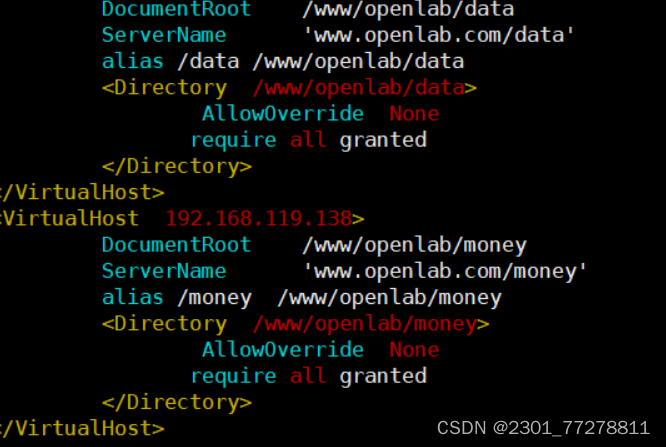
[root@server ~]# vim /etc/httpd/conf/httpd.conf
#dd删除这里
#<VirtualHost 192.168.119.138>
# DocumentRoot /www/openlab/money
# ServerName 'www.openlab.com/money'
# alias /money /www/openlab/data
# <Directory /www/openlab/money>
# AllowOverride None
# require all granted
# </Directory>
# </VirtualHost>
[root@server ~]# vim /etc/httpd/conf.d/ssl.conf
<VirtualHost 192.168.119.138:443>
SSLEngine on
SSLCertificateFile /etc/pki/tls/certs/money.crt
SSLCertificateKeyFile /etc/pki/tls/private/money.key
ServerName 'www.openlab.com/money'
DocumentRoot /www/openlab/money
alias /money /www/openlab/money
</VirtualHost>
<Directory /www/openlab/money>
AllowOverride none
Require all granted
</Directory>
[root@server ~]# systemctl start httpd
Enter TLS private key passphrase for 192.168.48.130:443 (RSA) : ****** # 输入私钥的密码:123456