文章目录
- 前言
- 一、pom jar导入:
- 二、项目配置:
- 2.1 配置 说明:
- 2.1 .1 seata server 端:
- 2.1 .2 seata client 端:
- 2.2 开启seata 对于数据源的代理:
- 2.3 seata-client 的注册中心:
- 2.4 seata-client 的配置中心:
- 2.5 去掉手写的数据源代理和feign代理:
- 三、项目使用:
- 3.1 AT 模式使用:
- 3.2 XA 模式使用:
- 3.3 TCC 模式使用:
- 四、总结:
- 五、参考:
前言
在了解了Seata 的工作原理后,如何在springboot 项目中进行整合使用,本文进行阐述。
提示:本文使用 seata 版本 :1.5 ;在整合之前 你需要先要部署seate 的服务
一、pom jar导入:
<?xml version="1.0" encoding="UTF-8"?>
<project xmlns="http://maven.apache.org/POM/4.0.0" xmlns:xsi="http://www.w3.org/2001/XMLSchema-instance"
         xsi:schemaLocation="http://maven.apache.org/POM/4.0.0 https://maven.apache.org/xsd/maven-4.0.0.xsd">
    <modelVersion>4.0.0</modelVersion>
    <parent>
        <groupId>org.springframework.boot</groupId>
        <artifactId>spring-boot-starter-parent</artifactId>
        <version>2.7.14</version>
        <relativePath/> <!-- lookup parent from repository -->
    </parent>
    <groupId>com.example</groupId>
    <artifactId>spring-seata-storage</artifactId>
    <version>0.0.1-SNAPSHOT</version>
    <name>spring-seata-storage</name>
    <description>spring-seata-storage</description>
    <properties>
        <java.version>1.8</java.version>
    </properties>
    <dependencies>
        <dependency>
            <groupId>org.springframework.boot</groupId>
            <artifactId>spring-boot-starter-web</artifactId>
        </dependency>

        <dependency>
            <groupId>org.projectlombok</groupId>
            <artifactId>lombok</artifactId>
            <optional>true</optional>
        </dependency>
        <dependency>
            <groupId>org.springframework.boot</groupId>
            <artifactId>spring-boot-starter-test</artifactId>
            <scope>test</scope>
        </dependency>
        <dependency>
            <groupId>org.springframework.cloud</groupId>
            <artifactId>spring-cloud-starter-openfeign</artifactId>
            <optional>true</optional>
            <version>3.1.6</version>
        </dependency>
        <!-- mysql -->
        <!-- https://mvnrepository.com/artifact/com.baomidou/mybatis-plus-boot-starter -->
        <dependency>
            <groupId>com.baomidou</groupId>
            <artifactId>mybatis-plus-boot-starter</artifactId>
            <version>3.5.2</version>
        </dependency>
        <!-- https://mvnrepository.com/artifact/mysql/mysql-connector-java -->
        <dependency>
            <groupId>mysql</groupId>
            <artifactId>mysql-connector-java</artifactId>
            <version>8.0.21</version>
            <!-- <version>5.1.49</version>-->
        </dependency>
        <!-- https://mvnrepository.com/artifact/net.sf.jsqlparser/jsqlparser -->
        <dependency>
            <groupId>net.sf.jsqlparser</groupId>
            <artifactId>jsqlparser</artifactId>
            <version>0.8.0</version>
        </dependency>

        <dependency>
            <groupId>io.swagger</groupId>
            <artifactId>swagger-annotations</artifactId>
            <version>1.6.2</version>
        </dependency>

        <!-- https://mvnrepository.com/artifact/io.seata/seata-spring-boot-starter -->
       <!-- <dependency>
            <groupId>io.seata</groupId>
            <artifactId>seata-spring-boot-starter</artifactId>
            <version>1.5.2</version>
        </dependency>-->
        <!--处理 在SpringBoot 2.4.x的版本之后,对于bootstrap.properties/bootstrap.yaml配置文件(我们合起来成为Bootstrap配置文件)的支持,
        需要导入如下的依赖-->
        <dependency>
            <groupId>org.springframework.cloud</groupId>
            <artifactId>spring-cloud-starter-bootstrap</artifactId>
            <version>3.1.6</version>
        </dependency>

        <!-- seata 使用nacos 作为配置中心和 注册中心时 使用  -->
        <dependency>
            <groupId>com.alibaba.cloud</groupId>
            <artifactId>spring-cloud-starter-alibaba-nacos-config</artifactId>
            <version>2021.0.5.0</version>
        </dependency>
        <dependency>
            <groupId>com.alibaba.cloud</groupId>
            <artifactId>spring-cloud-starter-alibaba-nacos-discovery</artifactId>
            <version>2021.0.5.0</version>
        </dependency>


        <dependency>
            <groupId>com.alibaba.cloud</groupId>
            <!-- 里面已经集成服务间调用X-id的传递,包括FeignClient的重写,如果在之前自定义封装过Feign,注意启动冲突-->
            <artifactId>spring-cloud-starter-alibaba-seata</artifactId>
            <version>2021.0.5.0</version>
            <exclusions>
                <!--去除低版本-->
                <exclusion>
                    <groupId>io.seata</groupId>
                    <artifactId>seata-spring-boot-starter</artifactId>
                </exclusion>
            </exclusions>
        </dependency>
        <!-- https://mvnrepository.com/artifact/io.seata/seata-spring-boot-starter -->
        <dependency>
            <groupId>io.seata</groupId>
            <artifactId>seata-spring-boot-starter</artifactId>
            <version>1.6.1</version>
        </dependency>

    </dependencies>

    <build>
        <plugins>
            <plugin>
                <groupId>org.springframework.boot</groupId>
                <artifactId>spring-boot-maven-plugin</artifactId>
                <configuration>
                    <mainClass>com.example.springseata.springseatastorage</mainClass>
                </configuration>
                <executions>
                    <execution>
                        <goals>
                            <goal>repackage</goal>
                        </goals>
                    </execution>
                </executions>
            </plugin>
        </plugins>
        <resources>
            <resource>
                <directory>src/main/resources</directory>
                <filtering>true</filtering>
            </resource>
        </resources>
    </build>

</project>
jar 目的:
- spring-boot-starter-web: 使用 浏览器进行 http 访问;
- lombok: 生成 get set 等方法,使代码更加简洁;
- spring-boot-starter-test: 可以进行单元测试;
- spring-cloud-starter-openfeign: 可以使用feign 接口进行服务间的http 通信;
- mybatis-plus-boot-starte,mysql-connector-java ,jsqlparser:导入mysql-plus 进行 增删改查;
- swagger-annotations: 类和方法的说明;
- spring-cloud-starter-bootstrap :在SpringBoot 2.4.x的版本之后,对于bootstrap.properties/bootstrap.yaml配置文件(我们合起来成为Bootstrap配置文件)的支持;
- spring-cloud-starter-alibaba-nacos: seata 使用nacos 作为配置中心和 注册中心时 使用;
- spring-cloud-starter-alibaba-seata: 导入cloud对饮的jar 让其帮助进行 分布式事务xid 的传递;
- seata-spring-boot-starter : seata 的核销服务jar;
springcloud ,springboot,springcloud-alibaba 版本对应:版本说明
二、项目配置:
2.1 配置 说明:
目的: 了解seat 客户端和服务端的 关系,清楚其配置的含义;
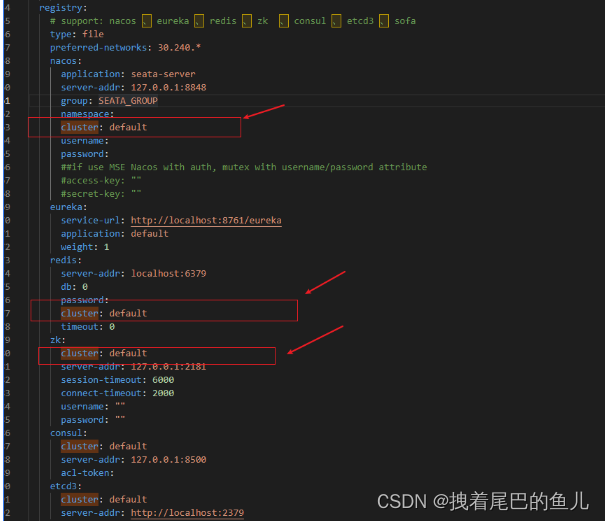
2.1 .1 seata server 端:
-
seata server 的存储模式:
存储模式指定了Seata Server用于存储事务和元数据的方式,这个只有在seata 服务端才有。Seata Server支持三种存储模式:file、db和Redis。列如 当开始事务时需要生成全局事务id Xid ,在生成后就需要Seata 服务进行存储,所以他是Seata Server的重要组成部分; -
seata server 的配置中心:
配置中心的作用:用于配置 Seata Server的相关参数, Seata Server 端在启动的时候也可以配置很多参数,如果把这些参数都放到 Seata Server 中,每次修改度需要连接到Seata Server 的服务器,然后对其配置文件进行修改,如果把这个参数放到 配置中心如config ,zk,nacos 就可以在配置中心进行修改,更加的方便; -
seata server 的注册中心:
Seata Server 的注册中心是用于存储和管理 Seata 事务参与者的信息的组件;多个Seata Server 可以成为一个集群,然后注册到zk,eureka,nacos 里,这样方便集群的管理;
2.1 .2 seata client 端:
-
seata client 的配置中心:
同seata-sever 端相同,客户端在启动的时候也可以进行参数的配置,所以可以在客户端我们也可以 将参数放到 config ,zk,nacos 进行配置; -
seata client 的注册中心:
seata 客户端的注册中心,用于服务端的发现,一个重要的信息就是,可以将seata 客户端和seata 服务端 注册到相同的地方,已nacos 为例:服务端和客户端 注册到相同命名空间,相同分组,相同应用,此时客户端会动态的发现 seata 服务的地址,此时不需要在显示的设置 seata 服务断的地址;
Seata 客户端在启动时会从 Nacos 服务获取service.vgroupMapping.your-service-group定义的服务群组实例,这需要和 Seata 服务端的配置保持一致。以下三个参数需要和 Seata 服务端保持一致:application:,group,namespace
2.2 开启seata 对于数据源的代理:
目的:让 seata 接管数据源,然后才能协调各个微服务的本地事务;
seata:
  enabled: true # spring 自动装配
  enable-auto-data-source-proxy: true # 开启数据源自动代理
  transport:
    enable-client-batch-send-request: true #客户端事务消息请求是否批量合并发送,默认true,false单条发送
  tx-service-group: my_tx_group # 事务分组
  application-id: storage
  service:
    vgroup-mapping:
      my_tx_group: default
#    grouplist:
#      default: localhost:8091
- tx-service-group 定义事务分组,可以自定义,多个微服务只有在同一个事务分组中,分布式事务才能生效,也就是多个微服务改参数要保持一致;
- application-id 该服务事务id ,同一分组下的 的微服务 需要进行不同的定义;
- servicevgroup-mapping 定义改事务分组 连接的seata 服务端 集群的名称,改名称需要和seata server 定义的集群名称保持一致;
- grouplist 中 default 为集群的名称,后面的为集群seata-server 端的地址,注意
这中连接模式只在 seata 客户端为 file 模式下生效; 其他方式如nacos ,需要配置使得 seata-server 和seata-client 都注册在相同命名空间,相同分组,相同application 下,这样seata-client 就可以动态的发现seata-server 的实例地址;
2.3 seata-client 的注册中心:
目的: 了解本地springboot 服务如何连接到 seata server 端
客户端和服务端 seata 都是默认已file 作为注册中心:
-
file
seata-server 服务端 注册中心使用的file 本地模式,则seata 客户端 也需要使用file注册模式:
此时需要配置 seata.service.grouplist.default=127.0.0.1:8091 用于客户端连接 seata 服务端; -
nacos
seata-server 服务端 注册中心使用的nacos,则seata 客户端 也需要使用nacos注册模式:
 seata-server 服务端 注册中心使用的nacos,则seata 客户端 也需要使用nacos注册模式:
seata:
  enabled: true # spring 自动装配
  enable-auto-data-source-proxy: true # 开启数据源自动代理
  transport:
    enable-client-batch-send-request: true #客户端事务消息请求是否批量合并发送,默认true,false单条发送
  tx-service-group: my_tx_group
  application-id: storage
  service:
    vgroup-mapping:
      my_tx_group: default
#    grouplist:
#      default: localhost:8091

  registry:
    #    type: file
    type: nacos
    nacos:
      application: seata-server
      server-addr: localhost:8848
      group: SEATA_GROUP
      namespace: 7f2765bc-d8c1-4b49-b706-8c292d2ffac9
      username: nacos
      password: nacos
注意 application,server-addr,group,namespace,username,password 客户端和服务端报纸一致;
2.4 seata-client 的配置中心:
目的: 了解本地springboot 如何对seata 进行参数配置
客户端和服务端 seata 都是默认已file 作为配置中心,他们的只是用作参数的配置使用,所以他们各自是独立的;
- file
seata 客户端的默认配置; - nacos
使用nacos 作为配置中心 :
seata:
enabled: true # spring 自动装配
enable-auto-data-source-proxy: true # 开启数据源自动代理
transport:
enable-client-batch-send-request: true #客户端事务消息请求是否批量合并发送,默认true,false单条发送
tx-service-group: my_tx_group
application-id: storage
service:
vgroup-mapping:
my_tx_group: default
# grouplist:
# default: localhost:8091
config:
type: nacos
# type: file
nacos:
server-addr: localhost:8848
namespace: c0befc56-f31b-4de6-929b-6f75604992d1
# namespace: 7f2765bc-d8c1-4b49-b706-8c292d2ffac9
group: DEFAULT_GROUP
username: nacos
password: nacos
##if use MSE Nacos with auth, mutex with username/password attribute
#access-key: ""
#secret-key: ""
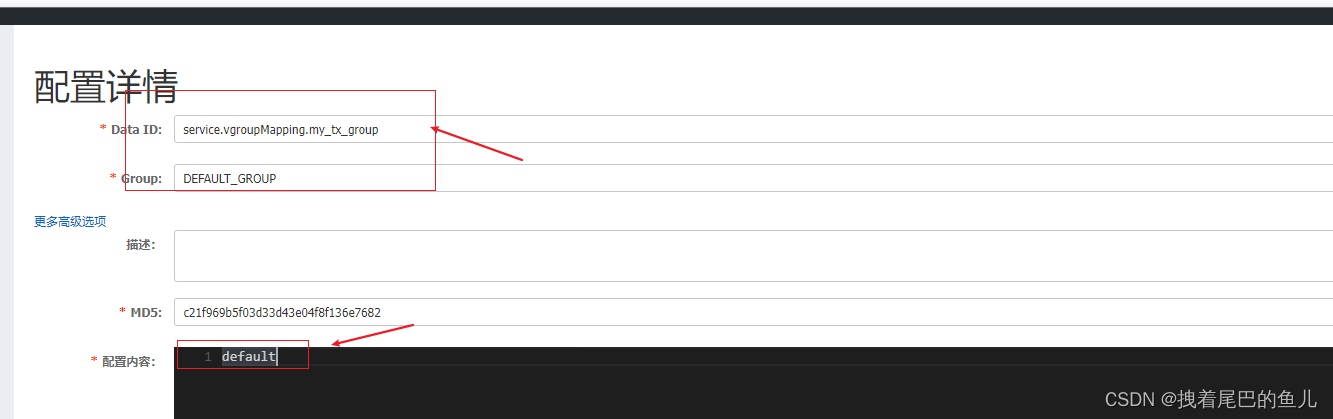
data-id: seata.properties
本文测试时虽然在 nacos 中创建了seata.properties 的配置文件但是其 配置的参数没有起作用;
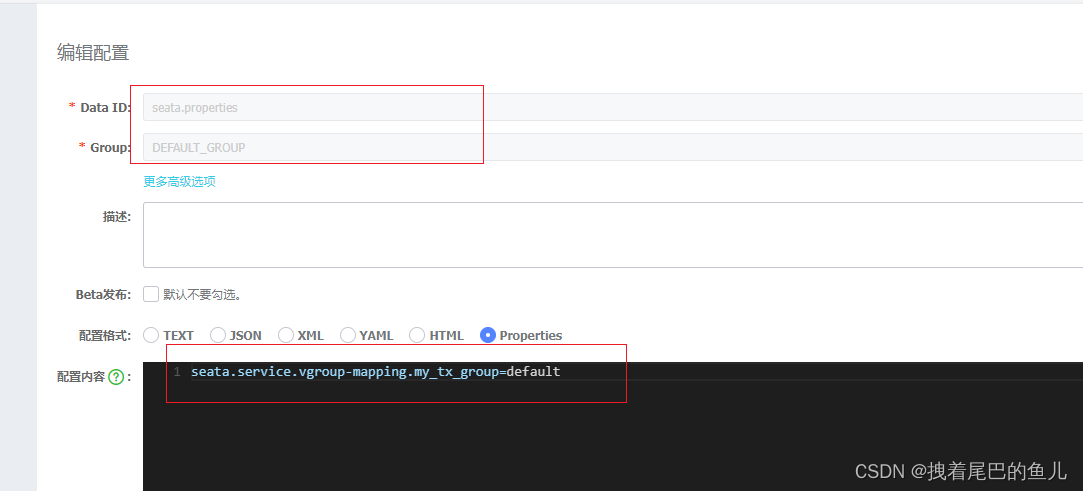
会提示无法找到service.vgroupMapping.my_tx_group(my_tx_group 为定义的分组名称)的集群,通过创建 service.vgroupMapping.my_tx_group 配置文件 并且定义default 得以解决,目前没有找到其它解决办法;
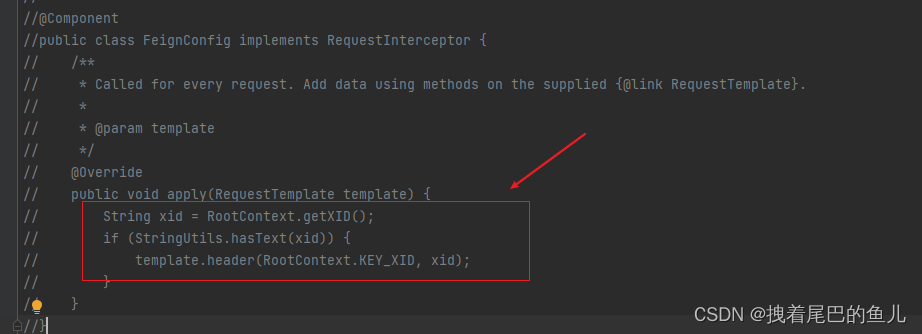
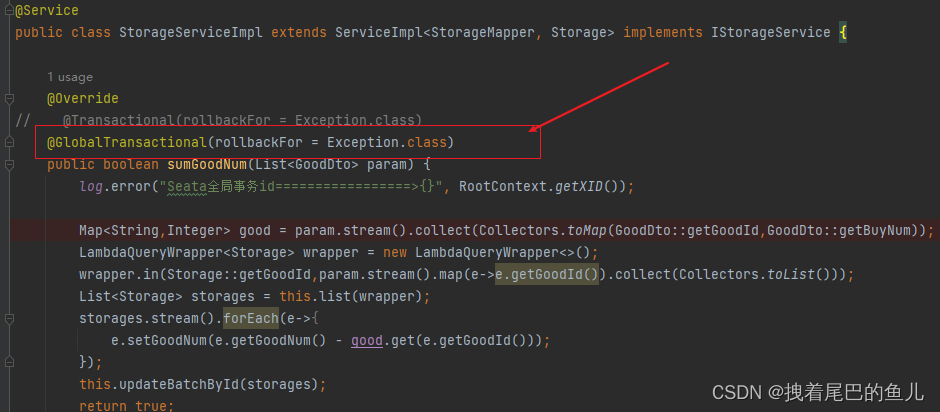
2.5 去掉手写的数据源代理和feign代理:
- seata DataSourceProxy 的代理:因为在其配置文件中已经开启了自动代理
seata:
  enabled: true # spring 自动装配
  enable-auto-data-source-proxy: true # 开启数据源自动代理
所以需要去重 手动加入的代理,防止冲突,导致 事务失效

- feign 接口的代理:
因为引入的spring-cloud-starter-alibaba-seata 已经对feign 进行了xid 的处理
<dependency>
    <groupId>com.alibaba.cloud</groupId>
    <!-- 里面已经集成服务间调用X-id的传递,包括FeignClient的重写,如果在之前自定义封装过Feign,注意启动冲突-->
    <artifactId>spring-cloud-starter-alibaba-seata</artifactId>
    <version>2021.0.5.0</version>
    <exclusions>
        <!--去除低版本-->
        <exclusion>
            <groupId>io.seata</groupId>
            <artifactId>seata-spring-boot-starter</artifactId>
        </exclusion>
    </exclusions>
</dependency>
所以可以去除 手动增加的对于feign 接口xid 的特殊处理防止冲突:
三、项目使用:
3.1 AT 模式使用:
seata 客户端的事务模式默认使用AT 模式;通过以下两个步骤配置就可使用:
- 在每个 数据库中增加undo_log 表,用于AT 模式事务日志记录使用:
CREATE TABLE `undo_log` (
  `id` bigint(20) NOT NULL AUTO_INCREMENT,
  `branch_id` bigint(20) NOT NULL,
  `xid` varchar(100) NOT NULL,
  `context` varchar(128) NOT NULL,
  `rollback_info` longblob NOT NULL,
  `log_status` int(11) NOT NULL,
  `log_created` datetime NOT NULL,
  `log_modified` datetime NOT NULL,
  `ext` varchar(100) DEFAULT NULL,
  PRIMARY KEY (`id`),
  UNIQUE KEY `ux_undo_log` (`xid`,`branch_id`)
) ENGINE=InnoDB AUTO_INCREMENT=8 DEFAULT CHARSET=utf8;
- 在不同服务中都完成seata 的集群 ,然后在对应的业务实现中增加@GlobalTransactional(rollbackFor =
Exception.class) 注解:
3.2 XA 模式使用:
- mysql 开启XA协议:
SHOW VARIABLES LIKE 'innodb_support_xa';

如果没有开通,则打开 MySQL 配置文件 my.cnf 或 my.ini。在文件中找到 [mysqld] 部分,并在该部分下添加以下行:
[mysqld]
innodb_support_xa = 1
保存配置文件并重启 MySQL 服务;
- 显示设置 模式为XA 模式,代码层面无需变动;
seata.data-source-proxy-mode=XA
3.3 TCC 模式使用:
根据两阶段行为模式的不同,我们将分支事务划分为 Automatic (Branch) Transaction Mode 和 TCC (Branch) Transaction Mode.
AT 模式(参考链接 TBD)基于 支持本地 ACID 事务 的 关系型数据库:
一阶段 prepare 行为:在本地事务中,一并提交业务数据更新和相应回滚日志记录。
二阶段 commit 行为:马上成功结束,自动 异步批量清理回滚日志。
二阶段 rollback 行为:通过回滚日志,自动 生成补偿操作,完成数据回滚。
相应的,TCC 模式,不依赖于底层数据资源的事务支持:
一阶段 prepare 行为:调用 自定义 的 prepare 逻辑。
二阶段 commit 行为:调用 自定义 的 commit 逻辑。
二阶段 rollback 行为:调用 自定义 的 rollback 逻辑。
所谓 TCC 模式,是指支持把 自定义 的分支事务纳入到全局事务的管理中。
- tcc 事务记录表:tcc_fence_log
CREATE TABLE `tcc_fence_log` (
  `xid` varchar(128) NOT NULL COMMENT 'global id',
  `branch_id` bigint(20) NOT NULL COMMENT 'branch id',
  `action_name` varchar(64) NOT NULL COMMENT 'action name',
  `status` tinyint(4) NOT NULL COMMENT 'status(tried:1;committed:2;rollbacked:3;suspended:4)',
  `gmt_create` datetime(3) NOT NULL COMMENT 'create time',
  `gmt_modified` datetime(3) NOT NULL COMMENT 'update time',
  PRIMARY KEY (`xid`,`branch_id`),
  KEY `idx_gmt_modified` (`gmt_modified`),
  KEY `idx_status` (`status`)
) ENGINE=InnoDB DEFAULT CHARSET=utf8mb4;
- 订单服务 java demo:
IOrderService:
public interface IOrderService extends IService<Order> {
    Boolean orderCreate(OrderReqDto reqDto);
}
实现类:
@Override
@GlobalTransactional(rollbackFor = Exception.class)
  public Boolean orderCreate(OrderReqDto reqDto) {
      log.error("Seata全局事务id=================>{}", RootContext.getXID());
      // stock服务未报错,order服务报错
      try {
          // 扣减库存-通过fegin 接口进行调用
          storageFeignApi.tccSumGoodNum(reqDto.getByGoods());
      } catch (Exception e) {
          e.printStackTrace();
          throw new RuntimeException(e);
      }

      // 订单创建
      Order order = new Order();
      order.setAccountId("123").setMoney(reqDto.getOrderMoney());
      this.save(order);
      return true;
  }
controller:
@ResponseBody
    @PostMapping("/tcc/sure")
    public Boolean orderCreate(@RequestBody OrderReqDto reqDto) throws SQLException {
        return orderService.orderCreate(reqDto);
    }
- 库存服务 java demo:
controller:
 @ResponseBody
    @PostMapping(value = "/tcc/sumGoodNum")
    public boolean tccSumGoodNum(@RequestBody List<GoodDto> param){
        return  tccStorageService.deduct(param);
    }
ITccStorageService:
package com.example.springseatastorage.service;


import com.example.springseatastorage.controller.dto.GoodDto;
import io.seata.rm.tcc.api.BusinessActionContext;
import io.seata.rm.tcc.api.BusinessActionContextParameter;
import io.seata.rm.tcc.api.LocalTCC;
import io.seata.rm.tcc.api.TwoPhaseBusinessAction;

import java.util.List;

@LocalTCC
public interface ITccStorageService {
    /**
     * 减库存
     * useTCCFence=true 为开启防悬挂
     * @param param
     */
    @TwoPhaseBusinessAction(name = "deduct", commitMethod = "busCommit", rollbackMethod = "busRollback", useTCCFence = true)
    boolean deduct(@BusinessActionContextParameter(paramName = "param")  List<GoodDto>param);

    /**
     * 提交事务
     *
     * @param actionContext
     * @return
     */
    boolean busCommit(BusinessActionContext actionContext);

    /**
     * 回滚事务
     *
     * @param actionContext
     * @return
     */
    boolean busRollback(BusinessActionContext actionContext);
}
ITccStorageServicempl:
package com.example.springseatastorage.service.impl;

import com.baomidou.mybatisplus.core.conditions.query.LambdaQueryWrapper;
import com.example.springseatastorage.controller.dto.GoodDto;
import com.example.springseatastorage.entity.Storage;
import com.example.springseatastorage.service.IStorageService;
import com.example.springseatastorage.service.ITccStorageService;
import io.seata.core.context.RootContext;
import io.seata.rm.tcc.api.BusinessActionContext;
import lombok.extern.slf4j.Slf4j;
import org.springframework.beans.factory.annotation.Autowired;
import org.springframework.stereotype.Service;
import org.springframework.transaction.annotation.Propagation;
import org.springframework.transaction.annotation.Transactional;

import java.util.List;
import java.util.Map;
import java.util.stream.Collectors;

@Slf4j
@Service
public class ITccStorageServicempl implements ITccStorageService {
    @Autowired
    private IStorageService storageService;

    @Override
    @Transactional(rollbackFor = Exception.class, propagation = Propagation.REQUIRED)
    public boolean deduct(List<GoodDto> param) {
        log.error("Seata全局事务id=================>{}", RootContext.getXID());

        Map<String, Integer> good = param.stream().collect(Collectors.toMap(GoodDto::getGoodId, GoodDto::getBuyNum));
        LambdaQueryWrapper<Storage> wrapper = new LambdaQueryWrapper<>();
        wrapper.in(Storage::getGoodId, param.stream().map(e -> e.getGoodId()).collect(Collectors.toList()));
        List<Storage> storages = storageService.list(wrapper);
        storages.stream().forEach(e -> {
            e.setGoodNum(e.getGoodNum() - good.get(e.getGoodId()));
        });
        storageService.updateBatchById(storages);

        return true;
    }

    @Override
    public boolean busCommit(BusinessActionContext actionContext) {
        log.info("busCommit xid = " + actionContext.getXid() + "提交成功");
        return true;
    }

    @Override
    public boolean busRollback(BusinessActionContext actionContext) {
        // 编写对应的业务数据进行回滚
        List<GoodDto> param = actionContext.getActionContext("param", List.class);
//        int count = actionContext.getActionContext("count", Integer.class);
//        LambdaQueryChainWrapper<Stock> eq = lambdaQuery().eq(Stock::getCommodityCode, commodityCode);
//        Long count1 = eq.one().getCount();
//        // 扣了多少数,需要重新添加回去
//        lambdaUpdate().set(Stock::getCount, count + count1)
//                .eq(Stock::getCommodityCode, commodityCode)
//                .update();
        log.info("busRollback xid = " + actionContext.getXid() + "回滚成功");
        return true;
    }
}
四、总结:
本文通过springboot 项目整合seata 然后 通过 AT,XA,TCC 事务模式,模拟实现分布式事务。
五、参考:
1 Seata新手部署指南;
2 版本说明;
3 Seata 事务模式;