文章目录
- 1.搜索
- 1.1常见搜索方式
- 1.2模型
- 2.map
- 2.1介绍
- 2.2 Map.Entry<K, V>
- 2.3map的使用
- 2.4遍历map
- 2.5TreeMap和HashMap的区别
- 3.set
- 3.1介绍
- 3.2set的使用
- 3.3遍历set
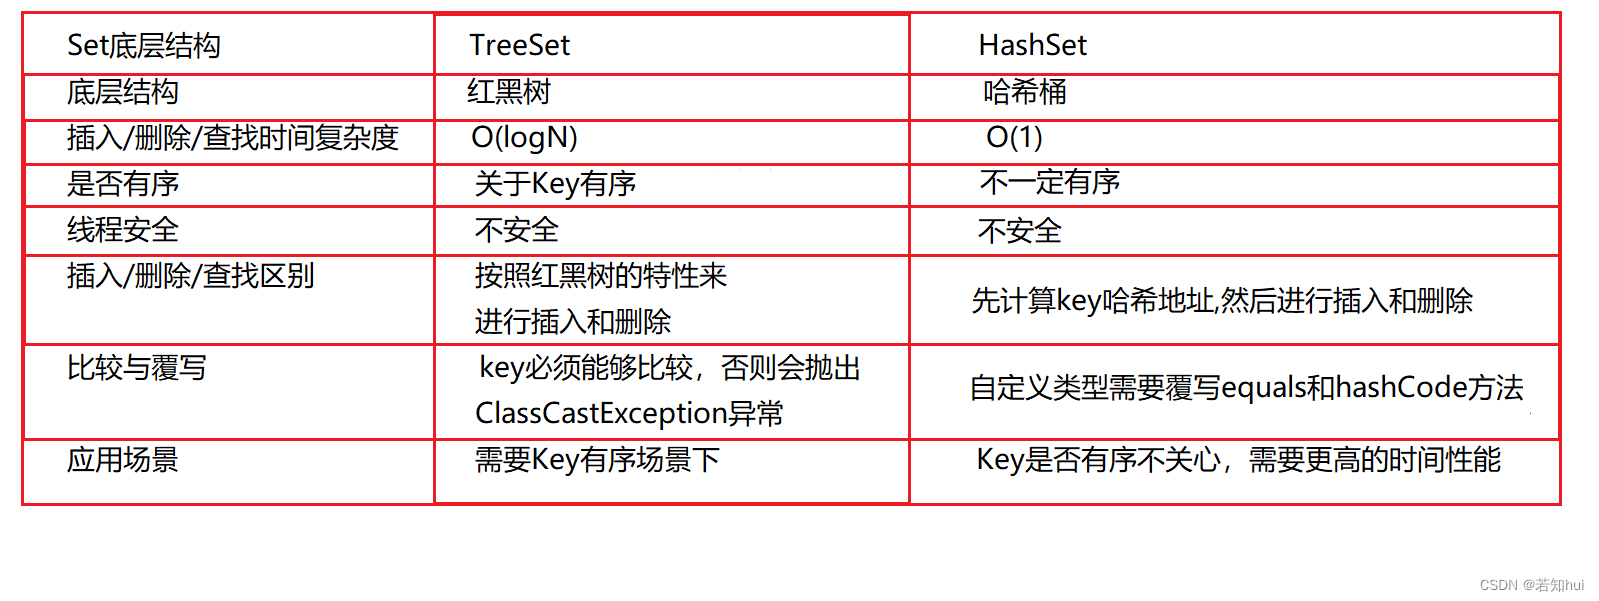
- 3.4 TreeSet和HashSet的不同
- 4.搜索树
- 4.1概念
- 4.2实现
- 4.3性能分析
- 5.哈希表
- 5.1查找数据
- 5.2冲突的概念
- 5.3冲突的避免方法
- 5.4冲突的解决方法
- 5.5实现(简单类型)
- 5.6实现(泛型)
1.搜索
1.1常见搜索方式
(1)直接遍历:时间复杂度会达到O(N)
(2)二分查找:时间复杂度O(logN)
(3)Map和set:一种专门用来进行搜索的容器或者数据结构,其搜索的效率与其具体的实例化子类有关
1.2模型
(1)k-v模型:map(key-value)
(2)k模型:set(key)
2.map
Map是一个接口类,该类没有继承自Collection,该类中存储的是<K,V>结构的键值对,并且K一定是唯一的,不能重复
2.1介绍
- Map是一个接口,不能直接实例化对象,如果要实例化对象只能实例化其实现类TreeMap或者HashMap
- Map中Key是唯一的,如果相同会被替代成最新的value,value是可以重复的
- 在Map中插入时,key不能为空,但是value可以为空
- Map中的Key可以全部分离出来,存储到Set中来进行访问(因为Key不能重复)
- Map中的value可以全部分离出来,存储在Collection的任何一个子集合中(value可能有重复)
- Map中键值对的Key不能直接修改,value可以修改,如果要修改key,只能先将该key删除掉,然后再来进行重新插入
2.2 Map.Entry<K, V>
Map.Entry<K, V> 是Map内部实现的用来存放<key, value>键值对映射关系的内部类
public static void main(String[] args) {
        Map<String,Integer> map = new HashMap<>();
        map.put("hello",2);
        map.put("world",4);
        map.put("school",6);
        System.out.println(map);//{world=4, school=6, hello=2}
        //通过map.entrySet遍历key和value
        Set<Map.Entry<String,Integer>> entrySet = map.entrySet();
        for (Map.Entry<String,Integer> entry:entrySet){
            //key:world  val:4 key:school  val:6 key:hello  val:2
            System.out.print("key:"+entry.getKey()+"  val:"+entry.getValue()+" ");
        }
        System.out.println();
        //将键值对中的value替换为指定value
        for (Map.Entry<String,Integer> entry:entrySet){
            //4 6 2
            System.out.print(entry.setValue(entry.getValue())+" ");
        }
    }
2.3map的使用
public static void main(String[] args) {
        Map<String,Integer> map = new HashMap<>();
        map.put("hello",2);
        map.put("world",4);
        map.put("school",6);//设置 key 对应的 value
        System.out.println(map);//{world=4, school=6, hello=2}
        //存储顺序和打印的顺序不同是由于他的底层是通过哈希函数计算的
        System.out.println(map.get("hello"));//2 返回 key 对应的 value
        System.out.println(map.getOrDefault("hello", 4));//2 返回 key 对应的 value,key 不存在,返回默认值
        System.out.println(map.remove("world"));//4 删除 key 对应的映射关系
        System.out.println(map.keySet());//[school, hello] 返回所有 key 的不重复集合
        System.out.println(map.values());//[6, 2] 返回所有 value 的可重复集合
        System.out.println(map.entrySet());//[school=6, hello=2] 返回所有的 key-value 映射关系
        System.out.println(map.containsKey("world"));//false 判断是否包含 key
        System.out.println(map.containsValue(2));//true 判断是否包含 value
    }
2.4遍历map
public static void main(String[] args){
        Map<String,Integer> map = new HashMap<>();
        map.put("hello",2);
        map.put("world",4);
        map.put("school",6);
        System.out.println(map);//{world=4, school=6, hello=2}
        //通过map.keySet遍历key和value
        for (String key:map.keySet()){
            //key:world value:4 key:school value:6 key:hello value:2
            System.out.print("key:"+key+" value:"+map.get(key)+" ");
        }
        System.out.println();
        //通过map.values遍历value
        for (Integer value:map.values()){
            //4 6 2
            System.out.print(value+" ");
        }
        System.out.println();
        //集合方式遍历key
        Set<String> set = map.keySet();
        System.out.println(set);//[world, school, hello]
        //集合方式遍历value
        Collection<Integer> collection = map.values();
        System.out.println(collection);//[4, 6, 2]
        //通过map.entrySet遍历key和value
        Set<Map.Entry<String,Integer>> entrySet = map.entrySet();
        for (Map.Entry<String,Integer> entry:entrySet){
            //key:world  val:4 key:school  val:6 key:hello  val:2
            System.out.print("key:"+entry.getKey()+"  val:"+entry.getValue()+" ");
        }
        System.out.println();
        //Map.Entry<>迭代器
        Set<Map.Entry<String,Integer>> entrySet1 = map.entrySet();
        Iterator<Map.Entry<String,Integer>> iterator = entrySet1.iterator();
        while (iterator.hasNext()){
            Map.Entry<String,Integer> entry = iterator.next();
            //key:world  val:4 key:school  val:6 key:hello  val:2
            System.out.print("key:"+entry.getKey()+"  val:"+entry.getValue()+" ");
        }
        System.out.println();
        //java8特有的遍历方法
        map.forEach((key,value)->{
            //key:world value:4 key:school value:6 key:hello value:2
            System.out.print("key:"+key+" value:"+value+" ");
        });
    }
2.5TreeMap和HashMap的区别

3.set
3.1介绍
- Set是继承自Collection的接口类,Set中只存储了Key,并且要求key唯一
- Set的底层是使用Map来实现的,其使用key与Object的一个默认对象作为键值对插入到Map中的
- Set最大的功能就是对集合中的元素进行去重
- 实现Set接口的常用类有TreeSet和HashSet
- Set中的Key不能修改,如果要修改,先将原来的删除掉,然后再重新插入
- Set中不能插入null的key
3.2set的使用
public static void main(String[] args) {
        //set不能添加重复元素
        Set<String> set = new HashSet<>();
        set.add("hello");
        set.add("world");
        set.add("world");
        set.add("school");//添加元素
        System.out.println(set);//[world, school, hello]
        System.out.println(set.contains("hello"));//true
        System.out.println(set.contains("d"));//false 是否包含某个元素
        System.out.println(set.remove("hello"));//true;
        System.out.println(set.remove("d"));//false 删除某个元素
        System.out.println(set.size());//2 返回set中元素的个数
        System.out.println(set.isEmpty());//false 检测set是否为空
        List<String> list = new ArrayList<>();
        list.add("abc");
        list.add("def");
        list.add("fag");
        set.addAll(list);//将集合c中的元素添加到set中
        System.out.println(set);//[world, abc, def, school, fag]
        set.clear();//清空set
}
3.3遍历set
public static void main(String[] args) {
        //set不能添加重复元素
        Set<String> set = new HashSet<>();
        set.add("hello");
        set.add("world");
        set.add("school");//添加元素
        System.out.println(set);//[world, school, hello]
        //使用toArray(),将set中的元素转换为数组返回,对数组进行遍历
        Object[] array = set.toArray();
        for (int i = 0; i < array.length; i++) {
            System.out.print(array[i]+" ");//world school hello
        }
        System.out.println();
        //使用toArray(T[] a),传递一个数组,把集合中的元素存储到数组中
        String[] array1 = new String[set.size()];
        String[] strings = set.toArray(array1);
        for (int i = 0; i < strings.length; i++) {
            System.out.print(strings[i]+" ");//world school hello
        }
        System.out.println();
        //使用迭代器遍历
        Iterator<String> iterator = set.iterator();
        while (iterator.hasNext()){
            System.out.print(iterator.next()+" ");//world school hello
        }
    }
3.4 TreeSet和HashSet的不同
4.搜索树
4.1概念
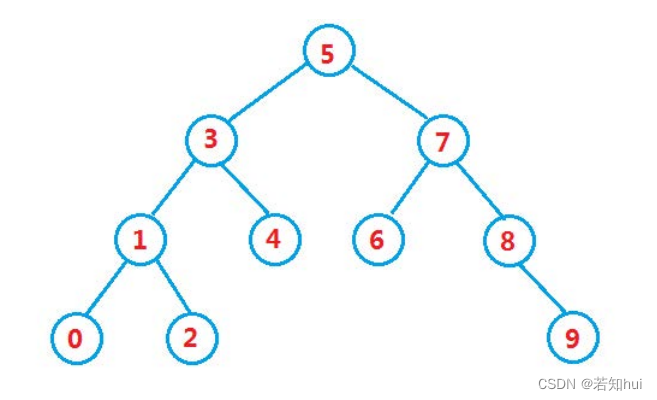
二叉搜索树(二叉排序树):每一棵树的左子树小于根结点,右子树大于根结点,也可以是一棵空树
4.2实现
public class BinaryTree {
    static class TreeNode{
        public int val;
        public TreeNode left;
        public TreeNode right;
        public TreeNode(int val){
            this.val = val;
        }
    }
    public static TreeNode root;
    //查找二叉搜索树中是否包含某个元素
    public static boolean search(int val){
        if (root == null){
            return false;
        }
        TreeNode cur = root;
        while (cur!=null){
            //找到val
            if(cur.val==val){
                return true;
            }else if (cur.val>val){
                //大于val,在左子树找
                cur = cur.left;
            }else {
                //小于val,在左子树找
                cur = cur.right;
            }
        }
        return false;
    }
    //添加一个元素到二叉搜索树中
    public static boolean insert(int val) {
    //空树,直接插入到根结点
        if (root == null){
            root = new TreeNode(val);
        }
        TreeNode cur = root;
        TreeNode tmp = null;
        //找到插入位置的父亲结点
        while (cur!=null){
            if (cur.val > val){
                tmp = cur;
                cur = cur.left;
            }else if (cur.val < val){
                tmp = cur;
                cur = cur.right;
            }else {
                return false;
            }
        }
        if (tmp.val < val){
            tmp.right = new TreeNode(val);
        }else {
            tmp.left = new TreeNode(val);
        }
        return true;
    }

    //中序遍历二叉树
    public static void inorder(TreeNode root) {
        if (root == null){
            return;
        }
        inorder(root.left);
        System.out.print(root.val+" ");
        inorder(root.right);
    }
    //删除元素
    public static boolean remove(int key){
        if (root == null){
            return false;
        }
        TreeNode cur = root;
        TreeNode parent = null;
        //找到删除结点和要删除的结点的父节点
        while (cur != null){
            if (cur.val > key){
                parent = cur;
                cur = cur.left;
            }else if(cur.val < key){
                parent = cur;
                cur = cur.right;
            }else {
                removeNode(cur,parent);
                return true;
            }
        }
        return false;
    }
    public static void removeNode(TreeNode cur,TreeNode parent){
        if (cur.left == null){
            if (cur == root){
                root = root.right;
            }else if (parent.right == cur){
                parent.right = cur.right;
            }else {
            //parent.left == cur
                parent.left = cur.right;
            }
        }else if (cur.right == null){
            if (cur == root){
                root = root.left;
            }else if (parent.right == cur){
                parent.right = cur.left;
            }else {
            //parent.left == cur
                parent.left = cur.left;
            }
        }else {
        //cur.left!=null&&cur.right!=null
        //使用替代法删除,此处在右树找最小值
            TreeNode target = cur.right;
            TreeNode targetParent = cur;
            while (target.left != null){
                targetParent = target;
                target = target.left;
            }
            cur.val = target.val;
            if (target == targetParent.left){
                targetParent.left = target.right;
            }else {
                targetParent.right = target.right;
            }
        }
    }
}
4.3性能分析
(1)单分支的树:时间复杂度为N
(2)改进:AVL树(高度平衡的二叉树)、红黑树(RBTree)
5.哈希表
存储和取数据的时候都会遵守某种规则,称作哈希函数,哈希函数是可以自己设定的,构造出来的结构称哈希表(散列表),用该方法进行搜索不需要进行多次关键码的比较,因此搜索的效率比较高
5.1查找数据
(1)顺序查找:时间复杂度O(N)
(2)二分查找:时间复杂度O(logN)
(3)哈希表:增删查改的时间复杂度都可以达到O(1)
5.2冲突的概念
不同关键字通过相同哈希哈数计算出相同的哈希地址,该种现象称为哈希冲突或哈希碰撞
5.3冲突的避免方法
冲突的发生是必然的,我们只能尽量降低冲突的发生频率
(1)设计合理的哈希函数
设计原则:哈希函数定义域必须包括需要存储的全部关键码;哈希函数计算出来的地址能均匀分布在整个空间中;哈希函数应该比较简单
(2)调节负载因子
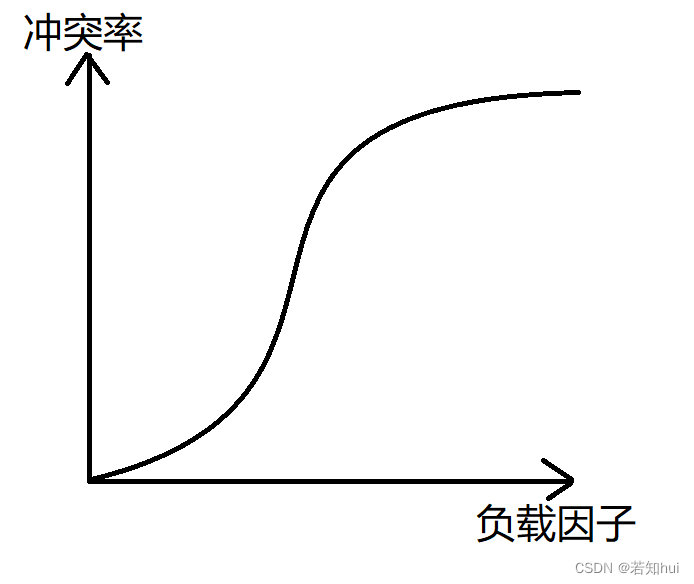
a,散列表的负载因子=填入表中的元素的个数/散列表的长度
b,负载因子和冲突率的关系
c,超过负载因子就需要扩容
d,想要降低冲突率就只能减少负载因子,想要减少负载因子就只能增加散列表的长度
5.4冲突的解决方法
(1)闭散列(开放定址法):空间利用率低
a,线性探测:放到冲突位置的下一个空的地方(不好删除;会把冲突元素放到一起)
b,二次探测:使用Hi = (H0+i^2)%m放到下一个空的地方(i是冲突的次数,H0是冲突的位置,m是散列表的长度)
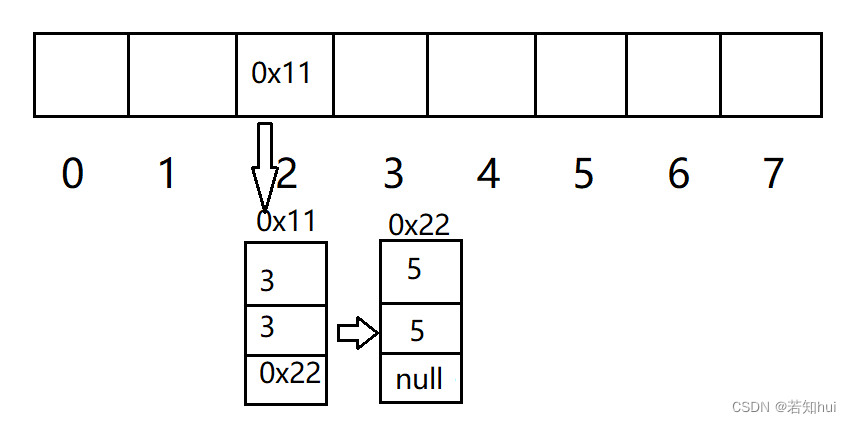
(2)开散列(哈希桶/链地址法/开链法):把所有的元素挂到链表上,JDK1.8使用的是尾插法
a,解决:数组+链表+红黑树(树化是有条件的)
b,树化的条件:链表的长度超过8;数组的长度超过64
c,把红黑树变为链表的条件:树的结点为6
d,哈希表的扩容要注意:重新哈希
5.5实现(简单类型)
public class HashBuck {
    static class Node{
        public int key;
        public int val;
        public Node next;
        public Node(int key,int val){
            this.key = key;
            this.val = val;
        }
    }
    public int usedSize;//存放数据个数
    public static final double FACTOR = 0.75;//负载因子
    public Node[] array;
    public HashBuck(){
        this.array = new Node[8];
    }
    //插入元素
    public boolean put(int key,int val){
        Node node = new Node(key,val);
        //1、找到要插入下标的位置
        int index = key % array.length;
        //2、遍历这个下标的链表,看看有没有一样的值
        Node cur = array[index];
        while (cur!=null){
            if (cur.key == key){
                cur.val = val;//更新val的值
                return false;
            }
            cur = cur.next;
        }
        //3、遍历完成当前链表的值,若没有相同的就开始插入
        cur = array[index];
        node.next = cur;
        array[index] = node;
        this.usedSize++;
        //4、存放元素之后,判断当前哈希桶中的负载因子是否超过默认的负载因子
        if (loadFactor() >= FACTOR){
            //5、扩容
            resize();
        }
        return true;
    }
    //扩容
    private void resize(){
        //1、更新数组长度,申请二倍数组长度
        Node[] tmp = new Node[this.array.length*2];
        //2、遍历原来的数组,将每个小标的节点的数据都进行重新哈希
        for (int i = 0; i < array.length; i++) {
            Node cur = array[i];
            while (cur!=null){
                Node curNext = cur.next;
                int newIndex = cur.key % tmp.length;//新的数组的下标
                cur.next = tmp[newIndex];
                tmp[newIndex] = cur;
                cur = curNext;
            }
        }
        array = tmp;
    }
    //得到负载因子的值
    private double loadFactor(){
        return this.usedSize*1.0/this.array.length;
    }
    //获取val的值
    public int get(int key){
        int index = key % array.length;
        Node cur = array[index];
        while (cur != null){
            if (cur.key == key){
                return cur.val;
            }
            cur = cur.next;
        }
        return -1;
    }
}
//测试
public static void main(String[] args) {
        HashBuck h = new HashBuck();
        h.put(1,1);
        h.put(2,2);
        h.put(3,3);
        h.put(6,4);
        h.put(14,14);
        h.put(17,17);
        h.put(24,24);
        System.out.println('a');//在此处打断点
    }
5.6实现(泛型)
HashMap:
class Person{
    public String id;
    public Person(String id) {
        this.id = id;
    }
    @Override
    public String toString() {
        return "person{" +
                "id='" + id + '\'' +
                '}';
    }
    //找到下标下和key一样的结点
    @Override
    public boolean equals(Object o) {
        if (this == o) return true;
        if (o == null || getClass() != o.getClass()) return false;
        Person person = (Person) o;
        return Objects.equals(id, person.id);
    }
    //找到下标的节点
    @Override
    public int hashCode() {
        return Objects.hash(id);
    }
}
public static void main(String[] args) {
        HashMap<Person,String> hashMap = new HashMap<>();
        Person p1 = new Person("12345");
        Person p2 = new Person("12345");
        hashMap.put(p1,"xian");
        System.out.println(hashMap.get(p2));//xian
    }
注意:
(1)以后我们自己定义的类一定要重写equals和HashCode,要知道HashCode一样,equals不一定一样,equals一样,HashCode一定一样
(2)HashSet的底层是一个HashMap(原码中HashSet存的元素作为HashMap的key,不能重复)
(3)map第一次添加元素的时候,容量才会赋予16
public class HashBuck2<k,v> {
    static class Node<k,v>{
        public k key;
        public v val;
        public Node<k,v> next;
        public Node(k key,v val){
            this.key = key;
            this.val = val;
        }
    }
    public Node<k,v>[] array = (Node<k,v>[])new Node[8];
    public static final double FACTOR = 0.75;//负载因子
    public int usedSize;
    public void put(k key,v val){
        Node<k,v> node = new Node<>(key,val);
        //1、找到要插入的下标位置
        int hash = key.hashCode();//将key变成一个整数
        int index = hash % array.length;
        //2、遍历这个下标的链表,看看有没有一样的值
        Node<k,v> cur = array[index];
        while (cur!=null){
            if (cur.key.equals(key)){
                cur.val = val;//更新val的值
            }
            cur = cur.next;
        }
        //3、遍历完成当前链表的值,若没有相同的就开始插入
        cur = array[index];
        node.next = cur;
        array[index] = node;
        this.usedSize++;
        //4、存放元素之后,判断当前哈希桶中的负载因子是否超过默认的负载因子
        if (loadFactor() >= FACTOR){
            //5、扩容
            resize();
        }
    }
    //扩容
    private void resize(){
        //1、更新数组长度,申请二倍数组长度
        Node<k,v>[] tmp = new Node[this.array.length*2];
        //2、遍历原来的数组,将每个小标的节点的数据都进行重新哈希
        for (int i = 0; i < array.length; i++) {
            Node<k,v> cur = array[i];
            while (cur!=null){
                Node<k,v> curNext = cur.next;
                int hash = array[i].hashCode();//将key变成一个整数
                int newIndex = hash % array.length;//新的数组的下标
                cur.next = tmp[newIndex];
                tmp[newIndex] = cur;
                cur = curNext;
            }
        }
        array = tmp;
    }
    //得到负载因子的值
    private double loadFactor(){
        return this.usedSize*1.0/this.array.length;
    }
    //获取val的值
    public v get(k key){
        int hash = key.hashCode();
        int index = hash % array.length;
        Node<k,v> cur = array[index];
        while (cur != null){
            if (cur.key.equals(key)){
                return cur.val;
            }
            cur = cur.next;
        }
        return null;
    }
}
//测试
public static void main(String[] args) {
        HashBuck2<Person,String> hashBuck2 = new HashBuck2<>();
        Person p1 = new Person("12345");
        Person p2 = new Person("12345");
        hashBuck2.put(p1,"xian");
        System.out.println(hashBuck2.get(p2));//xian
    }




![[LeetCode周赛复盘] 第 359 场周赛20230820](https://img-blog.csdnimg.cn/8e9e917f29134d058a75a412b2f7ff1f.png)

