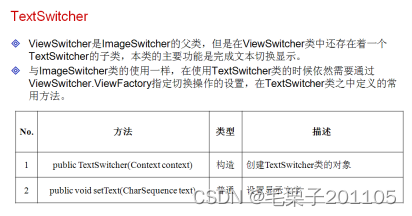
1. 文本切换:TextSwitcher
1.1 知识点
(1)理解TextSwitcher和ViewFactory的使用。
1.2 具体内容
范例:切换显示当前时间
<LinearLayout xmlns:android="http://schemas.android.com/apk/res/android"
    xmlns:tools="http://schemas.android.com/tools"
    android:layout_width="match_parent"
    android:layout_height="match_parent"
    android:orientation="vertical" >
    <TextSwitcher
        android:id="@+id/myTextSwitcher"
        android:layout_width="match_parent"
        android:layout_height="wrap_content"
        android:layout_gravity="center_horizontal"/>
    <Button
        android:id="@+id/but"
        android:layout_width="match_parent"
        android:layout_height="wrap_content"
        android:text="显示当前时间"
        android:layout_gravity="center_horizontal"/>

</LinearLayout>
package com.example.textswitcher;
import java.text.DateFormat;
import java.text.SimpleDateFormat;
import java.util.Date;
import android.app.Activity;
import android.os.Bundle;
import android.view.View;
import android.view.View.OnClickListener;
import android.view.ViewGroup.LayoutParams;
import android.widget.Button;
import android.widget.TextSwitcher;
import android.widget.TextView;
import android.widget.ViewSwitcher.ViewFactory;
public class TextSwitcherActivity extends Activity {
private Button but = null;
private TextSwitcher textSwitcher = null;
@Override
protected void onCreate(Bundle savedInstanceState) {
super.onCreate(savedInstanceState);
super.setContentView(R.layout.activity_text_switcher);
this.but = (Button) super.findViewById(R.id.but);
this.textSwitcher = (TextSwitcher) super.findViewById(R.id.myTextSwitcher);
this.textSwitcher.setFactory(new ViewFactory() {
@Override
public View makeView() {
TextView textView = new TextView(TextSwitcherActivity.this);
textView.setLayoutParams(new TextSwitcher.LayoutParams(LayoutParams.WRAP_CONTENT,LayoutParams.WRAP_CONTENT));
textView.setBackgroundColor(0xFFFFFFFF);
textView.setTextSize(30);
return textView;
}
});
this.but.setOnClickListener(new OnClickListener(){
@Override
public void onClick(View v) {
Date date = new Date();
DateFormat df = new SimpleDateFormat("yyyy-MM-dd HH:mm:ss.SSS");
String sDate = df.format(date);//将Date类型的日期转换成字符串
TextSwitcherActivity.this.textSwitcher.setText("当前时间:"+sDate);
}
});
}
}
当然也可以设置动画效果。
<TextSwitcher
        android:id="@+id/myTextSwitcher"
        android:layout_width="match_parent"
        android:layout_height="wrap_content"
        android:layout_gravity="center_horizontal"
        android:inAnimation="@android:anim/slide_in_left"
        android:outAnimation="@android:anim/slide_out_right"/>
1.3 小结
(1)TextSwitcher与ImageSwitcher一样,如果需要转换都必须通过ViewFactory接口设置。
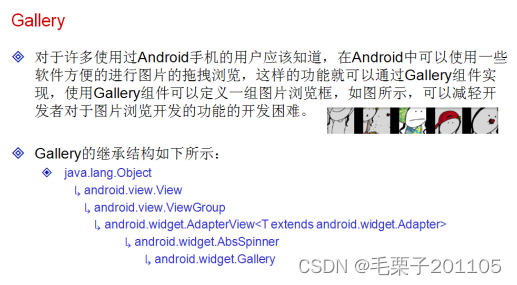
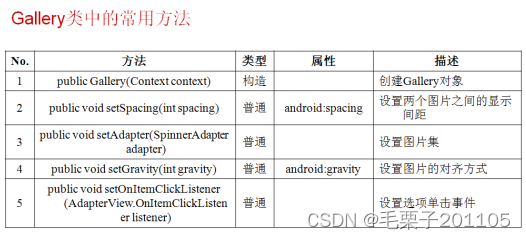
2. 拖拉图片:Gallery
2.1 知识点
(1)掌握Gallery组件的使用;
(2)使用Gallery + ImageSwitcher完成图片浏览功能。
2.2 具体内容
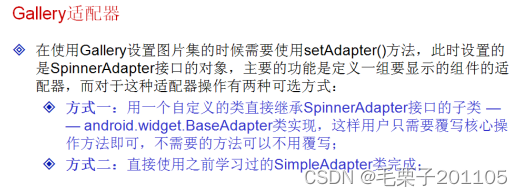
我们通过API去查找SpinnerAdapter这个接口。发现此接口有几个实现类:ArrayAdapter,SimpleAdapter,BaseAdapter
·使用ArrayAdapter,BaseAdapter实际上就是需要开发者自己去实现Adapter的操作,包括定义组件等。

第一步:编写自定义适配器
package com.example.galleryproject;

import android.content.Context;
import android.view.View;
import android.view.ViewGroup;
import android.view.ViewGroup.LayoutParams;
import android.widget.BaseAdapter;
import android.widget.Gallery;
import android.widget.ImageView;

public class ImageGalleryAdapter extends BaseAdapter{
	private Context context;
	private int img[] = {R.drawable.head0,R.drawable.head1,R.drawable.head2,
			R.drawable.head3,R.drawable.head4,R.drawable.head5,
			R.drawable.head6,R.drawable.head7,R.drawable.head8,
			R.drawable.head9,R.drawable.head10,R.drawable.head11,};
	public ImageGalleryAdapter(Context context){
		this.context = context;
	}
	@Override
	public int getCount() {//返回图片个数
		return img.length;
	}
	@Override
	public Object getItem(int position) {//取得指定位置的图片
		return img[position];
	}
	@Override
	public long getItemId(int position) {//取得指定位置的图片ID
		return img[position];
	}
	@Override
	public View getView(int position, View convertView, ViewGroup parent) {
		//很明显,现在我们是要浏览图片,那么图片肯定是需要使用ImageView
		ImageView imgView = new ImageView(context);
		imgView.setBackgroundColor(0xFFFFFFFF);
		imgView.setImageResource(this.img[position]);
		imgView.setScaleType(ImageView.ScaleType.CENTER);//设置居中显示
		imgView.setLayoutParams(new Gallery.LayoutParams(LayoutParams.WRAP_CONTENT,LayoutParams.WRAP_CONTENT));
		return imgView;
	}
}
此时自定义的适配器就已经完成,是一个专门负责给Gallery组件填充数据的适配器,当Gallery需要显示内容的时候,直接是用setAdapter()方法设置这个自定义的适配器就OK了。
第二步:定义布局文件
<LinearLayout
    xmlns:android="http://schemas.android.com/apk/res/android"
    xmlns:tools="http://schemas.android.com/tools"
    android:layout_width="match_parent"
    android:layout_height="match_parent"
    android:orientation="vertical" >
    <Grallery
        android:id="@+id/myGallery"
        android:layout_width="match_parent"
        android:layout_height="wrap_content"
		android:layout_gravity="center_horizontal"
		/>
</LinearLayout>
定义了布局文件之后,我们需要编写Activity程序。
package com.example.galleryproject;

import android.app.Activity;
import android.os.Bundle;
import android.view.View;
import android.widget.AdapterView;
import android.widget.AdapterView.OnItemClickListener;
import android.widget.Gallery;
import android.widget.Toast;

public class GalleryActivity extends Activity {
	private Gallery myGallery = null;
	@Override
	protected void onCreate(Bundle savedInstanceState) {
		super.onCreate(savedInstanceState);
		super.setContentView(R.layout.activity_gallery);
		this.myGallery = (Gallery) super.findViewById(R.id.myGallery);
		this.myGallery.setAdapter(new ImageGalleryAdapter(this));
		this.myGallery.setOnItemClickListener(new OnItemClickListener(){

			@Override
			public void onItemClick(AdapterView<?> adapter, View view, int position,
					long id) {
				Toast.makeText(GalleryActivity.this, "选中了第"+(position+1)+"张图片", Toast.LENGTH_SHORT).show();
			}

		});
	}
}
从事件处理来看,和ListView组件操作相似的。
·对于使用SimpleAdapter来说,必须要准备一个List,而这个List里面保存的是Map,而且Map中的key值要是字符串类型,如果现在有100个图片需要使用画廊组件现,这个时候我们可以做一些特殊的处理。
第一步:准备一张图片的显示的模板布局
<LinearLayout
    xmlns:android="http://schemas.android.com/apk/res/android"
    xmlns:tools="http://schemas.android.com/tools"
    android:layout_width="match_parent"
    android:layout_height="match_parent"
    android:orientation="horizontal" >
    <ImageView
        android:id="@+id/mtImg"
        android:layout_width="wrap_content"
        android:layout_height="wrap_content"
        android:scaleType="center"
		/>
</LinearLayout>
第二部:编写Activity程序,实现画廊
package com.example.galleryproject;

import java.lang.reflect.Field;
import java.util.ArrayList;
import java.util.HashMap;
import java.util.List;
import java.util.Map;

import android.app.Activity;
import android.os.Bundle;
import android.view.View;
import android.widget.AdapterView;
import android.widget.AdapterView.OnItemClickListener;
import android.widget.Gallery;
import android.widget.SimpleAdapter;
import android.widget.Toast;

public class GalleryActivity extends Activity {
	private Gallery myGallery = null;
	private SimpleAdapter adapter = null;
	private List<Map<String,Integer>> list = new ArrayList<Map<String,Integer>>();
	@Override
	protected void onCreate(Bundle savedInstanceState) {
		super.onCreate(savedInstanceState);
		super.setContentView(R.layout.activity_gallery);
		this.myGallery = (Gallery) super.findViewById(R.id.myGallery);
		this.initAdapter();//装配适配器
		this.myGallery.setAdapter(adapter);
		this.myGallery.setOnItemClickListener(new OnItemClickListener(){
			@Override
			public void onItemClick(AdapterView<?> adapter, View view, int position,
					long id) {
				Toast.makeText(GalleryActivity.this, "选中了第"+(position+1)+"张图片", Toast.LENGTH_SHORT).show();
			}
		});
	}
	/**
	 * 装配适配器
	 */
	public void initAdapter(){
		//我们说如果有非常多的图片,一个一个列出来非常麻烦 现在使用一些IO知识,通过图片名称的前半部分相同就全部加载进来
		Field field[] = R.drawable.class.getDeclaredFields();//取得drawable全部内容
		for (int i = 0; i < field.length; i++) {
			if(field[i].getName().startsWith("head")){
				Map<String,Integer> map = new HashMap<String,Integer>();
				try{
					map.put("img",field[i].getInt(R.drawable.class));
				}catch(Exception e){
					e.printStackTrace();
				}
				this.list.add(map);
			}
		}
		this.adapter = new SimpleAdapter(this,this.list,R.layout.gallery_view,new String[]{"img"},new int[]{R.id.myImg});
	}
}
以上的操作都是实现了简单的画廊,在很多情况下,用户可以通过选择一张图片,然后直接显示这个图片在中央,这就是说进行了图片的切换,那么需要依靠ImageSwitcher完成。
<LinearLayout
    xmlns:android="http://schemas.android.com/apk/res/android"
    xmlns:tools="http://schemas.android.com/tools"
    android:layout_width="match_parent"
    android:layout_height="match_parent"
    android:orientation="vertical" >
    <ImageSwitcher
        android:id="@+id/myImageSwitcher"
        android:layout_width="match_parent"
        android:layout_height="wrap_content"
        />
    <Gallery
        android:id="@+id/myGallery"
        android:layout_width="match_parent"
        android:layout_height="wrap_content"
		android:layout_gravity="center_horizontal"
		android:spacing="3px"
		/>
</LinearLayout>
package com.example.galleryproject;

import java.util.ArrayList;
import java.util.HashMap;
import java.util.List;
import java.util.Map;

import android.app.Activity;
import android.os.Bundle;
import android.view.View;
import android.view.ViewGroup.LayoutParams;
import android.widget.AdapterView;
import android.widget.AdapterView.OnItemClickListener;
import android.widget.Gallery;
import android.widget.ImageSwitcher;
import android.widget.ImageView;
import android.widget.SimpleAdapter;
import android.widget.ViewSwitcher.ViewFactory;

public class GalleryActivity extends Activity {
	private Gallery myGallery = null;
	private SimpleAdapter adapter = null;
	private List<Map<String, Integer>> list = new ArrayList<Map<String, Integer>>();
	private ImageSwitcher imageSwitcher = null;
	private int img[] = { R.drawable.head0, R.drawable.head1, R.drawable.head2,
			R.drawable.head3, R.drawable.head4, R.drawable.head5,
			R.drawable.head6, R.drawable.head7, R.drawable.head8,
			R.drawable.head9, R.drawable.head10, R.drawable.head11, };

	@Override
	protected void onCreate(Bundle savedInstanceState) {
		super.onCreate(savedInstanceState);
		super.setContentView(R.layout.activity_gallery);
		this.myGallery = (Gallery) super.findViewById(R.id.myGallery);
		this.imageSwitcher = (ImageSwitcher) super.findViewById(R.id.myImageSwitcher);
		this.imageSwitcher.setFactory(new ViewFactory() {
			@Override
			public View makeView() {
				ImageView imgView = new ImageView(GalleryActivity.this);
				imgView.setBackgroundColor(0xFFFFFFFF);
				imgView.setScaleType(ImageView.ScaleType.CENTER);//设置居中显示
				imgView.setLayoutParams(new Gallery.LayoutParams(LayoutParams.WRAP_CONTENT,LayoutParams.WRAP_CONTENT));
				return imgView;
			}
		});
		this.imageSwitcher.setImageResource(img[0]);
		this.initAdapter();//装配适配器
		this.myGallery.setAdapter(adapter);
		this.myGallery.setOnItemClickListener(new OnItemClickListener(){
			@Override
			public void onItemClick(AdapterView<?> adapter, View view, int position,
					long id) {
				GalleryActivity.this.imageSwitcher.setImageResource(img[position]);
			}
		});
	}
	/**
	 * 装配适配器
	 */
	public void initAdapter() {
		for (int i = 0; i < img.length; i++) {
			Map<String, Integer> map = new HashMap<String, Integer>();
			try {
				map.put("img", img[i]);
			} catch (Exception e) {
				e.printStackTrace();
			}
			this.list.add(map);
		}
		this.adapter = new SimpleAdapter(this, this.list,
				R.layout.gallery_view, new String[] { "img" },
				new int[] { R.id.myImg });
	}
}
在使用BaseAdapter的时候需要自定义一个适配器类,而是用SimpleAdapter的时候必须要定义布局模板。
2.3 小结
(1)Gallery组件可以完成图片的拖拉浏览功能;
(2)使用Gallery + ImageSwitcher组件可以完成图片的切换操作;
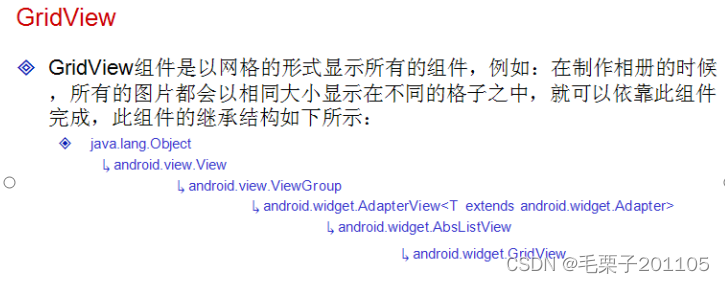
3. 网格视图:GridView
3.1 知识点
(1)掌握GridView的特点及应用;
(2)可以使用BaseAdapter进行GridView显示内容的设置。
3.2 具体内容


主页面的布局:
<LinearLayout xmlns:android="http://schemas.android.com/apk/res/android"
    xmlns:tools="http://schemas.android.com/tools"
    android:layout_width="match_parent"
    android:layout_height="match_parent"
    android:paddingBottom="@dimen/activity_vertical_margin"
    android:paddingLeft="@dimen/activity_horizontal_margin"
    android:paddingRight="@dimen/activity_horizontal_margin"
    android:paddingTop="@dimen/activity_vertical_margin"
    android:orientation="vertical"
    tools:context=".GridViewActivity" >

    <GridView
        android:id="@+id/myGirdView"
        android:layout_width="match_parent"
        android:layout_height="match_parent"
        android:numColumns="3" – 每行加载多少个单元格
        android:stretchMode="columnWidth"  --设置缩放的时候保持列宽的一致
        />

</LinearLayout>
单元格的布局:
<?xml version="1.0" encoding="utf-8"?>
<LinearLayout xmlns:android="http://schemas.android.com/apk/res/android"
    android:layout_width="match_parent"
    android:layout_height="match_parent"
    android:orientation="vertical" >

    <ImageView
        android:id="@+id/img"
        android:layout_width="wrap_content"
        android:layout_height="wrap_content"
        android:scaleType="center"
        android:padding="10px"
        />

</LinearLayout>
Activity:
package com.example.gridviewproject;

import java.lang.reflect.Field;
import java.util.ArrayList;
import java.util.HashMap;
import java.util.List;
import java.util.Map;

import android.app.Activity;
import android.os.Bundle;
import android.widget.GridView;
import android.widget.SimpleAdapter;

public class GridViewActivity extends Activity {
	SimpleAdapter adapter = null;
	List<Map<String,Integer>> list = new ArrayList<Map<String,Integer>>();
    GridView gv = null;
	@Override
	protected void onCreate(Bundle savedInstanceState) {
		super.onCreate(savedInstanceState);
		setContentView(R.layout.activity_grid_view);
		gv = (GridView) super.findViewById(R.id.myGirdView);
		this.initAdapter();
		gv.setAdapter(adapter);
	}


	public void initAdapter(){//装载adapter
		Field[] fields = R.drawable.class.getDeclaredFields();//取得所有的图片
		for(int i=0;i<fields.length;i++){
			if(fields[i].getName().startsWith("date")){
				Map<String,Integer> map = new HashMap<String,Integer>();
				try {
					map.put("img", fields[i].getInt(R.drawable.class));
				} catch (IllegalArgumentException e) {
					// TODO Auto-generated catch block
					e.printStackTrace();
				} catch (IllegalAccessException e) {
					// TODO Auto-generated catch block
					e.printStackTrace();
				}
				this.list.add(map);
			}
		}
		this.adapter = new SimpleAdapter(this,list,R.layout.gird_view_item,new String[]{"img"},new int[]{R.id.img});
	}
}
到这里为止,完成了网格视图的加载,那么接下来进行事件处理,单击显示图片
package com.example.gridviewproject;

import java.lang.reflect.Field;
import java.util.ArrayList;
import java.util.HashMap;
import java.util.List;
import java.util.Map;

import android.app.Activity;
import android.app.AlertDialog;
import android.app.Dialog;
import android.os.Bundle;
import android.view.View;
import android.view.ViewGroup.LayoutParams;
import android.widget.AdapterView;
import android.widget.AdapterView.OnItemClickListener;
import android.widget.GridView;
import android.widget.ImageView;
import android.widget.LinearLayout;
import android.widget.SimpleAdapter;

public class GridViewActivity extends Activity {
	SimpleAdapter adapter = null;
	List<Map<String,Integer>> list = new ArrayList<Map<String,Integer>>();
    GridView gv = null;
	@Override
	protected void onCreate(Bundle savedInstanceState) {
		super.onCreate(savedInstanceState);
		setContentView(R.layout.activity_grid_view);
		gv = (GridView) super.findViewById(R.id.myGirdView);
		this.initAdapter();
		gv.setAdapter(adapter);
		gv.setOnItemClickListener(new OnItemClickListenerImpl());
	}


	public void initAdapter(){//装载adapter
		Field[] fields = R.drawable.class.getDeclaredFields();//取得所有的图片
		for(int i=0;i<fields.length;i++){
			if(fields[i].getName().startsWith("date")){
				Map<String,Integer> map = new HashMap<String,Integer>();
				try {
					map.put("img", fields[i].getInt(R.drawable.class));
				} catch (IllegalArgumentException e) {
					// TODO Auto-generated catch block
					e.printStackTrace();
				} catch (IllegalAccessException e) {
					// TODO Auto-generated catch block
					e.printStackTrace();
				}
				this.list.add(map);
			}
		}
		this.adapter = new SimpleAdapter(this,list,R.layout.gird_view_item,new String[]{"img"},new int[]{R.id.img});
	}

	private class OnItemClickListenerImpl implements OnItemClickListener{

		@Override
		public void onItemClick(AdapterView<?> arg0, View arg1, int arg2,
				long arg3) {
			Map<String,Integer> map = (Map<String, Integer>) GridViewActivity.this.adapter.getItem(arg2);//取得所点击的图片
			ImageView showImg = new ImageView(GridViewActivity.this);
			showImg.setScaleType(ImageView.ScaleType.CENTER);//代表设置图片居中
			showImg.setLayoutParams(new LinearLayout.LayoutParams(LayoutParams.WRAP_CONTENT, LayoutParams.WRAP_CONTENT));
			showImg.setImageResource(map.get("img"));
			Dialog dialog = new AlertDialog.Builder(GridViewActivity.this).setIcon(R.drawable.ic_launcher)
					         .setTitle("显示图片").setView(showImg).setNegativeButton("取消", null).create();
			dialog.show();//显示对话框
		}}

}
以上使用的是SimpleAdapter完成的,现在使用BaseAdapter完成
专门定义一个新的适配器类:
package com.example.myAdapter;

import java.util.List;

import android.content.Context;
import android.view.View;
import android.view.ViewGroup;
import android.view.ViewGroup.LayoutParams;
import android.widget.BaseAdapter;
import android.widget.ImageView;
import android.widget.LinearLayout;

public class ImageAdapter extends BaseAdapter {
    private List<Integer> list;
	private Context context;

	public ImageAdapter(List<Integer> list, Context context) {
		super();
		this.list = list;
		this.context = context;
	}

	@Override
	public int getCount() {
		// TODO Auto-generated method stub
		return this.list.size();
	}

	@Override
	public Object getItem(int position) {
		// TODO Auto-generated method stub
		return this.list.get(position);
	}

	@Override
	public long getItemId(int position) {
		// TODO Auto-generated method stub
		return this.list.get(position);
	}

	@Override
	public View getView(int position, View convertView, ViewGroup parent) {
        ImageView showImg = new ImageView(this.context);
        showImg.setScaleType(ImageView.ScaleType.CENTER);//
        showImg.setImageResource(list.get(position));
        showImg.setPadding(10,10,10,10);
		return showImg;
	}

}
package com.example.gridviewproject;
import java.lang.reflect.Field;
import java.util.ArrayList;
import java.util.HashMap;
import java.util.List;
import java.util.Map;
import com.example.myAdapter.ImageAdapter;
import android.app.Activity;
import android.app.AlertDialog;
import android.app.Dialog;
import android.os.Bundle;
import android.view.View;
import android.view.ViewGroup.LayoutParams;
import android.widget.AdapterView;
import android.widget.AdapterView.OnItemClickListener;
import android.widget.GridView;
import android.widget.ImageView;
import android.widget.LinearLayout;
import android.widget.SimpleAdapter;
public class GridViewActivity extends Activity {
List<Integer> list = new ArrayList<Integer>();
GridView gv = null;
@Override
protected void onCreate(Bundle savedInstanceState) {
super.onCreate(savedInstanceState);
setContentView(R.layout.activity_grid_view);
gv = (GridView) super.findViewById(R.id.myGirdView);
this.initAdapter();
gv.setAdapter(new ImageAdapter(list, this));
gv.setOnItemClickListener(new OnItemClickListenerImpl());
}
public void initAdapter(){//装载adapter
Field[] fields = R.drawable.class.getDeclaredFields();//取得所有的图片
for(int i=0;i<fields.length;i++){
if(fields[i].getName().startsWith("date")){
try {
this.list.add(fields[i].getInt(R.drawable.class));
} catch (IllegalArgumentException e) {
// TODO Auto-generated catch block
e.printStackTrace();
} catch (IllegalAccessException e) {
// TODO Auto-generated catch block
e.printStackTrace();
}
}
}
}
private class OnItemClickListenerImpl implements OnItemClickListener{
@Override
public void onItemClick(AdapterView<?> arg0, View arg1, int arg2,
long arg3) {
ImageView showImg = new ImageView(GridViewActivity.this);
showImg.setScaleType(ImageView.ScaleType.CENTER);//代表设置图片居中
showImg.setLayoutParams(new LinearLayout.LayoutParams(LayoutParams.WRAP_CONTENT, LayoutParams.WRAP_CONTENT));
showImg.setImageResource(list.get(arg2));
Dialog dialog = new AlertDialog.Builder(GridViewActivity.this).setIcon(R.drawable.ic_launcher)
.setTitle("显示图片").setView(showImg).setNegativeButton("取消", null).create();
dialog.show();//显示对话框
}}
}3.3 小结
(1)GridView可以进行网格的显示操作;
(2)GridView的内容可以使用SimpleAdapter设置,也可以通过自定义的BaseAdapter子类完成设置。