GPIO口的操作,是很常见的功能。传统的GPIO sysfs接口已被弃用。自Linux 4.8起,内核提供了全新的操作gpio的方式libgpiod(C library and tools for interacting with the linux GPIO character device),当然也更高效,推荐使用。
libgpiod简介
libgpiod - 用于与Linux GPIO字符设备进行交互的C库和工具(gpiod代表GPIO设备)
libgpiod/libgpiod.git - C library and tools for interacting with the linux GPIO character device
自Linux 4.8起,GPIO sysfs接口已被弃用。用户空间应改用字符设备。该库封装了ioctl调用和数据结构,提供了一个简单直观的API。
新的字符设备接口保证在关闭设备文件描述符后释放所有分配的资源,并添加了一些在已过时的sysfs接口中不存在的新功能(如事件轮询、一次设置/读取多个值或开源和开漏GPIO)。
不幸的是,不再可以仅使用标准命令行工具与Linux设备文件进行交互。这就是创建一个库的原因,它封装了繁琐的、基于ioctl的内核-用户空间交互,并提供了一组方便的函数和不透明的数据结构。 此外,该项目还包含一组命令行工具,可方便地将用户脚本转换为使用字符设备。
旧的方式 GPIO sysfs 接口使用
在linux4.8之前,没有libgpiod,传统操作GPIO口使用的是sysfs方式控制。使用方式举例如下:
1.sysfs 先导出 GPIO 17 和 GPIO 18
echo 17 > /sys/class/gpio/export
echo 18 > /sys/class/gpio/export
现在再去 ls /sys/class/gpio/ 目录,就会多出来 gpio17 和 gpio18 目录。
2.设置 gpio 模式为输出。
echo out > /sys/class/gpio/gpio17/direction
echo out > /sys/class/gpio/gpio18/direction
3.设置 gpio 高电平点亮 LED,点亮绿色(G)灯。
echo 1 > /sys/class/gpio/gpio18/value
#熄灭写 0 即可
echo 0 > /sys/class/gpio/gpio18/value
如何构建libgpiod
这是一个相当标准的autotools项目。核心C库除了标准C库与GNU扩展之外,没有任何外部依赖项。 命令行工具可选择依赖于libedit以获得交互功能。 要构建项目(包括命令行工具),
运行:
./autogen.sh --enable-tools=yes --prefix=<安装路径>

make

make install
autogen脚本将执行./configure并将所有命令行参数传递给它。
有关所有configure功能,请参阅:./configure --help。
自带工具
目前有六个可用的命令行工具:
* gpiodetect - 列出系统上存在的所有gpiochips,它们的名称、标签和GPIO线数
* gpioinfo - 列出线路、它们的gpiochip、偏移量、名称和方向,如果在使用中,则列出使用者名称和任何其他配置的属性,如活动状态、偏置、驱动、边缘检测和去抖动周期
* gpioget - 读取指定GPIO的值
* gpioset - 设置指定GPIO的值,保持线路状态直到进程被终止或退出
* gpiomon - 等待GPIO上的边缘事件,指定要监视的边缘,处理多少个事件后退出,或者是否将事件报告到控制台
* gpionotify - 等待GPIO信息的更改,指定要监视的更改,处理多少个事件后退出,或者是否将事件报告到控制台
工具使用举例
# 检测可用的gpiochips。
$ gpiodetect
gpiochip0 [pinctrl-bcm2711]
gpiochip1 [raspberrypi-exp-gpio]

# 读取gpiochip上所有的信息。
$ gpioinfo -c 1
gpiochip1 - 8个:
  0:“BT_ON” 输出
  1:“WL_ON” 输出
  2:“PWR_LED_OFF” 输出低电平 使用者=“led1”
  3:“GLOBAL_RESET” 输出
  4:“VDD_SD_IO_SEL” 输出 使用者=“vdd-sd-io”
  5:“CAM_GPIO” 输出 使用者=“cam1_regulator”
  6:“SD_PWR_ON” 输出 使用者=“sd_vcc_reg”
  7:“SD_OC_N” 输入

# 读取特定的信息。
$ ./gpioinfo PWR_LED_OFF STATUS_LED_G_CLK GLOBAL_RESET
gpiochip0 42 “STATUS_LED_G_CLK” 输出 使用者=“led0”
gpiochip1 2 “PWR_LED_OFF” 输出低电平 使用者=“led1”
gpiochip1 3 “GLOBAL_RESET” 输出

# 按名称读取单个GPIO的值。
$ gpioget RXD1
“RXD1” = 激活

# 按芯片和偏移量读取单个GPIO的值。
$ gpioget -c 0 15
“15” = 激活

# 以数字值的形式读取单个GPIO的值。
$ gpioget --numeric RXD1
1

# 同时读取两个值。将的活动状态设置为低电平,并且不使用带引号的名称。
$ gpioget --active-low --unquoted GPIO23 GPIO24
GPIO23 = 激活 GPIO24 = 激活

# 设置的值,并保持该直到被终止。
$ gpioset GPIO23=1

# 设置两个的值,然后使其成为守护进程并保持。
$ gpioset --daemonize GPIO23=1 GPIO24=0

# 设置单个的值,保持20毫秒,然后退出。
$ gpioset --hold-period 20ms -t0 GPIO23=1

# 在GPIO22上以1Hz频率闪烁LED
$ gpioset -t500ms GPIO22=1

# 在GPIO22上以1Hz频率和20%的工作比闪烁LED
$ gpioset -t200ms,800ms GPIO22=1

# 以交互方式设置一些(需要--enable-gpioset-interative)
$ gpioset --interactive --unquoted GPIO23=inactive GPIO24=active
gpioset> get
GPIO23 = inactive GPIO24 = active
gpioset> toggle
gpioset> get
GPIO23 = 激活 GPIO24 = inactive
gpioset> set GPIO24=1
gpioset> get
GPIO23 = 激活 GPIO24 = 激活
gpioset> toggle
gpioset> get
GPIO23 = inactive GPIO24 = inactive
gpioset> toggle GPIO23
gpioset> get
GPIO23 = 激活 GPIO24 = inactive
gpioset> exit

# 等待单个GPIO上的三个上升沿事件,然后退出。
$ gpiomon --num-events=3 --edges=rising GPIO22
10002.907638045 上升沿 “GPIO22”
10037.132562259 上升沿 “GPIO22”
10047.179790748 上升沿 “GPIO22”

# 在单个GPIO上等待三个边缘事件,使用本地时间和不带引号的名称,然后退出。
$ gpiomon --num-events=3 --edges=both --localtime --unquoted GPIO22
2022-11-15T10:36:59.109615508 上升沿 GPIO22
2022-11-15T10:36:59.129681898 下降沿 GPIO22
2022-11-15T10:36:59.698971886 上升沿 GPIO22

# 等待下降沿事件并使用自定义输出格式。
$ gpiomon --format="%e %c %o %l %S" --edges=falling -c gpiochip0 22
2 gpiochip0 22 GPIO22 10946.693481859
2 gpiochip0 22 GPIO22 10947.025347604
2 gpiochip0 22 GPIO22 10947.283716669
2 gpiochip0 22 GPIO22 10947.570109430
...

# 阻塞直到发生边缘事件。不打印任何内容。
$ gpiomon --num-events=1 --quiet GPIO22

# 监视多个,在第一个边缘事件后退出。
$ gpiomon --quiet --num-events=1 GPIO5 GPIO6 GPIO12 GPIO17

# 监视的信息更改。
$ gpionotify GPIO23
11571.816473718 请求 “GPIO23”
11571.816535124 释放 “GPIO23”
11572.722894029 请求 “GPIO23”
11572.722932843 释放 “GPIO23”
11573.222998598 请求 “GPIO23”
...

# 监视的请求,报告UTC时间和不带引号的名称。
$ gpionotify --utc --unquoted GPIO23
2022-11-15T03:05:23.807090687Z 请求 GPIO23
2022-11-15T03:05:23.807151390Z 释放 GPIO23
2022-11-15T03:05:24.784984280Z 请求 GPIO23
2022-11-15T03:05:24.785023873Z 释放 GPIO23
...

# 监视多个,在第一个请求后退出。
$ gpionotify --quiet --num-events=1 --event=requested GPIO5 GPIO6 GPIO12 GPIO17

# 阻塞直到被释放。
$ gpionotify --quiet --num-events=1 --event=released GPIO6
libgpiod库的交叉编译
1. 安装交叉编译工具链:根据目标平台的架构和操作系统,下载并安装相应的交叉编译工具链。例如,对于ARM架构的Linux系统,您可以使用arm-linux-gnueabi工具链。
2. 下载libgpiod源代码:从libgpiod的官方仓库或官方网站下载最新的源代码压缩包。
3. 解压源代码:将下载的压缩包解压到您选择的目录中。
4. 进入源代码目录:使用终端进入解压后的libgpiod源代码目录。
5. 设置环境变量:根据您的交叉编译工具链,设置以下环境变量:
   #export CROSS_COMPILE=<交叉编译工具链前缀>
   export CROSS_COMPILE=/opt/okt507/buildroot/host/bin/aarch64-linux-gnu-
   export CC=${CROSS_COMPILE}gcc
   export CXX=${CROSS_COMPILE}g++
   export AR=${CROSS_COMPILE}ar
   export AS=${CROSS_COMPILE}as
   export LD=${CROSS_COMPILE}ld
   export RANLIB=${CROSS_COMPILE}ranlib
   export STRIP=${CROSS_COMPILE}strip
单个设置麻烦,可以保存脚本文件,例如 setenv.sh ,然后在终端中运行以下命令来设置环境变量并构建libgpiod库:
source setenv.sh这将加载脚本中的环境变量,并使其在当前终端会话中生效。然后,您可以继续执行构建步骤来编译和安装libgpiod库。
遇到错误
yang@ubuntu:~/okt507/gpiod/libgpiod-1.6.4$ ./autogen.sh --enable-tools=yes
./autogen.sh: 17: ./autogen.sh: autoreconf: not found

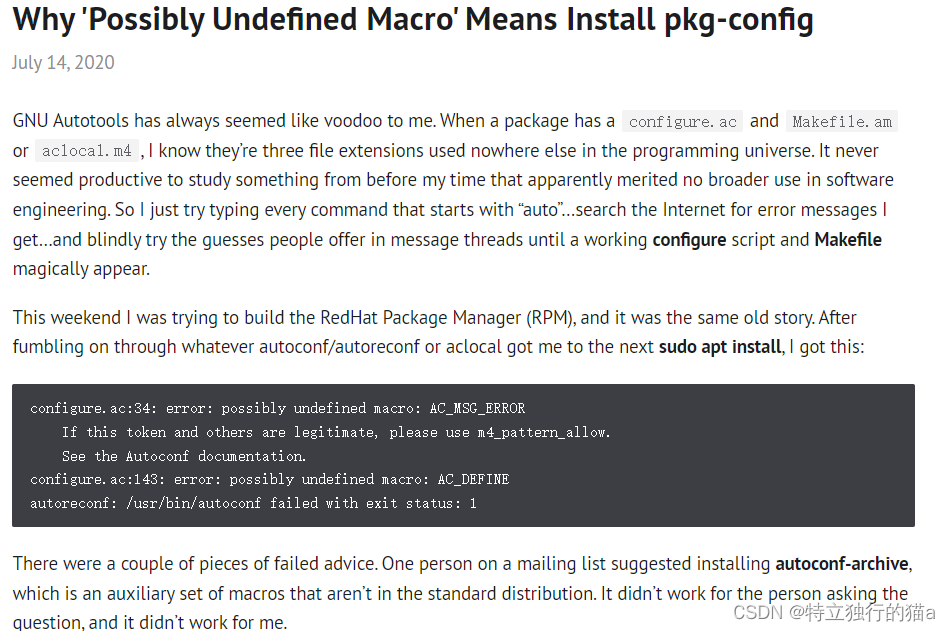
error: possibly undefined macro: AC_CHECK_HEADERS

configure.ac:190: the top level
configure.ac:91: error: possibly undefined macro: AC_CHECK_HEADERS
      If this token and others are legitimate, please use m4_pattern_allow.
      See the Autoconf documentation.
configure.ac:183: error: possibly undefined macro: AC_LANG_PUSH
configure.ac:185: error: possibly undefined macro: AC_LANG_POP
autoreconf: error: /usr/bin/autoconf failed with exit status: 1
需要安装依赖:
sudo apt-get install -y autoconf automake libtool
sudo apt-get install autoconf-archive
sudo apt-get install m4

sudo apt install pkg-config
其中最后一个 pkg-config一定不能忘了,很重要的依赖,否则容易报以下错误:
configure.ac:91: error: possibly undefined macro: AC_CHECK_HEADERS
      If this token and others are legitimate, please use m4_pattern_allow.
      See the Autoconf documentation.
具体原因,这里有解释:
Why 'Possibly Undefined Macro' Means Install pkg-config | AE1020: Lazy Notebook
最后,开始交叉编译:
#加载环境变量
source setenv.sh
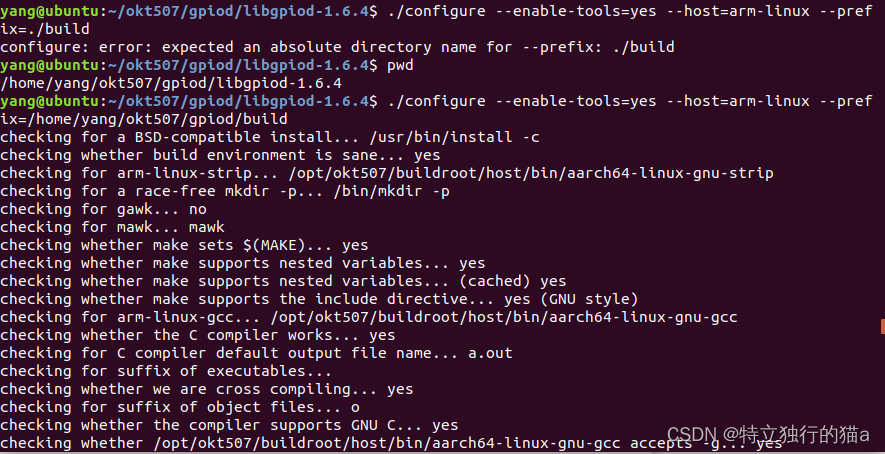
./autogen.sh --enable-tools=yes --host=arm-linux

#--prefix指定make install的安装目录
./configure --enable-tools=yes --host=arm-linux --prefix=/home/yang/okt507/gpiod/build
Ubuntu关闭后台更新解决重启时间过长问题
Ubuntu虚拟机重启发现用时过长,显示:A stop job is running for Unattended Upgrades Shutdown (10s / 30 min)
经过百度,发现是Ubuntu会自动更新,但这时间也太长了,于是果断禁用。
执行命令:
sudo dpkg-reconfigure unattended-upgrades
选择no并按ENTER以禁用无人参与的升级。
环境变量setenv.sh脚本
#!/bin/bash
 # 设置交叉编译工具链前缀
export CROSS_COMPILE=<交叉编译工具链前缀>
 # 设置交叉编译工具链
export CC=${CROSS_COMPILE}gcc
export CXX=${CROSS_COMPILE}g++
export AR=${CROSS_COMPILE}ar
export AS=${CROSS_COMPILE}as
export LD=${CROSS_COMPILE}ld
export RANLIB=${CROSS_COMPILE}ranlib
export STRIP=${CROSS_COMPILE}strip
 # 设置安装路径
#export INSTALL_PATH=<安装路径>
6. 配置构建:运行以下命令配置构建过程:
./autogen.sh --enable-tools=yes --prefix=<安装路径>将 <安装路径> 替换为您希望安装libgpiod的路径。
7. 运行构建:运行以下命令开始构建libgpiod库:
8. 安装库:运行以下命令将构建好的库安装到指定的安装路径:
c API使用
#include <gpiod.h>
#include <stdio.h>
#include <unistd.h>

#ifndef	CONSUMER
#define	CONSUMER	"Consumer"
#endif

int blend_led(struct gpiod_line *r, int r_val, struct gpiod_line *g, int g_val, struct gpiod_line *b, int b_val);

/**
* GPIO 16 <-> R
* GPIO 17 <-> B
* GPIO 18 <-> G
*/
int main(int argc, char **argv)
{
	char *chipname = "gpiochip0";
	unsigned int line_num_16 = 16;	// GPIO 16
	unsigned int line_num_17 = 17;	// GPIO 17
	unsigned int line_num_18 = 18;	// GPIO 18

	struct gpiod_chip *chip;
	struct gpiod_line *line16, *line17, *line18;
	int ret;

	chip = gpiod_chip_open_by_name(chipname);
	if (!chip) {
		printf("Open chip by name failed. name: %s\n", chipname);
		goto end;
	}

	line16 = gpiod_chip_get_line(chip, line_num_16);
	if (!line16) {
		printf("Get line failed. line_num: %u\n", line_num_16);
		goto close_chip;
	}

	line17 = gpiod_chip_get_line(chip, line_num_17);
	if (!line17) {
		printf("Get line failed. line_num: %u\n", line_num_17);
		goto release_line16;
	}

	line18 = gpiod_chip_get_line(chip, line_num_18);
	if (!line18) {
		printf("Get line failed. line_num: %u\n", line_num_18);
		goto release_line17;
	}

	ret = gpiod_line_request_output(line16, CONSUMER, 0);
	if (ret < 0) {
		printf("Request line16 as output failed\n");
		goto release_line18;
	}

	ret = gpiod_line_request_output(line17, CONSUMER, 0);
	if (ret < 0) {
		printf("Request line17 as output failed\n");
		goto release_line18;
	}

	ret = gpiod_line_request_output(line18, CONSUMER, 0);
	if (ret < 0) {
		printf("Request line18 as output failed\n");
		goto release_line18;
	}

	//R
	ret = blend_led(line16, 1, line17, 0, line18, 0);
	if (ret < 0) {
		printf("Set output failed.\n");
		goto release_line18;
	}

	sleep(1);
	//G
	ret = blend_led(line16, 0, line17, 0, line18, 1);
	if (ret < 0) {
		printf("Set output failed.\n");
		goto release_line18;
	}
	sleep(1);

	//B
	ret = blend_led(line16, 0, line17, 1, line18, 0);
	if (ret < 0) {
		printf("Set output failed.\n");
		goto release_line18;
	}
	sleep(1);

	//yellow
	ret = blend_led(line16, 1, line17, 0, line18, 1);
	if (ret < 0) {
		printf("Set output failed.\n");
		goto release_line18;
	}
	sleep(1);

	ret = blend_led(line16, 1, line17, 1, line18, 0);
	if (ret < 0) {
		printf("Set output failed.\n");
		goto release_line18;
	}
	sleep(1);

	ret = blend_led(line16, 0, line17, 1, line18, 1);
	if (ret < 0) {
		printf("Set output failed.\n");
		goto release_line18;
	}
	sleep(1);

	ret = blend_led(line16, 1, line17, 1, line18, 1);
	if (ret < 0) {
		printf("Set output failed.\n");
		goto release_line18;
	}

release_line18:
	gpiod_line_release(line18);
release_line17:
	gpiod_line_release(line17);
release_line16:
	gpiod_line_release(line16);
close_chip:
	gpiod_chip_close(chip);
end:
	return 0;
}

int blend_led(struct gpiod_line *r, int r_val, struct gpiod_line *g, int g_val, struct gpiod_line *b, int b_val){
	int ret = 0;
	ret = gpiod_line_set_value(r, r_val);
	if (ret < 0) {
		printf("Set r output failed. val: %u\n", r_val);
		return ret;
	}

	ret = gpiod_line_set_value(g, g_val);
	if (ret < 0) {
		printf("Set g output failed. val: %u\n", g_val);
		return ret;
	}

	ret = gpiod_line_set_value(b, b_val);
	if (ret < 0) {
		printf("Set b output failed. val: %u\n", b_val);
		return ret;
	}

	return 0;
}
其他资源
qlibgpiod/libgpiod.git - C library and tools for interacting with the linux GPIO character device
Libgpiod库的使用,点亮LED_猪突猛进进进的博客-CSDN博客
百度安全验证
autoreconf执行,出现undefined macro问题_linuxarmsummary的博客-CSDN博客
RaspberryPi 4B 使用 libgpiod 操作 gpio_树莓派4b引脚图_TYYJ-洪伟的博客-CSDN博客
Why 'Possibly Undefined Macro' Means Install pkg-config | AE1020: Lazy Notebook
