初接触vue的时候觉得vue好难,因为项目中要用到,就硬着头皮上,慢慢的发现也不难,无外乎画个布局,然后通过样式调整界面。在通过属性和方法跟js交互。js就和我们写的java代码差不多了,复杂一点的就是引用这种那种库,然后就能做出来一个界面了。如果你的项目就是和服务器交互,感觉用vue来做确实也蛮合适的。
在上手之前,我先说下我们要实现的场景。我们需要做一个注册登陆的功能,相关字段只有用户名密码昵称,注册之后就能登陆,相关的后端逻辑,我会在另外一篇文章提到,这里只需要关心前端逻辑,我们需要实现的功能有:
- 注册页面
- 登陆页面
- 注册后保存用户名密码到本地
- 登陆页面取本地用户名密码填充
- 点击按钮登录并根据返回跳转
- 国际化
Get Start
使用HbuildX创建一个Vue2的项目,什么模板都不选,就最基础的那种。创建完之后,参考一下我的目录结果,吧缺失的文件补一下:
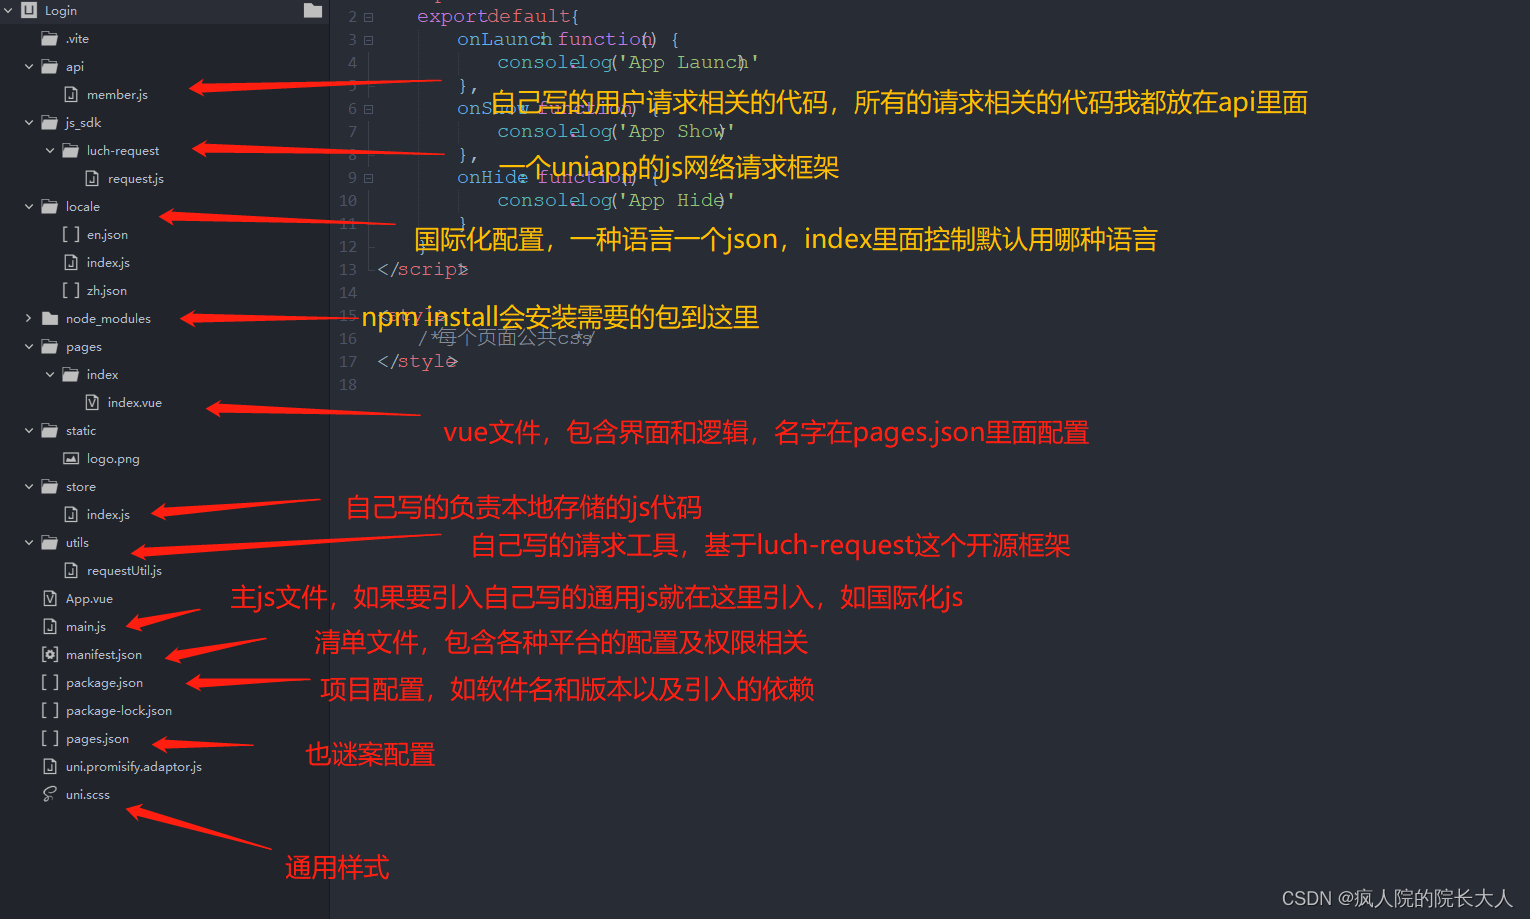
本来要新创建一个vue页面的,我为了省事直接修改了index.vue,在里面添加了登陆界面,注册界面通过登陆界面的注册按钮打开。
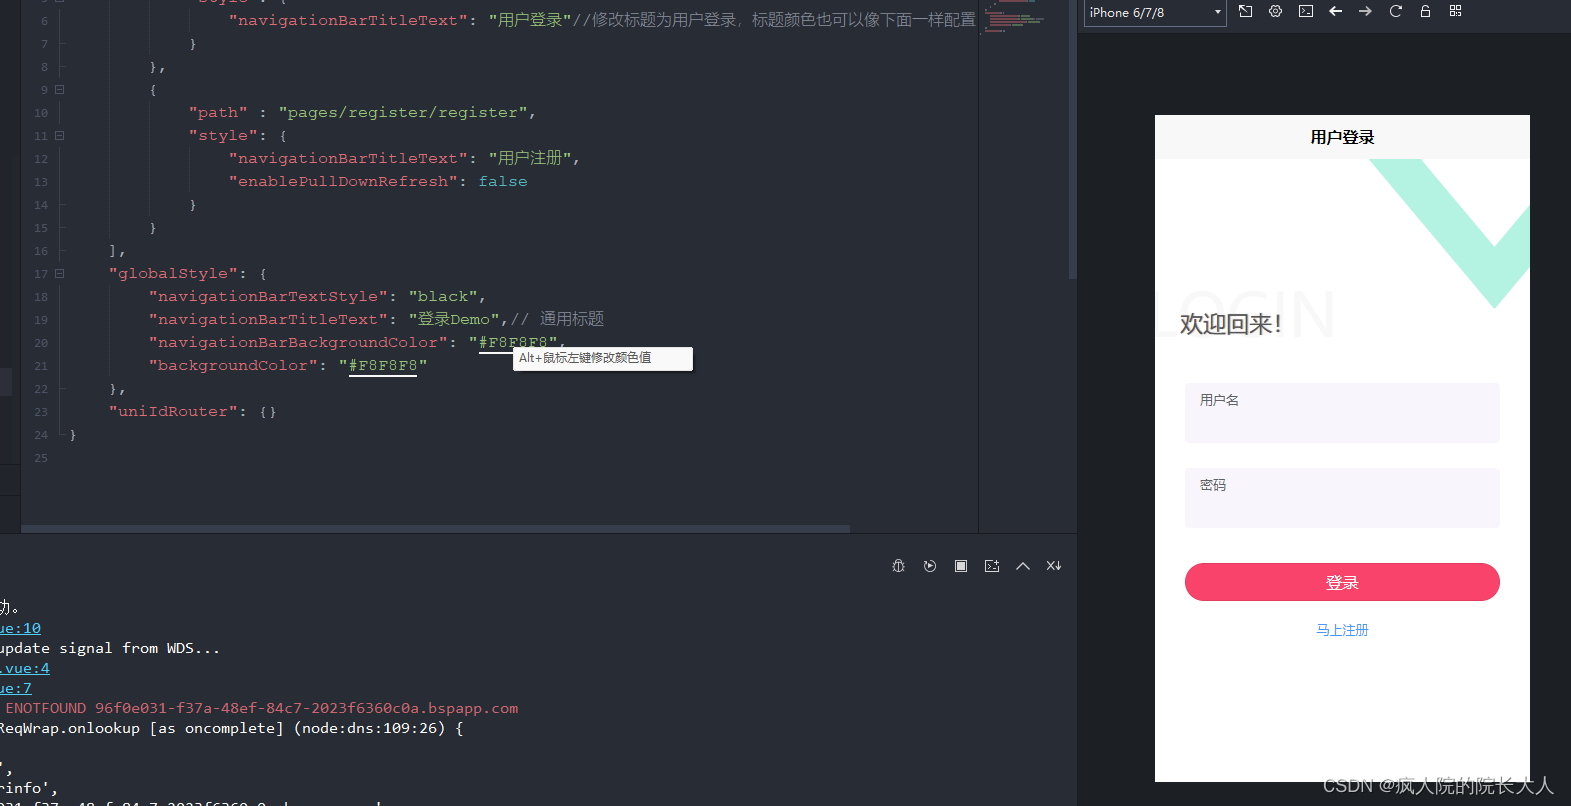
我们先在pages.json把页面名自定义一下,默认是uni-app,我们改成用户登录。同时我添加了用户注册的页面,并在对应的位置创建了Vue文件。
{
	"pages": [ //pages数组中第一项表示应用启动页,参考:https://uniapp.dcloud.io/collocation/pages
		{
			"path": "pages/index/index",
			"style": {
				"navigationBarTitleText": "用户登录"//修改标题为用户登录,标题颜色也可以像下面一样配置
			}
		},
		{
			"path": "pages/register/register",
			"style": {
				"navigationBarTitleText": "用户注册"
			}
		}
	],
	"globalStyle": {
		"navigationBarTextStyle": "black",
		"navigationBarTitleText": "登录Demo",// 通用标题
		"navigationBarBackgroundColor": "#F8F8F8",
		"backgroundColor": "#F8F8F8"
	},
	"uniIdRouter": {}
}
引入网络请求库luch-request。这个类比较长这里就不贴出来了,大家可以去这里下载:
也可以按照她开发者文档上说的去配置,我是下过来使用的。我们来实现登陆界面:
<template>
	<view class="container">
		<view class="left-bottom-sign"></view>
		<view class="back-btn yticon icon-zuojiantou-up" @click="navBack"></view>
		<view class="right-top-sign"></view>
		<!-- 设置白色背景防止软键盘把下部绝对定位元素顶上来盖住输入框等 -->
		<view class="wrapper">
			<view class="left-top-sign">{{$t('vue.public.login')}}</view>
			<view class="welcome">
				{{$t('vue.public.welcomeback')}}
			</view>
			<view class="input-content">
				<view class="input-item">
					<text class="tit">{{$t('vue.public.username')}}</text>
					<input type="text" v-model="username"  maxlength="11"/>
				</view>
				<view class="input-item">
					<text class="tit">{{$t('vue.public.pwd')}}</text>
					<input type="text" v-model="password"  placeholder-class="input-empty" maxlength="20"
					 password @confirm="toLogin" />
				</view>
			</view>
			<button class="confirm-btn" @click="toLogin" :disabled="logining">{{$t('vue.public.tologin')}}</button>
			<view class="forget-section" @click="toRegist">
				{{$t('vue.public.forgetpwd')}}
			</view>
		</view>
		<view class="register-section">
			{{$t('vue.public.notaccount')}}
			<text @click="toRegist">{{$t('vue.public.registernow')}}</text>
		</view>
	</view>
</template>

<script>
	import {
		mapMutations
	} from 'vuex';
	import {
		memberLogin,memberInfo
	} from '@/api/member.js';
	export default {
		data() {
			return {
				username: '',
				password: '',
				logining: false
			}
		},
		onLoad() {
			this.username = uni.getStorageSync('username') || '';
			this.password = uni.getStorageSync('password') || '';
		},
		methods: {
			...mapMutations(['login']),
			navBack() {
				uni.navigateBack();
			},
			toRegist() {
				uni.navigateTo({url:'/pages/public/register'});
			},
			async toLogin() {
				this.logining = true;
				memberLogin({
					username: this.username,
					password: this.password
				}).then(response => {
					let token = response.data.tokenHead+response.data.token;
					uni.setStorageSync('token',token);
					uni.setStorageSync('username',this.username);
					uni.setStorageSync('password',this.password);
					memberInfo().then(response=>{
						this.login(response.data);
						uni.navigateTo({url:'/pages/user/user'});
					});
				}).catch(() => {
					this.logining = false;
				});
			},
		},

	}
</script>

<style lang='scss'>
	page {
		background: #fff;
	}

	.container {
		padding-top: 115px;
		position: relative;
		width: 100vw;
		height: 100vh;
		overflow: hidden;
		background: #fff;
	}

	.wrapper {
		position: relative;
		z-index: 90;
		background: #fff;
		padding-bottom: 40upx;
	}

	.back-btn {
		position: absolute;
		left: 40upx;
		z-index: 9999;
		padding-top: var(--status-bar-height);
		top: 40upx;
		font-size: 40upx;
		color: $font-color-dark;
	}

	.left-top-sign {
		font-size: 120upx;
		color: $page-color-base;
		position: relative;
		left: -16upx;
	}

	.right-top-sign {
		position: absolute;
		top: 80upx;
		right: -30upx;
		z-index: 95;

		&:before,
		&:after {
			display: block;
			content: "";
			width: 400upx;
			height: 80upx;
			background: #b4f3e2;
		}

		&:before {
			transform: rotate(50deg);
			border-radius: 0 50px 0 0;
		}

		&:after {
			position: absolute;
			right: -198upx;
			top: 0;
			transform: rotate(-50deg);
			border-radius: 50px 0 0 0;
			/* background: pink; */
		}
	}

	.left-bottom-sign {
		position: absolute;
		left: -270upx;
		bottom: -320upx;
		border: 100upx solid #d0d1fd;
		border-radius: 50%;
		padding: 180upx;
	}

	.welcome {
		position: relative;
		left: 50upx;
		top: -90upx;
		font-size: 46upx;
		color: #555;
		text-shadow: 1px 0px 1px rgba(0, 0, 0, .3);
	}

	.input-content {
		padding: 0 60upx;
	}

	.input-item {
		display: flex;
		flex-direction: column;
		align-items: flex-start;
		justify-content: center;
		padding: 0 30upx;
		background: $page-color-light;
		height: 120upx;
		border-radius: 4px;
		margin-bottom: 50upx;

		&:last-child {
			margin-bottom: 0;
		}

		.tit {
			height: 50upx;
			line-height: 56upx;
			font-size: $font-sm+2upx;
			color: $font-color-base;
		}

		input {
			height: 60upx;
			font-size: $font-base + 2upx;
			color: $font-color-dark;
			width: 100%;
		}
	}

	.confirm-btn {
		width: 630upx;
		height: 76upx;
		line-height: 76upx;
		border-radius: 50px;
		margin-top: 70upx;
		background: $uni-color-primary;
		color: #fff;
		font-size: $font-lg;

		&:after {
			border-radius: 100px;
		}
	}

	.confirm-btn2 {
		width: 630upx;
		height: 76upx;
		line-height: 76upx;
		border-radius: 50px;
		margin-top: 40upx;
		background: $uni-color-primary;
		color: #fff;
		font-size: $font-lg;

		&:after {
			border-radius: 100px;
		}
	}

	.forget-section {
		font-size: $font-sm+2upx;
		color: $font-color-spec;
		text-align: center;
		margin-top: 40upx;
	}

	.register-section {
		position: absolute;
		left: 0;
		bottom: 50upx;
		width: 100%;
		font-size: $font-sm+2upx;
		color: $font-color-base;
		text-align: center;

		text {
			color: $font-color-spec;
			margin-left: 10upx;
		}
	}
</style>
接着我们在主js中引入我们添加的依赖,以便于全局生效。
main.js:
import Vue from 'vue'
import store from './store'
import App from './App'
import i18n from './locale'

const msg = (title, duration=1500, mask=false, icon='none')=>{
	//统一提示方便全局修改
	if(Boolean(title) === false){
		return;
	}
	uni.showToast({
		title,
		duration,
		mask,
		icon
	});
}

const prePage = ()=>{
	let pages = getCurrentPages();
	let prePage = pages[pages.length - 2];
	// #ifdef H5
	return prePage;
	// #endif
	return prePage.$vm;
}

Vue.config.productionTip = false
Vue.prototype.$fire = new Vue();
Vue.prototype.$store = store;
Vue.prototype.$api = {msg, prePage};

App.mpType = 'app'

const app = new Vue({
	i18n,
    ...App
})
app.$mount()
我们可以看到main.js引入了vuw的脚本,本地化的脚本(store/index.js)以及国际化脚本(locale/index.js)。Vue的脚本这里你可以要可以不要,我就写了一个界面的日志跟踪:
<script>
	export default {
		onLaunch: function() {
			console.log('App Launch')
		},
		onShow: function() {
			console.log('App Show')
		},
		onHide: function() {
			console.log('App Hide')
		}
	}
</script>

<style>
	/*每个页面公共css */
</style>
然后再store这里,通过mutations定义了两个常量方法,一个是登录,一个是登出,这两个方法通过调用vue的store管理方法来存储登陆状态和登录信息。mutations表示常量,类似java中的static。
import Vue from 'vue'
import Vuex from 'vuex'

Vue.use(Vuex)

const store = new Vuex.Store({
	state: {
		hasLogin: false,
		userInfo: {},
	},
	mutations: {
		login(state, provider) {

			state.hasLogin = true;
			state.userInfo = provider;
			uni.setStorage({//缓存用户登陆状态
			    key: 'userInfo',
			    data: provider
			})
			console.log(state.userInfo);
		},
		logout(state) {
			state.hasLogin = false;
			state.userInfo = {};
			uni.removeStorage({
                key: 'userInfo'
            });
			uni.removeStorage({
			    key: 'token'
			})
		}
	},
	actions: {

	}
})

export default store
然后我们把locale的内容也补充一下,因为再login.vue中引用到了国际化的字符串。当然了我们也可以再page中也进行国际化。vue官方支持国家话方案,可以参考这里。
locale/index.js:
import Vue from "vue";
import VueI18n from 'vue-i18n'
import en from './en.json'
import zh from './zh.json'
Vue.use(VueI18n);   // 全局注册国际化包

// 准备翻译的语言环境信息
const i18n = new VueI18n({
	locale: "zn",   // 初始化中文
	messages: {
		"zn":zh,
		"en":en
	}
});
export default i18n
国际化的文案分别放在各个国家的json中,比如zh.json:
{
	"vue.public.login": "LOGIN",
	"vue.public.welcomeback": "欢迎回来!",
	"vue.public.welcomeregister": "欢迎注册!",
	"vue.public.username": "用户名",
	"vue.public.nickname": "昵称",
	"vue.public.inputusername": "请输入用户名",
	"vue.public.inputnickname": "请输入昵称",
	"vue.public.pwd": "密码",
	"vue.public.inputpwdhint": "8-18位不含特殊字符的数字、字母组合",
	"vue.public.tologin": "登录",
	"vue.public.alreadyRegister": "已有账号?",
	"vue.public.loginnow": "前往登录",
	"vue.public.toregister": "注册",
	"vue.public.testlogin": "获取体验账号",
	"vue.public.forgetpwd": "忘记密码?",
	"vue.public.notaccount": "还没有账号?",
	"vue.public.registernow": "马上注册"
}
英文的国家化和其他的国际化都是使用上述json格式,只不过冒号后面的值不一样而已。到这里界面已经写好了,虽然还不能做网络请求,至少我们可以看看效果了。再看效果之前,我们需要再项目的根目录打开终端,输入npm install ,也可以加上-t查看安装进度。然后可以使用npm run dev或者使用HbuildX提供的运行按钮来运行到内置浏览器或Chrome:
注册界面也写一下:
<template>
	<view class="container">
		<view class="left-bottom-sign"></view>
		<view class="back-btn yticon icon-zuojiantou-up" @click="navBack"></view>
		<view class="right-top-sign"></view>
		<!-- 设置白色背景防止软键盘把下部绝对定位元素顶上来盖住输入框等 -->
		<view class="wrapper">
			<view class="left-top-sign">{{$t('vue.public.login')}}</view>
			<view class="welcome">
				{{$t('vue.public.welcomeregister')}}
			</view>
			<view class="input-content">
				<view class="input-item">
					<text class="tit">{{$t('vue.public.username')}}</text>
					<input type="text" v-model="username" :placeholder="$t('vue.public.inputusername')" maxlength="11"/>
				</view>
				<view class="input-item">
					<text class="tit">{{$t('vue.public.nickname')}}</text>
					<input type="text" v-model="nickname" :placeholder="$t('vue.public.inputnickname')" maxlength="11"/>
				</view>
				<view class="input-item">
					<text class="tit">{{$t('vue.public.pwd')}}</text>
					<input type="text" v-model="password" :placeholder="$t('vue.public.inputpwdhint')" placeholder-class="input-empty" maxlength="20"
					 password />
				</view>
			</view>
			<button class="confirm-btn" @click="toRegister" >{{$t('vue.public.toregister')}}</button>

		</view>
		<view class="register-section">
			{{$t('vue.public.alreadyRegister')}}
			<text @click="toLogin">{{$t('vue.public.loginnow')}}</text>
		</view>
	</view>
</template>

<script>
	import {
		mapMutations
	} from 'vuex';
	import {
		memberLogin,memberInfo, memberRegister
	} from '@/api/member.js';
	export default {
		data() {
			return {
				username: '',
				nickname: '',
				password: '',
			}
		},
		methods: {
			...mapMutations(['login']),
			navBack() {
				uni.navigateBack();
			},
			toLogin() {
				uni.navigateTo({url:'/pages/public/login'});
			},
			async toRegister() {
				memberRegister({
					username: this.username,
					nickname: this.nickname,
					password: this.password
				}).then(response => {
					//this.toLogin();
					console.log(response);
					if(response.code == 200){
						uni.showToast({
							title:'Register Success.',
							duration:1500
						});
						setTimeout(this.toLogin, 2000);
					}
				}).catch(() => {

				});
			},
		},

	}
</script>

<style lang='scss'>
	page {
		background: #fff;
	}

	.container {
		padding-top: 115px;
		position: relative;
		width: 100vw;
		height: 100vh;
		overflow: hidden;
		background: #fff;
	}

	.wrapper {
		position: relative;
		z-index: 90;
		background: #fff;
		padding-bottom: 40upx;
	}

	.back-btn {
		position: absolute;
		left: 40upx;
		z-index: 9999;
		padding-top: var(--status-bar-height);
		top: 40upx;
		font-size: 40upx;
		color: $font-color-dark;
	}

	.left-top-sign {
		font-size: 120upx;
		color: $page-color-base;
		position: relative;
		left: -16upx;
	}

	.right-top-sign {
		position: absolute;
		top: 80upx;
		right: -30upx;
		z-index: 95;

		&:before,
		&:after {
			display: block;
			content: "";
			width: 400upx;
			height: 80upx;
			background: #b4f3e2;
		}

		&:before {
			transform: rotate(50deg);
			border-radius: 0 50px 0 0;
		}

		&:after {
			position: absolute;
			right: -198upx;
			top: 0;
			transform: rotate(-50deg);
			border-radius: 50px 0 0 0;
			/* background: pink; */
		}
	}

	.left-bottom-sign {
		position: absolute;
		left: -270upx;
		bottom: -320upx;
		border: 100upx solid #d0d1fd;
		border-radius: 50%;
		padding: 180upx;
	}

	.welcome {
		position: relative;
		left: 50upx;
		top: -90upx;
		font-size: 46upx;
		color: #555;
		text-shadow: 1px 0px 1px rgba(0, 0, 0, .3);
	}

	.input-content {
		padding: 0 60upx;
	}

	.input-item {
		display: flex;
		flex-direction: column;
		align-items: flex-start;
		justify-content: center;
		padding: 0 30upx;
		background: $page-color-light;
		height: 120upx;
		border-radius: 4px;
		margin-bottom: 50upx;

		&:last-child {
			margin-bottom: 0;
		}

		.tit {
			height: 50upx;
			line-height: 56upx;
			font-size: $font-sm+2upx;
			color: $font-color-base;
		}

		input {
			height: 60upx;
			font-size: $font-base + 2upx;
			color: $font-color-dark;
			width: 100%;
		}
	}

	.confirm-btn {
		width: 630upx;
		height: 76upx;
		line-height: 76upx;
		border-radius: 50px;
		margin-top: 70upx;
		background: $uni-color-primary;
		color: #fff;
		font-size: $font-lg;

		&:after {
			border-radius: 100px;
		}
	}

	.confirm-btn2 {
		width: 630upx;
		height: 76upx;
		line-height: 76upx;
		border-radius: 50px;
		margin-top: 40upx;
		background: $uni-color-primary;
		color: #fff;
		font-size: $font-lg;

		&:after {
			border-radius: 100px;
		}
	}

	.forget-section {
		font-size: $font-sm+2upx;
		color: $font-color-spec;
		text-align: center;
		margin-top: 40upx;
	}

	.register-section {
		position: absolute;
		left: 0;
		bottom: 50upx;
		width: 100%;
		font-size: $font-sm+2upx;
		color: $font-color-base;
		text-align: center;

		text {
			color: $font-color-spec;
			margin-left: 10upx;
		}
	}
</style>
登陆页面和注册页面写好了,我们要来实现网络请求,在请求之前先做一个配置,主要是服务器和拦截器的设置,拦截器有利于我们跟踪代码运行,requestUtil.js:
import Request from '@/js_sdk/luch-request/request.js'
import i18n from "../locale";

const http = new Request()

http.setConfig((config) => { /* 设置全局配置 */
	config.baseUrl = 'http://127.0.0.1:8902' /* 根域名不同 */
	config.header = {
		...config.header
	}
	return config
})

/**
 * 自定义验证器,如果返回true 则进入响应拦截器的响应成功函数(resolve),否则进入响应拦截器的响应错误函数(reject)
 * @param { Number } statusCode - 请求响应体statusCode(只读)
 * @return { Boolean } 如果为true,则 resolve, 否则 reject
 */
http.validateStatus = (statusCode) => {
	return statusCode === 200
}

http.interceptor.request((config, cancel) => { /* 请求之前拦截器 */
	const token = uni.getStorageSync('token');
	if(token){
		config.header = {
			'Authorization':token,
			...config.header
		}
	}else{
		config.header = {
			...config.header
		}
	}
	/*
	if (!token) { // 如果token不存在,调用cancel 会取消本次请求,但是该函数的catch() 仍会执行
	  cancel('token 不存在') // 接收一个参数,会传给catch((err) => {}) err.errMsg === 'token 不存在'
	}
	*/
	return config
})

http.interceptor.response((response) => { /* 请求之后拦截器 */
	const res = response.data;
	if (res.code !== 200) {
		//提示错误信息
		uni.showToast({
			title:res.message,
			duration:1500
		})
		//401未登录处理
		if (res.code === 401) {
			uni.showModal({
				title: i18n.t('vue.request.permit'),  //'提示'
				content:i18n.t('vue.request.permithint'),  //'你已被登出,可以取消继续留在该页面,或者重新登录',
				confirmText:i18n.t('vue.request.relogin'),  //'重新登录',
				cancelText:i18n.t('vue.request.cancel'),  //'取消',
				success: function(res) {
					if (res.confirm) {
						uni.navigateTo({
							url: '/pages/public/login'
						})
					} else if (res.cancel) {
						console.log('用户点击取消');
					}
				}
			});
		}
		return Promise.reject(response);
	} else {
		return response.data;
	}
}, (response) => {
	//提示错误信息
	console.log('response error', JSON.stringify(response));
	uni.showToast({
		title:response.errMsg,
		duration:1500
	})
	return Promise.reject(response);
})

export function request (options = {}) {
	return http.request(options);
}

export default request
上面的vue页面,我们再注册调用了注册方法memberRegister,再登录调用了memberLogin登陆方法。我们把这个功能实现下(api/member.js):
import request from '@/utils/requestUtil'

export function memberLogin(data) {
	return request({
		method: 'POST',
		url: '/sso/login',
		header: {
			'content-type': 'application/x-www-form-urlencoded;charset=utf-8'
		},
		data: data
	})
}

export function memberRegister(data) {
	return request({
		method: 'POST',
		url: '/sso/register',
		header: {
			'content-type': 'application/x-www-form-urlencoded;charset=utf-8'
		},
		data: data
	})
}

export function memberInfo() {
	return request({
		method: 'GET',
		url: '/sso/info'
	})
}
到这里我们前端页面的注册登陆就写好了,你可以配合服务端来测试。