瓶子或者柱面在做字符识别的时候由于变形,识别效果是很不好的
或者是检测瓶子表面缺陷的时候效果也没有展平的好
下面介绍两个项目,关于曲面(弧面、柱面)展平(拉直)
项目一:通过识别曲面的6个点展开
 图1
图1
如 图1所示,通过A、B、C、D、E、F六个点,对柱面展成平面,对应公式可参考下图(图2)
用这个项目的前提是,需要找到这6个点,和通过机器视觉的算法或者是深度学习的算法来实现。
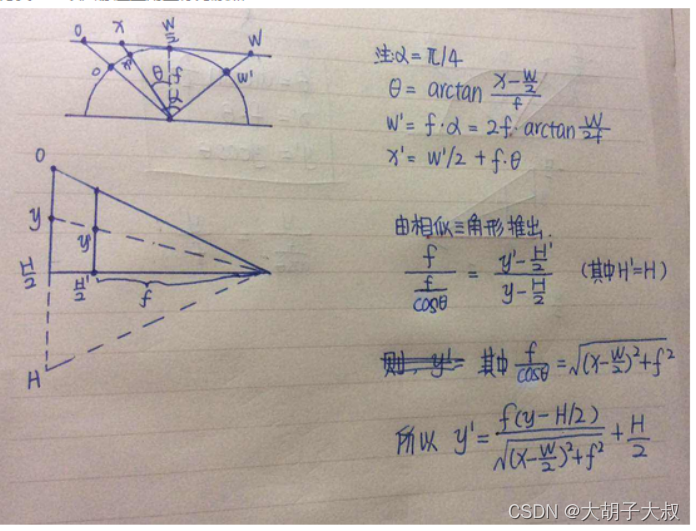
图2
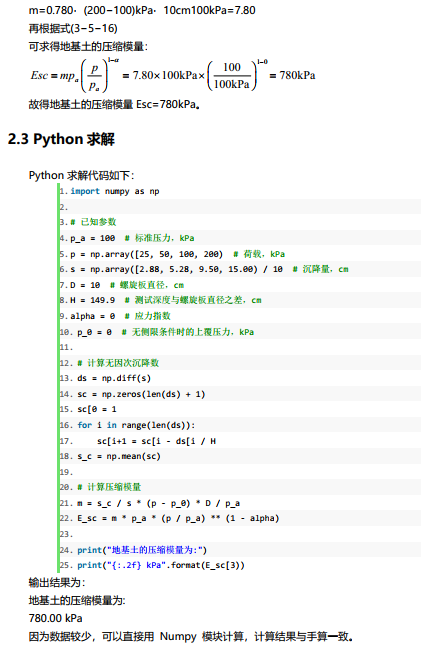
1、 项目一代码
import cv2
import numpy as np


BLACK_COLOR = (0, 0, 0)
WHITE_COLOR = (255, 255, 255)
YELLOW_COLOR = (0, 255, 255)
RED_COLOR = (0, 0, 255)


class Line(object):
    def __init__(self, point1, point2):
        """
        For line formula y(x) = k * x + b, calc k and b params
        If the line is vertical, set "vertical" attr to True and save "x" position of the line
        """
        self.point1 = point1
        self.point2 = point2
        self.vertical = False
        self.fixed_x = None
        self.k = None
        self.b = None

        # cached angle props
        self.angle = None
        self.angle_cos = None
        self.angle_sin = None

        self.set_line_props(point1, point2)

    def is_vertical(self):
        return self.vertical

    def set_line_props(self, point1, point2):
        if point2[0] - point1[0]:
            self.k = float(point2[1] - point1[1]) / (point2[0] - point1[0])
            self.b = point2[1] - self.k * point2[0]

            k_normal = - 1 / self.k
        else:
            self.vertical = True
            self.fixed_x = point2[0]

            k_normal = 0

        self.angle = np.arctan(k_normal)
        self.angle_cos = np.cos(self.angle)
        self.angle_sin = np.sin(self.angle)

    def get_x(self, y):
        if self.is_vertical():
            return self.fixed_x
        else:
            return int(round(float(y - self.b) / self.k))

    def get_y(self, x):
        return self.k * x + self.b


class LabelUnwrapper(object):
    COL_COUNT = 30
    ROW_COUNT = 20

    def __init__(self, src_image=None, pixel_points=None, percent_points=None):
        """
        Point lists are lists of 6 points - [A, B, C, D, E, F]

        :param pixel_points: List[Tuple] Points, whose coordinates specified as pixels
        :param percent_points: List[Tuple] Points, whose coordinates specified as fraction of image width/height

        In both cases points represent figure below:

        |        |                  |        |
        |    B   |                  A        C
        | /    \ |                  | \    / |
        A        C                  |   B    |
        |        |                  |        |
        |        |       OR         |        |
        |        |                  |        |
        F        D                  F        D
        | \    / |                  | \    / |
        |   E    |                  |   E    |
        |        |                  |        |

        So, A-B-C-D-E-F-A polygon represent raw wine label on bottle

        """
        self.src_image = src_image
        self.width = self.src_image.shape[1]
        self.height = src_image.shape[0]

        self.dst_image = None
        self.points = pixel_points
        self.percent_points = percent_points

        self.point_a = None  # top left
        self.point_b = None  # top center
        self.point_c = None  # top right
        self.point_d = None  # bottom right
        self.point_e = None  # bottom center
        self.point_f = None  # bottom left

        self.center_line = None
        self.load_points()

    def load_points(self):
        if self.points is None:
            points = []
            for point in self.percent_points:
                x = int(point[0] * self.width)
                y = int(point[1] * self.height)
                points.append((x, y))

            self.points = points

        self.points = np.array(self.points)
        (self.point_a, self.point_b, self.point_c,
         self.point_d, self.point_e, self.point_f) = self.points

        center_top = (self.point_a + self.point_c) / 2
        center_bottom = (self.point_d + self.point_f) / 2

        self.center_line = Line(center_bottom, center_top)
        if not len(self.points) == 6:
            raise ValueError("Points should be an array of 6 elements")

    def unwrap(self, interpolate=False):
        source_map = self.calc_source_map()
        if interpolate:
            self.unwrap_label_interpolation(source_map)
        else:
            self.unwrap_label_perspective(source_map)
        return self.dst_image

    def calc_dest_map(self):
        width, height = self.get_label_size()

        dx = float(width) / (self.COL_COUNT - 1)
        dy = float(height) / (self.ROW_COUNT - 1)

        rows = []
        for row_index in range(self.ROW_COUNT):
            row = []
            for col_index in range(self.COL_COUNT):
                row.append([int(dx * col_index),
                            int(dy * row_index)])

            rows.append(row)
        return np.array(rows)

    def unwrap_label_interpolation(self, source_map):
        """
        Unwrap label using interpolation - more accurate method in terms of quality
        """
        from scipy.interpolate import griddata

        width, height = self.get_label_size()

        dest_map = self.calc_dest_map()

        grid_x, grid_y = np.mgrid[0:width - 1:width * 1j, 0:height - 1:height * 1j]

        destination = dest_map.reshape(dest_map.size // 2, 2)
        source = source_map.reshape(source_map.size // 2, 2)

        grid_z = griddata(destination, source, (grid_x, grid_y), method='cubic')
        map_x = np.append([], [ar[:, 0] for ar in grid_z]).reshape(width, height)
        map_y = np.append([], [ar[:, 1] for ar in grid_z]).reshape(width, height)
        map_x_32 = map_x.astype('float32')
        map_y_32 = map_y.astype('float32')
        warped = cv2.remap(self.src_image, map_x_32, map_y_32, cv2.INTER_CUBIC)
        self.dst_image = cv2.transpose(warped)

    def unwrap_label_perspective(self, source_map):
        """
        Unwrap label using transform, unlike unwrap_label_interpolation doesn't require scipy
        """
        width, height = self.get_label_size()
        self.dst_image = np.zeros((height, width, 3), np.uint8)

        dx = float(width) / (self.COL_COUNT - 1)
        dy = float(height) / (self.ROW_COUNT - 1)

        dx_int = int(np.ceil(dx))
        dy_int = int(np.ceil(dy))

        for row_index in range(self.ROW_COUNT - 1):
            for col_index in range(self.COL_COUNT - 1):
                src_cell = (source_map[row_index][col_index],
                            source_map[row_index][col_index + 1],
                            source_map[row_index + 1][col_index],
                            source_map[row_index + 1][col_index + 1])

                dst_cell = np.int32([[0, 0], [dx, 0], [0, dy], [dx, dy]])

                M = cv2.getPerspectiveTransform(np.float32(src_cell), np.float32(dst_cell))
                dst = cv2.warpPerspective(self.src_image, M, (dx_int, dy_int))
                x_offset = int(dx * col_index)
                y_offset = int(dy * row_index)

                self.dst_image[y_offset:y_offset + dy_int,
                               x_offset:x_offset + dx_int] = dst

    def get_roi_rect(self, points):
        max_x = min_x = points[0][0]
        max_y = min_y = points[0][1]
        for point in points:
            x, y = point
            if x > max_x:
                max_x = x
            if x < min_x:
                min_x = x
            if y > max_y:
                max_y = y
            if y < min_y:
                min_y = y

        return np.array([
            [min_x, min_y],
            [max_x, min_y],
            [max_x, max_y],
            [min_x, max_y]
        ])

    def get_roi(self, image, points):
        rect = self.get_roi_rect(points)
        return image[np.floor(rect[0][1]):np.ceil(rect[2][1]),
                     np.floor(rect[0][0]):np.ceil(rect[1][0])]

    def calc_source_map(self):
        top_points = self.calc_ellipse_points(self.point_a, self.point_b, self.point_c,
                                              self.COL_COUNT)
        bottom_points = self.calc_ellipse_points(self.point_f, self.point_e, self.point_d,
                                                 self.COL_COUNT)

        rows = []
        for row_index in range(self.ROW_COUNT):
            row = []
            for col_index in range(self.COL_COUNT):
                top_point = top_points[col_index]
                bottom_point = bottom_points[col_index]

                delta = (top_point - bottom_point) / float(self.ROW_COUNT - 1)

                point = top_point - delta * row_index
                row.append(point)
            rows.append(row)
        return np.array(rows)

    def draw_mesh(self, color=RED_COLOR, thickness=1):
        mesh = self.calc_source_map()
        for row in mesh:
            for x, y in row:
                point = (int(round(x)), int(round(y)))
                cv2.line(self.src_image, point, point, color=color, thickness=thickness)

    def draw_poly_mask(self, color=WHITE_COLOR):
        cv2.polylines(self.src_image, np.int32([self.points]), 1, color)

    def draw_mask(self, color=WHITE_COLOR, thickness=1, img=None):
        """
        Draw mask, if image not specified - draw to source image
        """
        if img is None:
            img = self.src_image

        cv2.line(img, tuple(self.point_f.tolist()), tuple(self.point_a.tolist()), color, thickness)
        cv2.line(img, tuple(self.point_c.tolist()), tuple(self.point_d.tolist()), color, thickness)

        self.draw_ellipse(img, self.point_a, self.point_b, self.point_c, color, thickness)
        self.draw_ellipse(img, self.point_d, self.point_e, self.point_f, color, thickness)

    def get_label_contour(self, color=WHITE_COLOR, thickness=1):
        mask = np.zeros(self.src_image.shape)
        self.draw_mask(color, thickness, mask)
        return mask

    def get_label_mask(self):
        """
        Generate mask of the label, fully covering it
        """
        mask = np.zeros(self.src_image.shape)
        pts = np.array([[self.point_a, self.point_c, self.point_d, self.point_f]])
        cv2.fillPoly(mask, pts, WHITE_COLOR)
        self.draw_filled_ellipse(mask, self.point_a, self.point_b, self.point_c, True)
        self.draw_filled_ellipse(mask, self.point_f, self.point_e, self.point_d, False)
        return mask

    def draw_ellipse(self, img, left, top, right, color=WHITE_COLOR, thickness=1):
        """
        Draw ellipse using opencv function
        """
        is_arc, center_point, axis, angle = self.get_ellipse_params(left, top, right)

        if is_arc:
            start_angle, end_angle = 0, 180
        else:
            start_angle, end_angle = 180, 360

        cv2.ellipse(img, center_point, axis, angle, start_angle, end_angle, color, thickness)

    def draw_filled_ellipse(self, img, left, top, right, is_top=False):
        is_arc, center_point, axis, angle = self.get_ellipse_params(left, top, right)

        if is_arc ^ is_top:
            color = WHITE_COLOR
        else:
            color = BLACK_COLOR

        cv2.ellipse(img, center_point, axis, angle, 0, 360, color=color, thickness=-1)

    def get_ellipse_params(self, left, top, right):
        center = (left + right) / 2
        center_point = tuple(map(lambda x: int(np.round(x)), center.tolist()))

        axis = (int(np.linalg.norm(left - right) / 2), int(np.linalg.norm(center - top)))

        x, y = left - right
        angle = np.arctan(float(y) / x) * 57.296

        is_arc = False
        if (top - center)[1] > 0:
            is_arc = True

        return is_arc, center_point, axis, angle

    def calc_ellipse_points(self, left, top, right, points_count):
        center = (left + right) / 2

        # get ellipse axis
        a = np.linalg.norm(left - right) / 2
        b = np.linalg.norm(center - top)

        # get start and end angles
        if (top - center)[1] > 0:
            delta = np.pi / (points_count - 1)

        else:
            delta = - np.pi / (points_count - 1)

        cos_rot = (right - center)[0] / a
        sin_rot = (right - center)[1] / a

        points = []
        for i in range(points_count):
            phi = i * delta
            dx, dy = self.get_ellipse_point(a, b, phi)

            x = round(center[0] + dx * cos_rot - dy * sin_rot)
            y = round(center[1] + dx * sin_rot + dy * cos_rot)

            points.append([x, y])

        points.reverse()
        return np.array(points)

    def get_ellipse_point(self, a, b, phi):
        """
        Get ellipse radius in polar coordinates
        """
        return a * np.cos(phi), b * np.sin(phi)

    def get_label_size(self):
        top_left = self.point_a
        top_right = self.point_c
        bottom_right = self.point_d
        bottom_left = self.point_f

        width1 = np.linalg.norm(top_left - top_right)
        width2 = np.linalg.norm(bottom_left - bottom_right)
        avg_width = int((width1 + width2) * np.pi / 4)

        height1 = np.linalg.norm(top_left - bottom_left)
        height2 = np.linalg.norm(top_right - bottom_right)
        avg_height = int((height1 + height2) / 2)
        return avg_width, avg_height


if __name__ == '__main__':
    shape = {"tag": "label", "shape": [{"x": 0.012232142857142842, "y": 0.2219140625},
                                       {"x": 0.48655701811449864, "y": 0.14404355243445227},
                                       {"x": 0.9632539682539681, "y": 0.2171875},
                                       {"x": 0.9466567460317459, "y": 0.7276953125},
                                       {"x": 0.48447501824501454, "y": 0.7952298867391453},
                                       {"x": 0.023134920634920626, "y": 0.7258984375}]}

    points = []
    for point in shape['shape']:
        points.append([point['x'], point['y']])

    imcv = cv2.imread('image.jpg', cv2.IMREAD_UNCHANGED)

    unwrapper = LabelUnwrapper(src_image=imcv, percent_points=points)

    dst_image = unwrapper.unwrap()
    for point in unwrapper.points:
        cv2.line(unwrapper.src_image, tuple(point), tuple(point), color=YELLOW_COLOR, thickness=3)

    # unwrapper.draw_mesh()

    cv2.imwrite("image_with_mask.png", imcv)
    cv2.imwrite("unwrapped.jpg", dst_image)
2、原始代码github地址库:
GitHub - Nepherhotep/unwrap_labels: Algorithm to unwrap labels using edge markers
项目二:对项目一的升级版,实现深度学习曲面标签位置,并进行字符识别
1、通过训练掩膜图像,获得模型后,自动计算6个点的位置

图3 掩膜图像

图5 深度学习后找到的六个点
2、将弧映射至曲面
自己拿了矿泉水瓶做的实验

图6 网格圆柱投影
3、进行展开

图7 展开后效果图
展开前字符识别效果很不好
 图8 未展开直接识别字符
 图9 展开后字符全部识别出来
图8和图9用的百度飞桨做的字符识别,对中文识别效果很好,项目用到的pytesseract字符库识别效果非常不好,对于广告体的中文字无法识别。
展开流程图
 图10 展开流程图
4、项目二github地址:
GitHub - AntoninLeroy/wine_label_reader_toolkit: Computer vision project to read a label on a wine bottle using tensorflow, OpenCV and Tesseract.
项目三依赖的库
Flask==2.0.2
Flask_Cors==3.0.10
imutils==0.5.4
keras==2.8.0
numpy==1.21.5
opencv_python==4.5.5.62
Pillow==9.0.1
pytesseract==0.3.8
scikit_learn==1.0.2
scipy==1.7.3
tensorflow==2.8.0
tqdm==4.62.3
特别说明:项目二用了深度学习,使用框架,依赖gpu,无gpu无法运行,没有gpu的同学可以看项目三,项目三是本人改进的版本
项目三:自己通过视觉算法或者ps生成掩膜图像放置对应的位置即可
1、项目三基础代码
import cv2
import numpy as np
from showVision import *
import json
#日期:2023年8月10日
#作者:大胡子大叔
#托管:csdn
#程序功能:通过掩膜图像和原始图像,对柱形图进行拉伸,或者说是展开,曲面展成平面图形
#之所以修改,是因为cpu电脑无法运行tensorflow和keras的库一直报错,所以直接去掉了,没有用深度学习对识别位置进行检测
#可以通过传统的二维算法将位置提取出来,然后再展开即可
#重要的算法是展开
#倾斜的图像也可以矫正
#原始图像路径
img = cv2.imread("./img/train_and_valid/X/400.png")

#遮罩图像路径
mask = cv2.imread("./img/train_and_valid/Y/400.png", 0)

#得到遮罩后的图像
image = cv2.bitwise_and(img, img, mask=mask)

label = labelVision()
mesh,unwrapped=label.readLabels(mask, img)

# 最近邻插值法缩放# 缩放到原来的四分之一
image_scale = cv2.resize(image, (0, 0), fx=0.5, fy=0.5, interpolation=cv2.INTER_NEAREST)
mesh_scale = cv2.resize(mesh, (0, 0), fx=0.5, fy=0.5, interpolation=cv2.INTER_NEAREST)
unwrapped_scale = cv2.resize(unwrapped, (0, 0), fx=0.5, fy=0.5, interpolation=cv2.INTER_NEAREST)
# 显示结果图像
#因为图片尺寸过大,需要缩放窗口,缩放窗口以后,显示窗口有时看不见,所以需要设置一下显示窗口的位置
cv2.imshow('cut', image_scale)
#设置窗口的位置
cv2.moveWindow('cut',100,100)
cv2.waitKey(0)
cv2.imshow('mesh', mesh_scale)
cv2.moveWindow('mesh',100,100)
cv2.waitKey(0)
cv2.imshow('unwrapped', unwrapped_scale)
cv2.moveWindow('unwrapped',100,100)
cv2.waitKey(0)
cv2.destroyAllWindows()
2、项目三依赖的库
imutils
numpy
opencv_python如果不做字符识别可不安装下面的库
pytesseract
曲面(弧面、柱面)展平(拉直)需要自己做一个遮罩层
此代码主要是为了方便嫁接使用
自己用视觉算法识别遮罩即可进行嫁接
里面代码去掉了原始程序对gpu的依赖(即自动检测遮罩层位置,所以需要自己做遮罩层)
如果就想用深度学习识别,不想去掉的话,可以访问原始代码地址
https://github.com/AntoninLeroy/wine_label_reader_toolkit
原始代码包含自动识别、展开、字符识别整个流程
如果只想要柱面展开代码,请自行下载
本里面包含两个版本,一个版本包含字符识别,一个版本不包含字符识别
3、项目三代码下载地址
https://download.csdn.net/download/sunnyrainflower/88228306
扩展一:平面变曲面(平面向柱面投影)

图11
参考链接:柱面投影介绍与python实现(一)_zwx1995zwx的博客-CSDN博客
实现代码
from skimage.io import imread, imshow ,imsave
from skimage.transform import resize
import math
import numpy as np

img = imread('img.jpg')
img = (resize(img , [1000,800])*255).astype(np.uint8)

###圆柱投影
def cylindrical_projection(img , f) :
   rows = img.shape[0]
   cols = img.shape[1]

   #f = cols / (2 * math.tan(np.pi / 8))

   blank = np.zeros_like(img)
   center_x = int(cols / 2)
   center_y = int(rows / 2)

   for  y in range(rows):
       for x in range(cols):
           theta = math.atan((x- center_x )/ f)
           point_x = int(f * math.tan( (x-center_x) / f) + center_x)
           point_y = int( (y-center_y) / math.cos(theta) + center_y)

           if point_x >= cols or point_x < 0 or point_y >= rows or point_y < 0:
               pass
           else:
               blank[y , x, :] = img[point_y , point_x ,:]
   return blank

waved_img = cylindrical_projection(img,500)
imshow(waved_img)
拓展二:弧面表拉直(展平)
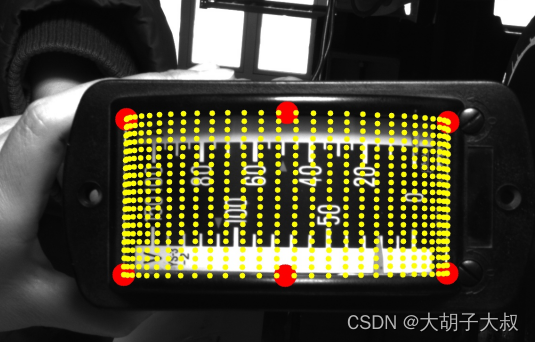
图12
 图 13
图 13
用了项目三中的代码将弧形表进行展开,发现两侧的刻度过度拉伸,直接用的话效果不是很好,还需对代码进行调整才能使用,不过为弧度表的表盘识别提供了新方向。
------------------------------------------------------------
声明 | 未经允许,禁止转载,谢谢合作!
作者 | 大胡子大叔
出品 | CSDN
-------------------------------------------------------------

![[C++]笔记-制作自己的静态库](https://img-blog.csdnimg.cn/ee25960fae274b419f2d45a0e8df0a91.png)