一、MyBatis简介
1、基本概念
MyBatis是一个持久层框架,用于简化JDBC开发。
表现层:页面展示; 业务层(service):逻辑处理; 持久层(dao):将数据保存到数据库。
2、JDBC编码与MyBatis优化示例
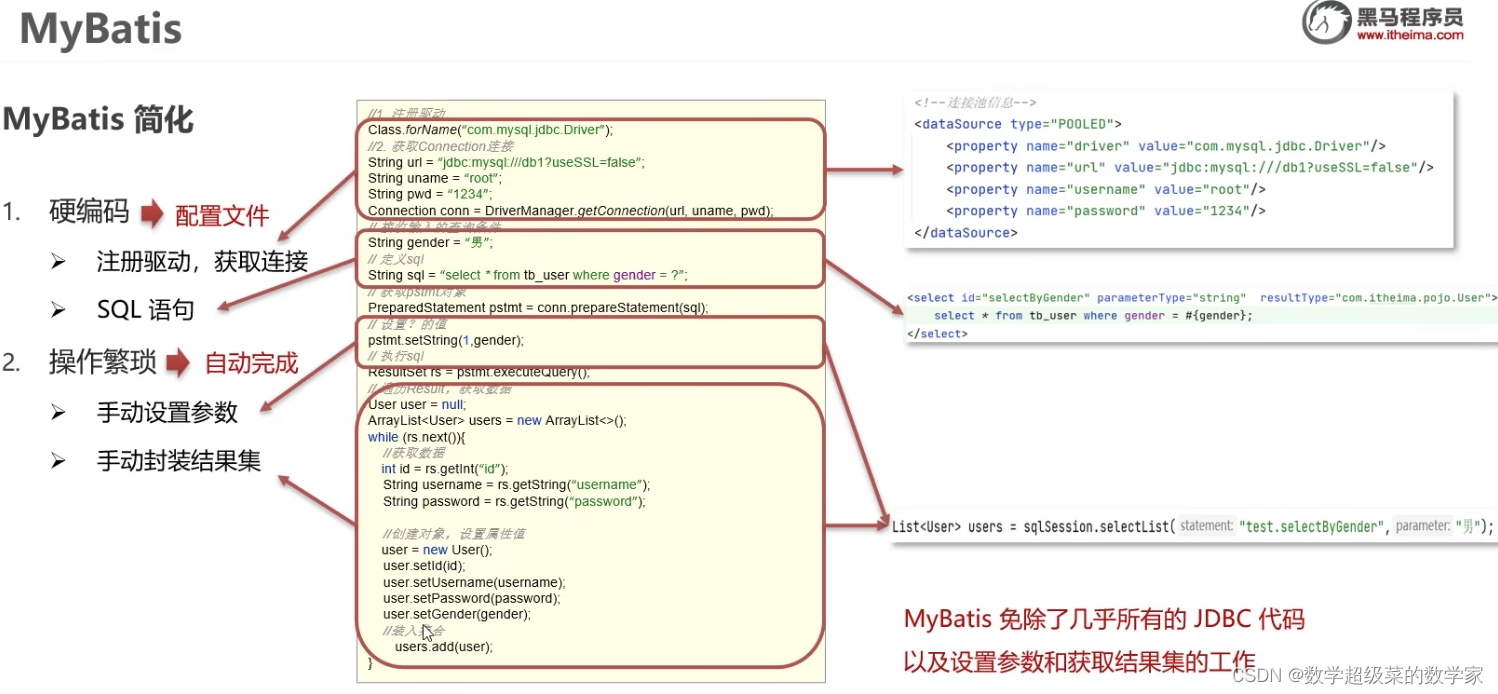
JDBC硬编码,将所有信息直接写在编码内,耦合度高,代码繁琐;MyBatis将连接信息和SQL语句分别写在配置文件中来简化。 最后的手动设置参数也都直接简化。
二、MyBatis快速入门
《查询user表中所有数据》
总结三小步:cv一下MyBatis-config核心配置文件、sql映射文件、创建SqlSessionFactory工厂对象,执行sql并返回查询结果
1、MyBatis核心配置文件(mybatis-config.xml):注册驱动(driver)、数据库连接(url username password)、加载sql映射文件mappper(路径查找 || 包扫描);
<?xml version="1.0" encoding="UTF-8" ?>
<!DOCTYPE configuration
        PUBLIC "-//mybatis.org//DTD Config 3.0//EN"
        "https://mybatis.org/dtd/mybatis-3-config.dtd">
<configuration>
    <environments default="development">
        <environment id="development">
            <transactionManager type="JDBC"/>
            <dataSource type="POOLED">
<!--                数据库连接信息-->
                <property name="driver" value="com.mysql.jdbc.Driver"/>
                <property name="url" value="jdbc:mysql:///mybatis?useSSL=false"/>
                <property name="username" value="root"/>
                <property name="password" value="wbj731290"/>
            </dataSource>
        </environment>
    </environments>

<!--    加载SQL映射文件有俩种方法:1、resource路径查找;2、包扫描-->
    <mappers>

<!--        1、由于Usermapper在同一目录下采用相对路径-->
        <mapper resource="UserMapper.xml"/>

<!--        2、包扫描方法-->
        <package name="com/itheima/mapper"/>

    </mappers>
</configuration>
2、sql映射文件(XXXMapper.xml):书写sql语句、绑定对应的实体类
<?xml version="1.0" encoding="UTF-8" ?>
<!DOCTYPE mapper
        PUBLIC "-//mybatis.org//DTD Mapper 3.0//EN"
        "https://mybatis.org/dtd/mybatis-3-mapper.dtd">
<!--
namesoace:名称空间(改为自定义名称))
-->
<mapper namespace="test">
<!--    定义查询语句-->
    <select id="selectAll" resultType="com.itheima.User">
        select * from tb_user;
    </select>
</mapper>
3、创建sqlsessionFactory工厂对象、执行sql
public class MyBatisDemo {
    public static void main(String[] args) throws IOException {
        //1、加载MyBatis核心配置文件 ,获取sqlsessionfactory
        String resource = "mybatis-config.xml";
        //将获取的资源转化为字节输入流
        InputStream inputStream = Resources.getResourceAsStream(resource);
        //将字节输入流作为参数建立sqlsession工厂
        SqlSessionFactory sqlSessionFactory = new SqlSessionFactoryBuilder().build(inputStream);

        //2、获取sqlsession对象 用它来执行sql
        SqlSession sqlSession = sqlSessionFactory.openSession();
        //3、执行sql
        List<User> users = sqlSession.selectList("test.selectAll");
        System.out.println(users);

        //4、释放资源
        sqlSession.close();
    }
}
4、在右栏Database设置

三、mapper代理开发
目的:解决原生开发中的硬编码;简化后期执行sql。
分析:在MyBatisDemo执行类中执行sql语句
List<User> users = sqlSession.selectList("test.selectAll");
需要参数sql映射文件内的namespace和id 这就造成了执行类和sql映射文件的耦合
此案例中只有一个查询语句,实际开发中需要无数的查询语句,不可能一个个写,所以就创建获取UserMapper接口,来作为管理sql查询与sqlSession对象的“桥梁”。
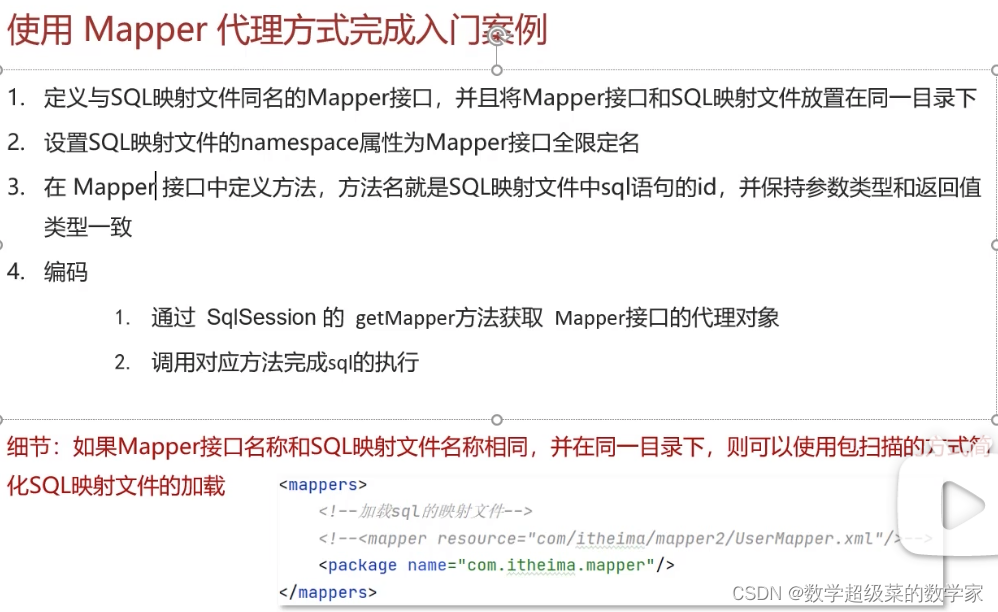
1、创建sql映射文件同名的Mapper接口并使两者在同一目录下。
不是直接将sql映射文件拖拽到Mapper接口目录下!
在resources配置文件目录下新创建与接口同目录名的Directory (创建时用/作为分隔符),将sql映射文件拖拽到新创建的Directory下即可。
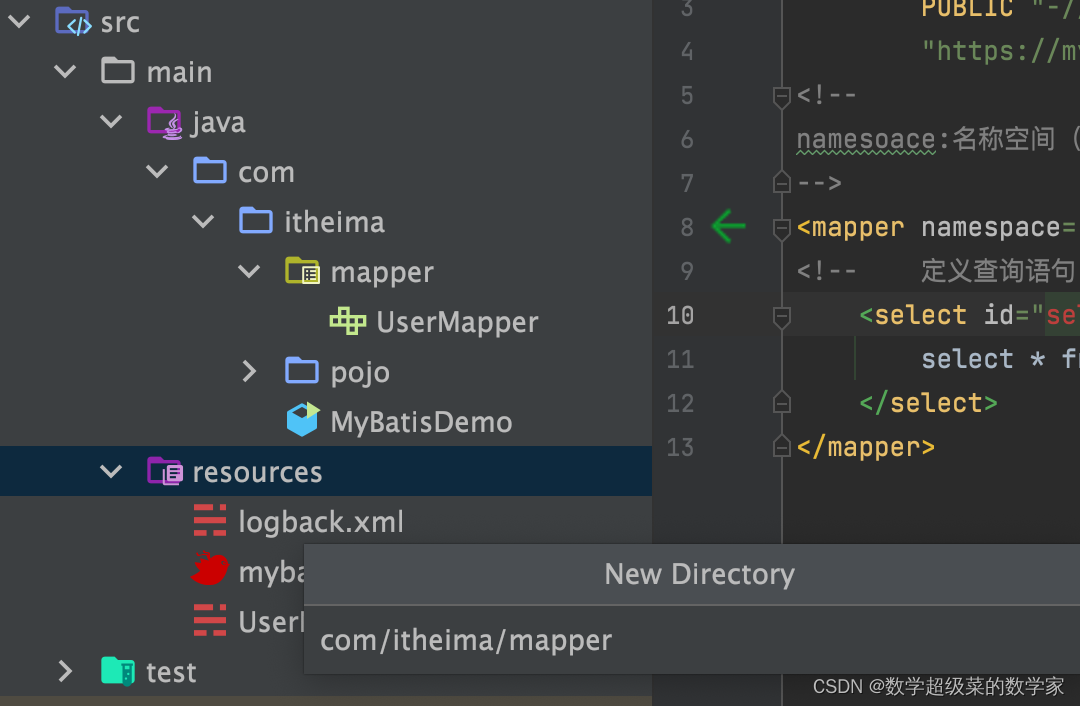
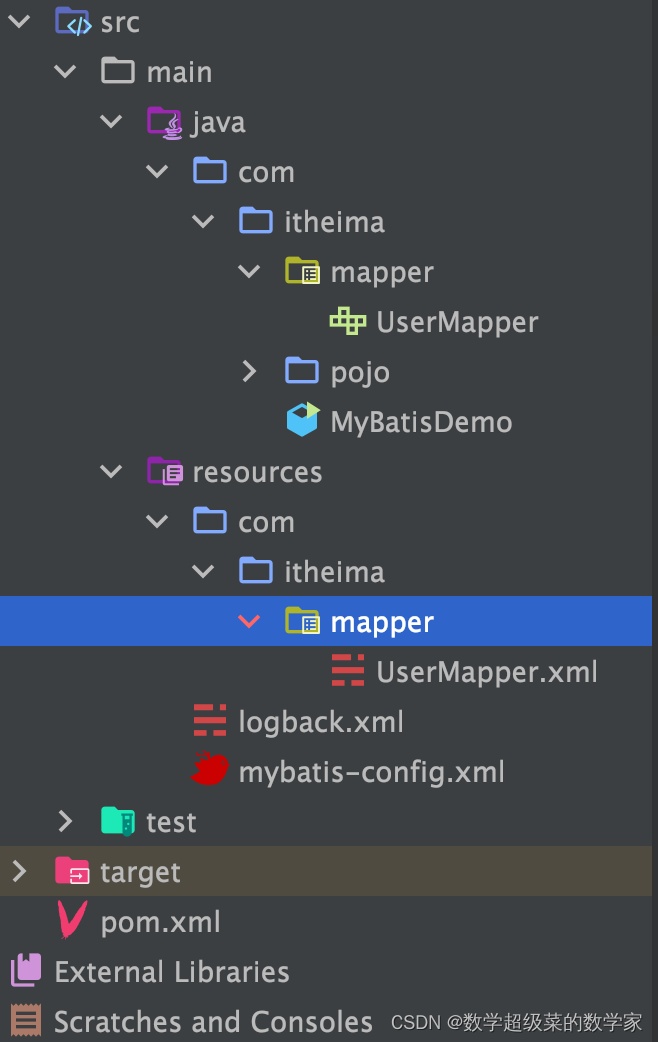
注意:同时要改变mybatis-config.xml核心配置文件mapper的路径!!!
copy path -》path from source root
更加方便的就是在mybatis-config.xml核心配置文件中使用包扫描:
同时可以处理大量的包
<package name="com/itheima/mapper"/>
2、设置sql映射文件namespace属性为Mapper接口全限定名(接口的绝对路径)。
<mapper namespace="com.itheima.mapper.UserMapper">
<!--    定义查询语句-->
    <select id="selectAll" resultType="com.itheima.pojo.User">
        select * from tb_user;
    </select>
</mapper>
3、Mapper接口中定义方法,方法名为sql映射文件的id
    List<User>selectAll();
//返回多个集合,用List,resultType是User
四、MyBatis核心配置文件
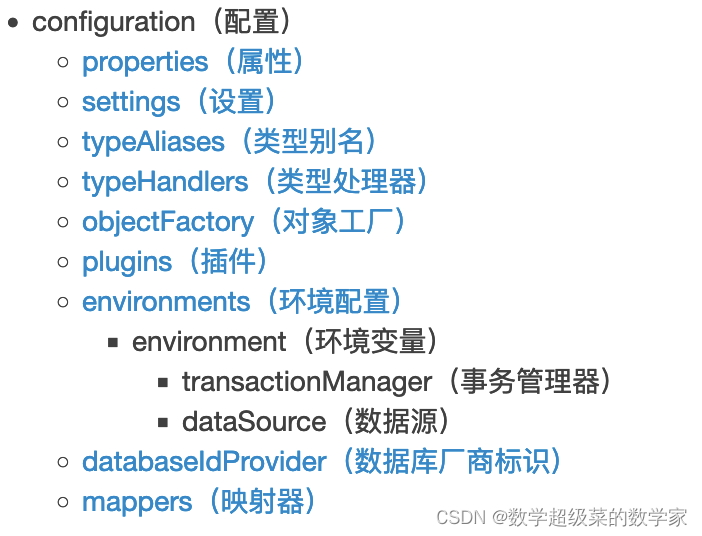
1、environments:配置数据库连接环境信息,可配置多个environment,通过属性default切换不同的environment。(可以配置多个环境,但每个 SqlSessionFactory 实例只能选择一种环境)
2、transactionManager(事务管理方式)可以选择JDBC、spring等
3、dataSource type 数据源类型
4、mappers 加载sql映射文件
很不同!!!配置各个标签时需要遵守先后顺序
五、配置文件完成增删改查
1、安装mybatisx插件
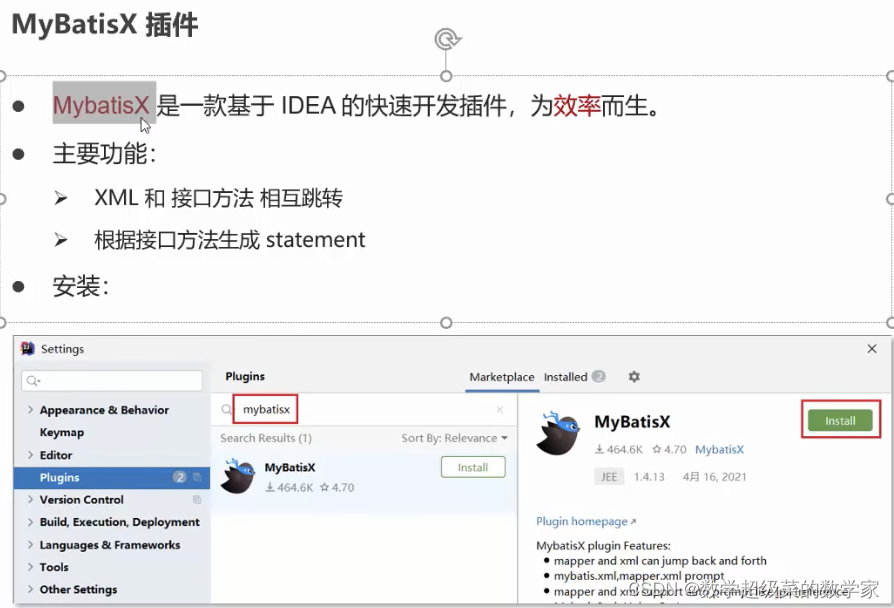
处理sql映射文件内的查询语句的id和返回值类型 与 对应的接口内的方法一一对应
析:实现增删改查功能,最基本的就是编写接口方法(Mapper接口)、编写SQL语句(SQL映射文件)、执行类使用sqlSession对象执行。注意一个Mapper接口与一个SQL映射文件唯一对应。
2、SQL映射文件中使用resultMap映射实体类解决数据库属性名与项目的实体类内部的实体属性名称不一致
步骤: 1、定义<resultMap>标签
2、在<result>标签中使用resultMap属性替换resultType属性
type作用:找到Mapper配置文件对应的实体类。要么写resources path 比如com.itheima.Brand
要么在mybatis核心配置文件配置别名。
 id:唯一标识 -->
<!--    type:映射的类型,支持别名-->

    <resultMap id="brandResultMap" type="brand">
<!--        id:完成主键字段的映射-->
<!--        result:完成一般字段的映射-->
<!--            column表的列名-->
<!--            property实体类的属性名-->

        <result column="brand_name" property="brandName"/>
        <result column="company_name" property="companyName"/>

    </resultMap>

    <select id="selectAll" resultMap="brandResultMap">
        select *
        from tb_brand;
    </select>
3、对于SQL映射文件中SQL语句采用了模糊匹配like 那么在使用参数时也要编程中模糊处理。
前后都要加上%
        int status = 1;
        String companyName = "华为";
        String brandName = "华为";

        companyName ="%" + companyName + "%";
        brandName ="%" + brandName + "%";
4、
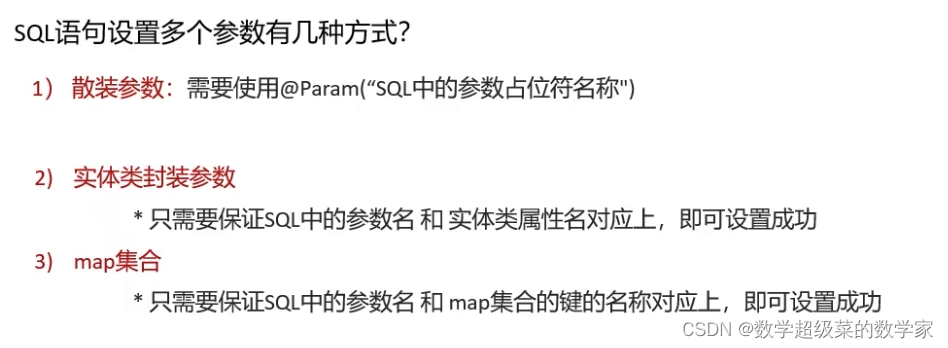
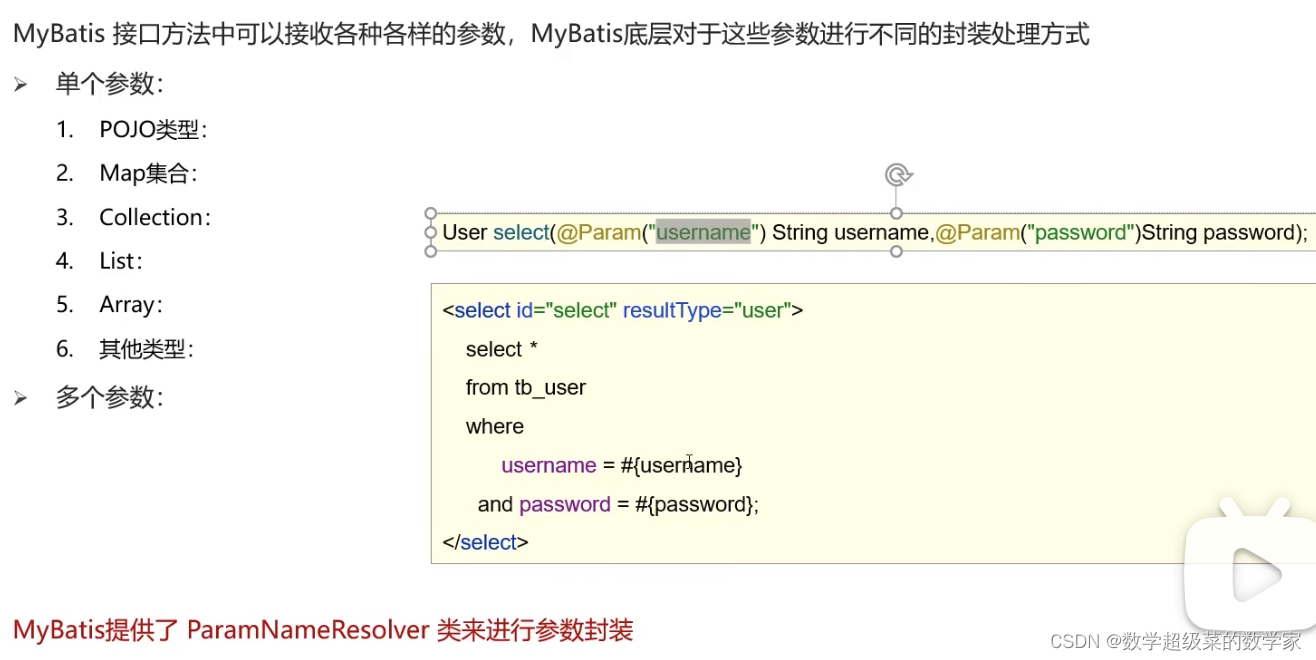
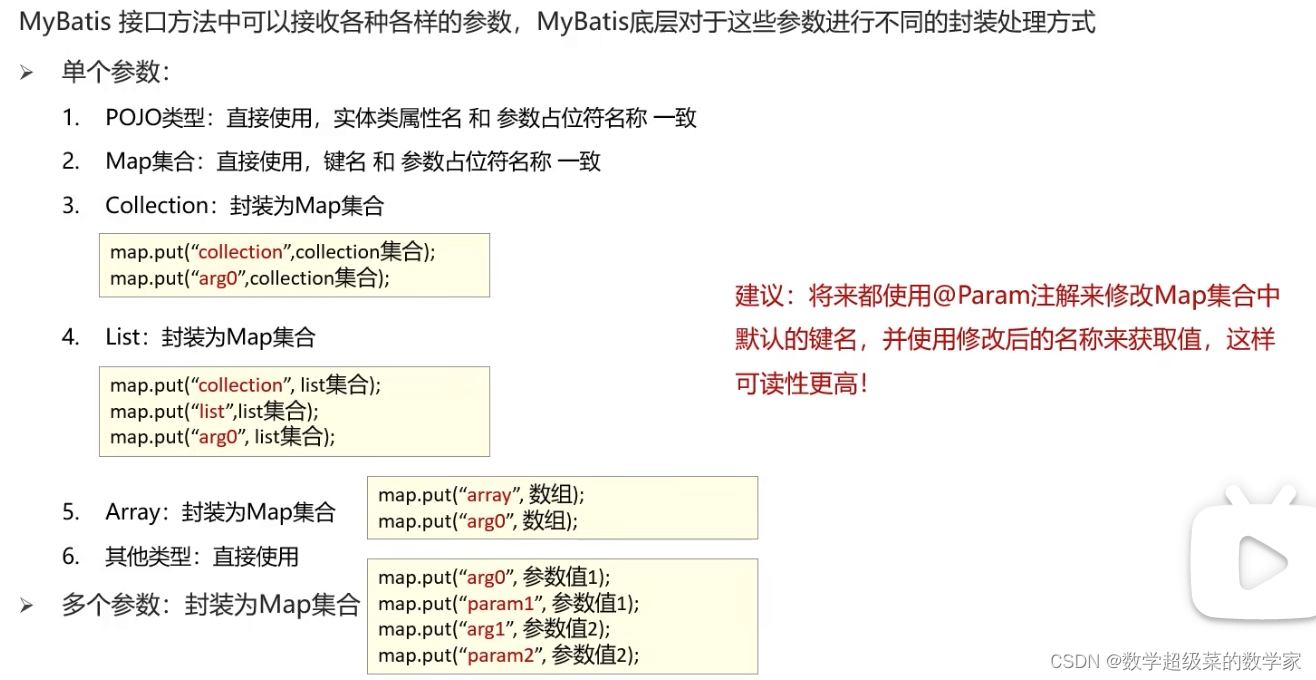
散装参数: 使用注解@Param
List<Brand> selectByCondition(@Param("status")int status, @Param("companyName")String companyName, @Param("brandName")String brandName);
实体封装参数
执行类创建实体对象
        int status = 1;
        String companyName = "华为";
        String brandName = "华为";

        companyName ="%" + companyName + "%";
        brandName ="%" + brandName + "%";

        Brand brand = new Brand();
        brand.setStatus(status);
        brand.setCompanyName(companyName);
        brand.setBrandName(brandName);
接口中方法的参数改为对象
List<Brand> selectByCondition(Brand brand);
map集合创建的是map对象而已。
5、添加add数据
insert into tb_brand(brand_name, company_name,ordered,description,status)
values (#{brandName}, #{companyName}, #{ordered}, #{description}, #{status});
openSession():默认开启事务,进行增删改查后需要使用sqlSession.commit();手动提交事务
openSession(true):设置为自动提交事务
SqlSessionFactory sqlSessionFactory = new SqlSessionFactoryBuilder().build(inputStream);
        //2、获取sqlsession对象 用它来执行sql
SqlSession sqlSession = sqlSessionFactory.openSession(true);
        //3、获取UserMapper接口的代理对象
BrandMapper brandMapper = sqlSession.getMapper(BrandMapper.class);
brandMapper.add(brand);
<获取添加数据的主键>
 <insert id="add" useGeneratedKeys="true" keyProperty="id">
        insert into tb_brand(brand_name, company_name,ordered,description,status)
        values (#{brandName}, #{companyName}, #{ordered}, #{description}, #{status});
在添加时就有了id,需要使用useGeneratedKeys 和 keyProperty属性即可。然后再通过对象get就可以。
6、更新数据
sql映射文件--全字段更新
<update id="update">
        update tb_brand
        set
            status = #{status},
            company_name = #{companyName},
            brand_name = #{brandName},
            ordered = #{ordered},
            description = #{description}
        where id = #{id};
    </update>
7、删除
删除一个
<delete id="deleteById">
        delete from tb_brand where id = #{id};
    </delete>
以实体对象作为删除操作的对象,对象传参id,即删除指定id的对象。
批量删除
<delete id="deleteByIds">
        delete from tb_brand
        where id in(
        <foreach collection="ids" item="id" separator="," >
            #{id}
        </foreach>)
    </delete>

对应的方法:    void deleteByIds(@Param("ids")int[]ids);
mybatis会将数组参数封装为一个map集合
默认 array = 数组(即collection应该写array)
使用@Param()注解改变map集合的默认key名称
六、注解完成增删改查
注解开发 也就是不再需要sql映射文件 ,在定义接口时直接写上注解对应的sql语句
注解开发只适用于简单功能。基本不用。
七、动态SQL
动态SQL:SQL语句随着用户的输入或外部条件的变化而变化。
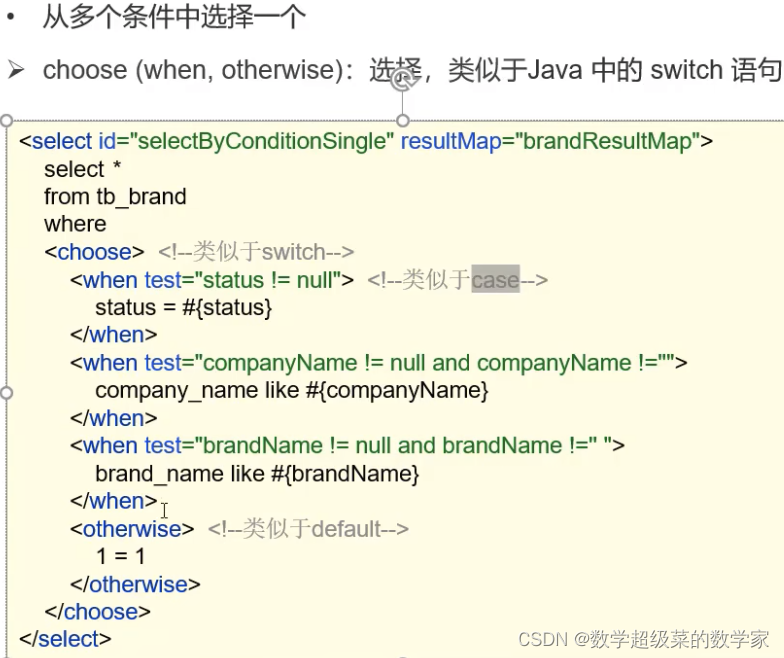
常用标签四个 :if、choose (when, otherwise)、trim (where, set)、foreach
案例1:多条件随机查询
<!--    if:条件判断-->
<!--        test标签内写逻辑表达式-->
<!--    解决未输入某些参数导致SQL语句格式错误-->
<!--    使用<where>标签代替where-->
    <select id="selectByCondition" resultMap="brandResultMap">
        select *
        from tb_brand
        <where>
        <if test="status != null">
            status = #{status}
        </if>
        <if test="companyName != null and brandName != null ">
            and company_name like #{companyName}
        </if>
        <if test="companyName != null and brandName != null ">
            and brand_name like #{brandName}
        </if>
        </where>
     </select>
案例2:单条件查询
案例3:动态更新字段
如果没有动态更新,就直接只改变某些字段的数据,那么其他数据就会被置为null。
只需要在sql映射文件的标签上设置就好了。
 <update id="update">
        update tb_brand
        <set>
            <if test="brandName != null and brandName !='' ">
                brand_name = #{brandName},
            </if>
            <if test="companyName != null and companyName !=''">
                company_name = #{companyName},
            </if>
            <if test="ordered != null">
                ordered = #{ordered},
            </if>

            <if test="description != null and description !=''">
                description = #{description},
            </if>
            <if test="status != null ">
                status = #{status}
            </if>
        </set>
        where id = #{id};

    </update>
总结
通过目录关系分析执行过程:
mybatis干啥的?就是通过sql语句在本地远程操作数据库。
首先就是实体类和sql映射文件负责处理数据库部分;mybatis核心配置文件负责连接数据库和加载sql映射文件;然后执行类必须有,就是建立sqlSession执行方法,也就是接口类中的方法,方法就是SQL映射文件里面的sql语句,那么接口又是怎么连接到sql映射文件从而读取方法?
就是将sql映射文件和接口放在同一个路径下,具体实现看上文。
在执行类执行方法,就会找接口,接口就会找到sql映射文件中对应的sql语句,然后就会远程执行数据库。
得会啥呢??
mybatis核心配置文件要晓得写吧。
得晓得要写Mapper接口、Mapper配置文件(SQL映射文件)吧。
你连接数据库,实体类得晓得要写吧。
再写一个执行类要的吧。
开发文档链接:mybatis – MyBatis 3 | 简介
对比:参数占位符${} 和#{}
#{}会将其替换为?。为了防止SQL注入。经常使用。
${}拼SQL,存在SQL注入问题。
特殊字符处理:<![CDATA[ 此处填写需要写的特殊字符 ]]>
起别名:
要写在mybatis核心配置文件中
1、给实体类起别名
<typeAliases>
    <typeAlias type="com.pjx.pojo.User" alias="UserDao"/>
</typeAliases>
2、指定的一个包名,则包下的类名首字母小写作为别名
  <typeAliases>
       <package name="com.pjx.pojo"/>
    </typeAliases>
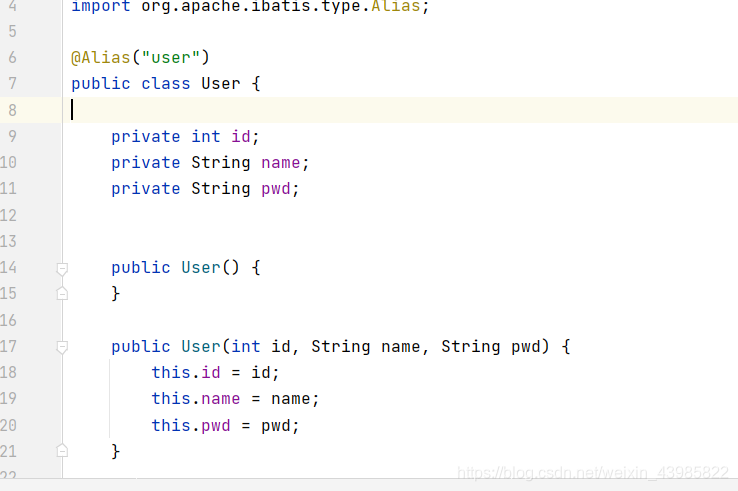
3、使用注解更改别名:
@Alias()
mybatis参数传递
使用Param注解定义参数的名称,此名称要和sql语句占位符内的参数名称保持一致
