ControlTemplate、Trigger与Storyboard
ControlTemplate通常用在Style中,Trigger通常作为ControlTemplate的一部分,StoryBoard表示动画效果,下面将通过对Button按钮设置这几项来简单说明这几项的用法。
在MainWindow中添加一个Button按钮;在Window段添加resource段,并在其中添加一个Style:
<Window x:Class="WpfControlTemplateTest.MainWindow"
        xmlns="http://schemas.microsoft.com/winfx/2006/xaml/presentation"
        xmlns:x="http://schemas.microsoft.com/winfx/2006/xaml"
        xmlns:d="http://schemas.microsoft.com/expression/blend/2008"
        xmlns:mc="http://schemas.openxmlformats.org/markup-compatibility/2006"
        xmlns:local="clr-namespace:WpfControlTemplateTest"
        mc:Ignorable="d"
        Title="MainWindow" Height="450" Width="800">
  <Window.Resources>
    <ResourceDictionary>
      <Style TargetType="Button">
        <Setter Property="Width" Value="100"></Setter>
        <Setter Property="Height" Value="40"></Setter>
        <Setter Property="Background" Value="LightGreen"></Setter>
        <Setter Property="BorderThickness" Value="0"></Setter>
        <Setter Property="Foreground" Value="White"></Setter>
      </Style>
    </ResourceDictionary>
  </Window.Resources>
  <Grid>
    <Button Name="btn1" Content="btn1"></Button>
  </Grid>
</Window>
此时的显示效果是这样的:
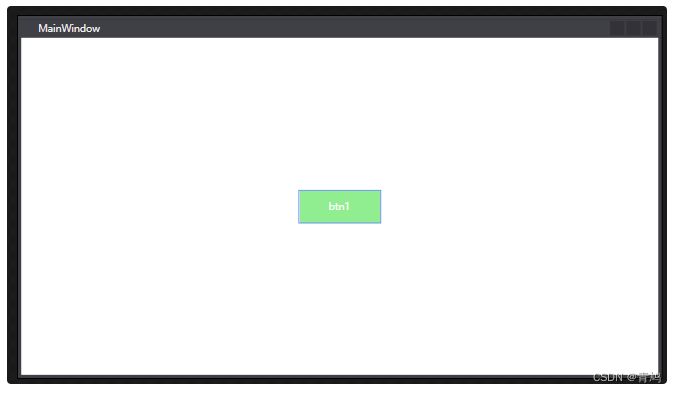
按钮样式改变了很多,但是很多时候我们都需要圆角按钮,为了让按钮变成圆角,我们需要设置按钮的Template属性。将下面的setter添加到我们的style中即可。
<Window x:Class="WpfControlTemplateTest.MainWindow"
        xmlns="http://schemas.microsoft.com/winfx/2006/xaml/presentation"
        xmlns:x="http://schemas.microsoft.com/winfx/2006/xaml"
        xmlns:d="http://schemas.microsoft.com/expression/blend/2008"
        xmlns:mc="http://schemas.openxmlformats.org/markup-compatibility/2006"
        xmlns:local="clr-namespace:WpfControlTemplateTest"
        mc:Ignorable="d"
        Title="MainWindow" Height="450" Width="800">
  <Window.Resources>
    <ResourceDictionary>
      <Style TargetType="Button">
        <Setter Property="Width" Value="100"></Setter>
        <Setter Property="Height" Value="40"></Setter>
        <Setter Property="Background" Value="LightGreen"></Setter>
        <Setter Property="BorderThickness" Value="0"></Setter>
        <Setter Property="Foreground" Value="White"></Setter>
        <!--添加的代码-->
        <Setter Property="Template">
          <Setter.Value>
            <ControlTemplate TargetType="Button">
              <Grid>
                <Border CornerRadius="10" Background="LightGreen"></Border>
                <!--注意这里-->
                <ContentPresenter
                                  Content="{TemplateBinding Content}"
                                  HorizontalAlignment="{TemplateBinding HorizontalContentAlignment}"
                                  Margin="{TemplateBinding Padding}"
                                  VerticalAlignment="{TemplateBinding VerticalContentAlignment}"
                                  />
              </Grid>
            </ControlTemplate>
          </Setter.Value>
        </Setter>
        <!--到此为止-->
      </Style>
    </ResourceDictionary>
  </Window.Resources>
  <Grid>
    <Button Name="btn1" Content="btn1"></Button>
  </Grid>
</Window>
现在的显示效果:
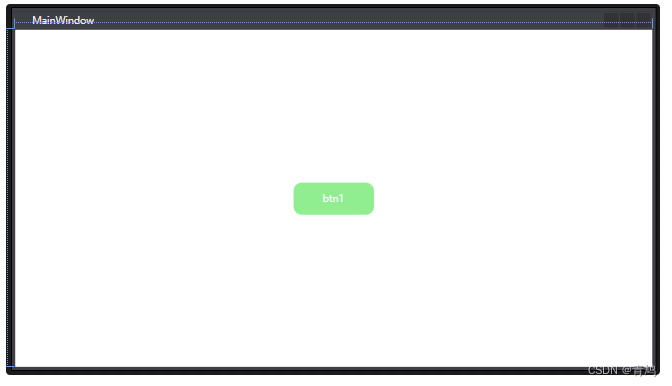
通过使用ControlTemplate,可以定制化控件的模板样式。
- WPF给我们提供了一个ContentPresenter,它的作用就是把原有模板的属性原封不动的投放到自定义模板中。
Trigger通常在ControlTemplate中定义,用来实现Hover、Press等效果。
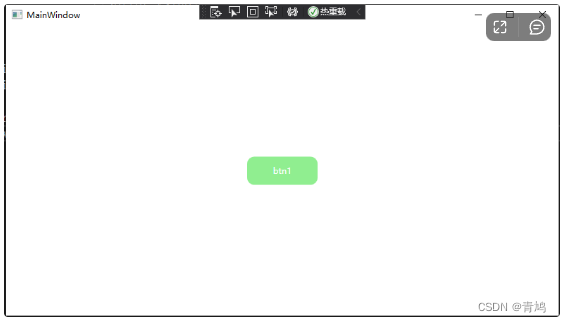
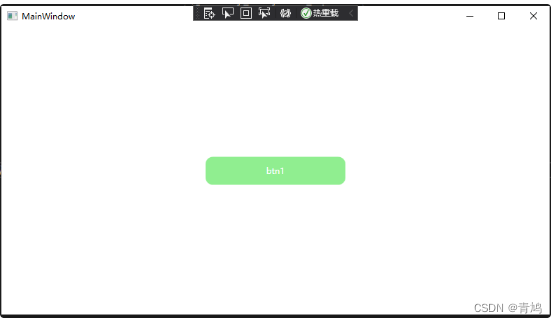
比如,我们希望btn1在hover时,width变为200,(翻译成人话:鼠标悬停在按钮上的时候,按钮长度变为200)则可以在ControlTemplate段中添加下面代码:
<Window x:Class="WpfControlTemplateTest.MainWindow"
        xmlns="http://schemas.microsoft.com/winfx/2006/xaml/presentation"
        xmlns:x="http://schemas.microsoft.com/winfx/2006/xaml"
        xmlns:d="http://schemas.microsoft.com/expression/blend/2008"
        xmlns:mc="http://schemas.openxmlformats.org/markup-compatibility/2006"
        xmlns:local="clr-namespace:WpfControlTemplateTest"
        mc:Ignorable="d"
        Title="MainWindow" Height="450" Width="800">
  <Window.Resources>
    <ResourceDictionary>
      <Style TargetType="Button">
        <Setter Property="Width" Value="100"></Setter>
        <Setter Property="Height" Value="40"></Setter>
        <Setter Property="Background" Value="LightGreen"></Setter>
        <Setter Property="BorderThickness" Value="0"></Setter>
        <Setter Property="Foreground" Value="White"></Setter>
        <Setter Property="Template">
          <Setter.Value>
            <ControlTemplate TargetType="Button">
              <Grid>
                <Border CornerRadius="10" Background="LightGreen"></Border>
                <ContentPresenter
                                  Content="{TemplateBinding Content}"
                                  HorizontalAlignment="{TemplateBinding HorizontalContentAlignment}"
                                  Margin="{TemplateBinding Padding}"
                                  VerticalAlignment="{TemplateBinding VerticalContentAlignment}"
                                  />
              </Grid>
              //添加的代码
              <ControlTemplate.Triggers>
                <Trigger Property="IsMouseOver" Value="True">
                  <Setter Property="Width" Value="200"></Setter>
                </Trigger>
              </ControlTemplate.Triggers>
              //到此为止
            </ControlTemplate>
          </Setter.Value>
        </Setter>
      </Style>
    </ResourceDictionary>
  </Window.Resources>
  <Grid>
    <Button Name="btn1" Content="btn1"></Button>
  </Grid>
</Window>
运行后的悬停前、悬停后效果对比:
此时,如果想为按钮的变化添加动画效果,就需要设置Storyboard。我们需要将ControlTemplate.Triggers段替换为如下代码:
<ControlTemplate.Triggers>
  <Trigger Property="IsMouseOver" Value="True">
    <Trigger.EnterActions>
      <BeginStoryboard>
        <Storyboard>
          <DoubleAnimation Storyboard.TargetProperty="Width" To="200" Duration="0:0:0.15"></DoubleAnimation>
        </Storyboard>
      </BeginStoryboard>
    </Trigger.EnterActions>
    <Trigger.ExitActions>
      <BeginStoryboard>
        <Storyboard>
          <DoubleAnimation Storyboard.TargetProperty="Width" To="100" Duration="0:0:0.1"></DoubleAnimation>
        </Storyboard>
      </BeginStoryboard>
    </Trigger.ExitActions>
  </Trigger>
</ControlTemplate.Triggers>
这里的DoubleAnimation指的是数字变化的动画,若需要颜色变化,则需要ColorAnimation。DoubleAnimation的Duration属性是一个时间,分别被设置了0.15秒和0.1秒。
运行效果:
此时,如果想为按钮的变化添加动画效果,就需要设置Storyboard。我们需要将ControlTemplate.Triggers段替换为如下代码:
<ControlTemplate.Triggers>
  <Trigger Property="IsMouseOver" Value="True">
    <Trigger.EnterActions>
      <BeginStoryboard>
        <Storyboard>
          <DoubleAnimation Storyboard.TargetProperty="Width" To="200" Duration="0:0:0.15"></DoubleAnimation>
        </Storyboard>
      </BeginStoryboard>
    </Trigger.EnterActions>
    <Trigger.ExitActions>
      <BeginStoryboard>
        <Storyboard>
          <DoubleAnimation Storyboard.TargetProperty="Width" To="100" Duration="0:0:0.1"></DoubleAnimation>
        </Storyboard>
      </BeginStoryboard>
    </Trigger.ExitActions>
  </Trigger>
</ControlTemplate.Triggers>

