1、创建spring Boot项目导入如下基础依赖
<!-- 打包方式 jar 包 -->
<packaging>jar</packaging>

<!-- 指定父工程 -->
<parent>
    <groupId>org.springframework.boot</groupId>
    <artifactId>spring-boot-starter-parent</artifactId>
    <version>2.3.3.RELEASE</version>
</parent>

<dependencies>
    <!-- spring boot Web 包 -->
    <dependency>
        <groupId>org.springframework.boot</groupId>
        <artifactId>spring-boot-starter-web</artifactId>
    </dependency>
    <!-- spring boot Test 包 -->
    <dependency>
        <groupId>org.springframework.boot</groupId>
        <artifactId>spring-boot-starter-test</artifactId>
        <scope>test</scope>
    </dependency>
    <!-- Lombok -->
    <dependency>
        <groupId>org.projectlombok</groupId>
        <artifactId>lombok</artifactId>
        <scope>provided</scope>
    </dependency>
</dependencies>
2、如果采用的是普通的maven项目,需要手动添加下面的启动类
@SpringBootApplication
public class RbacApplication {
    public static void main(String[] args) {
        SpringApplication.run(RbacApplication.class, args);
    }
}
3、集成数据库相关操作
1、导入依赖
<!-- MySQL 驱动 -->
<dependency>
    <groupId>mysql</groupId>
    <artifactId>mysql-connector-java</artifactId>
    <scope>runtime</scope>
</dependency>
2、在配置文件(application.properties)中配置四要素
spring.datasource.driver-class-name=com.mysql.jdbc.Driver
spring.datasource.url=jdbc:mysql:///rbac?useUnicode=true&characterEncoding=utf8&serverTimezone=GMT%2B8
spring.datasource.username=root
spring.datasource.password=admin
3、集成Druid连接池
<!-- druid -->
<dependency>
    <groupId>com.alibaba</groupId>
    <artifactId>druid-spring-boot-starter</artifactId>
    <version>1.1.21</version>
</dependency>
4、集成MyBatis
1、添加依赖
<!-- Mybatis 集成到 SpringBoot 中的依赖 -->
<dependency>
    <groupId>org.mybatis.spring.boot</groupId>
    <artifactId>mybatis-spring-boot-starter</artifactId>
    <version>1.3.1</version>
</dependency>
2、配置mapper对象
- 此时的配置只需要在启动类上添加扫描器即可
@SpringBootApplication
@MapperScan("mapper的全限定类名")
public class SsmApplication {
    public static void main(String[] args) {
        SpringApplication.run(SsmApplication.class, args);
    }
}
3、配置mybatis的一些属性(application.properties)
# 配置别名
mybatis.type-aliases-package=cn.wolfcode.domain

# 打印 SQL 日志
logging.level.cn.wolfcode.mapper=trace
5、集成事务
1、添加依赖
<!-- Spring JDBC 和 TX -->
<dependency>
    <groupId>org.springframework.boot</groupId>
    <artifactId>spring-boot-starter-jdbc</artifactId>
</dependency>
2、xml方式配置
- 采取配置类和 XML 混用的策略,在配置类上使用 @ImportResource(“classpath:spring-tx.xml”)。
3、注解方式
直接在业务层实现类上或者其方法上直接贴 @Transactional 注解即可。
4、配置代理
- Spring Boot 默认优先选择 CGLIB 代理,如果需要改为优先使用 JDK 代理
- 修改代理
spring.aop.proxy-target-class=false
6、集成Web
1、添加依赖
<!-- spring boot web 启动器(之前已添加了) -->
<dependency>
    <groupId>org.springframework.boot</groupId>
    <artifactId>spring-boot-starter-web</artifactId>
</dependency>
2、修改端口号(application.properties)
server.port=80
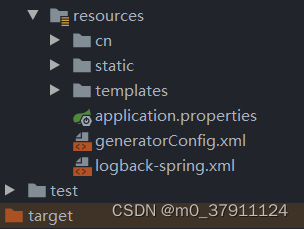
3、静态资源目录搭建
4、静态资源处理
- 默认情况下springBoot会从classpath下的/static,/public,/resources,/META-INF/resources下加载静态资源。
- 可以在配置文件中添加配置spring.resources.staticLocations 属性来修改静态资源的加载地址。
- 因为应用是打包为jar,所以如果有文件上传必须配置文件的所在路径。
# 告诉 Spring Boot 什么访问的路径是找静态资源
spring.mvc.static-path-pattern=/static/**
5、前端控制器映射路径配置
- 在 Spring Boot 自动配置中,WebMvcAutoConfiguration 自动配置类导入了DispatcherServletAutoConfiguration 配置对象,会自动创建 DispatcherServlet 前端控制器,默认的映射路径是 /,Spring Boot 多数用于前后端分离和微服务开发,默认支持 RESTFul 风格,所以一般都是使用默认的即可,不做改动。
7、集成Thymeleaf
1、添加依赖
<!-- 引入 Thymeleaf 依赖 -->
<dependency>
    <groupId>org.springframework.boot</groupId>
    <artifactId>spring-boot-starter-thymeleaf</artifactId>
</dependency>
2、在配置文件中配置
# Thymelea 模板配置
spring.thymeleaf.prefix=classpath:/templates/
spring.thymeleaf.suffix=.html
spring.thymeleaf.mode=HTML
spring.thymeleaf.encoding=UTF-8

# 热部署文件,页面不产生缓存,及时更新
spring.thymeleaf.cache=false
8、统一异常处理
1、框架自带
SpringBoot 默认情况下,会把所有的错误都交给BasicErrorController 类完成处理,错误的视图导向到classpath:/static/error/ 和 classpath:/templates/error/ 路径上,HTTP 状态码就是默认视图的名称。
- 出现 404 错误 -> classpath:/static/error/404.html
- 出现 5xx 错误 -> classpath:/static/error/5xx.html
2、控制器增强器方式进行处理
- 定义一个控制器增强器,用来处理异常,一般用于500的错误
@ControllerAdvice // 控制器增强器
public class ExceptionControllerAdvice {
    @ExceptionHandler(RuntimeException.class) // 处理什么类型的异常
    public String handlException(RuntimeException e, Model model) {
        e.printStackTrace(); // 记得这行代码保留,不然项目后台出异常,开发工具控制台看不到错误信息
        return "errorView"; // 指定错误页面视图名称
    }
}
9、添加拦截器
1、编写拦截器
@Component
public class LoginInterceptor implements HandlerInterceptor {
    // ...
}
2、配置拦截器
- 定义一个配置类,实现 WebMvcConfigurer 接口,在 addInterceptors 方法注册拦截器。
@Configuration
public class MvcJavaConfig implements WebMvcConfigurer {

    @Autowired
    private LoginInterceptor loginInterceptor;

    @Autowired
    private PermissionInterceptor permissionInterceptor;

    public void addInterceptors(InterceptorRegistry registry) {
        // 注册登录拦截器
        registry.addInterceptor(loginInterceptor)
            // 对哪些资源起过滤作用
            .addPathPatterns("/**")
            // 对哪些资源起排除作用
            .excludePathPatterns("/login", "/static/**");
    }
}
10、Spring Boot中的日志介绍
1、简介
- Spring Boot默认已经开启日志,默认的日志格式为:时间 日志级别 线程id 线程名称 日志类 日志说明
- Spring Boot日志分为:系统日志和应用日志。
- 日志级别越高,输出内容越少,如果设置的级别为 info,则 debug 以及 trace 级别的都无法显示,日志级别由低到高 trace < debug < info < warn < error。
- Spring Boot 默认选择 Logback 作为日志框架,也能选择其他日志框架,但是没有必要。
2、输出日志
1、方式一
- 在类中定义一个静态 Logger 对象,传入当前类的作用是方便输出日志时可以清晰地看到该日志信息是属于哪个类的。
private static final Logger log = LoggerFactory.getLogger(当前类.class);
2、方式二
- 使用 Lombok 提供的 @Slf4j 注解来简化代码,其实和方式一的作用是一样的。
@Slf4j
@Service
public class PermissionServiceImpl implements IPermissionService {}
- 在需要输出日志的地方使用日志的输出方法
log.info(...);
log.error(...);
...
// 输出日志中有变量可以使用 {} 作为占位符
log.info("删除id为{}的数据", id);
- 若要修改日志级别,最快速的方式是在 application.properties 配置
# 把日志级别修改为 debug,不过我们一般不会更改,除非要调试找 bug,不然控制台显示的内容太多也容易乱
logging.level.root=debug
![[附源码]Node.js计算机毕业设计房屋中介管理信息系统Express](https://img-blog.csdnimg.cn/8092944f6c614d5f971e16fdfcfa6e56.png)
![[附源码]Python计算机毕业设计SSM基于web的图书借阅管理系统(程序+LW)](https://img-blog.csdnimg.cn/2e94a2f41e914a67b91119faaf616e64.png)
