1、卷积运算

在二维卷积运算中,卷积窗口从输入张量的左上角开始,从左到右、从上到下滑动。 当卷积窗口滑动到新一个位置时,包含在该窗口中的部分张量与卷积核张量进行按元素相乘,得到的张量再求和得到一个单一的标量值,由此我们得出了这一位置的输出张量值。 在如上例子中,输出张量的四个元素由二维互相关运算得到,这个输出高度为2、宽度为2,如下所示:

import torch
from torch import nn

def Conv2d(X, K):
    """计算二维卷积运算"""
    h, w = K.shape
    Y = torch.zeros((X.shape[0] - h + 1, X.shape[1] - w + 1))
    for i in range(Y.shape[0]):
        for j in range(Y.shape[1]):
            Y[i, j] = (X[i:i + h, j:j + w] * K).sum()
    return Y
2、经典卷积神经网络
2.1 Lenet
网络构架:

代码实现:
import torch
import torch.nn as nn

class LeNet(nn.Module):
    def __init__(self, num_classes=10):
        super(LeNet, self).__init__()
        self.conv1 = nn.Conv2d(in_channels=1, out_channels=6, kernel_size=5)
        self.pool1 = nn.MaxPool2d(kernel_size=2)
        self.conv2 = nn.Conv2d(in_channels=6, out_channels=16, kernel_size=5)
        self.pool2 = nn.MaxPool2d(kernel_size=2)
        self.fc1 = nn.Linear(in_features=16*5*5, out_features=120)
        self.fc2 = nn.Linear(in_features=120, out_features=84)
        self.fc3 = nn.Linear(in_features=84, out_features=num_classes)

    def forward(self, x):
        x = self.pool1(torch.relu(self.conv1(x)))
        x = self.pool2(torch.relu(self.conv2(x)))
        x = x.view(-1, 16*5*5)
        x = torch.relu(self.fc1(x))
        x = torch.relu(self.fc2(x))
        x = self.fc3(x)
        return x

# 创建LeNet模型
model = LeNet(num_classes=10)
print(model)
LeNet实现适用于MNIST数据集,其中输入图像大小为28x28,输出类别数为10(0-9的手写数字)。
2.2 Alexnet
网络构架:


代码实现:
import torch
import torch.nn as nn

class AlexNet(nn.Module):
    def __init__(self, num_classes=1000):
        super(AlexNet, self).__init__()
        self.features = nn.Sequential(
            nn.Conv2d(3, 64, kernel_size=11, stride=4, padding=2),
            nn.ReLU(inplace=True),
            nn.MaxPool2d(kernel_size=3, stride=2),
            nn.Conv2d(64, 192, kernel_size=5, padding=2),
            nn.ReLU(inplace=True),
            nn.MaxPool2d(kernel_size=3, stride=2),
            nn.Conv2d(192, 384, kernel_size=3, padding=1),
            nn.ReLU(inplace=True),
            nn.Conv2d(384, 256, kernel_size=3, padding=1),
            nn.ReLU(inplace=True),
            nn.Conv2d(256, 256, kernel_size=3, padding=1),
            nn.ReLU(inplace=True),
            nn.MaxPool2d(kernel_size=3, stride=2),
        )
        self.avgpool = nn.AdaptiveAvgPool2d((6, 6))
        self.classifier = nn.Sequential(
            nn.Dropout(),
            nn.Linear(256 * 6 * 6, 4096),
            nn.ReLU(inplace=True),
            nn.Dropout(),
            nn.Linear(4096, 4096),
            nn.ReLU(inplace=True),
            nn.Linear(4096, num_classes),
        )

    def forward(self, x):
        x = self.features(x)
        x = self.avgpool(x)
        x = torch.flatten(x, 1)
        x = self.classifier(x)
        return x

# 创建AlexNet模型
model = AlexNet(num_classes=1000)
print(model)
代码中的AlexNet实现适用于ImageNet数据集,其中输入图像大小为224x224,输出类别数为1000。
2.3 VGG
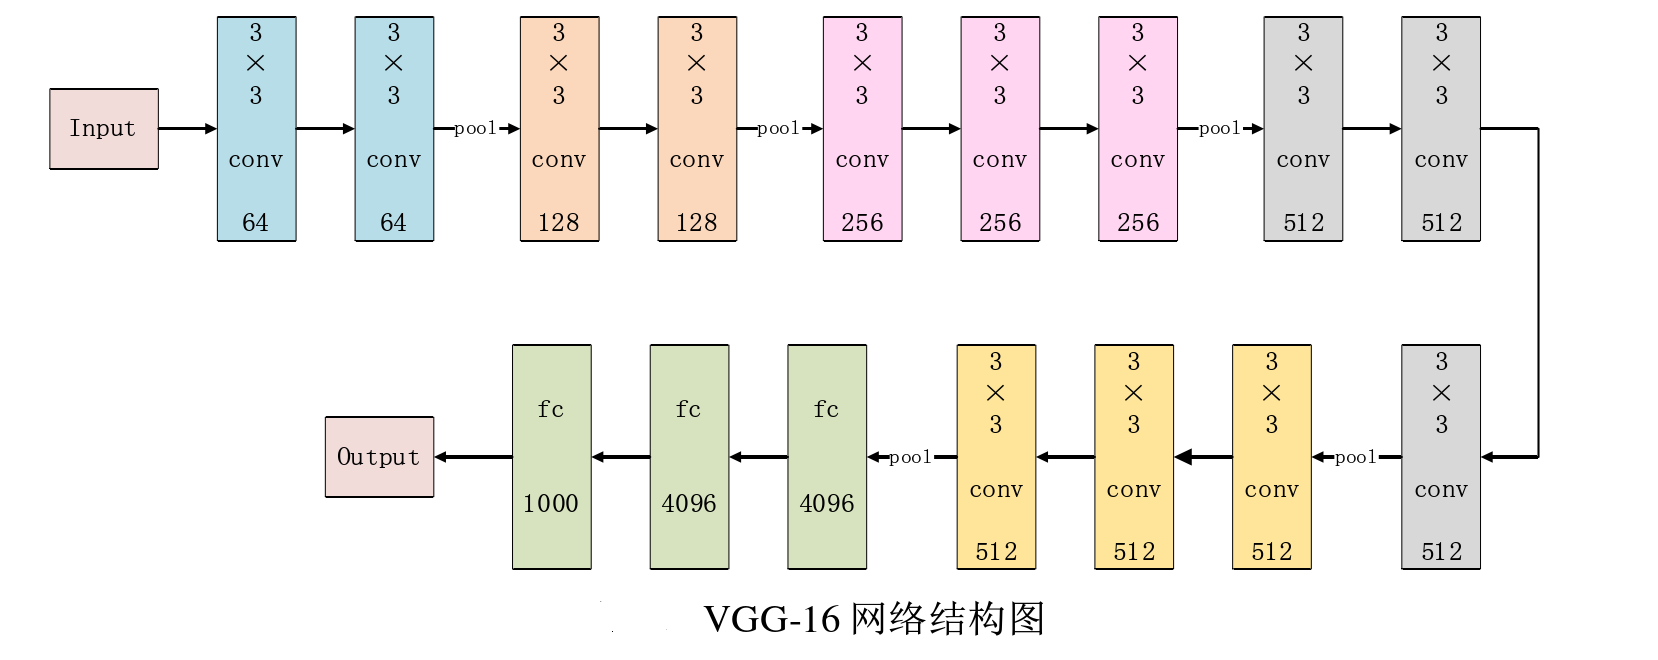
VGG16网络构架:

代码实现:
import torch
import torch.nn as nn

class VGG16(nn.Module):
    def __init__(self, num_classes=1000):
        super(VGG16, self).__init__()
        self.features = nn.Sequential(
            nn.Conv2d(3, 64, kernel_size=3, padding=1),
            nn.ReLU(inplace=True),
            nn.Conv2d(64, 64, kernel_size=3, padding=1),
            nn.ReLU(inplace=True),
            nn.MaxPool2d(kernel_size=2, stride=2),
            nn.Conv2d(64, 128, kernel_size=3, padding=1),
            nn.ReLU(inplace=True),
            nn.Conv2d(128, 128, kernel_size=3, padding=1),
            nn.ReLU(inplace=True),
            nn.MaxPool2d(kernel_size=2, stride=2),
            nn.Conv2d(128, 256, kernel_size=3, padding=1),
            nn.ReLU(inplace=True),
            nn.Conv2d(256, 256, kernel_size=3, padding=1),
            nn.ReLU(inplace=True),
            nn.Conv2d(256, 256, kernel_size=3, padding=1),
            nn.ReLU(inplace=True),
            nn.MaxPool2d(kernel_size=2, stride=2),
            nn.Conv2d(256, 512, kernel_size=3, padding=1),
            nn.ReLU(inplace=True),
            nn.Conv2d(512, 512, kernel_size=3, padding=1),
            nn.ReLU(inplace=True),
            nn.Conv2d(512, 512, kernel_size=3, padding=1),
            nn.ReLU(inplace=True),
            nn.MaxPool2d(kernel_size=2, stride=2),
            nn.Conv2d(512, 512, kernel_size=3, padding=1),
            nn.ReLU(inplace=True),
            nn.Conv2d(512, 512, kernel_size=3, padding=1),
            nn.ReLU(inplace=True),
            nn.Conv2d(512, 512, kernel_size=3, padding=1),
            nn.ReLU(inplace=True),
            nn.MaxPool2d(kernel_size=2, stride=2),
        )
        self.classifier = nn.Sequential(
            nn.Linear(512 * 7 * 7, 4096),
            nn.ReLU(inplace=True),
            nn.Dropout(),
            nn.Linear(4096, 4096),
            nn.ReLU(inplace=True),
            nn.Dropout(),
            nn.Linear(4096, num_classes),
        )

    def forward(self, x):
        x = self.features(x)
        x = x.view(x.size(0), -1)
        x = self.classifier(x)
        return x

# 创建VGG16模型
model = VGG16(num_classes=1000)
print(model)
代码中的VGG16实现适用于ImageNet数据集,其中输入图像大小为224x224,输出类别数为1000。
2.4 ResNet
ResNet50网络构架:

代码实现:
import torch
import torch.nn as nn

# 定义残差块
class ResidualBlock(nn.Module):
    def __init__(self, in_channels, out_channels, stride=1):
        super(ResidualBlock, self).__init__()
        self.conv1 = nn.Conv2d(in_channels, out_channels, kernel_size=3, stride=stride, padding=1, bias=False)
        self.bn1 = nn.BatchNorm2d(out_channels)
        self.relu = nn.ReLU(inplace=True)
        self.conv2 = nn.Conv2d(out_channels, out_channels, kernel_size=3, stride=1, padding=1, bias=False)
        self.bn2 = nn.BatchNorm2d(out_channels)

        if stride != 1 or in_channels != out_channels:
            self.downsample = nn.Sequential(
                nn.Conv2d(in_channels, out_channels, kernel_size=1, stride=stride, bias=False),
                nn.BatchNorm2d(out_channels)
            )
        else:
            self.downsample = None

    def forward(self, x):
        identity = x

        x = self.conv1(x)
        x = self.bn1(x)
        x = self.relu(x)

        x = self.conv2(x)
        x = self.bn2(x)

        if self.downsample is not None:
            identity = self.downsample(identity)

        x += identity
        x = self.relu(x)

        return x

# 定义ResNet-50
class ResNet50(nn.Module):
    def __init__(self, num_classes=1000):
        super(ResNet50, self).__init__()
        self.in_channels = 64
        self.conv1 = nn.Conv2d(3, 64, kernel_size=7, stride=2, padding=3, bias=False)
        self.bn1 = nn.BatchNorm2d(64)
        self.relu = nn.ReLU(inplace=True)
        self.maxpool = nn.MaxPool2d(kernel_size=3, stride=2, padding=1)

        self.layer1 = self._make_layer(64, 3, stride=1)
        self.layer2 = self._make_layer(128, 4, stride=2)
        self.layer3 = self._make_layer(256, 6, stride=2)
        self.layer4 = self._make_layer(512, 3, stride=2)

        self.avgpool = nn.AdaptiveAvgPool2d((1, 1))
        self.fc = nn.Linear(512 * 4, num_classes)

    def _make_layer(self, out_channels, num_blocks, stride):
        layers = []
        layers.append(ResidualBlock(self.in_channels, out_channels, stride))
        self.in_channels = out_channels
        for _ in range(1, num_blocks):
            layers.append(ResidualBlock(out_channels, out_channels))
        return nn.Sequential(*layers)

    def forward(self, x):
        x = self.conv1(x)
        x = self.bn1(x)
        x = self.relu(x)
        x = self.maxpool(x)

        x = self.layer1(x)
        x = self.layer2(x)
        x = self.layer3(x)
        x = self.layer4(x)

        x = self.avgpool(x)
        x = x.view(x.size(0), -1)
        x = self.fc(x)

        return x

# 创建ResNet-50模型
model = ResNet50(num_classes=1000)
print(model)
代码中的ResNet50实现适用于ImageNet数据集,其中输入图像大小为224x224,输出类别数为1000。
