基于Yolov5与LabelImg训练自己数据的完整流程
- 1. 创建虚拟环境
- 2. 通过git 安装 ultralytics
- 3. 下载yolov5
- 4. 安装labelImg标注软件
- 5. 使用labelImg进行标注,图片使用上面的coco128
- 5.1 点击“打开目录”选择存储图像的文件夹进行标注,右下角会出现图像列表
- 5.2 选择“创建区块”,在图像上对目标进行标注,然后填入类别,每张图片皆可标记多个目标
- 5.3 每一张图片标注完后,软件会提示进行保存,点击Yes即可;
- 5.4 标记完后的文件如图所示;
- 5.5 将xml文件放入vocLabels文件夹中;
- 6. 将数据转换成yolo需要的格式
- 7. 对数据集进行划分
- 8.训练
- 8.1 如果运行的时候出现如下报错,进入虚拟环境中搜索libiomp5md.dll,删掉一个即可
- 8.2 训练时需要修改的文件如下,修改文件的路径如下:
- 8.3 训练
- 8.4 预测
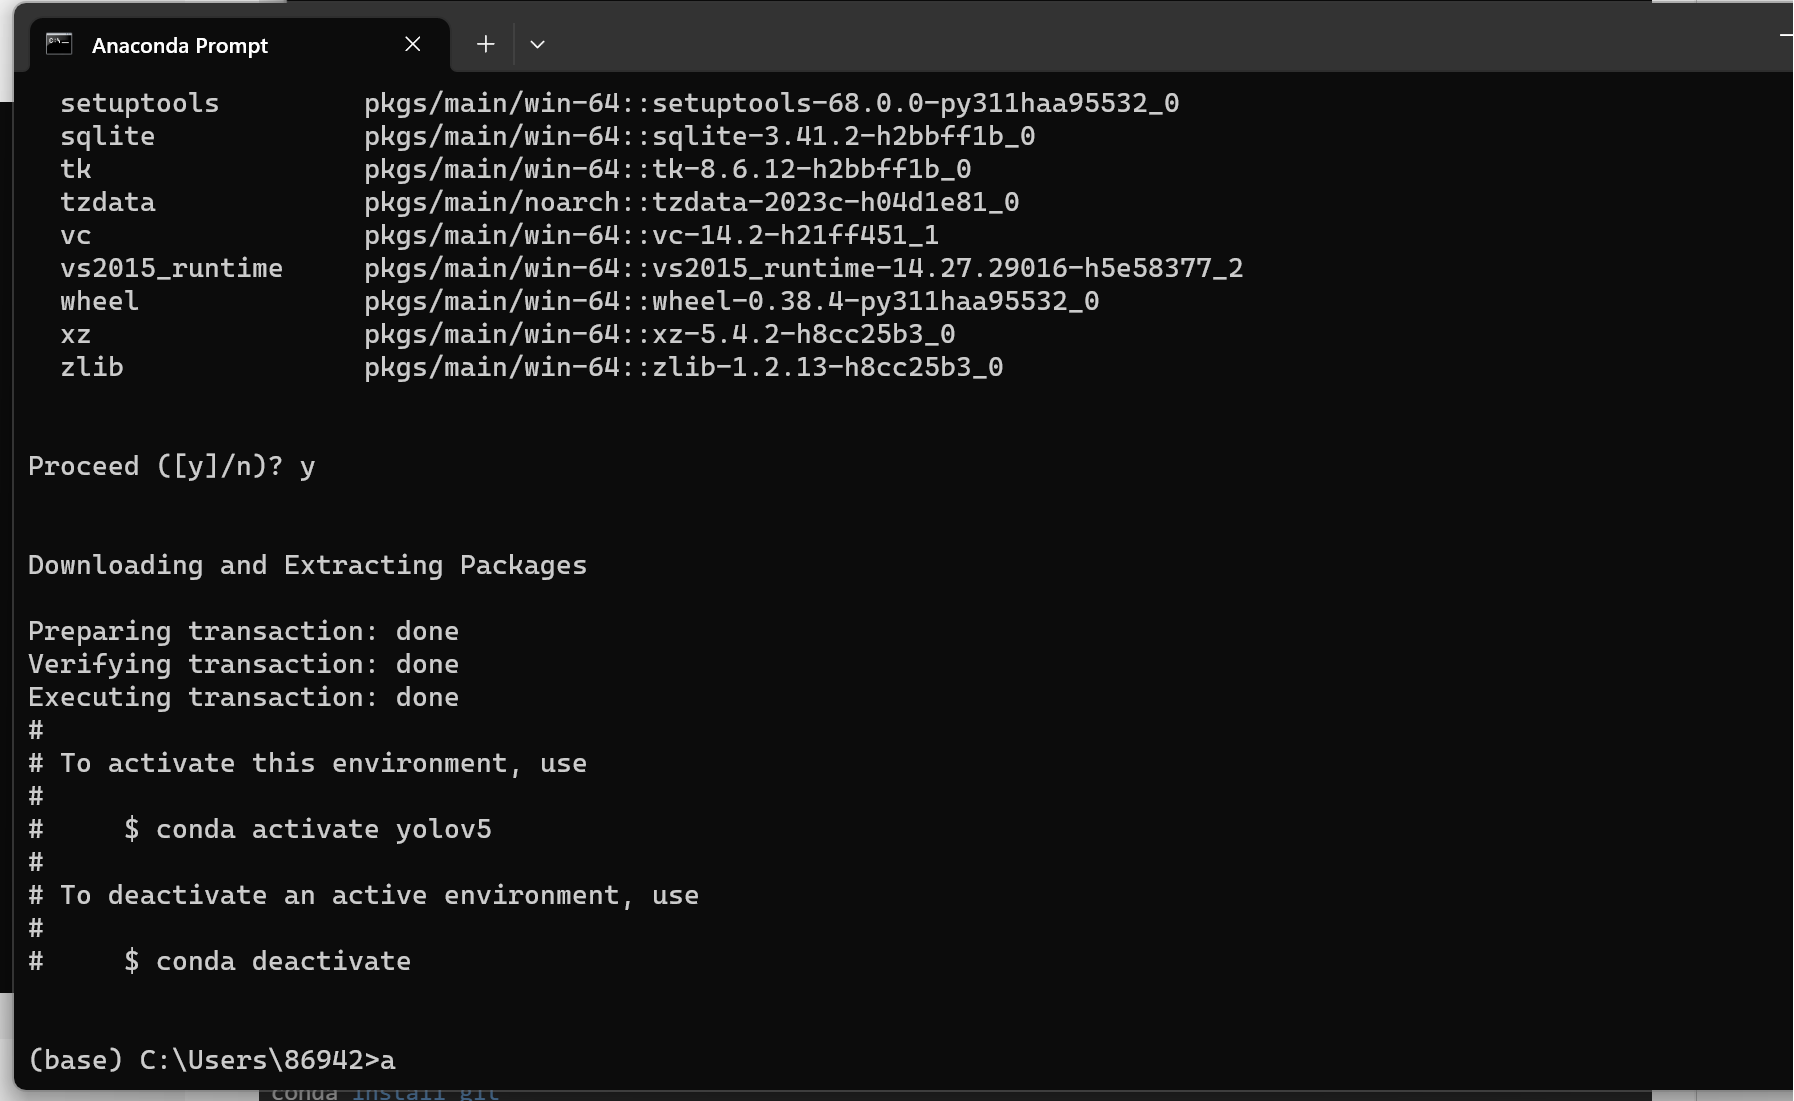
1. 创建虚拟环境
```python
conda create -n yolov5 python=3.11
# 激活yolos 环境,后续的安装都在里面进行
conda activate yolos
2. 通过git 安装 ultralytics
# 没有git的话要安装git
conda install git

# D:  进入D盘
D:
mkdir yolov5_env
cd yolov5_env

# Clone the ultralytics repository
git clone https://github.com/ultralytics/ultralytics

# Navigate to the cloned directory
cd ultralytics

# 先安装pytorch,因为在配置ultralytics会下载 ,但其是默认cpu版本,如果安装了cpu版本,不要着急,卸载重新安装即可
pip3 install torch torchvision torchaudio --index-url https://download.pytorch.org/whl/cu117  //这一步骤比较慢

# 如果觉得慢,可以下载相应的whl文件
https://download.pytorch.org/whl/torch_stable.html
下载后到目录下执行 pip install "torch-2.0.1+cu117-cp311-cp311-win_amd64.whl"
如果网非常差,缺什么根据提示从清华镜像下载
示例如下:
pip install -i https://pypi.tuna.tsinghua.edu.cn/simple sympy
pip install -i https://pypi.tuna.tsinghua.edu.cn/simple networkx
pip install -i https://pypi.tuna.tsinghua.edu.cn/simple matplotlib
pip install -i https://pypi.tuna.tsinghua.edu.cn/simple colorama
pip install -i https://pypi.tuna.tsinghua.edu.cn/simple opencv_python
pip install -i https://pypi.tuna.tsinghua.edu.cn/simple pandas
pip install -i https://pypi.tuna.tsinghua.edu.cn/simple scipy

# Install the package in editable mode for development
pip install -e .    //最后的“.”不可省略

# 如果提示 INFO: pip is looking at multiple versions of ultralytics to determine which version is compatible with other requirements. This could take a while.
# 使用下面的命令,因为我的在这之前安装了一个ultralytics
pip3 install -U --user pip && pip3 install -e .

# torch 安装完成后,可以执行如下命令,进行快速安装
pip install -i https://pypi.tuna.tsinghua.edu.cn/simple -r requirements.txt

# 后面有些代码需要pytest,也要安装一下
pip install -i https://pypi.tuna.tsinghua.edu.cn/simple pytest

# 如果需要安装onnx,也可以安装一下
conda install onnx
3. 下载yolov5
cd ..
# 下载代码
git clone https://github.com/ultralytics/yolov5
cd yolov5
pip install -i https://pypi.tuna.tsinghua.edu.cn/simple -r requirements.txt
测试环境:
运行train.py,其会自动下载相应的模型和coco128数据集进行训练。
链接里是yolov5的预训练模型
链接:https://pan.baidu.com/s/1PBiuasQ6i7FKST1b7NGMVA
提取码:j9z3
新建一个weights放入,训练的时候修改路径即可
parser.add_argument('--weights', type=str, default=ROOT / 'weights/yolov5s.pt', help='initial weights path')
如果运行的时候出现如下报错,进入虚拟环境中搜索libiomp5md.dll,删掉一个即可
OMP: Error #15: Initializing libiomp5md.dll, but found libiomp5md.dll already initialized

可以正常训练时则配置成功。
4. 安装labelImg标注软件
# 下载源代码
git clone https://github.com/HumanSignal/labelImg.git
# 创建labelImg虚拟环境,lebelImg 需要低版本的python,我这里安装3.7
conda create -n labelImg37 python=3.7
# 激活环境
conda activate labelImg37
# 安装依赖库
conda install pyqt=5
conda install -c anaconda lxml
# 将qrc转换成可调用的py
pyrcc5 -o libs/resources.py resources.qrc
# 直接运行会报错 'pyrcc5' 不是内部或外部命令,也不是可运行的程序;因为从anaconda 中安装的pyqt不包含pyrcc5
# 需要从cmd直接安装
pip install pyqt5_tools -i https://pypi.tuna.tsinghua.edu.cn/simple
# 然后再执行下一句
pyrcc5 -o libs/resources.py resources.qrc
#然后执行下一句弹出窗口
python labelImg.py
# python labelImg.py [IMAGE_PATH] [PRE-DEFINED CLASS FILE]

# 也可以直接通过pip安装
pip3 install labelImg
# 启动
labelImg
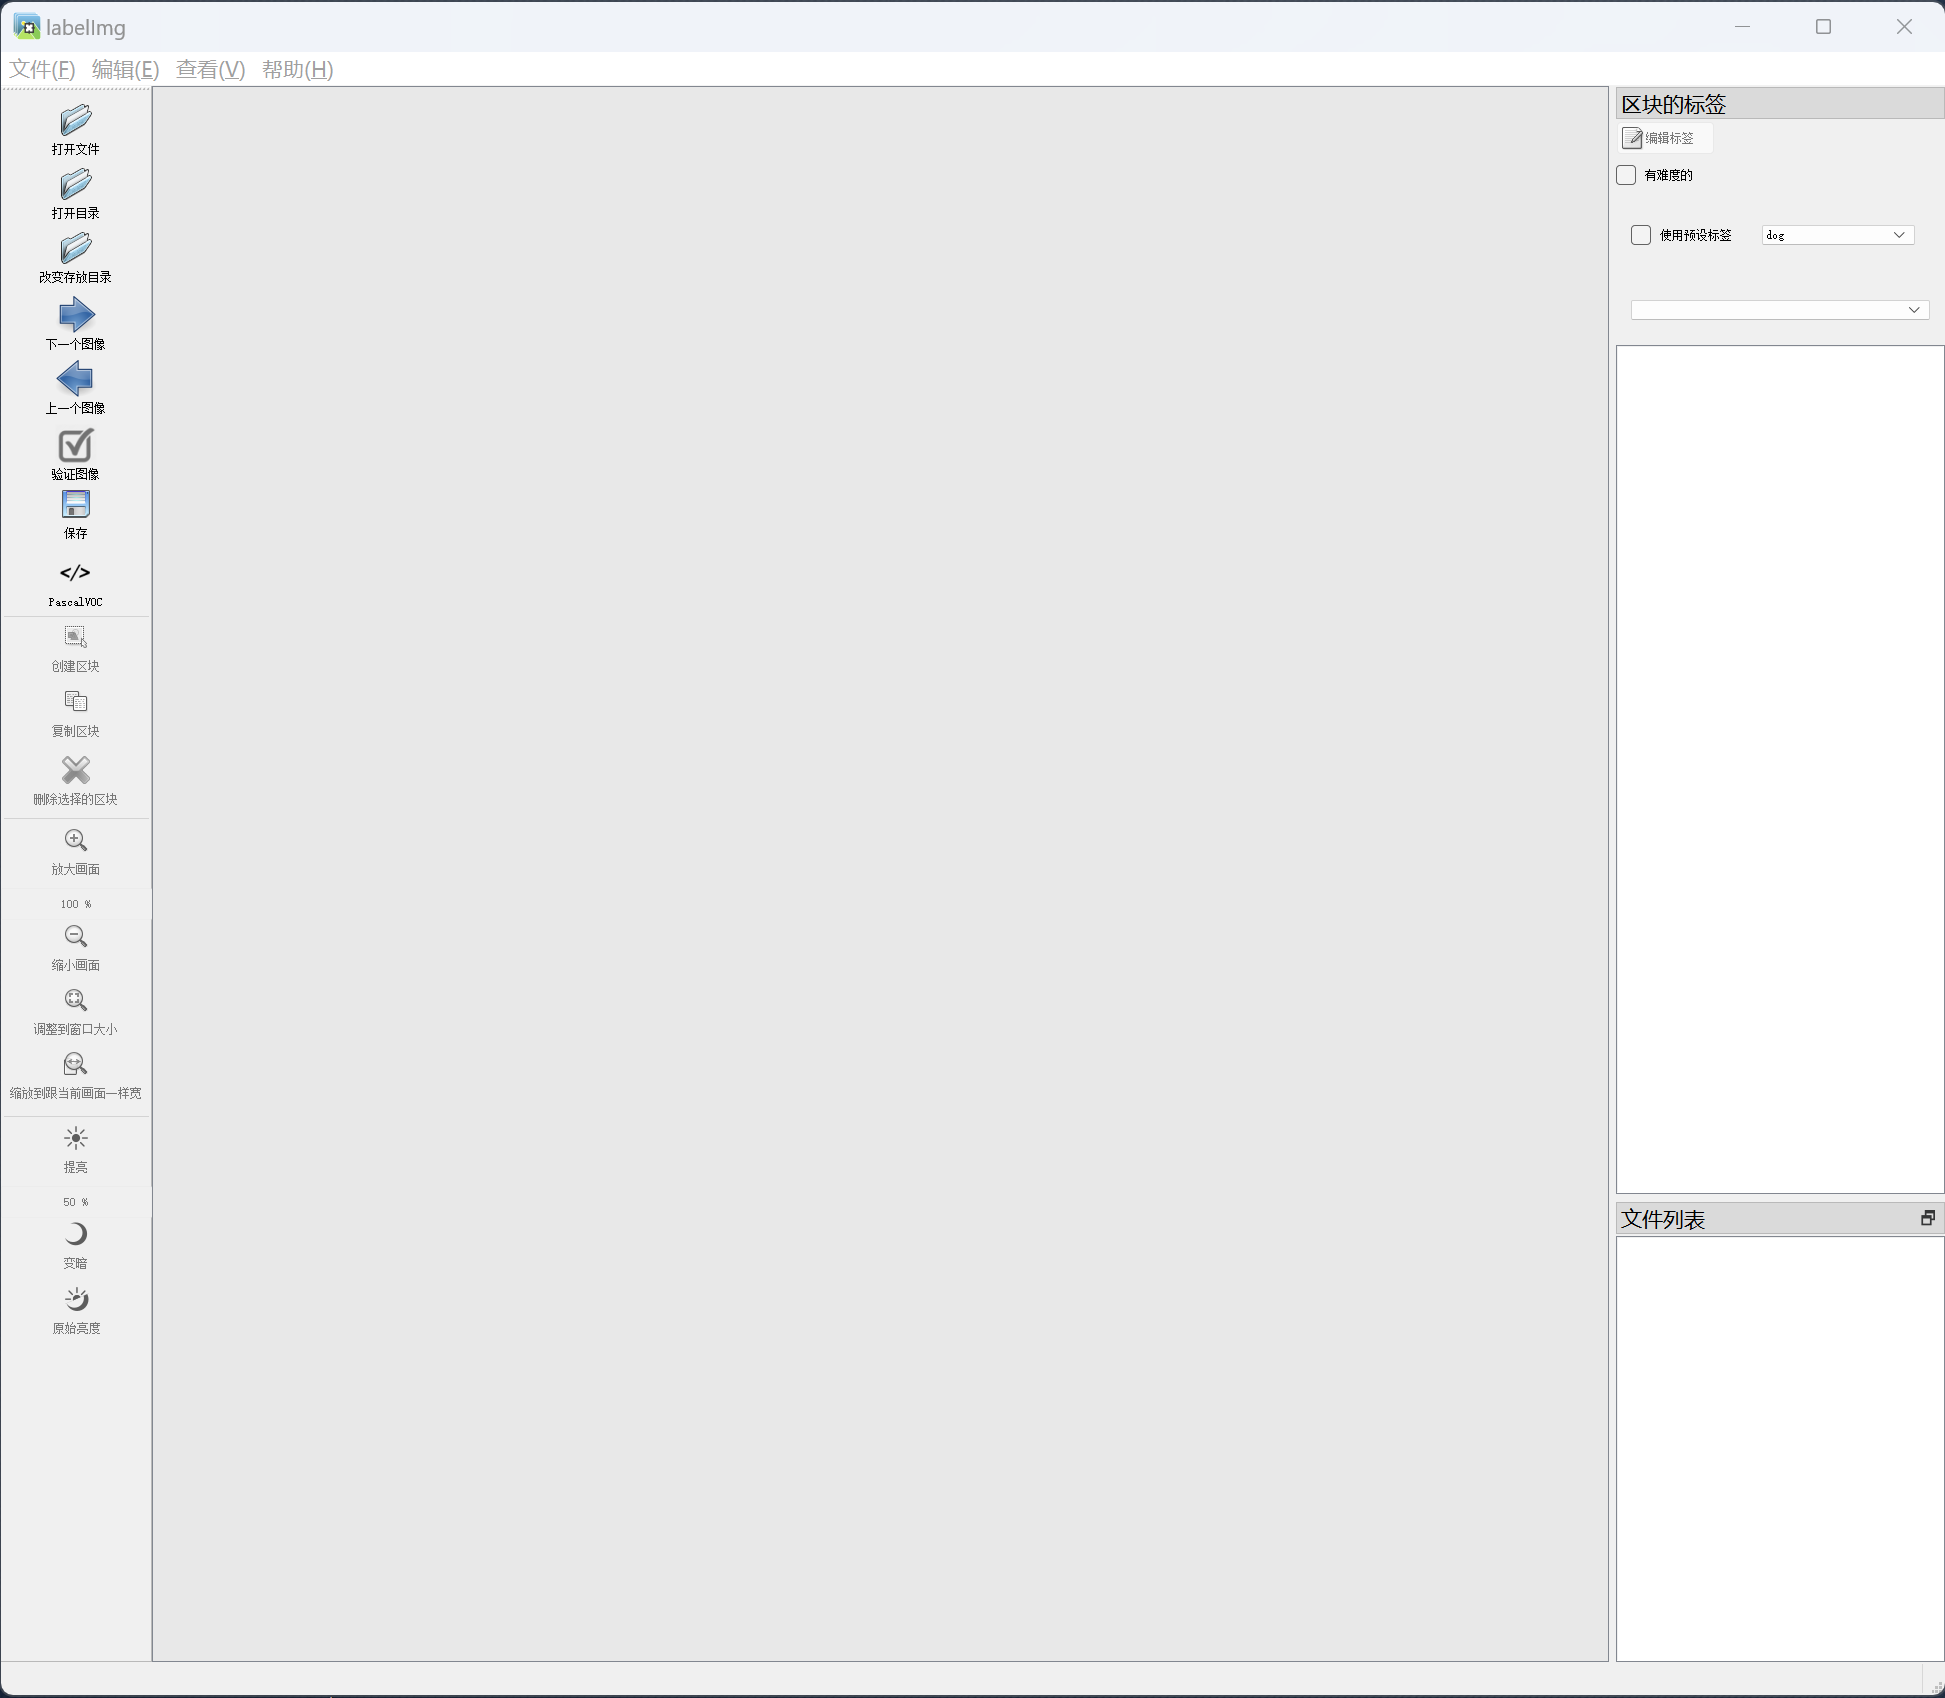
5. 使用labelImg进行标注,图片使用上面的coco128
首先创建一个文件夹:cocoImages, 里面分别创建2个文件夹,images用来放置标注图片, vocLabels 用来放置标注文件
5.1 点击“打开目录”选择存储图像的文件夹进行标注,右下角会出现图像列表

5.2 选择“创建区块”,在图像上对目标进行标注,然后填入类别,每张图片皆可标记多个目标
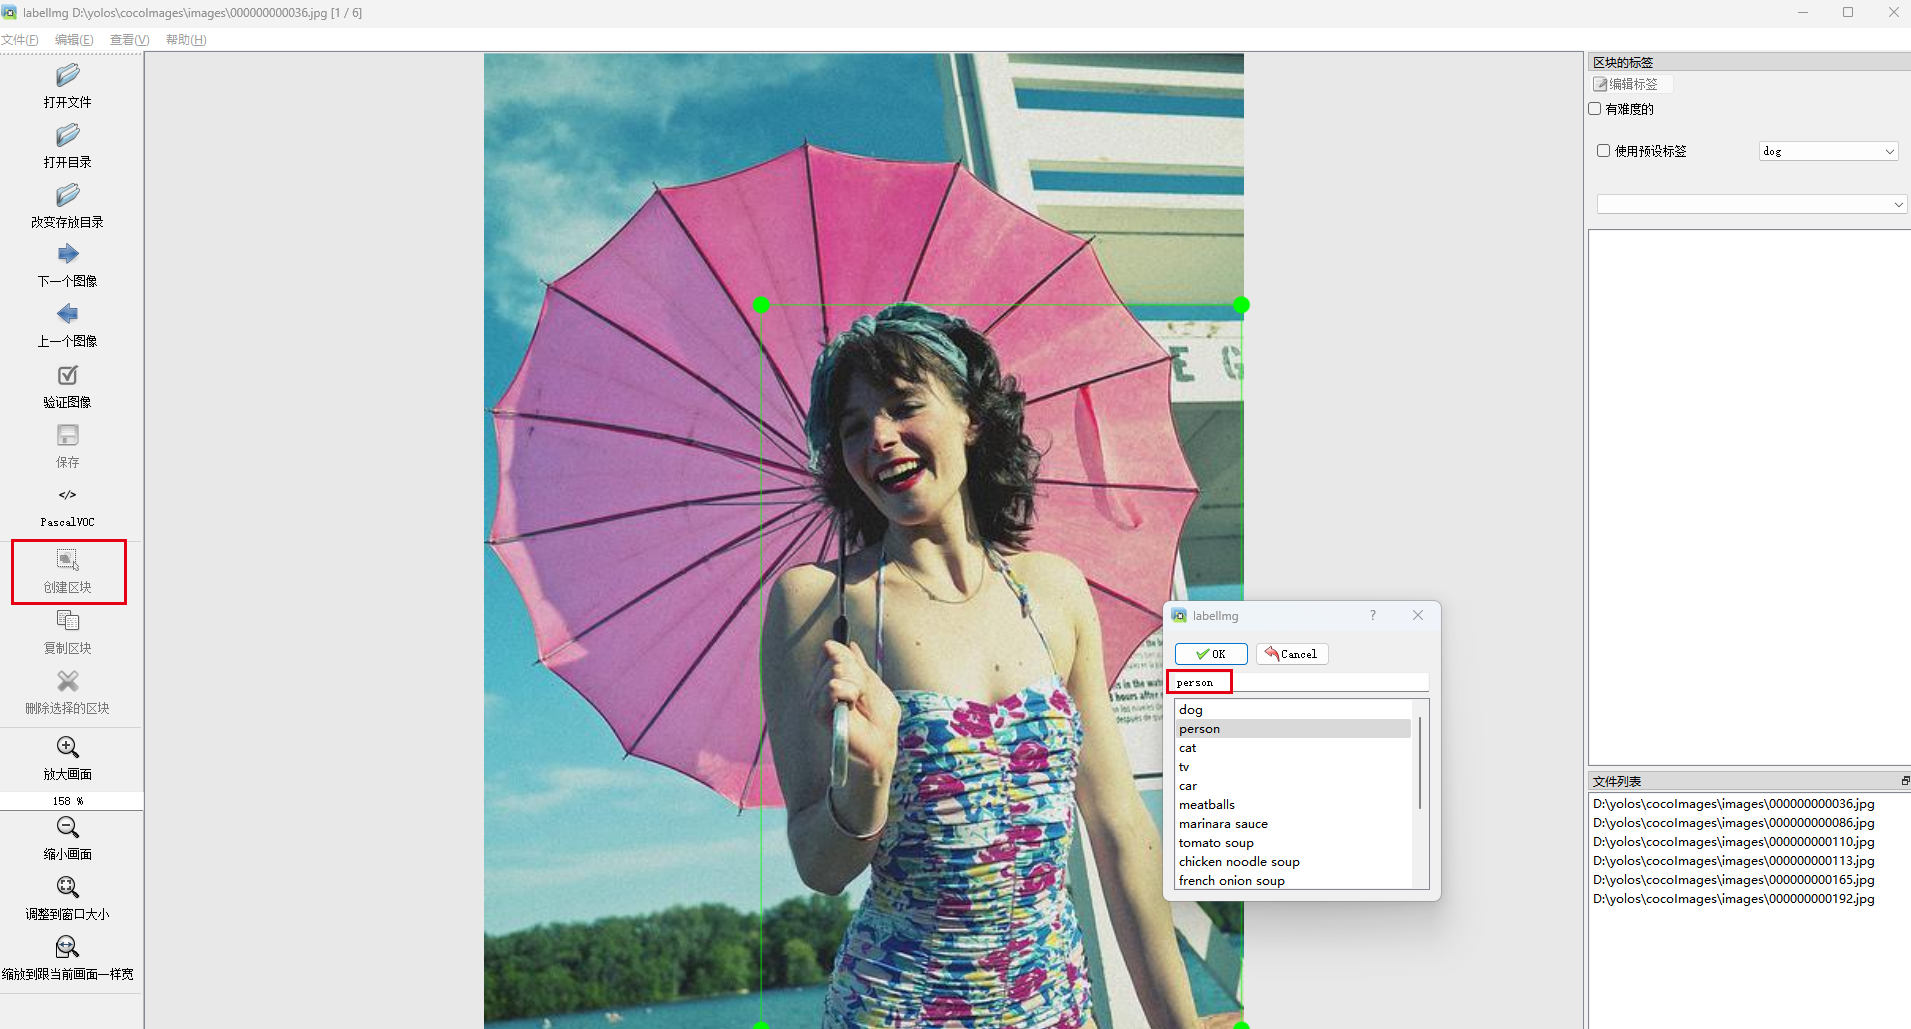
5.3 每一张图片标注完后,软件会提示进行保存,点击Yes即可;
5.4 标记完后的文件如图所示;
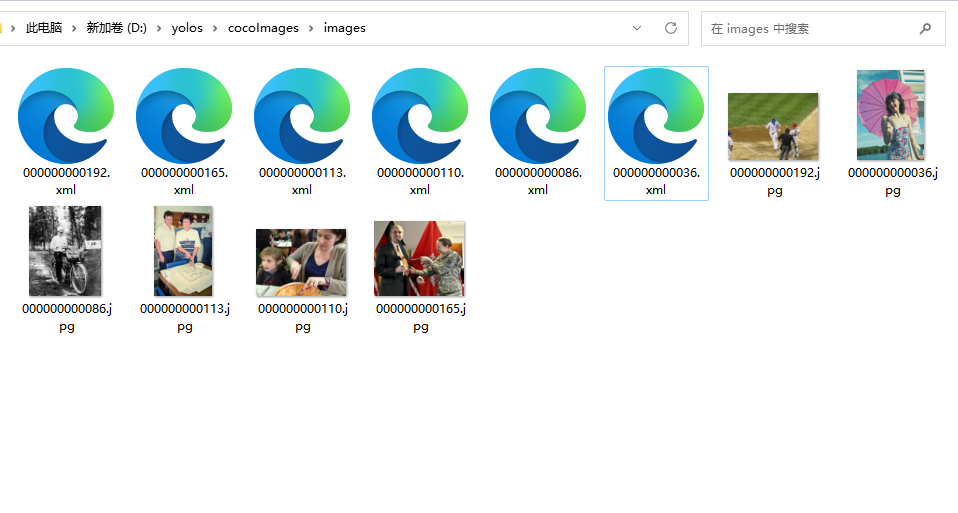
5.5 将xml文件放入vocLabels文件夹中;
6. 将数据转换成yolo需要的格式
首先将11行中的classes改为自己标注的类别,然后执行下代码生成相应的文件夹,接着将图像copy到JPEGImages下,labels copy到Annotations下面,再次执行一次该代码即可。
import xml.etree.ElementTree as ET
import pickle
import os
from os import listdir, getcwd
from os.path import join
import random

# classes=["aeroplane", 'bicycle', 'bird', 'boat', 'bottle', 'bus', 'car', 'cat', 'chair', 'cow', 'diningtable', 'dog',
#            'horse', 'motorbike', 'person', 'pottedplant', 'sheep', 'sofa', 'train', 'tvmonitor']  # class names

classes = ["person", 'cup', 'umbrella']


def clear_hidden_files(path):
    dir_list = os.listdir(path)
    for i in dir_list:
        abspath = os.path.join(os.path.abspath(path), i)
        if os.path.isfile(abspath):
            if i.startswith("._"):
                os.remove(abspath)
        else:
            clear_hidden_files(abspath)


def convert(size, box):
    dw = 1. / size[0]
    dh = 1. / size[1]
    x = (box[0] + box[1]) / 2.0
    y = (box[2] + box[3]) / 2.0
    w = box[1] - box[0]
    h = box[3] - box[2]
    x = x * dw
    w = w * dw
    y = y * dh
    h = h * dh
    return x, y, w, h


def convert_annotation(image_id, voc_labels, yolo_labels):
    in_file = open(os.path.join(voc_labels + '%s.xml') % image_id)
    out_file = open(os.path.join(yolo_labels + '%s.txt') % image_id, 'w')
    tree = ET.parse(in_file)
    root = tree.getroot()
    size = root.find('size')
    w = int(size.find('width').text)
    h = int(size.find('height').text)

    for obj in root.iter('object'):
        difficult = obj.find('difficult').text
        cls = obj.find('name').text
        if cls not in classes or int(difficult) == 1:
            continue
        cls_id = classes.index(cls)
        xml_box = obj.find('bndbox')
        b = (float(xml_box.find('xmin').text), float(xml_box.find('xmax').text), float(xml_box.find('ymin').text),
             float(xml_box.find('ymax').text))
        bb = convert((w, h), b)
        out_file.write(str(cls_id) + " " + " ".join([str(a) for a in bb]) + '\n')
    in_file.close()
    out_file.close()


if __name__ == '__main__':
    # 获取当前路径
    wd = os.getcwd()
    # 创建相应VOC模式文件夹
    voc_path = os.path.join(wd, "voc_dataset")
    if not os.path.isdir(voc_path):
        os.mkdir(voc_path)

    annotation_dir = os.path.join(voc_path, "Annotations/")
    if not os.path.isdir(annotation_dir):
        os.mkdir(annotation_dir)
    clear_hidden_files(annotation_dir)

    image_dir = os.path.join(voc_path, "JPEGImages/")
    if not os.path.isdir(image_dir):
        os.mkdir(image_dir)
    clear_hidden_files(image_dir)

    voc_file_dir = os.path.join(voc_path, "ImageSets/")
    if not os.path.isdir(voc_file_dir):
        os.mkdir(voc_file_dir)

    voc_file_dir = os.path.join(voc_file_dir, "Main/")
    if not os.path.isdir(voc_file_dir):
        os.mkdir(voc_file_dir)

    VOC_train_file = open(os.path.join(voc_path, "ImageSets/Main/train.txt"), 'w')
    VOC_test_file = open(os.path.join(voc_path, "ImageSets/Main/test.txt"), 'w')
    VOC_train_file.close()
    VOC_test_file.close()

    if not os.path.exists(os.path.join(voc_path, 'Labels/')):
        os.makedirs(os.path.join(voc_path, 'Labels'))

    train_file = open(os.path.join(voc_path, "2007_train.txt"), 'a')
    test_file = open(os.path.join(voc_path, "2007_test.txt"), 'a')
    VOC_train_file = open(os.path.join(voc_path, "ImageSets/Main/train.txt"), 'a')
    VOC_test_file = open(os.path.join(voc_path, "ImageSets/Main/test.txt"), 'a')

    image_list = os.listdir(image_dir)  # list image files
    probo = random.randint(1, 100)
    print("Probobility: %d" % probo)
    for i in range(0, len(image_list)):
        path = os.path.join(image_dir, image_list[i])
        if os.path.isfile(path):
            image_path = image_dir + image_list[i]
            image_name = image_list[i]
            (name_without_extent, extent) = os.path.splitext(os.path.basename(image_path))
            voc_name_without_extent, voc_extent = os.path.splitext(os.path.basename(image_name))
            annotation_name = name_without_extent + '.xml'
            annotation_path = os.path.join(annotation_dir, annotation_name)
        probo = random.randint(1, 100)
        print("Probobility: %d" % probo)
        if (probo < 75):
            if os.path.exists(annotation_path):
                train_file.write(image_path + '\n')
                VOC_train_file.write(voc_name_without_extent + '\n')
                yolo_labels_dir = os.path.join(voc_path, 'Labels/')
                convert_annotation(name_without_extent, annotation_dir, yolo_labels_dir)
        else:
            if os.path.exists(annotation_path):
                test_file.write(image_path + '\n')
                VOC_test_file.write(voc_name_without_extent + '\n')
                yolo_labels_dir =os.path.join(voc_path, 'Labels/')
                convert_annotation(name_without_extent, annotation_dir, yolo_labels_dir)

    train_file.close()
    test_file.close()
    VOC_train_file.close()
    VOC_test_file.close()
7. 对数据集进行划分
import os
import shutil
import random
ratio=0.1
img_dir='./voc_dataset/JPEGImages' #图片路径
label_dir='./voc_dataset/Labels'#生成的yolo格式的数据存放路径
train_img_dir='./voc_dataset/images/train2017'#训练集图片的存放路径
val_img_dir='./voc_dataset/images/val2017'
train_label_dir='./voc_dataset/labels/train2017'#训练集yolo格式数据的存放路径
val_label_dir='./voc_dataset/labels/val2017'
if not os.path.exists(train_img_dir):
    os.makedirs(train_img_dir)
if not os.path.exists(val_img_dir):
    os.makedirs(val_img_dir)
if not os.path.exists(train_label_dir):
    os.makedirs(train_label_dir)
if not os.path.exists(val_label_dir):
    os.makedirs(val_label_dir)
names=os.listdir(img_dir)
val_names=random.sample(names,int(len(names)*ratio))

cnt_1=0
cnt_2=0
for name in names:
    if name in val_names:
        #cnt_1+=1
        #if cnt_1>100:
            #break
        shutil.copy(os.path.join(img_dir,name),os.path.join(val_img_dir,name))
        shutil.copy(os.path.join(label_dir, name[:-4]+'.txt'), os.path.join(val_label_dir, name[:-4]+'.txt'))
    else:
        #cnt_2+=1
        #if cnt_2>1000:
            #break
        shutil.copy(os.path.join(img_dir, name), os.path.join(train_img_dir, name))
        shutil.copy(os.path.join(label_dir, name[:-4] + '.txt'), os.path.join(train_label_dir, name[:-4] + '.txt'))
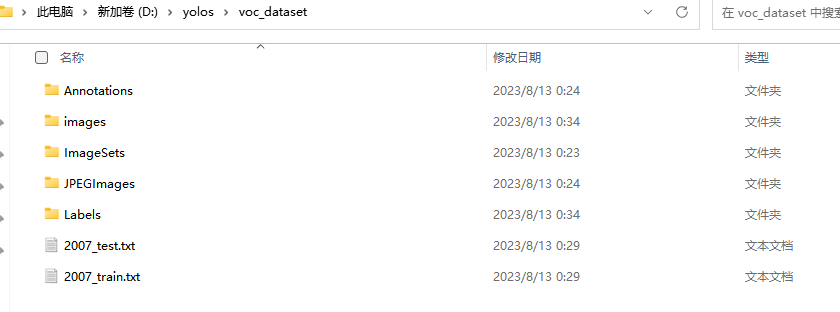
执行完第七个步骤后,数据集的文件分布如下所示,其中,images,Labels中的文件即yolov8训练时所需要的:
8.训练
8.1 如果运行的时候出现如下报错,进入虚拟环境中搜索libiomp5md.dll,删掉一个即可
OMP: Error #15: Initializing libiomp5md.dll, but found libiomp5md.dll already initialized
8.2 训练时需要修改的文件如下,修改文件的路径如下:
D:\yolov5_env\yolov5\data\myVOC.yaml
# YOLOv5 🚀 by Ultralytics, AGPL-3.0 license
# PASCAL VOC dataset http://host.robots.ox.ac.uk/pascal/VOC by University of Oxford
# Example usage: python train.py --data VOC.yaml
# parent
# ├── yolov5
# └── datasets
#     └── VOC  ← downloads here (2.8 GB)


# Train/val/test sets as 1) dir: path/to/imgs, 2) file: path/to/imgs.txt, or 3) list: [path/to/imgs1, path/to/imgs2, ..]
path: ../voc_dataset
train: # train images (relative to 'path')  16551 images
  - images/train2017
  - images/val2017
val: # val images (relative to 'path')  4952 images
  - images/val2017
test: # test images (optional)
  - images/val2017
#classes = ["person", 'cup', 'umbrella']
# Classes
names:
  0: person
  1: cup
  2: umbrella
网络配置参数:
D:\yolov5_env\yolov5\models\yolov5n.yaml
# YOLOv5 🚀 by Ultralytics, AGPL-3.0 license

# Parameters
nc: 3  # number of classes
depth_multiple: 0.33  # model depth multiple
width_multiple: 0.25  # layer channel multiple
anchors:
  - [10,13, 16,30, 33,23]  # P3/8
  - [30,61, 62,45, 59,119]  # P4/16
  - [116,90, 156,198, 373,326]  # P5/32

# YOLOv5 v6.0 backbone
backbone:
  # [from, number, module, args]
  [[-1, 1, Conv, [64, 6, 2, 2]],  # 0-P1/2
   [-1, 1, Conv, [128, 3, 2]],  # 1-P2/4
   [-1, 3, C3, [128]],
   [-1, 1, Conv, [256, 3, 2]],  # 3-P3/8
   [-1, 6, C3, [256]],
   [-1, 1, Conv, [512, 3, 2]],  # 5-P4/16
   [-1, 9, C3, [512]],
   [-1, 1, Conv, [1024, 3, 2]],  # 7-P5/32
   [-1, 3, C3, [1024]],
   [-1, 1, SPPF, [1024, 5]],  # 9
  ]

# YOLOv5 v6.0 head
head:
  [[-1, 1, Conv, [512, 1, 1]],
   [-1, 1, nn.Upsample, [None, 2, 'nearest']],
   [[-1, 6], 1, Concat, [1]],  # cat backbone P4
   [-1, 3, C3, [512, False]],  # 13

   [-1, 1, Conv, [256, 1, 1]],
   [-1, 1, nn.Upsample, [None, 2, 'nearest']],
   [[-1, 4], 1, Concat, [1]],  # cat backbone P3
   [-1, 3, C3, [256, False]],  # 17 (P3/8-small)

   [-1, 1, Conv, [256, 3, 2]],
   [[-1, 14], 1, Concat, [1]],  # cat head P4
   [-1, 3, C3, [512, False]],  # 20 (P4/16-medium)

   [-1, 1, Conv, [512, 3, 2]],
   [[-1, 10], 1, Concat, [1]],  # cat head P5
   [-1, 3, C3, [1024, False]],  # 23 (P5/32-large)

   [[17, 20, 23], 1, Detect, [nc, anchors]],  # Detect(P3, P4, P5)
  ]
下面的文件是网络训练时的参数,可以进行修改,
D:\yolov5_env\yolov5\data\hyps\hyp.scratch-low.yaml
8.3 训练
修改完成后,训练完整代码如下:
运行train.py,注意修改文件的名称:
    parser.add_argument('--weights', type=str, default=ROOT / 'weights/yolov5s.pt', help='initial weights path')
    parser.add_argument('--cfg', type=str, default='', help='model.yaml path')
    parser.add_argument('--data', type=str, default=ROOT / 'data/myVOC.yaml', help='dataset.yaml path')
最终输出结果如下:
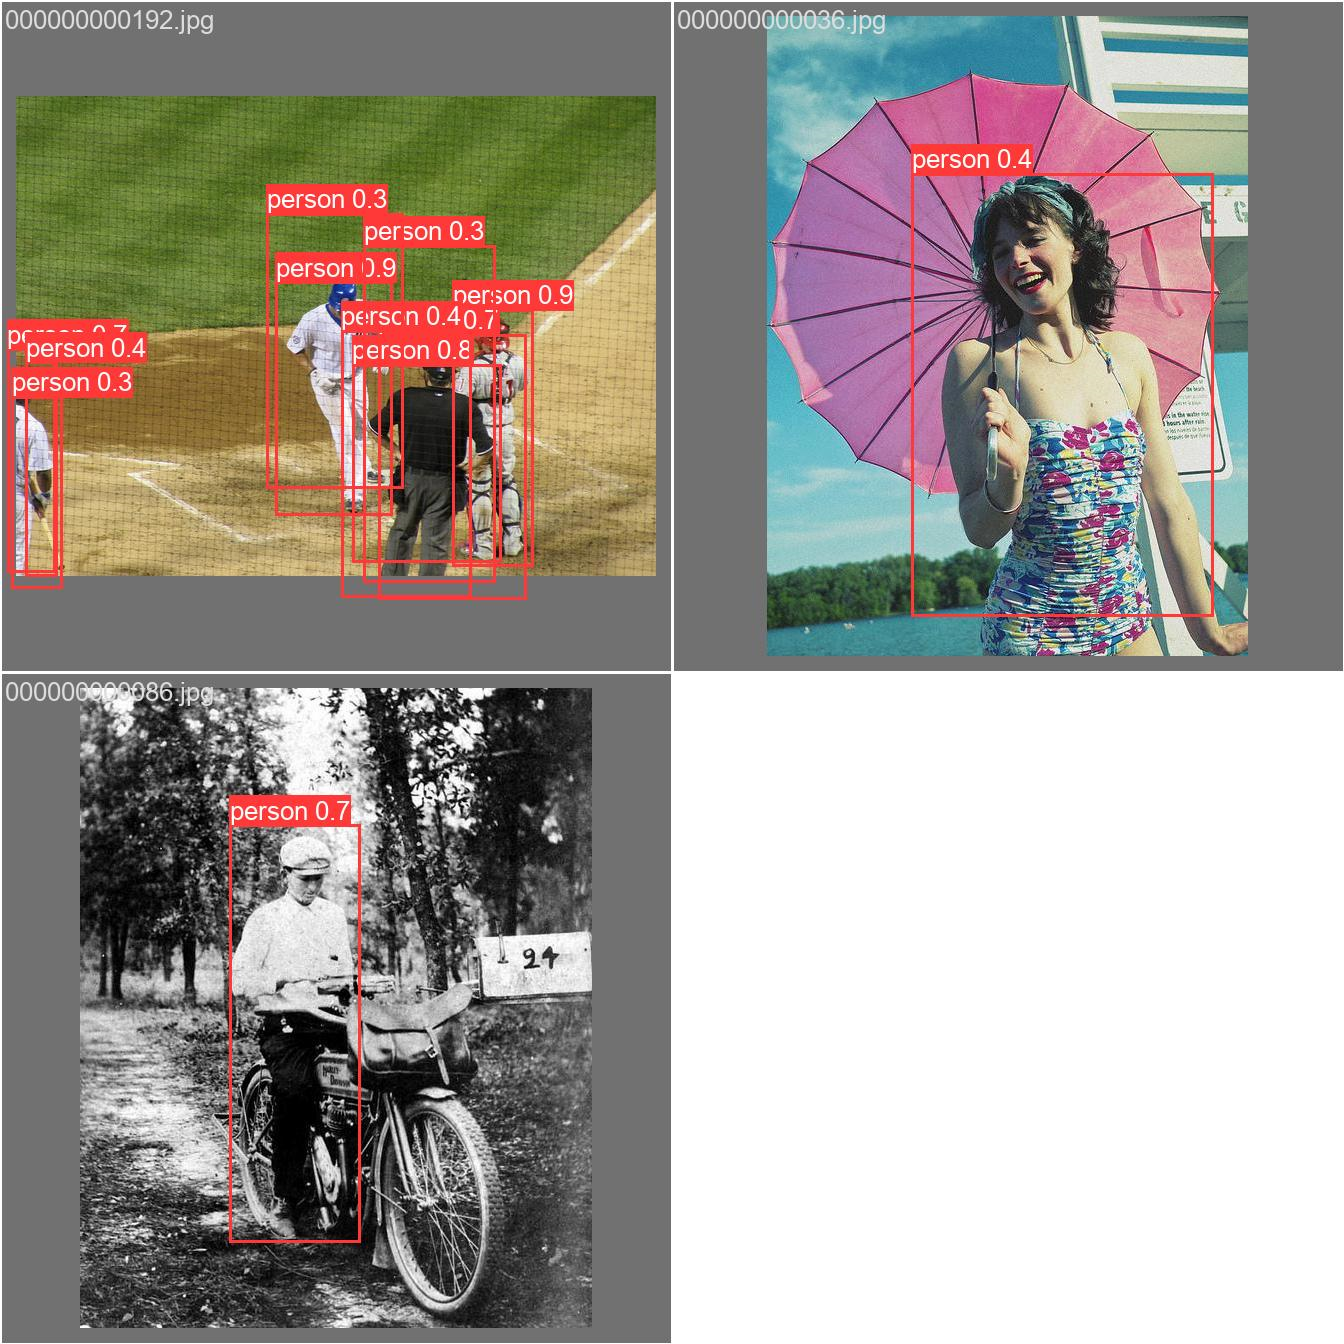
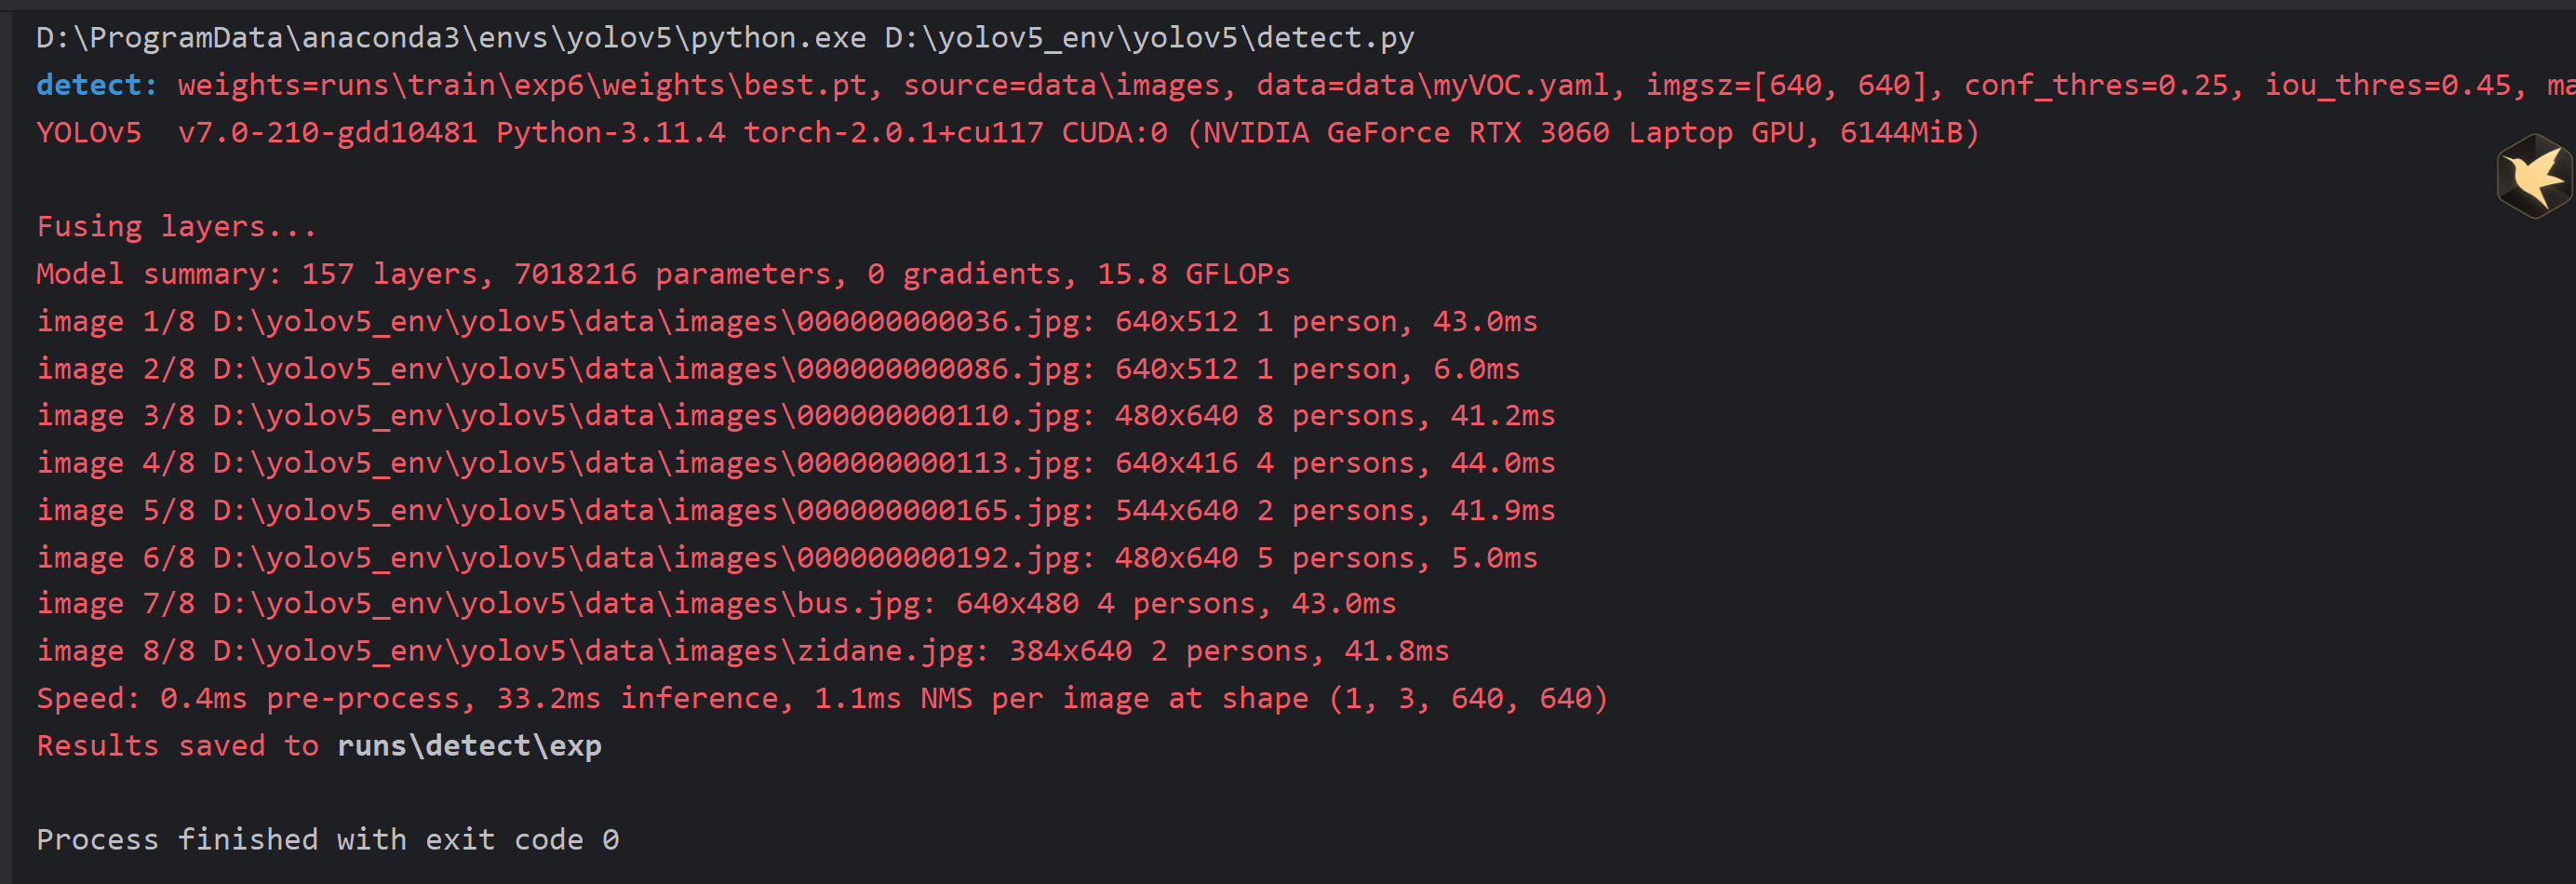
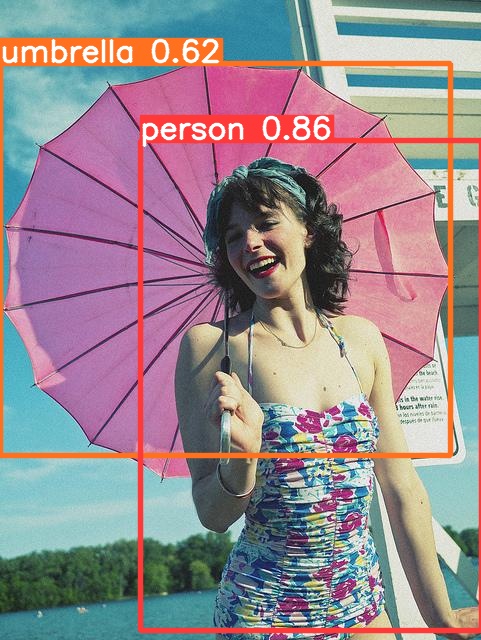
8.4 预测
detect.py 输出结果
注意修改路径
    parser.add_argument('--weights', nargs='+', type=str, default=ROOT / 'runs/train/exp6/weights/best.pt', help='model path or triton URL')
    parser.add_argument('--source', type=str, default=ROOT / 'data/images', help='file/dir/URL/glob/screen/0(webcam)')
    parser.add_argument('--data', type=str, default=ROOT / 'data/myVOC.yaml', help='(optional) dataset.yaml path')
    parser.add_argument('--conf-thres', type=float, default=0.25, help='confidence threshold')
    parser.add_argument('--iou-thres', type=float, default=0.45, help='NMS IoU threshold')
