AST入门与实战(一):基于babel库的js反混淆通用模板
首发地址:http://zhuoyue360.com/jsnx/106.html
1. 模板代码
通用模板来源自菜老板的知识星球.
const fs = require('fs');
const types = require("@babel/types");
const parser = require("@babel/parser");
const template = require("@babel/template").default;
const traverse = require("@babel/traverse").default;
const generator = require("@babel/generator").default;


//js混淆代码读取
process.argv.length > 2 ? encodeFile = process.argv[2] : encodeFile = "./encode.js";  //默认的js文件
process.argv.length > 3 ? decodeFile = process.argv[3] : decodeFile = encodeFile.slice(0, encodeFile.length - 3) + "_ok.js";

//将源代码解析为AST
let sourceCode = fs.readFileSync(encodeFile, { encoding: "utf-8" });
let ast = parser.parse(sourceCode);
console.time("处理完毕,耗时");


const visit =
{
	// TODO write your code here!
}

traverse(ast, visit);


const simplifyLiteral = {
	NumericLiteral({ node }) {
		if (node.extra && /^0[obx]/i.test(node.extra.raw)) {
			node.extra = undefined;
		}
	},
	StringLiteral({ node }) {
		if (node.extra && /\\[ux]/gi.test(node.extra.raw)) {
			node.extra = undefined;
		}
	},
}


traverse(ast, simplifyLiteral);


console.timeEnd("处理完毕,耗时");
let { code } = generator(ast, opts = {
	"compact"     : false,  // 是否压缩代码
  "comments"    : false,  // 是否保留注释
	"jsescOption" : { "minimal": true },  //Unicode转义
});

fs.writeFile(decodeFile, code, (err) => { });
2. 插件编写
1. 准备工作
我们已经拿到了最基础的使用模板以后,此时我们的ast反混淆已经成了一个填空题. 我们只需要把我们写好的网站反混淆插件填入即可,非常的简单. 接下来,我们找个简单的小案例来试试.
混淆代码均来自于:https://obfuscator.io/ 网站生成.
源代码:
function hi() {
  console.log("Hello,zhuoyue360.com");
}
function h3i() {
  console.log("Hello,zhuoyue360.com");
}function h2i() {
  console.log("Hello,zhuoyue360.com");
}function h44444i() {
  console.log("Hello,zhuoyue360.com");
}
hi();
混淆后的代码:(格式化后)
(function(_0x42555b, _0x288c31) {
    var _0x2e2c7a = _0x4f09
      , _0x264ee4 = _0x42555b();
    while (!![]) {
        try {
            var _0x54167b = parseInt(_0x2e2c7a(0x106)) / 0x1 * (-parseInt(_0x2e2c7a(0x10a)) / 0x2) + -parseInt(_0x2e2c7a(0x109)) / 0x3 * (parseInt(_0x2e2c7a(0x10b)) / 0x4) + -parseInt(_0x2e2c7a(0x10e)) / 0x5 * (parseInt(_0x2e2c7a(0x111)) / 0x6) + -parseInt(_0x2e2c7a(0x110)) / 0x7 + parseInt(_0x2e2c7a(0x10c)) / 0x8 + parseInt(_0x2e2c7a(0x10d)) / 0x9 * (parseInt(_0x2e2c7a(0x10f)) / 0xa) + parseInt(_0x2e2c7a(0x108)) / 0xb;
            if (_0x54167b === _0x288c31)
                break;
            else
                _0x264ee4['push'](_0x264ee4['shift']());
        } catch (_0x1b893f) {
            _0x264ee4['push'](_0x264ee4['shift']());
        }
    }
}(_0x49be, 0xbbf5c));
function hi() {
    console['log']('Hello,zhuoyue360.com');
}
function _0x4f09(_0xd05c9f, _0x352733) {
    var _0x49beab = _0x49be();
    return _0x4f09 = function(_0x4f0967, _0x3191e8) {
        _0x4f0967 = _0x4f0967 - 0x105;
        var _0x4f9c38 = _0x49beab[_0x4f0967];
        return _0x4f9c38;
    }
    ,
    _0x4f09(_0xd05c9f, _0x352733);
}
function _0x49be() {
    var _0x13bd5d = ['12032256MLzLfN', '1251zScKBQ', '25cNqVzl', '270jbEuTF', '5872188ZkfPRj', '1062282TyhTBn', 'Hello,zhuoyue360.com', '1kakbhL', 'log', '11816574EYEQFr', '66741ytXvQy', '42550jdDgVb', '12QEFacN'];
    _0x49be = function() {
        return _0x13bd5d;
    }
    ;
    return _0x49be();
}
function h3i() {
    var _0x2b1dcb = _0x4f09;
    console[_0x2b1dcb(0x107)](_0x2b1dcb(0x105));
}
function h2i() {
    var _0xa95bed = _0x4f09;
    console[_0xa95bed(0x107)](_0xa95bed(0x105));
}
function h44444i() {
    var _0xb505a4 = _0x4f09;
    console[_0xb505a4(0x107)](_0xb505a4(0x105));
}
hi();
我们要尽可能的把混淆后的代码转换成源代码 .此时,我们就需要借助另外一个网站:
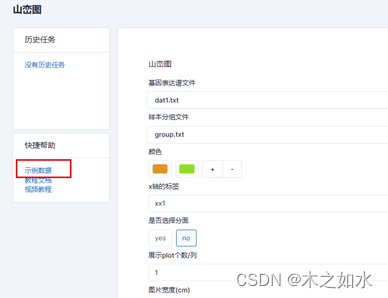
https://astexplorer.net/
配置如下, 具体的大家自行在网络上查看相关资料.

好了,目前我们所有的工作已经准备完成,我们就开始看如何还原代码了.
1. 函数调用计算
在下面这个案例中, 我们知道函数调用的真正方法是 _0x4f09 , 然后再使用_0x4f09 的每个函数的第一行都是var xxxxx= _0x4f09; 类似的赋值操作
function _0x4f09(_0xd05c9f, _0x352733) {
    var _0x49beab = _0x49be();
    return _0x4f09 = function(_0x4f0967, _0x3191e8) {
        _0x4f0967 = _0x4f0967 - 0x105;
        var _0x4f9c38 = _0x49beab[_0x4f0967];
        return _0x4f9c38;
    }
    ,
    _0x4f09(_0xd05c9f, _0x352733);
}

function h3i() {
    var _0x2b1dcb = _0x4f09;
    console[_0x2b1dcb(0x107)](_0x2b1dcb(0x105));
}
function h2i() {
    var _0xa95bed = _0x4f09;
    console[_0xa95bed(0x107)](_0xa95bed(0x105));
}
function h44444i() {
    var _0xb505a4 = _0x4f09;
    console[_0xb505a4(0x107)](_0xb505a4(0x105));
}
所以,我们的脚本可以按照下面的思路进行编写
- 可以先枚举所有函数.
- 函数的第一行代码是不是类似于
var xxxxx= _0x4f09; - 找到使用
xxxxx的函数调用,进行替换
那么让我们来编写第一个脚本.funcCallReplace
1. 枚举所有函数
根据工具提示,该节点是FunctionDeclaration
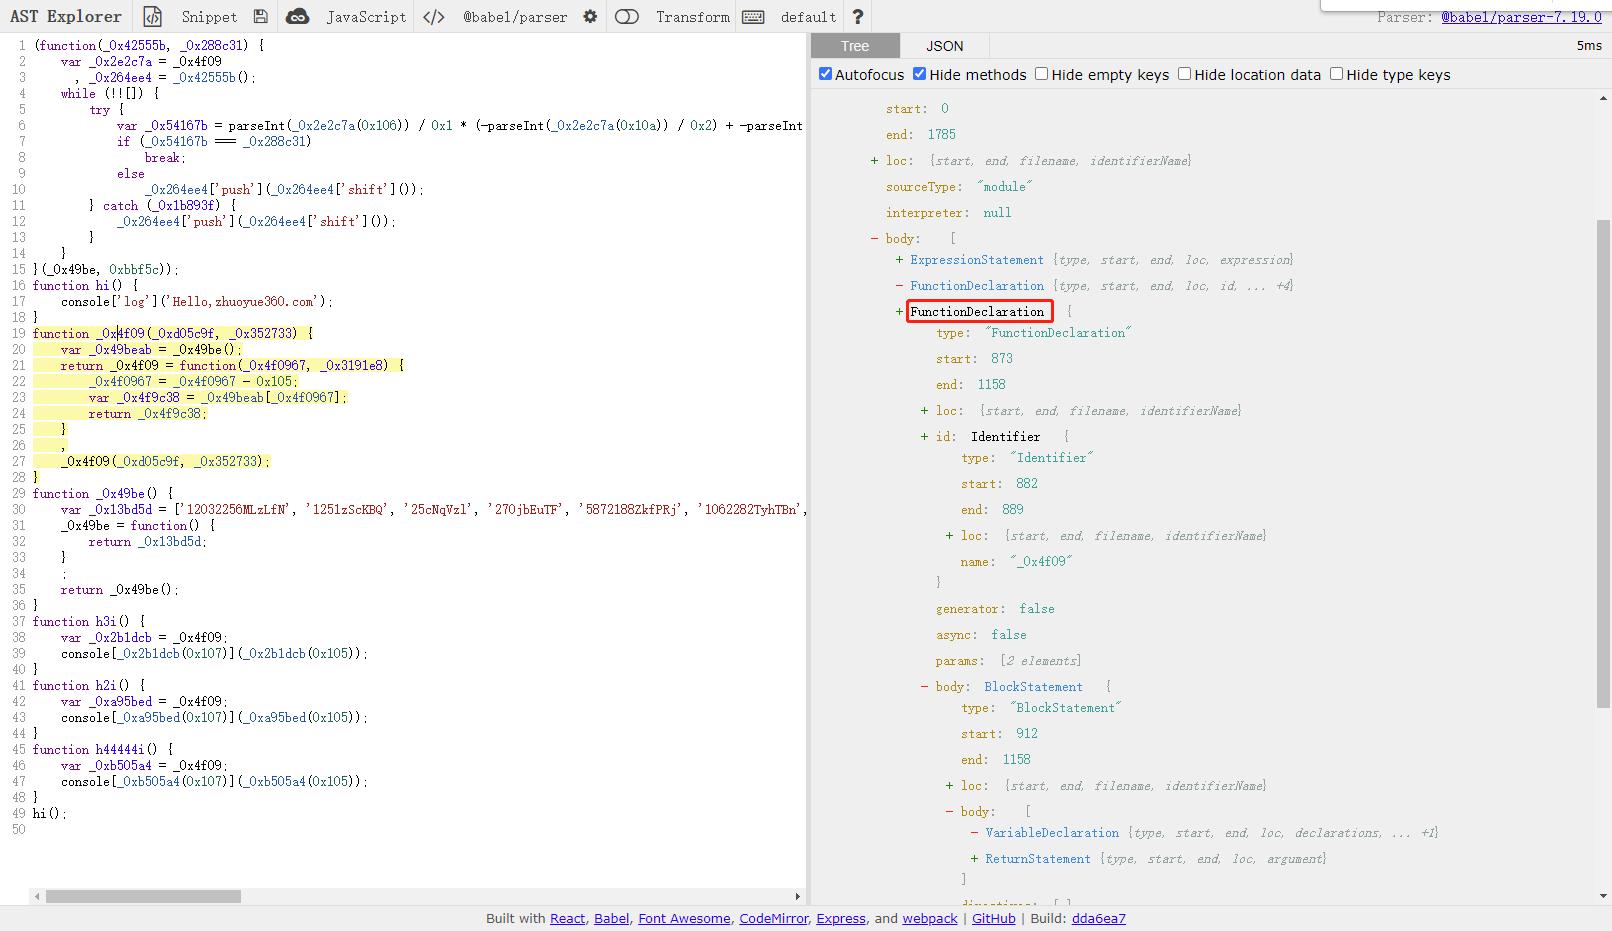
所以,我们初步的代码为:
const funcCallReplace = {
    FunctionDeclaration(path){
        let {node} = path;
        console.log(node.id.name)
    }
}

traverse(ast, funcCallReplace);
为了验证,我把返回枚举到的函数名称都给列举出来了.
node .\main.js
hi
_0x4f09
_0x49be
h3i
h2i
h44444i
处理完毕,耗时: 10.56ms
2. 函数的第一行代码是不是类似于var xxxxx= _0x4f09;
我们可以看到,目标函数的body的第一行,都是VariableDeclaration
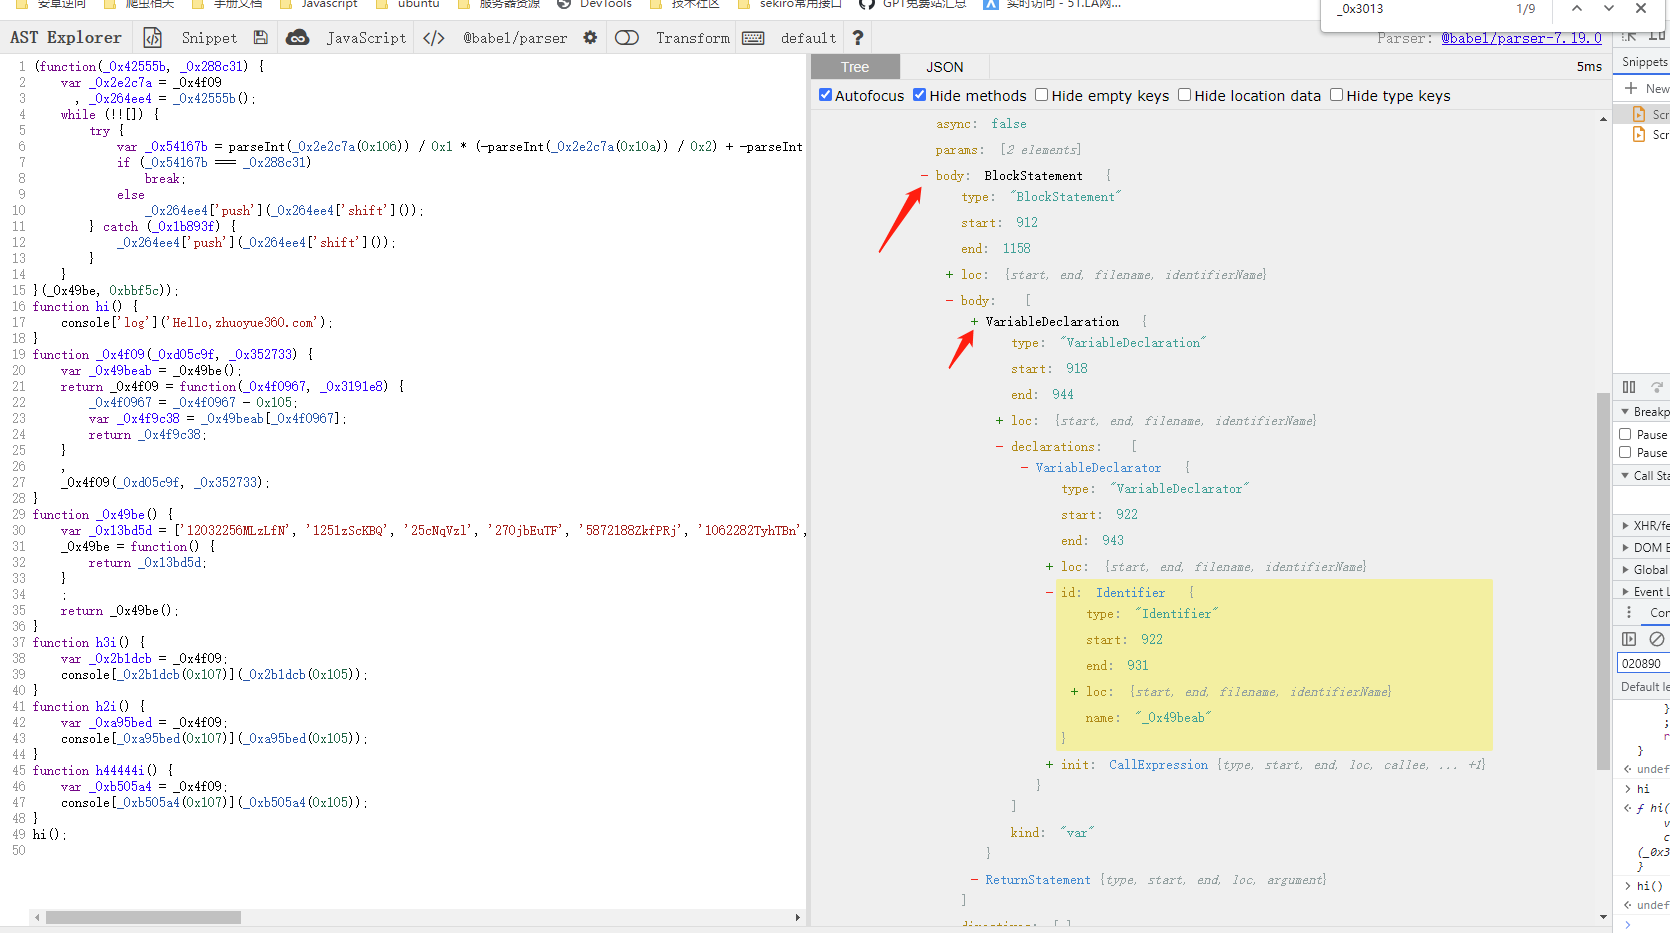
同时,VariableDeclarator的init 节点的callee的name 的内容为_0x49be
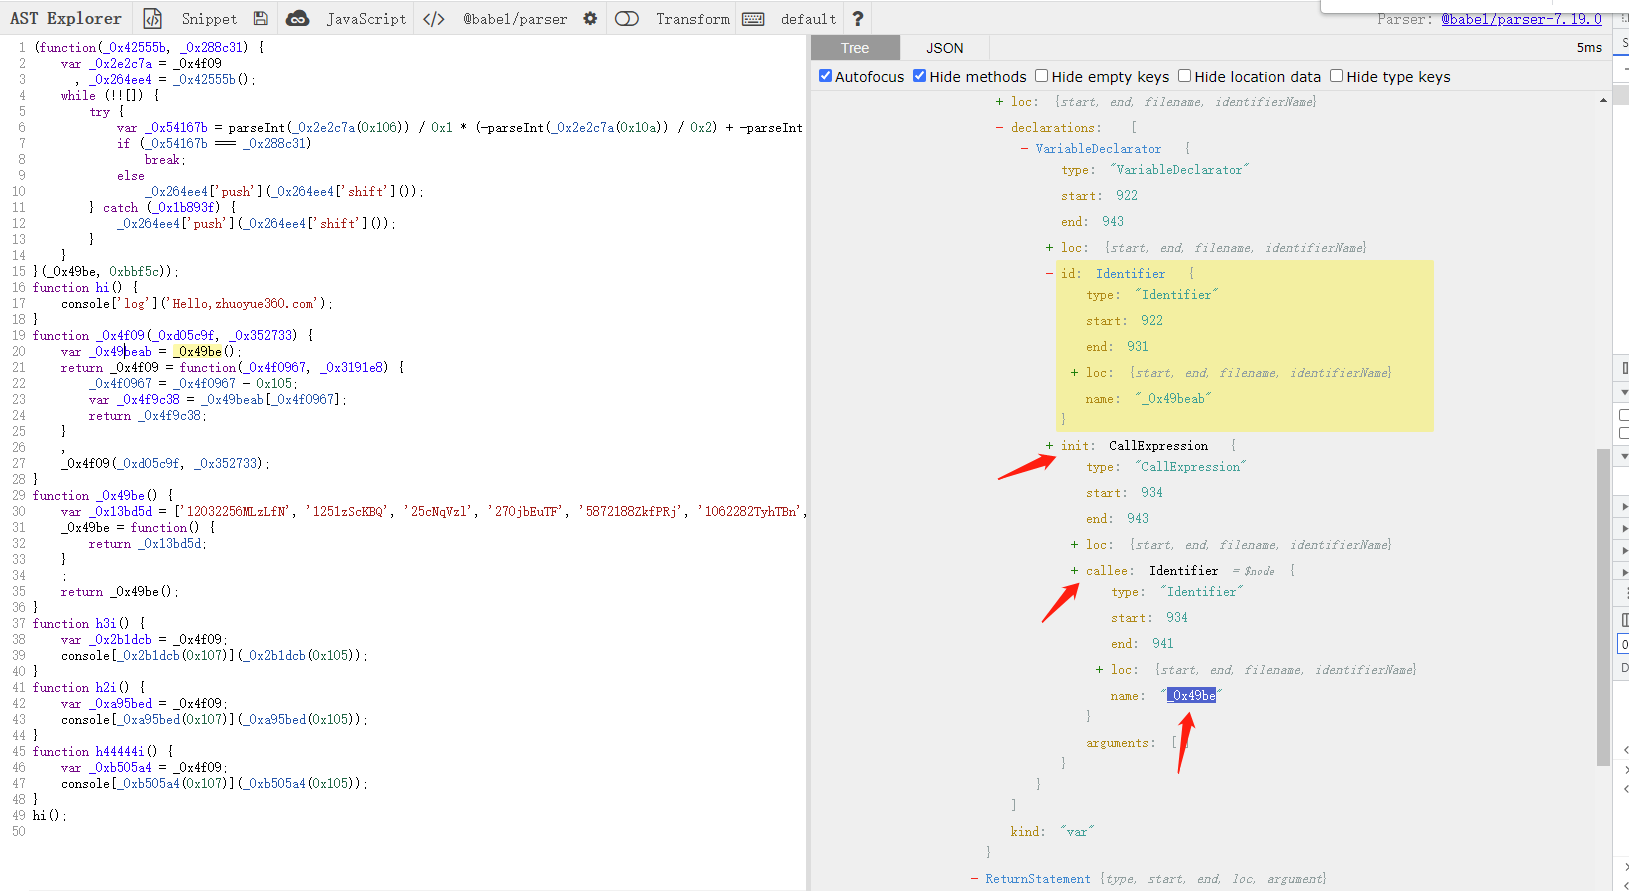
过滤条件搞清楚了,我们就来继续更新我们上面写的代码吧~
通过下面代码,我们已经可以把关键的函数过滤出来了~
const funcCallReplace = {
    FunctionDeclaration(path){
        let {node} = path;
        // 1. 拿到body
        let body = node.body.body;
        // 2. 判断body的第一条是否为VariableDeclaration
        if (body.length == 0 || body[0].type != 'VariableDeclaration' || body[0].declarations.length ==0) return
        let declaration = body[0].declarations[0];
        if (declaration.init == undefined || declaration.init.name != '_0x4f09') return
        let varName = declaration.id.name
        console.log(node.id.name)
        console.log(varName)
    }
}

traverse(ast, funcCallReplace);
执行后的结果:
h3i
main.js:33
_0x2b1dcb
main.js:34
h2i
main.js:33
_0xa95bed
main.js:34
h44444i
main.js:33
_0xb505a4
main.js:34
处理完毕,耗时: 3834.485107421875ms
main.js:61
处理完毕,耗时: 3.835s
然后,我们就需要看看谁用了varName, 然后我们把它给替换掉即可.
// 取自蔡老板星球脚本的代码.
function getAllBindingInfo(name,scope){
    let pathList = [];
    // 查看引用
    const bindings = scope.getBinding(name);
    if (!bindings ){
        return pathList;
    }
    for(let referPath of bindings.referencePaths){
        // 获取父节点
        let parentPath = referPath.parentPath
        // 判断类型.
        if (parentPath.isVariableDeclarator()){
            // 获取变量名称
            let {node,scope} = parentPath;
            let varName = node.id.name;
            pathList = [].concat(pathList,getAllBindingInfo(varName,scope));
            // 删除掉这些节点.
            parentPath.remove()
        }else{
            pathList.push(parentPath)

        }

    }
    // console.log(name,pathList)
    return pathList;


}


(function(_0x42555b, _0x288c31) {
    var _0x2e2c7a = _0x4f09
      , _0x264ee4 = _0x42555b();
    while (!![]) {
        try {
            var _0x54167b = parseInt(_0x2e2c7a(0x106)) / 0x1 * (-parseInt(_0x2e2c7a(0x10a)) / 0x2) + -parseInt(_0x2e2c7a(0x109)) / 0x3 * (parseInt(_0x2e2c7a(0x10b)) / 0x4) + -parseInt(_0x2e2c7a(0x10e)) / 0x5 * (parseInt(_0x2e2c7a(0x111)) / 0x6) + -parseInt(_0x2e2c7a(0x110)) / 0x7 + parseInt(_0x2e2c7a(0x10c)) / 0x8 + parseInt(_0x2e2c7a(0x10d)) / 0x9 * (parseInt(_0x2e2c7a(0x10f)) / 0xa) + parseInt(_0x2e2c7a(0x108)) / 0xb;
            if (_0x54167b === _0x288c31)
                break;
            else
                _0x264ee4['push'](_0x264ee4['shift']());
        } catch (_0x1b893f) {
            _0x264ee4['push'](_0x264ee4['shift']());
        }
    }
}(_0x49be, 0xbbf5c));
function _0x4f09(_0xd05c9f, _0x352733) {
    var _0x49beab = _0x49be();
    return _0x4f09 = function(_0x4f0967, _0x3191e8) {
        _0x4f0967 = _0x4f0967 - 0x105;
        var _0x4f9c38 = _0x49beab[_0x4f0967];
        return _0x4f9c38;
    }
    ,
    _0x4f09(_0xd05c9f, _0x352733);
}
function _0x49be() {
    var _0x13bd5d = ['12032256MLzLfN', '1251zScKBQ', '25cNqVzl', '270jbEuTF', '5872188ZkfPRj', '1062282TyhTBn', 'Hello,zhuoyue360.com', '1kakbhL', 'log', '11816574EYEQFr', '66741ytXvQy', '42550jdDgVb', '12QEFacN'];
    _0x49be = function() {
        return _0x13bd5d;
    }
    ;
    return _0x49be();
}
const funcCallReplace = {
    FunctionDeclaration(path){
        let {node,scope} = path;
        // 1. 拿到body
        let body = node.body.body;
        // 2. 判断body的第一条是否为VariableDeclaration
        if (body.length == 0 || body[0].type != 'VariableDeclaration' || body[0].declarations.length ==0) return
        let declaration = body[0].declarations[0];
        if (declaration.init == undefined || declaration.init.name != '_0x4f09') return
        let varName = declaration.id.name
        console.log(node.id.name)
        console.log(varName)
        // 3. 获取所有引用
        let bindingPathList = getAllBindingInfo(varName,scope);
        console.log(bindingPathList)
        for (let referPath of bindingPathList) {
            // 获取参数,执行函数,替换内容
            let args = referPath.node.arguments;
            if (args == undefined ||args.length != 1){
                continue
            }
            let argValue = referPath.node.arguments[0].extra.raw;
            console.log(argValue)
            referPath.replaceWith(types.valueToNode(_0x4f09(argValue)))
        }
    }
}

traverse(ast, funcCallReplace);
还原后得代码:
可以看到h3i ,h2i 和h44444i 的内容都清晰课件了.
(function (_0x42555b, _0x288c31) {
  var _0x2e2c7a = _0x4f09,
    _0x264ee4 = _0x42555b();
  while (!![]) {
    try {
      var _0x54167b = parseInt(_0x2e2c7a(262)) / 1 * (-parseInt(_0x2e2c7a(266)) / 2) + -parseInt(_0x2e2c7a(265)) / 3 * (parseInt(_0x2e2c7a(267)) / 4) + -parseInt(_0x2e2c7a(270)) / 5 * (parseInt(_0x2e2c7a(273)) / 6) + -parseInt(_0x2e2c7a(272)) / 7 + parseInt(_0x2e2c7a(268)) / 8 + parseInt(_0x2e2c7a(269)) / 9 * (parseInt(_0x2e2c7a(271)) / 10) + parseInt(_0x2e2c7a(264)) / 11;
      if (_0x54167b === _0x288c31) break;else _0x264ee4['push'](_0x264ee4['shift']());
    } catch (_0x1b893f) {
      _0x264ee4['push'](_0x264ee4['shift']());
    }
  }
})(_0x49be, 769884);
function hi() {
  console['log']('Hello,zhuoyue360.com');
}
function _0x4f09(_0xd05c9f, _0x352733) {
  var _0x49beab = _0x49be();
  return _0x4f09 = function (_0x4f0967, _0x3191e8) {
    _0x4f0967 = _0x4f0967 - 261;
    var _0x4f9c38 = _0x49beab[_0x4f0967];
    return _0x4f9c38;
  }, _0x4f09(_0xd05c9f, _0x352733);
}
function _0x49be() {
  var _0x13bd5d = ['12032256MLzLfN', '1251zScKBQ', '25cNqVzl', '270jbEuTF', '5872188ZkfPRj', '1062282TyhTBn', 'Hello,zhuoyue360.com', '1kakbhL', 'log', '11816574EYEQFr', '66741ytXvQy', '42550jdDgVb', '12QEFacN'];
  _0x49be = function () {
    return _0x13bd5d;
  };
  return _0x49be();
}
function h3i() {
  var _0x2b1dcb = _0x4f09;
  console["log"]("Hello,zhuoyue360.com");
}
function h2i() {
  var _0xa95bed = _0x4f09;
  console["log"]("Hello,zhuoyue360.com");
}
function h44444i() {
  var _0xb505a4 = _0x4f09;
  console["log"]("Hello,zhuoyue360.com");
}
hi();
接下来,就是垃圾代码删除的功能了. 这点留在下一篇文章中!

![Kubernetes pod调度约束[亲和性 污点] 生命阶段 排障手段](https://img-blog.csdnimg.cn/6f088c56456341a997a940efd0df442e.png)


