Vue 2
创建vue实例

示例:
<head>
    <meta charset="UTF-8">
    <meta name="viewport" content="width=device-width, initial-scale=1.0">
    <title>Document</title>
    <script src="https://cdn.jsdelivr.net/npm/vue@2.7.14/dist/vue.js"></script>
</head>

<body>
    <div id="app">
        {{ msg }}
        {{ name }}
    </div>


    <script>
        const app = new Vue({
            el: "#app",
            data: {
                msg: 'Hello World',
                name: '黑剑'
            }
        })
    </script>

</body>
插值表达式
注意点:
1 支持的是表达式, 而非语句
<p>{{ if }}</p>
2 不能在标签属性中使用
<p title="{{username}}"> xxxx</p>
使用三元运算符示例
<body>
    <div id="app">
        {{ msg }}
        {{ name }}
    </div>


    <script>
        const app = new Vue({
            el: "#app",
            data: {
                msg: 'Hello World',
                name: '黑剑'
            }
        })
    </script>

</body>
v-html
把标签内容渲染到文本框内
<body>
    <div id="app">
        <div v-html="msg">

        </div>
    </div>

    <script>
        new Vue({
            el: '#app',
            data: {
                msg : `
                    <a href="#">莲莲</a>
                `
            }
        })
    </script>

</body>
v-show & v-if
	<!-- v-if -->
    <p v-show="seen">看见黑刀了</p>
    <script>
        new Vue({
            el: 'p',
            data: {
                seen: true
            }
        })
    </script>
v-else-if
    <div class="msg">
        <p v-if="position === 1">甘雨</p>
        <p v-else-if="position === 2">刻晴</p>
        <p v-else>可莉</p>
    </div>
    <script>
        new Vue({
            el: '.msg',
            data: {
                position: 10
            }
        })
    </script>
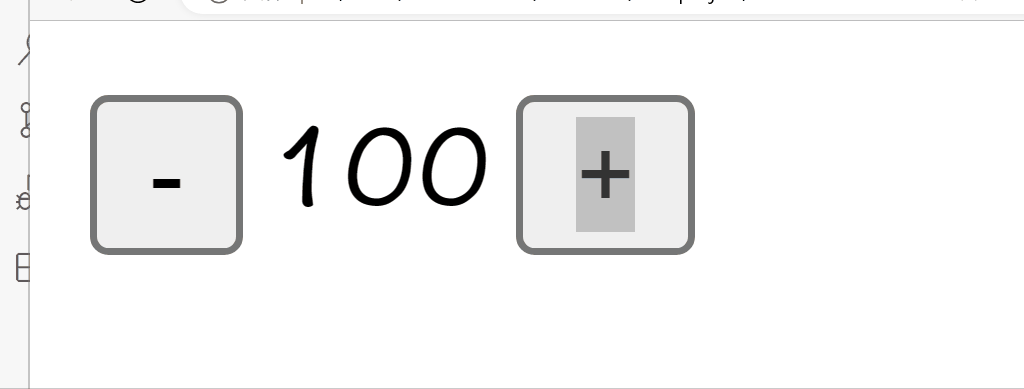
v-on
监听DOM事件
<body>
    <div class="msg">
        <button v-on:click="count--">-</button>
        <span>{{ count }}</span>
        <button v-on:click="count++">+</button>
    </div>
    <script>
        new Vue({
            el: '.msg',
            data: {
                count: 100
            }
        })
    </script>
</body>
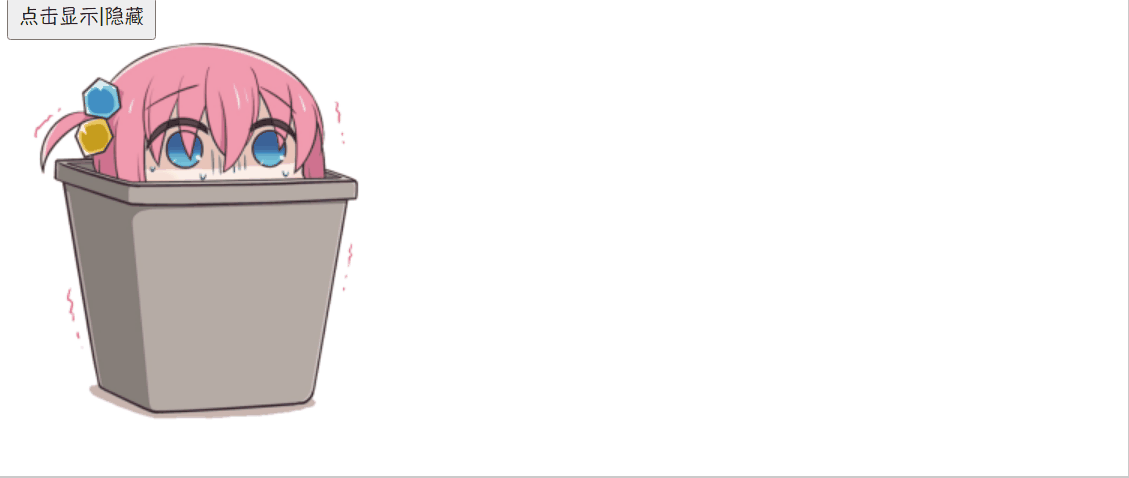
简写 v-on -> @
    <div class="msg">
        <button @click='fn'>点击显示|隐藏</button>
        <div v-show="isShow">
        	<img src="123.png" alt="#">
        </div>
    </div>
    <script>
        new Vue({
            el: '.msg',
            data: {
                isShow: true
            },
            methods: {
                fn() {
                    this.isShow = !this.isShow
                }
            }
        })
    </script>
+++
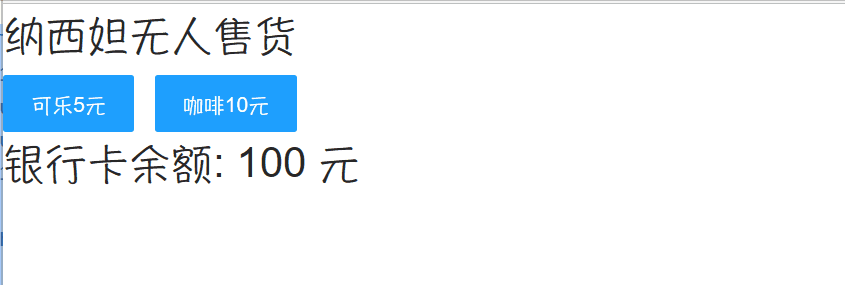
方法传参
    <div class="msg">
        <h1>纳西妲无人售货</h1>
        <button @click="buy(5)" class="layui-btn layui-btn-normal">可乐5元</button>
        <button @click="buy(10)" class="layui-btn layui-btn-normal">咖啡10元</button>
        <h1>
            银行卡余额: {{ price }} 元
        </h1>
    </div>
    <script>
        new Vue({
            el: '.msg',
            data: {
                price: 100
            },
            methods: {
                buy(money) {
                    this.price-=money
                }
            }
        })
    </script>
+++
v-bind
<body>
    <img v-bind:src="imgUrl" alt="">
    <script>
        new Vue({
            el: 'img',
            data: {
                imgUrl: '123.png'
            }
        })
    </script>
</body>
+++
简写 v-bind:src => :src
<body>
    <img :src="imgUrl" alt="">
    <script>
        new Vue({
            el: 'img',
            data: {
                imgUrl: '123.png'
            }
        })
    </script>
</body>
+++
切换图片案例
<body>
    <div class="msg">
        <button @click="index--" class="layui-btn">上一个NPC</button>
            <img :src="list[index]" style="width: 100px">
        <button @click="index++" class="layui-btn layui-btn-warm">下一个NPC</button>
    </div>
    <script>
        new Vue({
            el: '.msg',
            data: {
                index: 0,
                list: [
                    'image/aol.png',
                    'image/Apple%20TV.png',
                    'image/bbc.png',
                ]
            }
        })
    </script>
</body>
+++
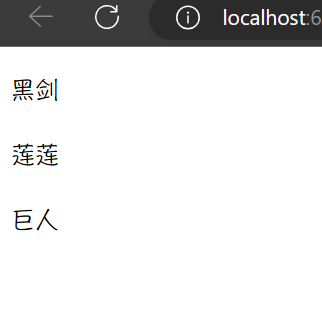
v-for
注意 : 加标识 key
v-for = “(item, index) in 数组”
- 1 item 每一项 2 index 下标
<div class="box">
    <p v-for="item in list">{{ item }}</p>
</div>
<script>
    new Vue({
        el: '.box',
        data: {
            list: ['黑剑', '莲莲', '巨人']
        }
    })
</script>
+++
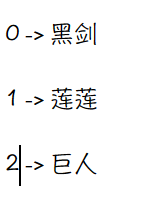
<div class="box">
    <p v-for="(item, index) in list">{{index}} -> {{ item }}</p>
</div>
+++
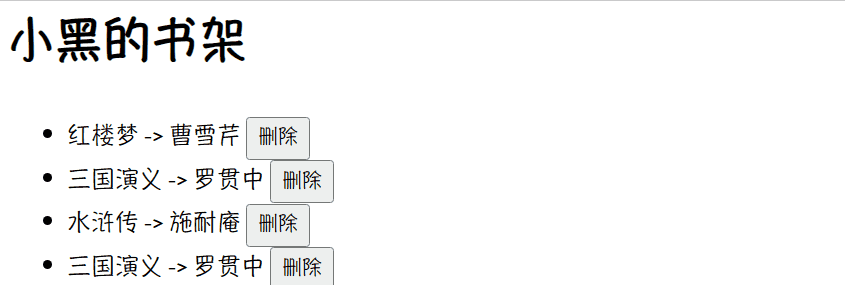
案例: 小黑的书架
<h1>小黑的书架</h1>
<ul>
    <li v-for="(item, index) in bookList">
        {{ item.name }} -> {{ item.author }}
        <button @click = "del(item.id)">删除</button>
    </li>
</ul>
<script>
    new Vue({
        el: 'ul',
        data: {
            bookList: [
                {id: 1, name: '红楼梦', author: '曹雪芹'},
                {id: 2, name: '三国演义', author: '罗贯中'},
                {id: 3, name: '水浒传', author: '施耐庵'},
                {id: 4, name: '三国演义', author: '罗贯中'}
            ]
        },
        methods: {
            del(id) {
                this.bookList = this.bookList.filter(item => item.id !== id)
            }
        }
    })
</script>
+++
v-for 加 :key
不加key只是替换内部文字, 加key实现标签替换
key 给元素唯一标识, 便于 vue 进行列表项的正确排序复用
1 key的值只能是 字符串或数字类型
2 key 的值唯一
3 推荐id作为key , 不推荐index , 因为index 会发生变化
改进
<li v-for="(item, index) in bookList" :key="item.id">
    {{ item.name }} -> {{ item.author }}
    <button @click = "del(item.id)">删除</button>
</li>
v-model
给表单元素使用, 双向数据绑定, 快速获取或设置表单内容
<body>
    <div id="app">
        账户: <input type="text" v-model="username"><br><br>
        密码: <input type="password" v-model="password"> <br> <br>
        <button @click="login">登录</button>
        <button @click="register">注册</button>
    </div>
    <script>
        new Vue({
            el: "#app",
            data: {
                username: '',
                password: ''
            },
            methods: {
                login() {
                    console.log('用户名: ' + this.username + '密码: ' + this.password);
                },
                register(){  // 把用户名和密码制空
                    this.username = ''
                    this.password = ''
                }
            }
        })
    </script>
</body>
+++
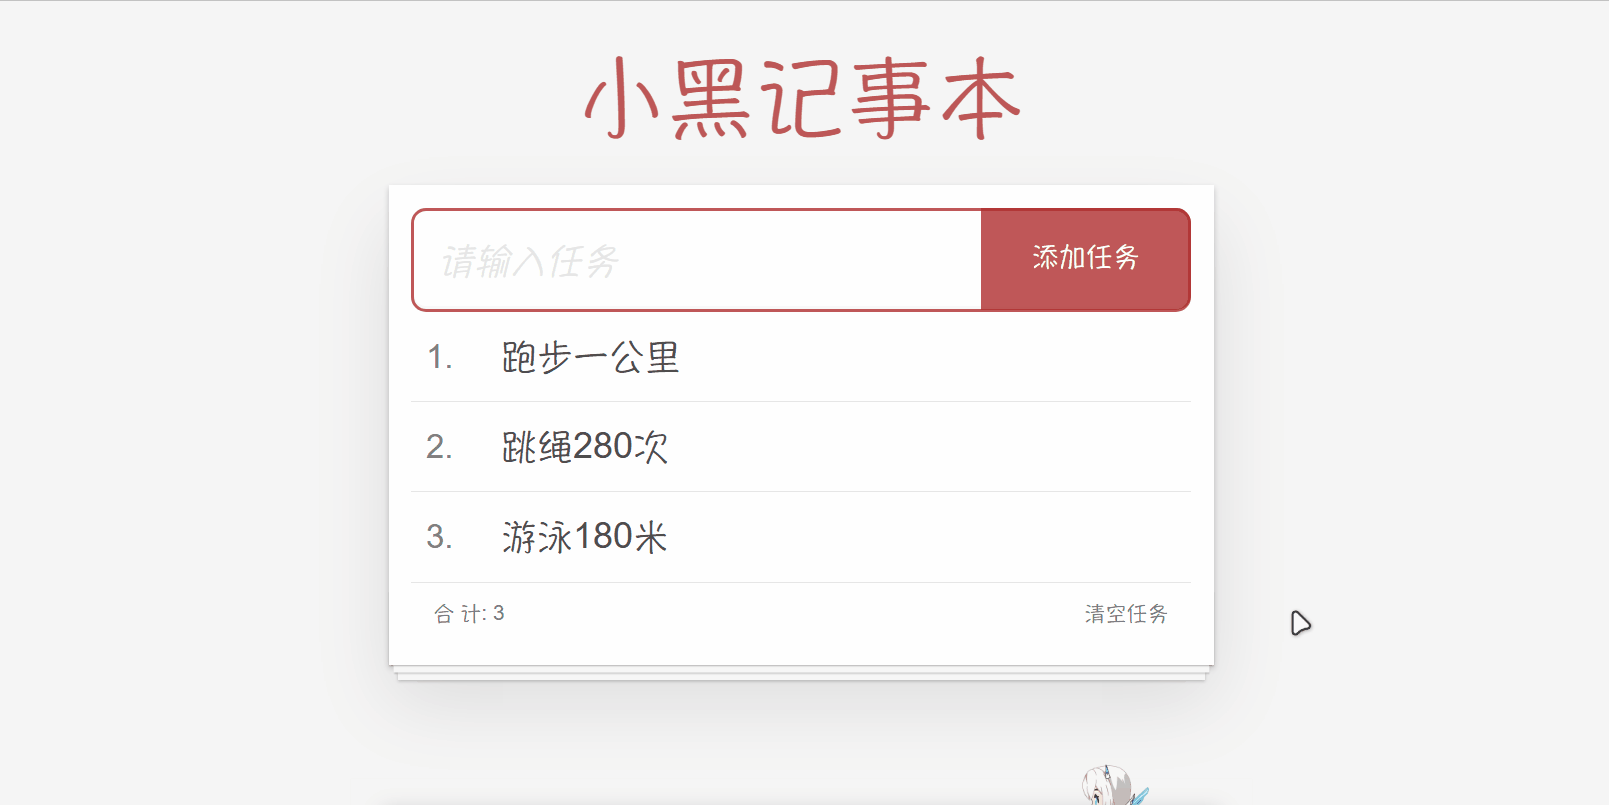
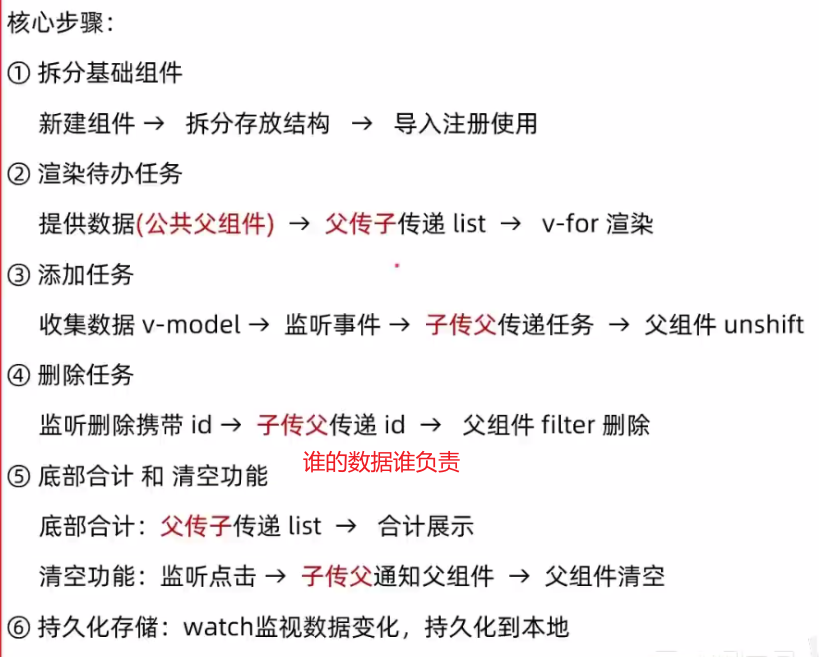
案例: 小黑记事本
<!DOCTYPE html>
<html lang="en">
<head>
    <meta charset="UTF-8"/>
    <meta http-equiv="X-UA-Compatible" content="IE=edge"/>
    <meta name="viewport" content="width=device-width, initial-scale=1.0"/>
    <link rel="stylesheet" href="./css/index.css"/>
    <script src="https://cdn.jsdelivr.net/npm/vue@2.7.14/dist/vue.js"></script>
    <title>记事本</title>
</head>
<body>

<!-- 主体区域 -->
<section id="app">
    <!-- 输入框 -->
    <header class="header">
        <h1>小黑记事本</h1>
        <input v-model="todoName" placeholder="请输入任务" class="new-todo"/>
        <button @click="add" class="add">添加任务</button>
    </header>
    <!-- 列表区域 -->
    <section class="main">
        <ul class="todo-list">
            <li class="todo" v-for="(item, index) in list" :key="item.id">
                <div class="view">
                    <span class="index">{{ index+1 }}.</span>
                    <label>{{ item.name }}</label>
                    <button @click="del(item.id)" class="destroy"></button>
                </div>
            </li>
        </ul>
    </section>
    <!-- 统计和清空 -->
    <footer class="footer">
        <!-- 统计 -->
        <span class="todo-count">合 计:<strong> {{ list.length }} </strong></span>
        <!-- 清空 -->
        <button @click="clear" class="clear-completed">
            清空任务
        </button>
    </footer>
</section>

<script>

    const app = new Vue({
        el: '#app',
        data: {
            todoName: '',
            list: [
                {id: 1, name: '跑步一公里'},
                {id: 2, name: '跳绳280次'},
                {id: 3, name: '游泳180米'}
            ]
        },
        methods: {
            del(id) {
                this.list = this.list.filter(item => item.id !== id)
            },
            add() {
                this.list.unshift({
                    id: +new Date(),
                    name: this.todoName
                })
                this.todoName = ''
            },
            clear() {
                this.list = []
            }
        }
    })

</script>
</body>
</html>
+++
指令修饰符
通过 . 指明一些指令后缀, 不同后缀封装不同操作
小黑记事本修改 18 行
1 按键修饰符
@keyup.enter -> 键盘回车监听
<input @keyup.enter="add" v-model="todoName" placeholder="请输入任务" class="new-todo"/>
2 v-model 修饰符
v-model.trim -> 去除首尾空格
姓名:<input v-model.trim="username" type="text"><br>
v-model.number -> 转数字
年纪:<input v-model.number="age" type="text"><br>
3 事件修饰符
@ 事件名.stop -> 阻止冒泡
<div @click.stop="sonFn" class="son">儿子</div>
@ 事件名.prevent -> 阻止默认行为
<a @click.prevent href="http://www.baidu.com">阻止默认行为</a>
v-bind 对样式class控制
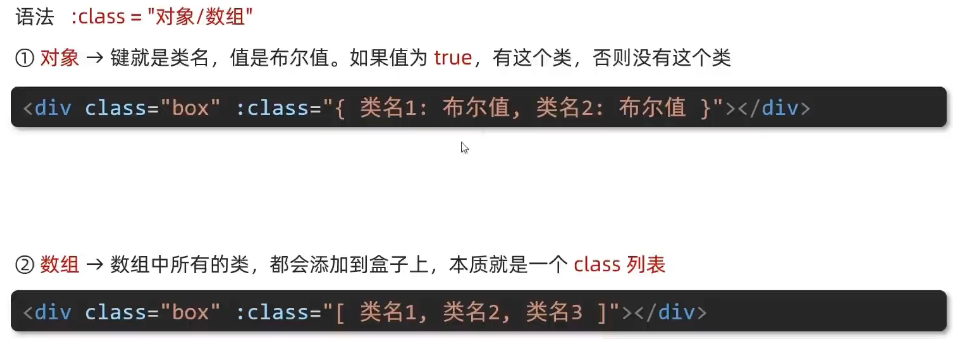
<div class="box" :class="{pink: true, big: true}">黑马程序员</div>
<div class="box" :class="['pink', 'big']">黑马程序员</div>
v-bind 对样式style控制

<div class="box" :style="{width: '100px', height: '100px', backgroundColor: 'red'}"></div>
v-model 用于其他表单元素
<body>

  <div id="app">
    <h3>小黑学习网</h3>

    姓名:
      <input type="text" v-model="username">
      <br><br>

    是否单身:
      <input type="checkbox" v-model="single">
      <br><br>

    <!--
      前置理解:
        1. name:  给单选框加上 name 属性 可以分组 → 同一组互相会互斥
        2. value: 给单选框加上 value 属性,用于提交给后台的数据
      结合 Vue 使用 → v-model
    -->
    性别:
      <input v-model="gender" type="radio" name="gender" value="1">男
      <input v-model="gender" type="radio" name="gender" value="0">女
      <br><br>

    <!--
      前置理解:
        1. option 需要设置 value 值,提交给后台
        2. select 的 value 值,关联了选中的 option 的 value 值
      结合 Vue 使用 → v-model
    -->
    所在城市:
      <select v-model="position">
        <option value="100">北京</option>
        <option value="101">上海</option>
        <option value="102">成都</option>
        <option value="103">南京</option>
      </select>
      <br><br>
    自我描述:
      <textarea v-model="text"></textarea>

    <button>立即注册</button>
  </div>
  <script src="https://cdn.jsdelivr.net/npm/vue@2/dist/vue.js"></script>
  <script>
    const app = new Vue({
      el: '#app',
      data: {
            username: '莲莲', single: false, gender: 0,
            position: 102, text: '力量正是成为王的理由'
      }
    })
  </script>
</body>
计算属性
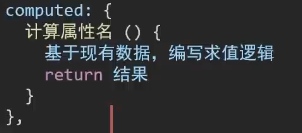
computed: {
            totalCount() {
                // 基于现有的数据,编写求值逻辑
                // 计算属性函数内部,可以直接通过 this 访问到 app 实例
                // console.log(this.list)

                // 需求:对 this.list 数组里面的 num 进行求和 → reduce
                let total = this.list.reduce((sum, item) => sum + item.num, 0)
                return total
            }
        }
computed 计算属性 vs methods 方法
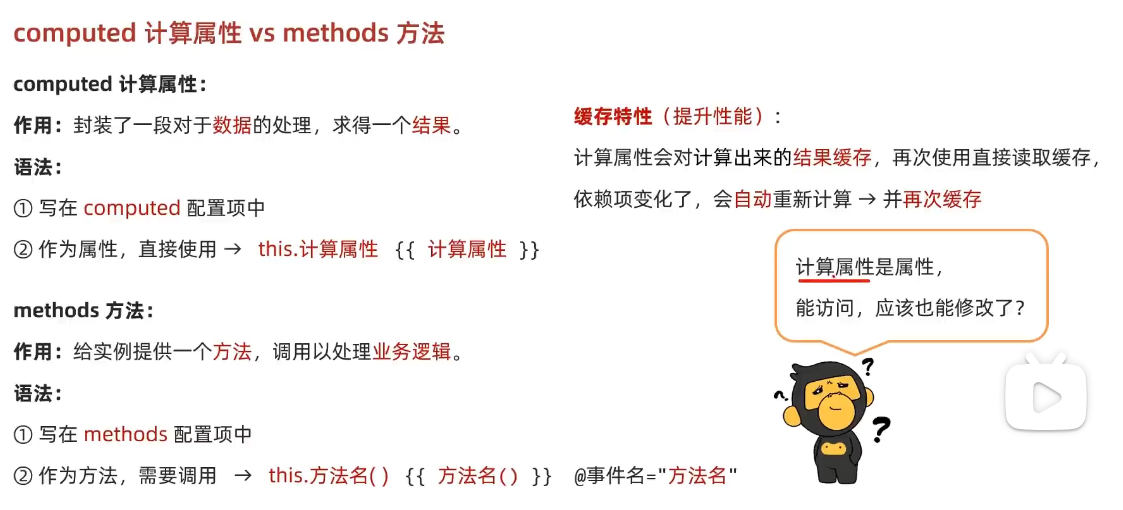
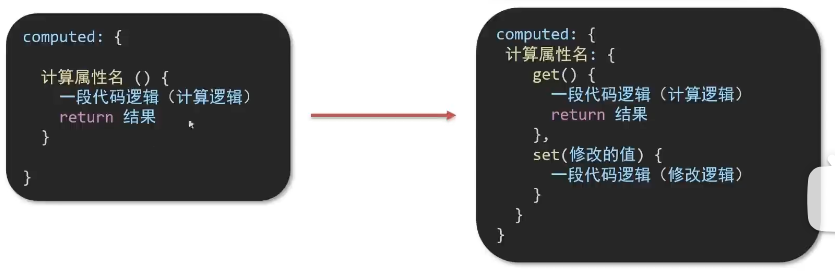
计算属性完整写法
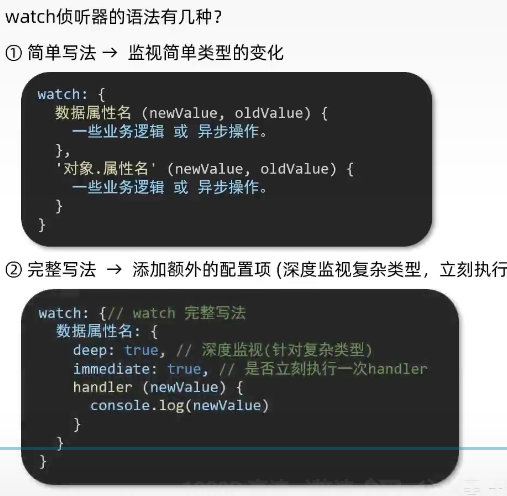
watch 监听器
监视数据变化, 执行一些业务逻辑或异步操作
<textarea v-model="obj.words"></textarea>
<script>
const app = new Vue({
        el: '#app',
        data: {
          // words: ''
          obj: {
            words: ''
          }
        },
          watch: {
            'obj.words'(newValue) {
                console.log(newValue);
            }
          }
      })
</script>
翻译 案例
const app = new Vue({
    el: '#app',
    data: {
        // words: ''
        obj: {
            words: ''
        },
        result: '',
        // timer: null,  延时器id, 这个属性不会被渲染到上面的页面, 只是做一个标记, 可以不定义
    },
    watch: {
        'obj.words'(newValue) { // oldValue 旧值一般用不到
            clearTimeout(this.timer)
            // 一旦有了新值, 立即发起请求
            this.timer = setTimeout(async () => {
                const res = await axios({
                    url: 'https://applet-base-api-t.itheima.net/api/translate',
                    params: {
                        words: newValue
                    }
                })
                this.result = res.data.data
                console.log(res.data.data);
            }, 300)
        }
    }
})
+++
水果案例
<!DOCTYPE html>
<html lang="en">
<head>
<meta charset="UTF-8"/>
<meta http-equiv="X-UA-Compatible" content="IE=edge"/>
<meta name="viewport" content="width=device-width, initial-scale=1.0"/>
<link rel="stylesheet" href="./css/inputnumber.css"/>
<link rel="stylesheet" href="./css/index.css"/>
<title>购物车</title>
</head>
<body>
<div class="app-container" id="app">
<!-- 顶部banner -->
<div class="banner-box"><img src="http://autumnfish.cn/static/fruit.jpg" alt=""/></div>
<!-- 面包屑 -->
<div class="breadcrumb">
<span>🏠</span>
/
<span>购物车</span>
</div>
<!-- 购物车主体 -->
<div class="main" v-if="fruitList.length > 0">
<div class="table">
<!-- 头部 -->
<div class="thead">
<div class="tr">
<div class="th">选中</div>
<div class="th th-pic">图片</div>
<div class="th">单价</div>
<div class="th num-th">个数</div>
<div class="th">小计</div>
<div class="th">操作</div>
</div>
</div>
<!-- 身体 -->
<div class="tbody">
<div v-for="(item, index) in fruitList" :key="item.id" class="tr" :class="{ active: item.isChecked }">
<div class="td"><input type="checkbox" v-model="item.isChecked"/></div>
<div class="td"><img :src="item.icon" alt=""/></div>
<div class="td">{{ item.price }}</div>
<div class="td">
<div class="my-input-number">
<button :disabled="item.num <= 1" class="decrease" @click="sub(item.id)"> -</button>
<span class="my-input__inner">{{ item.num }}</span>
<button class="increase" @click="add(item.id)"> +</button>
</div>
</div>
<div class="td">{{ item.price * item.num }}</div>
<div class="td">
<button @click="del(item.id)">删除</button>
</div>
</div>
</div>
</div>
<!-- 底部 -->
<div class="bottom">
<!-- 全选 -->
<label class="check-all">
<input type="checkbox" v-model="allOK"/>
全选
</label>
<div class="right-box">
<!-- 所有商品总价 -->
<span class="price-box">总价 : ¥ <span class="price">{{ totalPrice }}</span></span>
<!-- 结算按钮 -->
<button class="pay">结算( {{totalCount}} )</button>
</div>
</div>
</div>
<!-- 空车 -->
<div class="empty" v-else>🛒空空如也</div>
</div>
<script src="https://cdn.jsdelivr.net/npm/vue@2/dist/vue.js"></script>
<script>
const defaultArr = [
{
id: 1,
icon: 'http://autumnfish.cn/static/火龙果.png',
isChecked: true,
num: 2,
price: 6,
},
{
id: 2,
icon: 'http://autumnfish.cn/static/荔枝.png',
isChecked: false,
num: 7,
price: 20,
},
{
id: 3,
icon: 'http://autumnfish.cn/static/榴莲.png',
isChecked: false,
num: 3,
price: 40,
},
{
id: 4,
icon: 'http://autumnfish.cn/static/鸭梨.png',
isChecked: true,
num: 10,
price: 3,
},
{
id: 5,
icon: 'http://autumnfish.cn/static/樱桃.png',
isChecked: false,
num: 20,
price: 34,
},
]
const app = new Vue({
el: '#app',
data: {
// 水果列表
fruitList: JSON.parse(localStorage.getItem('list')) || defaultArr,
},
computed: {
allOK: {
get() {
return this.fruitList.every(item => item.isChecked)
},
set(value) {
this.fruitList.forEach(item => item.isChecked = value)
}
},
totalCount() {
return this.fruitList.reduce((sum, item) => {
if (item.isChecked) return sum+item.num
else return sum
}, 0)
},
totalPrice() {
return this.fruitList.reduce((price, item) => {
if (item.isChecked) return price+item.num*item.price
else return price
}, 0)
}
},
methods: {
del(id) {
this.fruitList = this.fruitList.filter(item => item.id !== id)
},
sub(id) {
const fruit = this.fruitList.find(item => item.id === id)
fruit.num--
},
add(id) {
const fruit = this.fruitList.find(item => item.id === id)
fruit.num++
},
},
watch: {
fruitList: {
deep: true,
handler(newValue) {
localStorage.setItem('list', JSON.stringify(newValue))
}
}
}
})
</script>
</body>
</html>
+++
Vue生命周期
Vue 实例从创建到销毁的过程, 四个阶段: 创建, 挂载. 更新, 销毁
钩子函数 (生命周期函数)
针对四个生命周期的前后有八个函数
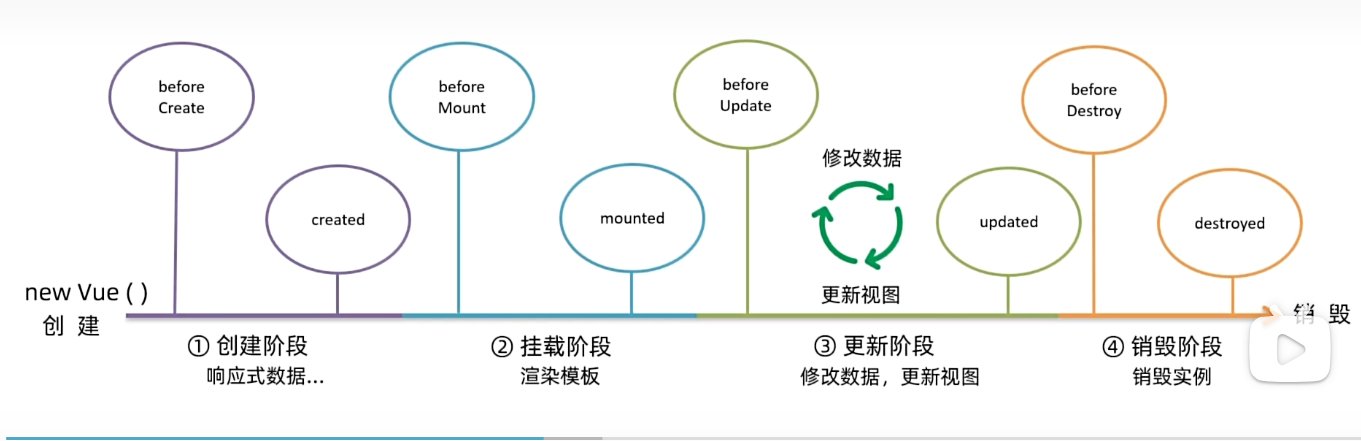
最重要的3个
created: 发送初始化渲染请求
mounted: 操作dom
beforeDestroy: 清除定时器, 延时器(释放vue以外的资源)
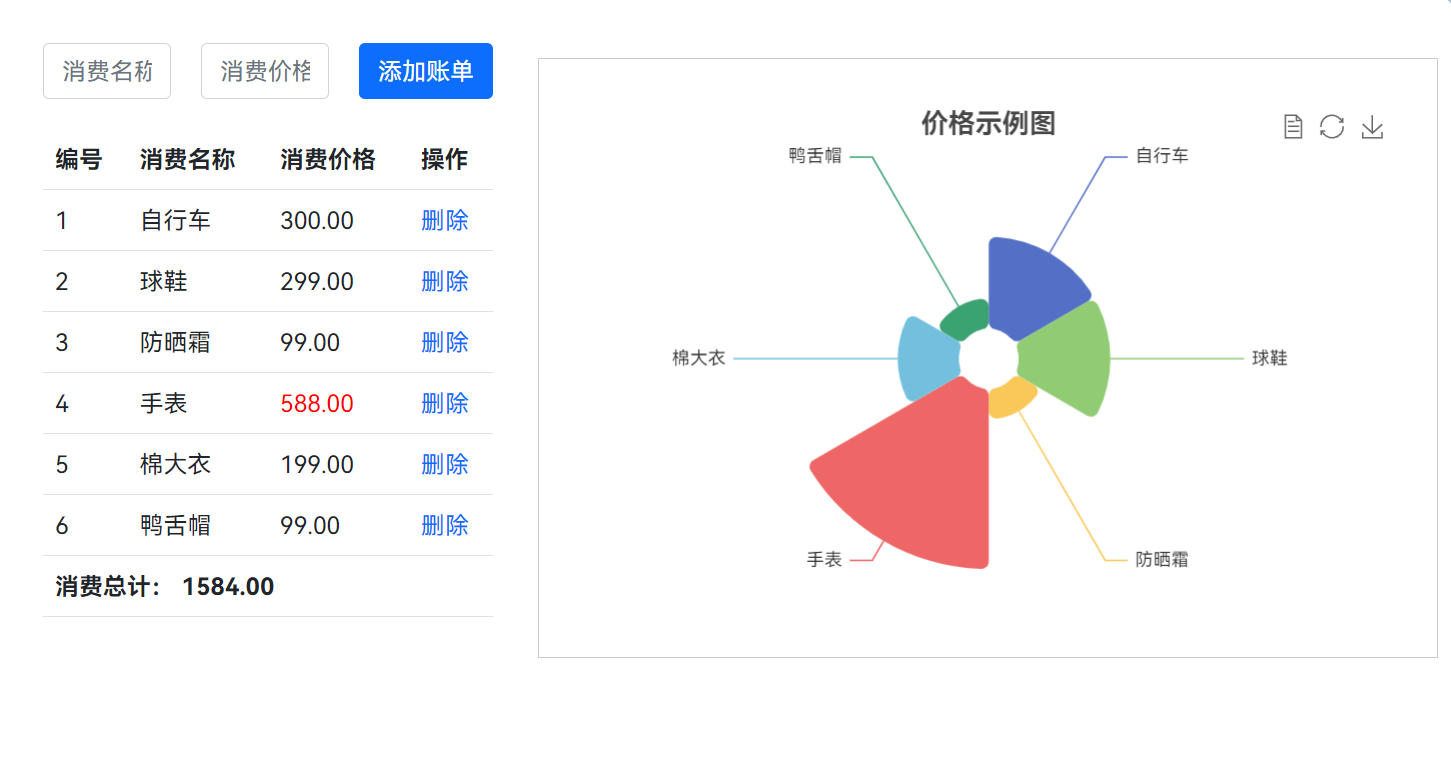
记账单饼图案例
<!DOCTYPE html>
<html lang="en">
<head>
<meta charset="UTF-8"/>
<meta name="viewport" content="width=device-width, initial-scale=1.0"/>
<title>Document</title>
<!-- CSS only -->
<link
rel="stylesheet"
href="https://cdn.jsdelivr.net/npm/bootstrap@5.1.3/dist/css/bootstrap.min.css"
/>
<style>
.red {
color: red !important;
}
.search {
width: 300px;
margin: 20px 0;
}
.my-form {
display: flex;
margin: 20px 0;
}
.my-form input {
flex: 1;
margin-right: 20px;
}
.table > :not(:first-child) {
border-top: none;
}
.contain {
display: flex;
padding: 10px;
}
.list-box {
flex: 1;
padding: 0 30px;
}
.list-box a {
text-decoration: none;
}
.echarts-box {
width: 600px;
height: 400px;
padding: 30px;
margin: 0 auto;
border: 1px solid #ccc;
}
tfoot {
font-weight: bold;
}
@media screen and (max-width: 1000px) {
.contain {
flex-wrap: wrap;
}
.list-box {
width: 100%;
}
.echarts-box {
margin-top: 30px;
}
}
</style>
</head>
<body>
<div id="app">
<div class="contain">
<!-- 左侧列表 -->
<div class="list-box">
<!-- 添加资产 -->
<form class="my-form">
<input v-model.trim="name" type="text" class="form-control" placeholder="消费名称"/>
<input v-model.number="price" type="text" class="form-control" placeholder="消费价格"/>
<button @click="add" type="button" class="btn btn-primary">添加账单</button>
</form>
<table class="table table-hover">
<thead>
<tr>
<th>编号</th>
<th>消费名称</th>
<th>消费价格</th>
<th>操作</th>
</tr>
</thead>
<tbody>
<tr v-for="(item, index) in list" :id="item.id">
<td>{{ index + 1 }}</td>
<td>{{ item.name }}</td>
<td :class="{red: item.price > 500}">{{ item.price.toFixed(2) }}</td>
<td><a @click="del(item.id)" href="javascript:;">删除</a></td>
</tr>
</tbody>
<tfoot>
<tr>
<td colspan="4">消费总计: {{ totalPrice.toFixed(2) }}</td>
</tr>
</tfoot>
</table>
</div>
<!-- 右侧图表 -->
<div class="echarts-box" id="main">
</div>
</div>
</div>
<script src="https://cdn.jsdelivr.net/npm/echarts@5.4.0/dist/echarts.min.js"></script>
<script src="https://cdn.jsdelivr.net/npm/vue@2/dist/vue.js"></script>
<script src="https://cdn.jsdelivr.net/npm/axios/dist/axios.min.js"></script>
<script>
/**
* 接口文档地址:
* https://www.apifox.cn/apidoc/shared-24459455-ebb1-4fdc-8df8-0aff8dc317a8/api-53371058
*
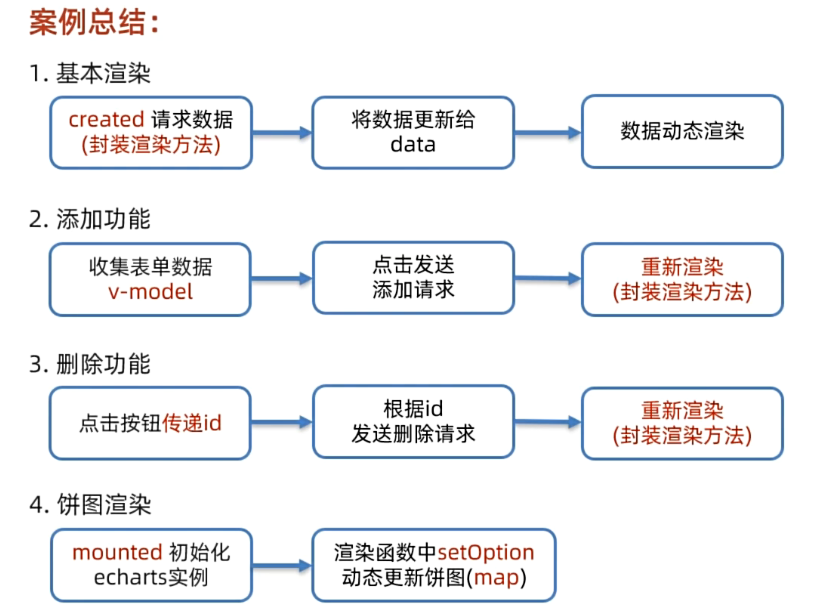
* 功能需求:
* 1. 基本渲染
* 2. 添加功能
* 3. 删除功能
* 4. 饼图渲染
*/
const app = new Vue({
el: '#app',
data: {
list: [],
creatorName: '莲莲',
name: '',
price: '',
},
computed: {
totalPrice() {
return this.list.reduce((sum, item) => sum+item.price, 0)
}
},
async created() {
await this.getList()
},
mounted() {
this.myChart = echarts.init(document.getElementById('main'))
},
methods: {
async getList() {
const res = await axios.get('https://applet-base-api-t.itheima.net/bill', {
params: {
creator: this.creatorName,
}
});
this.list = res.data.data;
this.myChart.setOption({
title: {
text: '价格示例图',
subtext: '',
left: 'center'
},
tooltip: {
trigger: 'item',
formatter: '{a} <br/>{b} : {c} ({d}%)'
},
toolbox: {
show: true,
feature: {
mark: { show: true },
dataView: { show: true, readOnly: false },
restore: { show: true },
saveAsImage: { show: true }
}
},
series: [
{
name: '价格示例图',
type: 'pie',
radius: [20, 140],
center: ['50%', '50%'],
roseType: 'area',
itemStyle: {
borderRadius: 5
},
data:
this.list.map(item => ({
value: item.price, name: item.name
}))
}
]
})
},
async add() {
if (!this.name) {
alert('请输入消费名称')
return
}
if (typeof this.price !== 'number') {
alert('请输入正确的价格')
return
}
await axios.post('https://applet-base-api-t.itheima.net/bill', {
creator: this.creatorName,
name: this.name,
price: this.price
});
await this.getList()
this.name = ''
this.price = ''
},
async del(id) {
await axios.delete(`https://applet-base-api-t.itheima.net/bill/${id}`);
await this.getList()
}
}
})
</script>
</body>
</html>
+++
vue-cli 脚手架
vue create [project-name]
cd [project-name]
yarn serve
项目文件夹
.
├── babel.config.js
├── jsconfig.json
├── node_modules  				第三包文件夹
├── package.json              项目配置文件->项目名 版本号 scripts 依赖包
├── public                  放html代码
│   ├── favicon.ico        图标
│   └── index.html              `index.html模板文件`
├── README.md
├── src                  源代码目录
│   ├── App.vue           `App根组件,编写项目内容`
│   ├── assets             静态资源目录  -  图标,字体
│   │   └── logo.png
│   ├── components      组件目录  -  通用组件
│   │   └── HelloWorld.vue
│   └── main.js           `入口文件  -> 打包或运行, 第一个执行的文件`
├── vue.config.js       vue-cli 配置文件
└── yarn.lock        yarn锁文件, 锁定安装版本
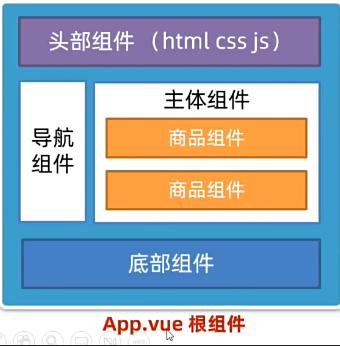
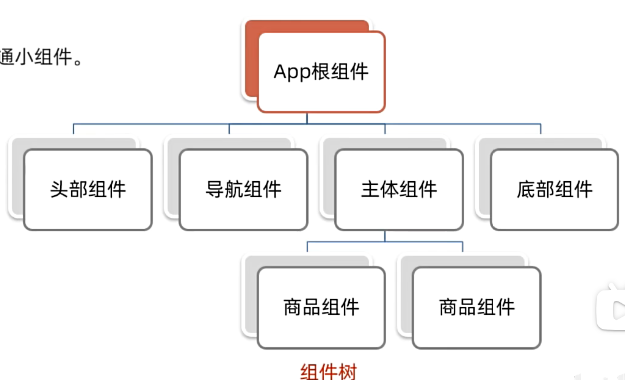
1 组件化
页面拆成一个个组件, 每个组件独立结构, 样式, 行为;
组件分类: 普通组件{Hello.vue 根组件{App.vue}
2 根组件{App.vue}
整个应用最上层的组件, 包裹着许多普通的小组件
1 template {根节点} 只能有一个根节点
2 style 样式
3 script 行为
组件注册
1 局部注册
注册后只能这个组件自己使用这个标签{}
<template>
<HelloWorld msg="Welcome to Your Vue.js App"/>
	<TestVue></TestVue>
</template>
<script>
    import HelloWorld from './components/HelloWorld.vue'
    import Test from "@/components/Test.vue";
    export default {
  		name: 'App',
  		components: {
    		HelloWorld,
    		TestVue
  		}
	}
</script>
2 全局注册
main.js 中:
import HelloVue from "@/components/HelloVue.vue";
import HelloRing from "@/components/HelloRing.vue";

Vue.component('HelloVue', HelloVue)
Vue.component('HelloRing', HelloRing)
+++
默认的style样式作用于全局, 这样style样式只会影响自己
data是一个函数 , 保证每个组件实例对象唯一
每次创建组件实例, 都会新执行一次data函数, 得到一个新对象
+++
组件通信
父子通信
父亲 -> 儿子 props
儿子 -> 父亲 $emit
案例
<script>
export default {
  props: ['title1'],
  methods: {
    handleClick() {
      this.$emit('changeTitle', '家有铮子,不败其家')
    }
  }
}
</script>

<template>
  <div>
    <div style="border: 3px solid #000;margin: 10px">
      我是Son组件 {{ title1 }}
      <button @click="handleClick">修改属性</button>
    </div>
  </div>
</template>

<style scoped>

</style>
<template>
  <div>
    <div style="border: 3px solid #000;margin: 10px">
      我是App组件
      <BaseSon :title1="myTitle" @changeTitle="changeMe"></BaseSon>
    </div>
  </div>
</template>

<script>

import BaseSon from "@/components/BaseSon.vue";

export default {
  name: 'App',
  components: {
    BaseSon

  },
  data() {
    return {
      myTitle: '我是你儿子',
    }
  },
  methods: {
    changeMe(newTitle) {
      this.myTitle = newTitle;
    }
  }
}
</script>

<style scoped>

</style>

+++
props 详解
// 完整写法(类型、默认值、非空、自定义校验)
  props: {
     // w: Number
     // w: [Number, String]
    w: {
      type: Number,
      required: true,
      default: 0,
      validator(val) {
        // console.log(val)
        if (val >= 100 || val <= 0) {
          console.error('传入的范围必须是0-100之间')
          return false
        } else {
          return true
        }
      },
    },
  },
+++
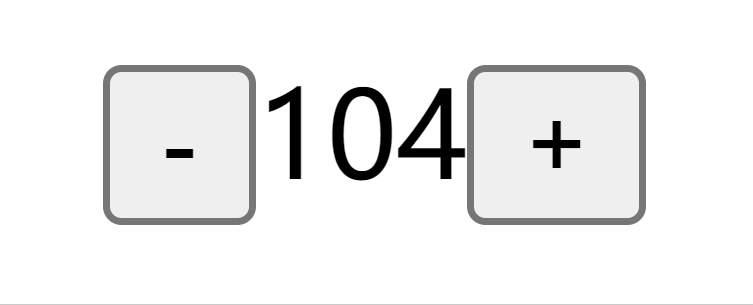
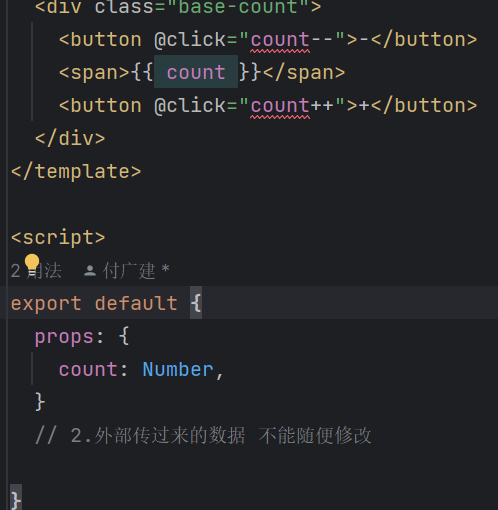
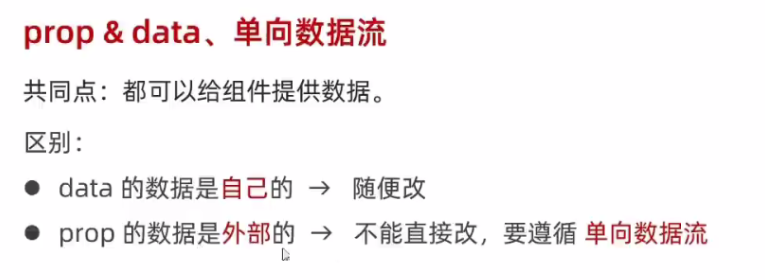
data 和 props 的区别
data 是定义了自己的数据, 自己的数据随便改
<template>
  <div class="base-count">
    <button @click="count--">-</button>
    <span>{{ count }}</span>
    <button @click="count++">+</button>
  </div>
</template>

<script>
export default {
  // 1.自己的数据随便修改  (谁的数据 谁负责)
  data () {
    return {
      count: 99,
    }
  },
  // 2.外部传过来的数据 不能随便修改

}
</script>
props 是父亲的数据, 不能随便改,
谁的数据谁负责, 应该父亲来改
用@click来改会报错
改造一下 => 儿子把这个count绑定一个changeCount通过$emit传给父亲
父亲用@changeCount="handleCount"接收newCount然后把count改一下
利用:count="count"再把count传给儿子
儿子传, 父亲改, 父亲传
BaseCount.vue
<template>
  <div class="base-count">
    <button @click="subCount">-</button>
    <span>{{ count }}</span>
    <button @click="addCount">+</button>
  </div>
</template>

<script>
export default {
  props: {
    count: Number,
  },
  // 2.外部传过来的数据 不能随便修改
  methods: {
    addCount() {
      this.$emit('changeCount', this.count + 1)
    },
    subCount() {
      this.$emit('changeCount', this.count - 1)
    }
  }
}
</script>

<style>
.base-count {
  margin: 20px;
}
</style>
App.vue
<template>
  <div class="app">
    <BaseCount @changeCount="handleCount"  :count="count"></BaseCount>
  </div>
</template>

<script>
import BaseCount from './components/BaseCount.vue'
export default {
  components:{
    BaseCount
  },
  data(){
    return {
      count:100
    }
  },
  methods:{
    handleCount(newCount) {
      this.count = newCount;
    }
  }
}
</script>

<style>

</style>
+++
+++
小黑记事本案例
思路
+++
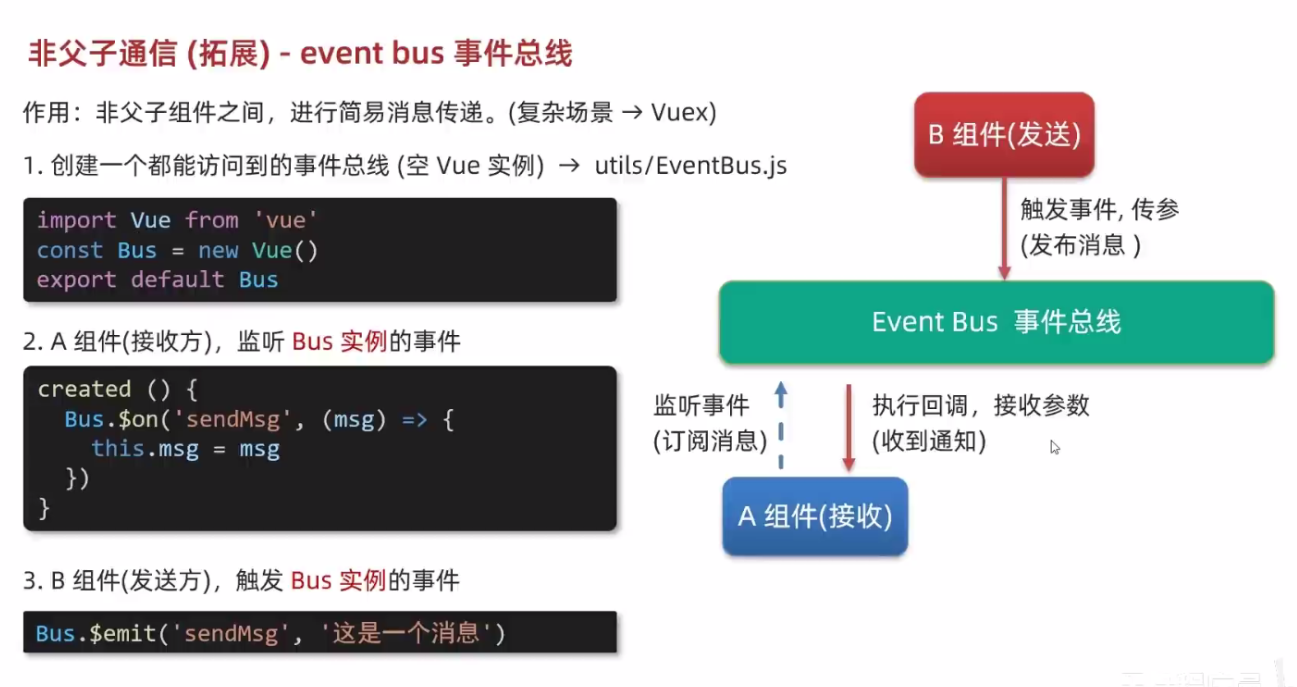
非父子传递数据 Event Bus 事件总线
用于传递简单的数据, 详细的数据
vuex
包结构
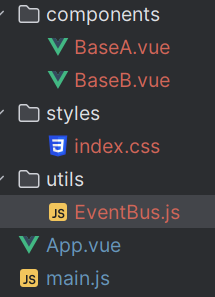
BaseA.vue
<template>
<div class="base-a">
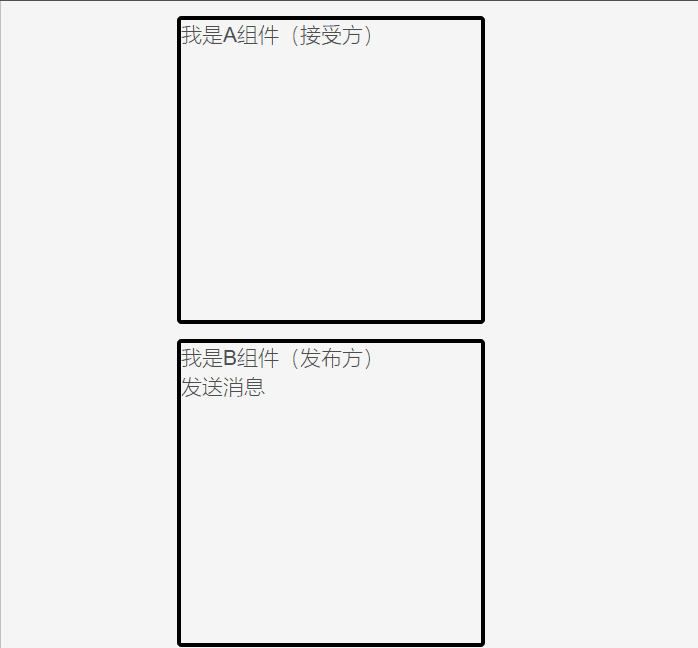
我是A组件(接受方)
<p> {{ msg }} </p>
</div>
</template>
<script>
import Bus from "@/utils/EventBus";
export default {
created() {
Bus.$on('message', (msg)=> {
this.msg = msg;
})
},
data() {
return {
msg: '',
}
}
}
</script>
<style scoped>
.base-a {
width: 200px;
height: 200px;
border: 3px solid #000;
border-radius: 3px;
margin: 10px;
}
</style>
BaseB.vue
<template>
  <div class="base-b">
    <div>我是B组件(发布方)</div>
    <button @click="sendMessage">发送消息</button>
  </div>
</template>

<script>
import Bus from "@/utils/EventBus";

export default {
  methods: {
    sendMessage() {
      Bus.$emit('message', '我是你哥哥');
    },
  }
}
</script>

<style scoped>
.base-b {
  width: 200px;
  height: 200px;
  border: 3px solid #000;
  border-radius: 3px;
  margin: 10px;
}
</style>
EventBus.js
import Vue from "vue";
const Bus = new Vue()
export default Bus
+++
+++
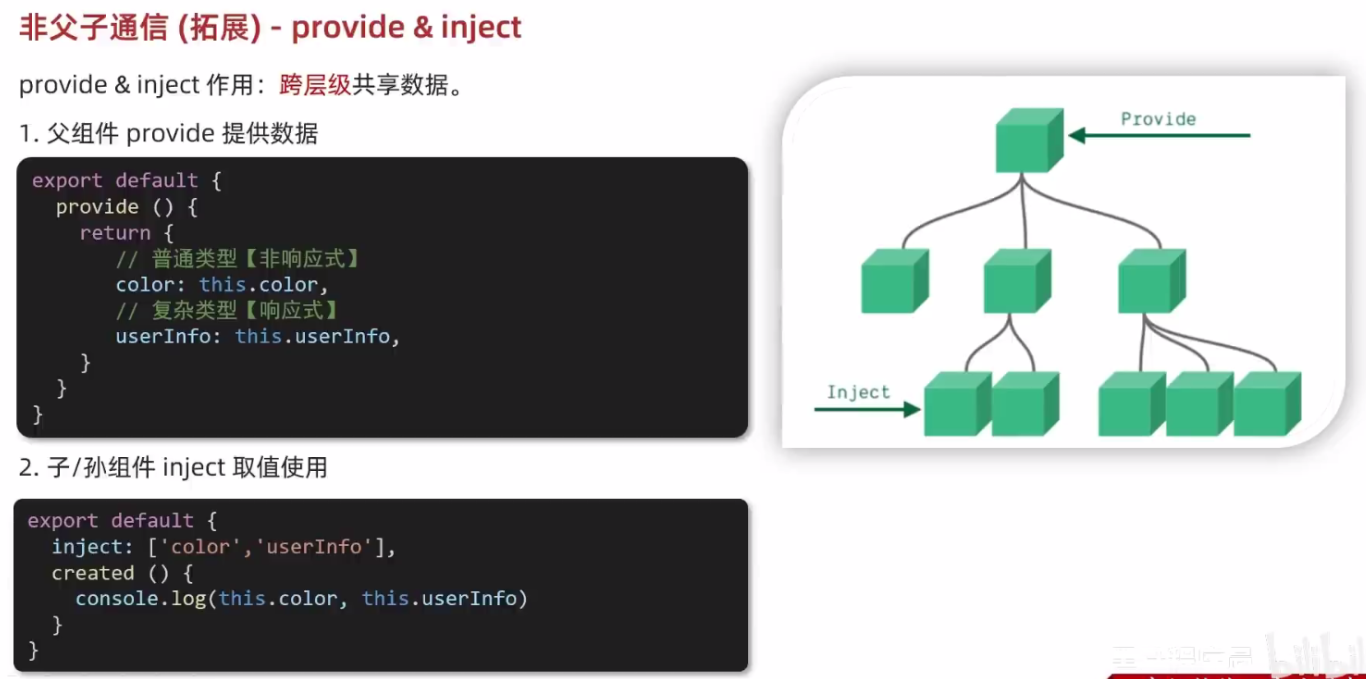
跨层级非父子通信 provide & inject
注意普通的类型非响应式 => 下面例子color改不了的
+++
App.vue
<template>
  <div class="app">
    我是APP组件
    <button @click="change">修改数据</button>
    <SonA></SonA>
    <SonB></SonB>
  </div>
</template>

<script>
import SonA from './components/SonA.vue'
import SonB from './components/SonB.vue'
export default {
  provide() {
    return {
      // 简单类型 是非响应式的
      color: this.color,
      // 复杂类型 是响应式的
      userInfo: this.userInfo,
    }
  },
  data() {
    return {
      color: 'red',
      userInfo: {
        name: 'zs',
        age: 18,
      },
    }
  },
  methods: {
    change() {
      this.color = 'pink'
      this.userInfo.name = 'ls'
    },
  },
  components: {
    SonA,
    SonB,
  },
}
</script>

<style>
.app {
  border: 3px solid #000;
  border-radius: 6px;
  margin: 10px;
}
</style>
SonA.vue
<template>
  <div class="SonA">我是SonA组件
    <GrandSon></GrandSon>
  </div>
</template>

<script>
import GrandSon from '../components/GrandSon.vue'
export default {
  components:{
    GrandSon
  }
}
</script>

<style>
.SonA {
  border: 3px solid #000;
  border-radius: 6px;
  margin: 10px;
  height: 200px;
}
</style>
SonB.vue
<template>
  <div class="SonB">
    我是SonB组件
  </div>
</template>

<script>
export default {

}
</script>

<style>
.SonB {
  border: 3px solid #000;
  border-radius: 6px;
  margin: 10px;
  height: 200px;
}
</style>
GrandSon.vue
<template>
  <div class="grandSon">
    我是GrandSon
    {{ color }} -{{ userInfo.name }} -{{ userInfo.age }}
  </div>
</template>

<script>
export default {
  inject: ['color', 'userInfo'],
}
</script>

<style>
.grandSon {
  border: 3px solid #000;
  border-radius: 6px;
  margin: 10px;
  height: 100px;
}
</style>
+++
v-model封装下拉框
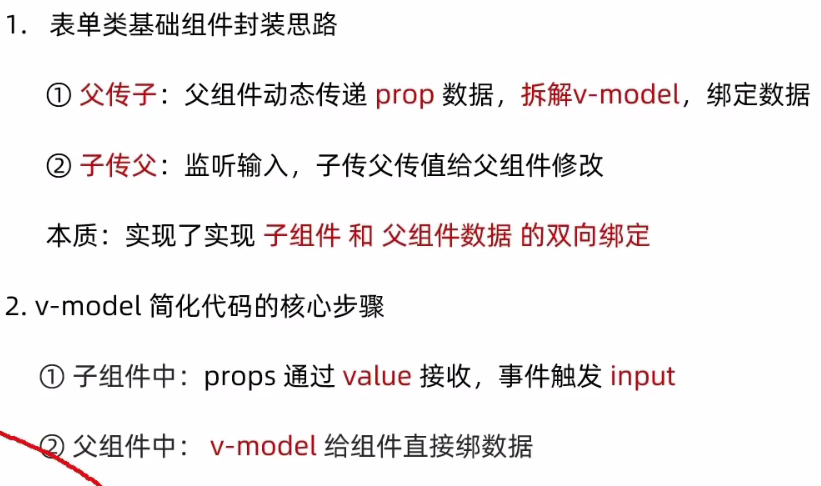
App.vue
<template>
  <div class="app">
    <BaseSelect v-model="selectId">

    </BaseSelect>
  </div>
</template>

<script>
import BaseSelect from './components/BaseSelect.vue'
export default {
  data() {
    return {
      selectId: '103',
    }
  },
  components: {
    BaseSelect,
  },
}
</script>

<style>
</style>
BaseSelect.vue
<template>
  <div>
    <select :value="value" @change="handleChange">
      <option value="101">北京</option>
      <option value="102">上海</option>
      <option value="103">武汉</option>
      <option value="104">广州</option>
      <option value="105">深圳</option>
    </select>
  </div>
</template>

<script>
export default {
  props: {
    value: String,
  },
  methods: {
    handleChange(e) {
        this.$emit('input', e.target.value)
    }
  }
}
</script>

<style>
</style>
+++
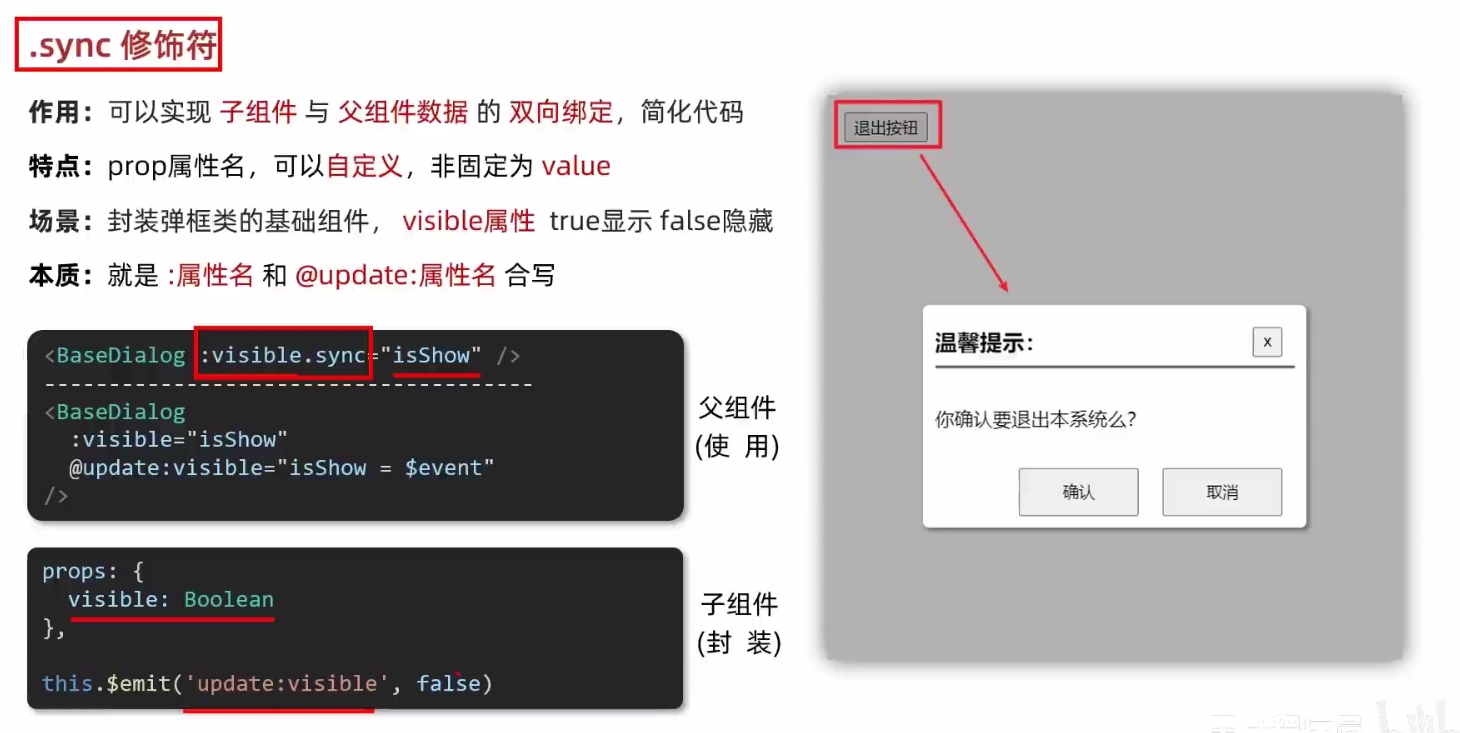
.sync 修饰符
v-model实现不了时, 考虑他
+++
ref和$ref获取dom和组件
<div ref="mychart" class="base-chart-box">
const myChart = echarts.init(document.querySelector('.base-chart-box'))
等价于, 下面的更好用, 不会受到其他元素
<div ref="mychart" class="base-chart-box">
const myChart = echarts.init(this.$refs.mychart)
+++
自定义 v-loading 指令

<template>
  <div class="main">
    <div class="box" v-loading="isLoading">
      <ul>
        <li v-for="item in list" :key="item.id" class="news">
          <div class="left">
            <div class="title">{{ item.title }}</div>
            <div class="info">
              <span>{{ item.source }}</span>
              <span>{{ item.time }}</span>
            </div>
          </div>

          <div class="right">
            <img :src="item.img" alt="">
          </div>
        </li>
      </ul>
    </div>
    <div class="box" v-loading="isLoading2"></div>
  </div>
</template>

<script>
// 安装axios =>  yarn add axios
import axios from 'axios'

// 接口地址:http://hmajax.itheima.net/api/news
// 请求方式:get
export default {
  data () {
    return {
      list: [],
      isLoading: true,
      isLoading2: true,
    }
  },
  async created () {
    // 1. 发送请求获取数据
    const res = await axios.get('http://hmajax.itheima.net/api/news')

    setTimeout(() => {
      // 2. 更新到 list 中
      this.list = res.data.data
      this.isLoading = false
    }, 2000)
  },
  directives: {
    loading: {
      // 给loading设置两个钩子, true显示蒙版, false显示内容
      inserted (el, binding) {
        binding.value ? el.classList.add('loading') : el.classList.remove('loading')
      },
      update (el, binding) {
        binding.value ? el.classList.add('loading') : el.classList.remove('loading')
      }
    }
  }
}
</script>

<style>
/* 伪类 - 蒙层效果 */
.loading:before {
  content: '';
  position: absolute;
  left: 0;
  top: 0;
  width: 100%;
  height: 100%;
  background: #fff url('./loading.gif') no-repeat center;
}

/* .box2 {
  width: 400px;
  height: 400px;
  border: 2px solid #000;
  position: relative;
} */

.box {
  width: 800px;
  min-height: 500px;
  border: 3px solid orange;
  border-radius: 5px;
  position: relative;
}
.news {
  display: flex;
  height: 120px;
  width: 600px;
  margin: 0 auto;
  padding: 20px 0;
  cursor: pointer;
}
.news .left {
  flex: 1;
  display: flex;
  flex-direction: column;
  justify-content: space-between;
  padding-right: 10px;
}
.news .left .title {
  font-size: 20px;
}
.news .left .info {
  color: #999999;
}
.news .left .info span {
  margin-right: 20px;
}
.news .right {
  width: 160px;
  height: 120px;
}
.news .right img {
  width: 100%;
  height: 100%;
  object-fit: cover;
}
</style>
+++
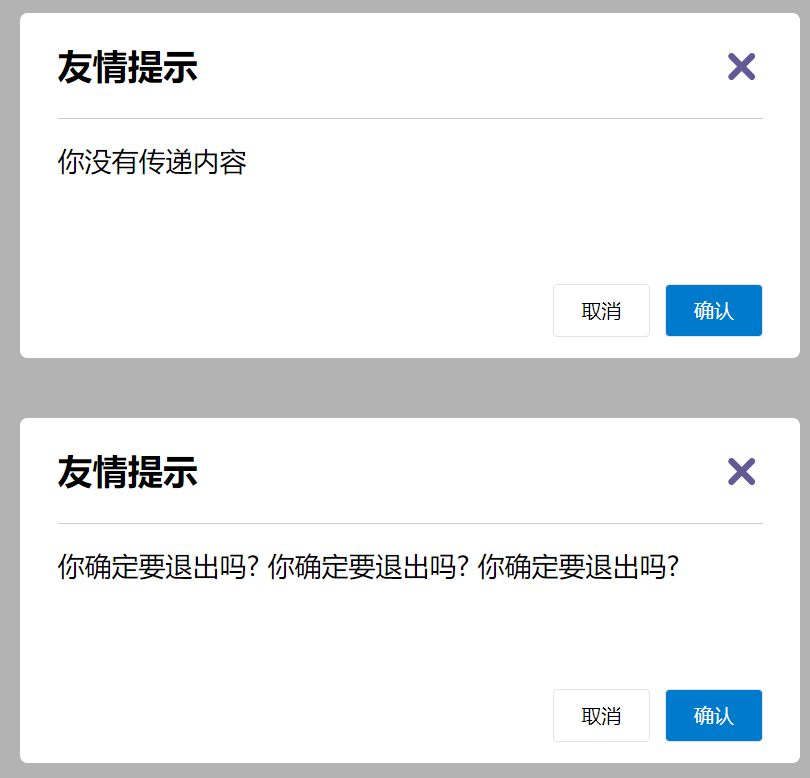
默认插槽
自定义组件内容, 而不是写死
<div class="dialog-content">
<!--      slot表示占位插槽-->
      <slot></slot>
    </div>
++++++++++++++++++++++++++++++++++
<template>
  <div>
    <MyDialog>
      你确定要删除吗?
      你确定要删除吗?
      你确定要删除吗?
    </MyDialog>
    <MyDialog>
      你确定要退出吗?
      你确定要退出吗?
      你确定要退出吗?
    </MyDialog>
  </div>
</template>
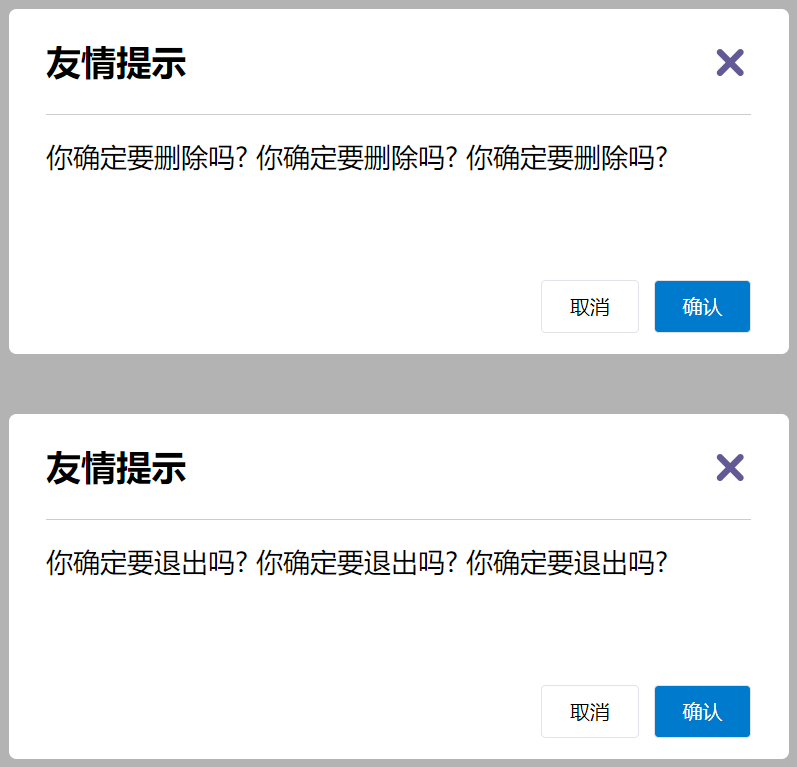
+++
插槽的默认值
<div class="dialog-content">
<!--      slot表示占位插槽-->
      <slot>你没有传递内容,这是默认值</slot>
    </div>
++++++++++++++++++++++++++++++
	<MyDialog>
    </MyDialog>
    <MyDialog>
      你确定要退出吗?
      你确定要退出吗?
      你确定要退出吗?
    </MyDialog>
+++
具名插槽
具有名字的插槽, 给多个插槽起名
<template>
<div class="dialog">
<div class="dialog-header">
<!-- 一旦插槽起了名字,就是具名插槽,只支持定向分发 -->
<slot name="head"></slot>
</div>
<div class="dialog-content">
<slot name="content"></slot>
</div>
<div class="dialog-footer">
<slot name="footer"></slot>
</div>
</div>
</template>
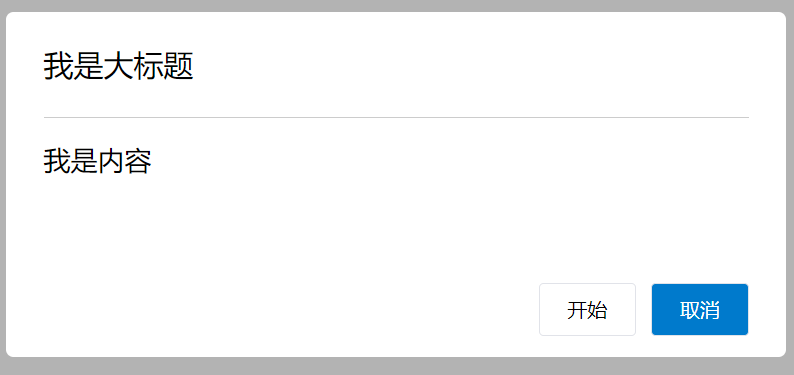
+++++
<template>
<div>
<MyDialog>
<!-- 需要通过template标签包裹需要分发的结构,包成一个整体 -->
<template #head>
<div>我是大标题</div>
</template>
<template #content>
<div>我是内容</div>
</template>
<template #footer>
<button>开始</button>
<button>取消</button>
</template>
</MyDialog>
</div>
</template>
+++
作用域插槽
插槽传参的一种语法, 他不是一种插槽,可以给插槽绑定数据, 供将来使用组件时使用
+++
使用步骤:
- 给 slot 标签添加属性以传值
- 所有属性被收集到一个对象中
- template中 #插槽名 = “obj” 来接收
+++
<template>
  <table class="my-table">
    <thead>
    <tr>
      <th>序号</th>
      <th>姓名</th>
      <th>年纪</th>
      <th>操作</th>
    </tr>
    </thead>
    <tbody>
    <tr v-for="(item, index) in data" :key="item.id">
      <td>{{ index + 1 }}</td>
      <td>{{ item.name }}</td>
      <td>{{ item.age }}</td>
      <td>
        <slot :row="item" msg="测试文本"></slot>
      </td>
    </tr>
    </tbody>
  </table>
</template>

<script>
export default {
  props: {
    data: Array,
  },
}
</script>

<style scoped>
.my-table {
  width: 450px;
  text-align: center;
  border: 1px solid #ccc;
  font-size: 24px;
  margin: 30px auto;
}

.my-table thead {
  background-color: #1f74ff;
  color: #fff;
}

.my-table thead th {
  font-weight: normal;
}

.my-table thead tr {
  line-height: 40px;
}

.my-table th,
.my-table td {
  border-bottom: 1px solid #ccc;
  border-right: 1px solid #ccc;
}

.my-table td:last-child {
  border-right: none;
}

.my-table tr:last-child td {
  border-bottom: none;
}

.my-table button {
  width: 65px;
  height: 35px;
  font-size: 18px;
  border: 1px solid #ccc;
  outline: none;
  border-radius: 3px;
  cursor: pointer;
  background-color: #ffffff;
  margin-left: 5px;
}
</style>
<template>
  <div>
    <MyTable :data="list">
      <template #default="obj">
        <button @click="del(obj.row.id)">
          删除
        </button>
      </template>
    </MyTable>
    <MyTable :data="list2">
      <template #default="{row}">
        <button @click="show(row)">查看</button>
      </template>
    </MyTable>
  </div>
</template>

<script>
import MyTable from './components/MyTable.vue'
export default {
  data () {
    return {
      list: [
        { id: 1, name: '张小花', age: 18 },
        { id: 2, name: '孙大明', age: 19 },
        { id: 3, name: '刘德忠', age: 17 },
      ],
      list2: [
        { id: 1, name: '赵小云', age: 18 },
        { id: 2, name: '刘蓓蓓', age: 19 },
        { id: 3, name: '姜肖泰', age: 17 },
      ]
    }
  },
  methods: {
    del(id) {
      this.list = this.list.filter(item => item.id !== id)
    },
    show(row) {
      alert(`姓名:${row.name};年龄:${row.age}`)
    }
  },
  components: {
    MyTable
  }
}
</script>
实战: 商品页(父子组件)
App.vue
<template>
  <div class="table-case">
    <MyTable :data="goods">
      <template #theadContent>
        <tr>
          <th>编号</th>
          <th>名称</th>
          <th>图片</th>
          <th width="100px">标签</th>
        </tr>
      </template>
      <template #tbodyContent="obj">
          <td>{{ obj.index + 1 }}</td>
          <td>{{ obj.item.name }}</td>
          <td>
            <img :src= "obj.item.picture"/>
          </td>
          <td>
             <MyTag v-model="obj.item.tag"></MyTag>
          </td>
      </template>
    </MyTable>
  </div>
</template>

<script>


import MyTable from "@/components/MyTable.vue";
import MyTag from "@/components/MyTag.vue";

export default {
  name: 'TableCase',
  components: {MyTag, MyTable},
  data() {
    return {
      goods: [
        {
          id: 101,
          picture:
            'https://yanxuan-item.nosdn.127.net/f8c37ffa41ab1eb84bff499e1f6acfc7.jpg',
          name: '梨皮朱泥三绝清代小品壶经典款紫砂壶',
          tag: '茶具',
        },
        {
          id: 102,
          picture:
            'https://yanxuan-item.nosdn.127.net/221317c85274a188174352474b859d7b.jpg',
          name: '全防水HABU旋钮牛皮户外徒步鞋山宁泰抗菌',
          tag: '男鞋',
        },
        {
          id: 103,
          picture:
            'https://yanxuan-item.nosdn.127.net/cd4b840751ef4f7505c85004f0bebcb5.png',
          name: '毛茸茸小熊出没,儿童羊羔绒背心73-90cm',
          tag: '儿童服饰',
        },
        {
          id: 104,
          picture:
            'https://yanxuan-item.nosdn.127.net/56eb25a38d7a630e76a608a9360eec6b.jpg',
          name: '基础百搭,儿童套头针织毛衣1-9岁',
          tag: '儿童服饰',
        },
      ],
    }
  },
}
</script>

<style lang="less" scoped>
.table-case {
  width: 1000px;
  margin: 50px auto;
  img {
    width: 100px;
    height: 100px;
    object-fit: contain;
    vertical-align: middle;
  }

}
</style>
MyTable.vue
<script>
export default {
  props: {
    data: Array,
  },
  data() {
    return {

    }
  },
}
</script>

<template>
  <table class="my-table">
    <thead>
      <slot name="theadContent"></slot>
    </thead>
    <tbody>
      <tr v-for="(item, index) in data" :key="item.id">
        <slot name="tbodyContent" :item="item" :index="index"></slot>
      </tr>
    </tbody>
  </table>
</template>

<style scoped lang="less">
  .my-table {
    width: 100%;
    border-spacing: 0;
    img {
      width: 100px;
      height: 100px;
      object-fit: contain;
      vertical-align: middle;
    }
    th {
      background: #f5f5f5;
      border-bottom: 2px solid #069;
    }
    td {
      border-bottom: 1px dashed #ccc;
    }
    td,
    th {
      text-align: center;
      padding: 10px;
      transition: all 0.5s;
      &.red {
        color: red;
      }
    }
    .none {
      height: 100px;
      line-height: 100px;
      color: #999;
    }
  }
</style>
MyTag.vue
<script>
  export default {
    props: {
      value: String,
    },
    data() {
      return {
        isEdit: false,
      }
    },
    methods: {
      handleClick() {
        this.isEdit = true
      },
      handleEnter(e) {
        // 非空处理
        if (e.target.value.trim() === '') return alert('标签内容不能为空')
        this.$emit('input', e.target.value)
        // 提交完成关闭输入状态
        this.isEdit = false
      }
    }
  }
</script>

<template>
  <div class="my-tag">
    <input v-if="isEdit" type="text"
           class="input" placeholder="输入标签"
           v-focus @blur="isEdit=false"
           :value="value" @keyup.enter="handleEnter">
    <div v-else class="text" @dblclick="handleClick">
      {{ value }}
    </div>
  </div>
</template>

<style scoped lang="less">
  .my-tag {
    cursor: pointer;
    .input {
      appearance: none;
      outline: none;
      border: 1px solid #ccc;
      width: 100px;
      height: 40px;
      box-sizing: border-box;
      padding: 10px;
      color: #666;
      &::placeholder {
        color: #666;
      }
    }
  }
</style>
+++
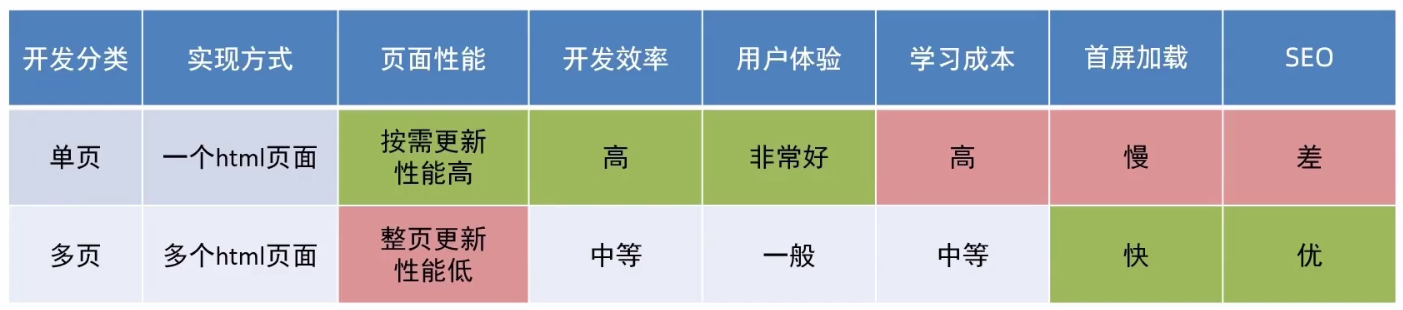
单页应用 vs 多页应用
使用场景

路由
路由是一种映射关系
路径和组件的映射关系, 根据路由知道不同路径, 应该渲染那个组件
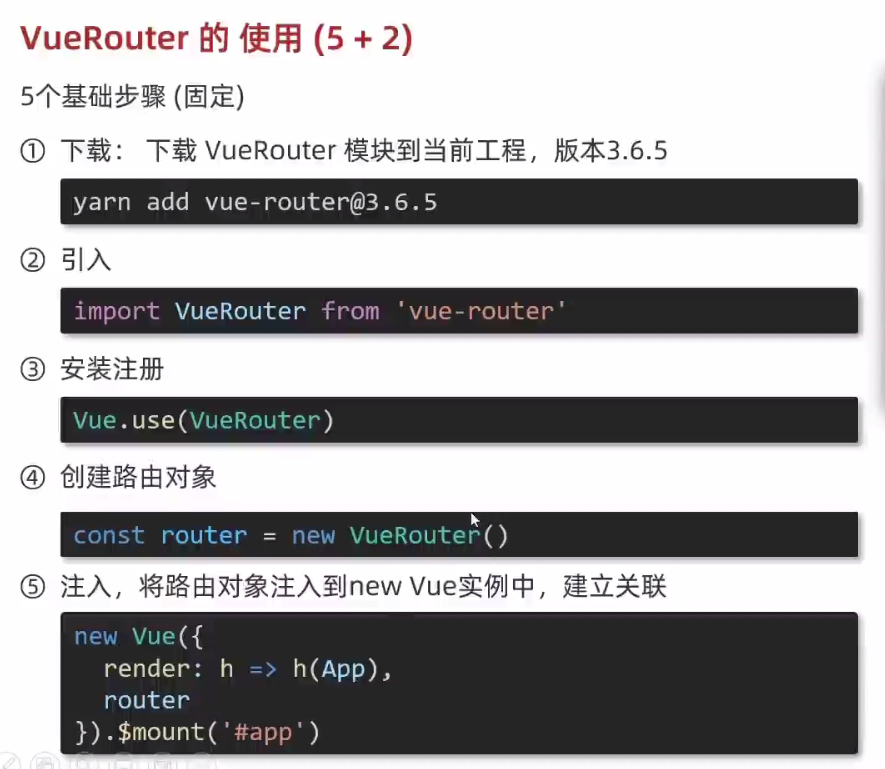
VueRouter
固定的步骤
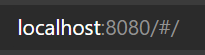
配置vue-router成功的标志是地址栏出现 #
+++
核心步骤
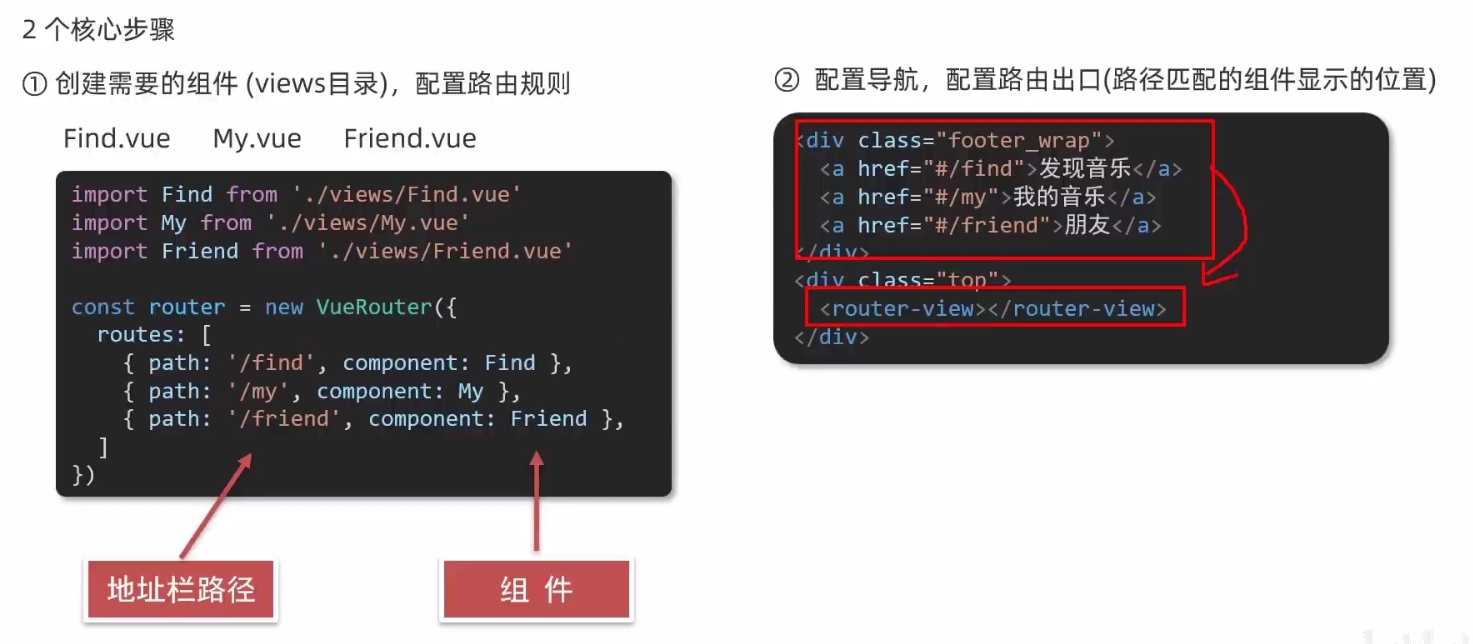
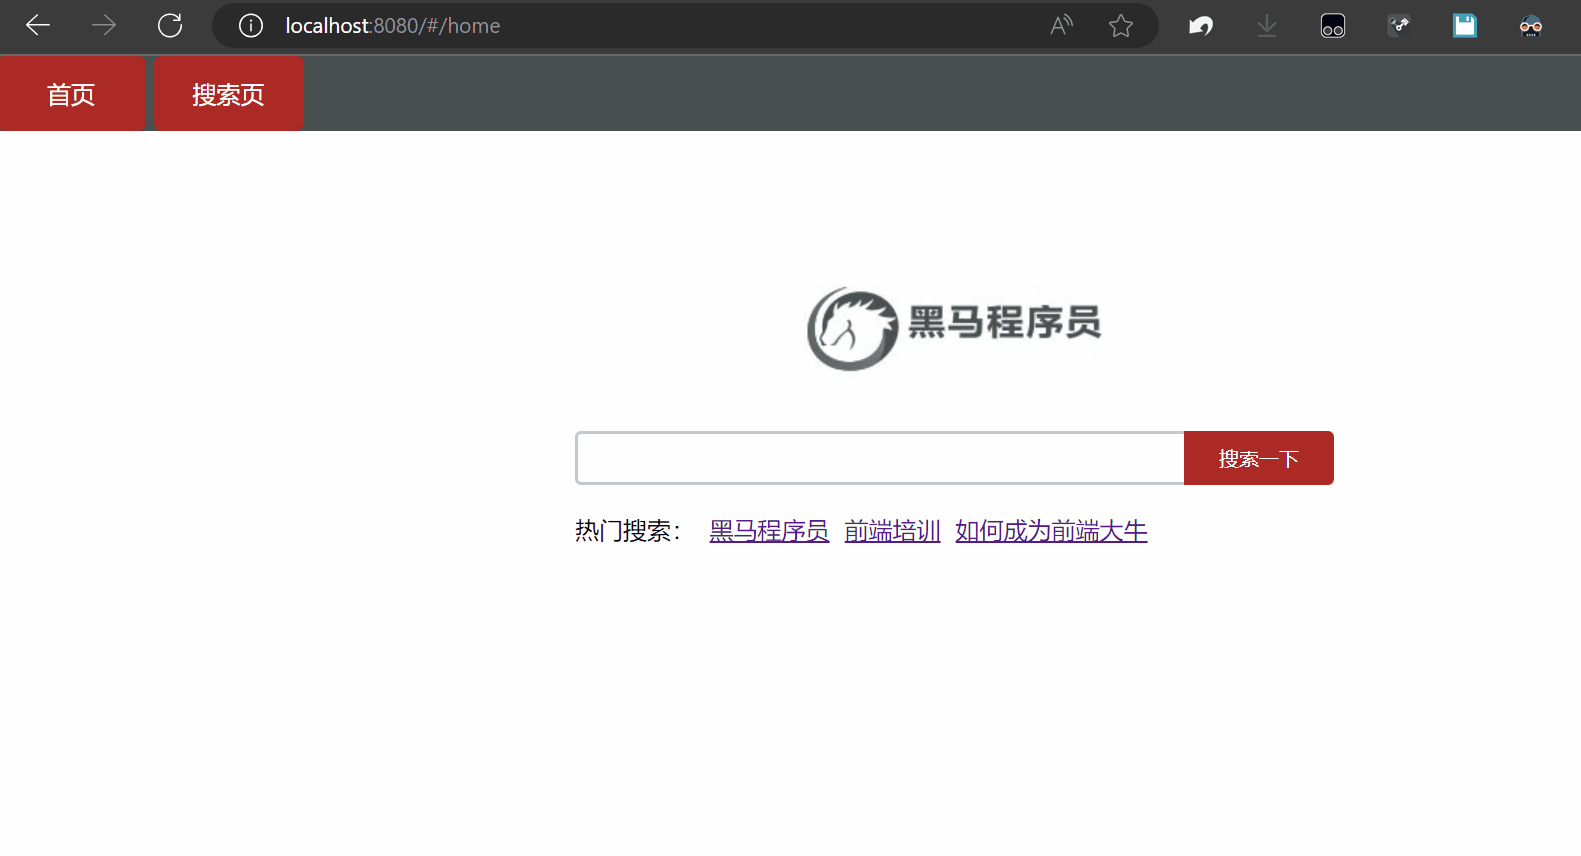
快速上手: 网易云导航栏
<template>
  <div>
    <div class="footer_wrap">
      <a href="#/find">发现音乐</a>
      <a href="#/my">我的音乐</a>
      <a href="#/friend">朋友</a>
    </div>

    <div class="top">
      <!-- 路由出口 → 匹配的组件所展示的位置 -->
      <router-view></router-view>
    </div>
  </div>
</template>
const router = new VueRouter({
  // routes 路由规则们
  // route  一条路由规则 { path: 路径, component: 组件 }
  routes: [
    { path: '/find', component: Find },
    { path: '/my', component: My },
    { path: '/friend', component: Friend },
  ]
})
+++
组件存放目录问题
.vue文件分两类, 一类是页面组件 , 另一类是复用组件
这两类文件分开放, 容易管理
页面组件放到 views文件夹 => 配合路由, 页面展示
复用组件放到 components文件夹 => 封装复用
+++
路由的封装抽离
不要把路由配置在main.js里面, 把他抽离出来, 利于维护
做法: 在router新文件夹下新建index.js来存放路由代码
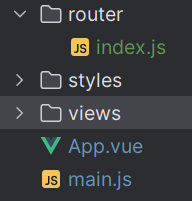
+++
index.js
import VueRouter from "vue-router";
import Find from "@/views/Find.vue";
import Friend from "@/views/Friend.vue";
import My from "@/views/My.vue";
import Vue from "vue";

Vue.use(VueRouter)


const router = new VueRouter({
    routes: [
    {path:'/find', component: Find},
    {path:'/friend', component: Friend},
    {path:'/my', component: My},
    ]
})

export default router
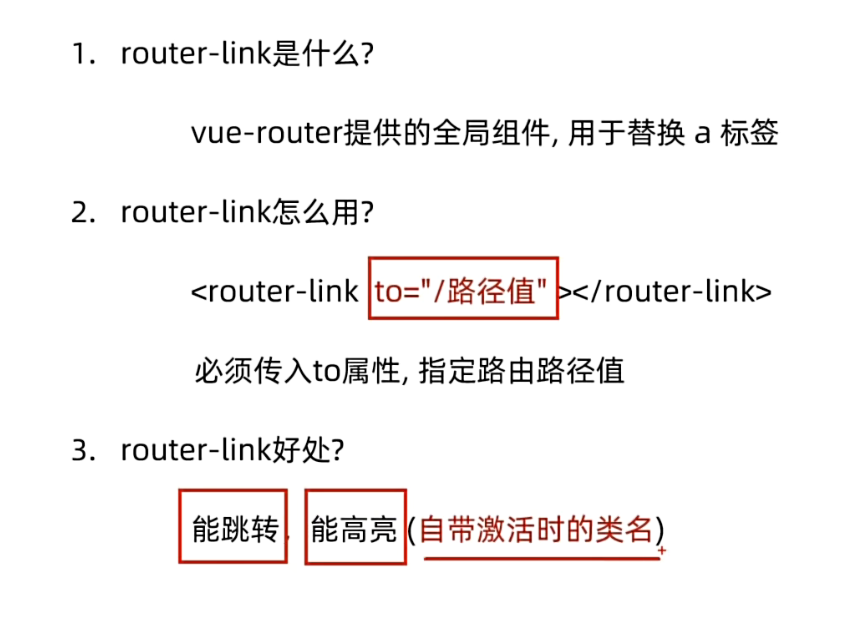
导航链接
把a标签改为router-link标签, href改to, 无#井号
router-link自带高亮, 给class里面的任意一个加入样式即可, 这个class只有点击才会冒出来

App.vue里面添加代码
.footer_wrap a.router-link-active {
  background-color: purple;
}
[外链图片转存失败,源站可能有防盗链机制,建议将图片保存下来直接上传(img-00XGwTrc-1691723724324)(https://imgfff-1313020458.cos.ap-shanghai.myqcloud.com/image/%E9%AB%98%E4%BA%AE.gif)]
+++
声明式导航. 两个类名
刚才多出的class有两个类属性
router-link-exact-active(灵活) & router-link-active
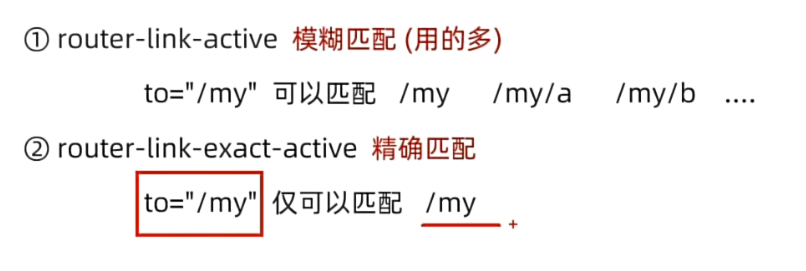
+++
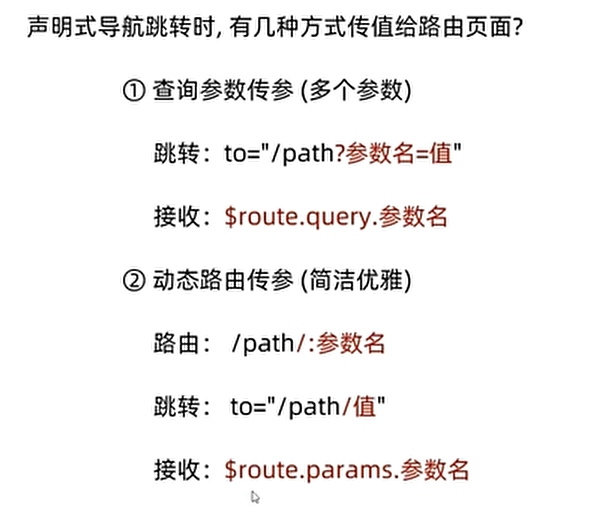
声明式导航 - 跳转传参 (查询参数传参)
<template>
  <div class="home">
    <div class="logo-box"></div>
    <div class="search-box">
      <input type="text">
      <button>搜索一下</button>
    </div>
    <div class="hot-link">
      热门搜索:
      <router-link to="/search?key=黑马程序员是一家什么公司?">黑马程序员</router-link>
      <router-link to="/search?key=培训前端的费用?">前端培训</router-link>
      <router-link to="/search?key=如何成为前端大牛?">如何成为前端大牛</router-link>
    </div>
  </div>
</template>
<template>
  <div class="search">
    <p>搜索关键字: {{ $route.query.key}} </p>
    <p>搜索结果: </p>
    <ul>
      <li>.............</li>
      <li>.............</li>
      <li>.............</li>
      <li>.............</li>
    </ul>
  </div>
</template>
+++
声明式导航 - 跳转传参 (动态路由传参)
需要多配一步路由规则 :words
routes: [
  { path: '/home', component: Home },
  { path: '/search/:words', component: Search }
]
    <div class="hot-link">
      热门搜索:
      <router-link to="/search/黑马程序员是一家什么样的公司???">黑马程序员</router-link>
      <router-link to="/search/前端培训需要多少钱???">前端培训</router-link>
      <router-link to="/search/如何成为前端大牛???">如何成为前端大牛</router-link>
    </div>
<p>搜索关键字: {{ $route.params.words }} </p>
+++
可选符
按照上面的动态路由传参, 此时点击搜索导航栏会出现空白, search/:word 强制必须携带参数, 加一个可选符 ? 解决问题
{ path: '/search/:words?', component: Search }
+++
路由重定向
const router = new VueRouter({
  routes: [
    {path:'/', component: Home},//如果访问 localhost:8080/  则重定向到 /home
    { path: '/home', component: Home },
    { path: '/search/:words?', component: Search },
    {path: '*', component: NotFound}//这是找不到页面, 404
  ]
})
路径不带
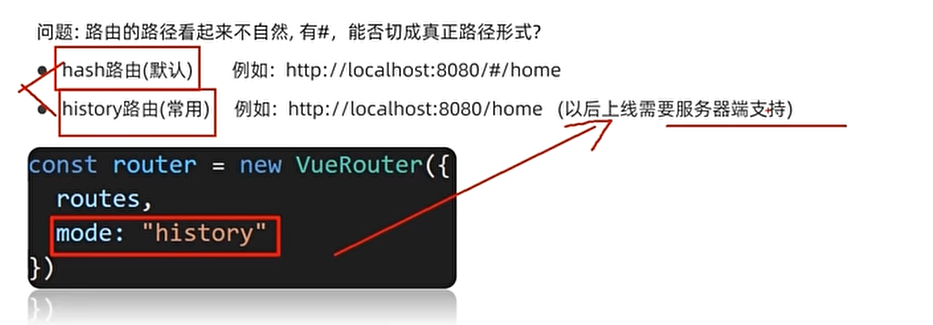
const router = new VueRouter({
  routes: [
    {path:'/', component: Home},//如果访问 localhost:8080/  则重定向到 /home
    { path: '/home', component: Home },
    { path: '/search/:words?', component: Search },
    {path: '*', component: NotFound}//这是找不到页面, 404
  ],
  mode: 'history'
})
++++
编程式导航路径跳转
- 通过路径跳转 (常用)
this.$router.push('路由路径')
- 如果路径名字太长了, 给路由起一个名字
this.$router.push({
    name: '路由名'
})
// 别忘了在router里面给路径起名字
{name: '路由名', path: '/path/xxx', ...},
+++
[外链图片转存失败,源站可能有防盗链机制,建议将图片保存下来直接上传(img-NREDjjnd-1691723724327)(https://imgfff-1313020458.cos.ap-shanghai.myqcloud.com/image/%E5%88%86.gif)]
+++
路由传参
我们点击搜索应该把搜索框里面的内容传给url跳过去
<template>
  <div class="home">
    <div class="logo-box"></div>
    <div class="search-box">
      <input v-model="inValue" type="text">
      <button @click="goSearch">搜索一下</button>
    </div>
    <div class="hot-link">
      热门搜索:
      <router-link to="/search/黑马程序员">黑马程序员</router-link>
      <router-link to="/search/前端培训">前端培训</router-link>
      <router-link to="/search/如何成为前端大牛">如何成为前端大牛</router-link>
    </div>
  </div>
</template>

<script>
export default {
  data() {
    return {
      inValue: '',
    }
  },
  name: 'FindMusic',
  methods: {
    goSearch () {
      this.$router.push(`search?key=${this.inValue}`)
    }
  },
}
</script>
<template>
  <div class="search">
    <p>搜索关键字: {{ $route.query.key }} </p>
    <p>搜索结果: </p>
    <ul>
      <li>.............</li>
      <li>.............</li>
      <li>.............</li>
      <li>.............</li>
    </ul>
  </div>
</template>
如果参数比较多, 适合对象式传参
goSearch () {
      this.$router.push({
        path: '/search',
        query: {
          key: this.inValue,

        },
      })
    }
动态路由传参
goSearch () {
      this.$router.push(`/search/${this.inValue}`)
    },
<p>搜索关键字: {{ $route.params.words }} </p>
+++
命名路由跳转传参
methods: {
    goSearch() {
      this.$router.push({
            name: 'search',
            params: {
              words: `${this.inValue}`,
            },
          }
      )
    },
  },
+++
综合小案例: 面经
首页请求渲染步骤:
- 安装axios
- 看接口文档, 确认请求方式, 请求地址, 请求参数
- created 中发送请求, 获取数据, 存起来
- 页面动态渲染
+++
跳转详情页传参
- 查询参数传参 ?参数=参数值 => this.$route.query.参数名
- 动态路由传参 改造路由 => /路径/参数 => this.$route.params.参数名
+++
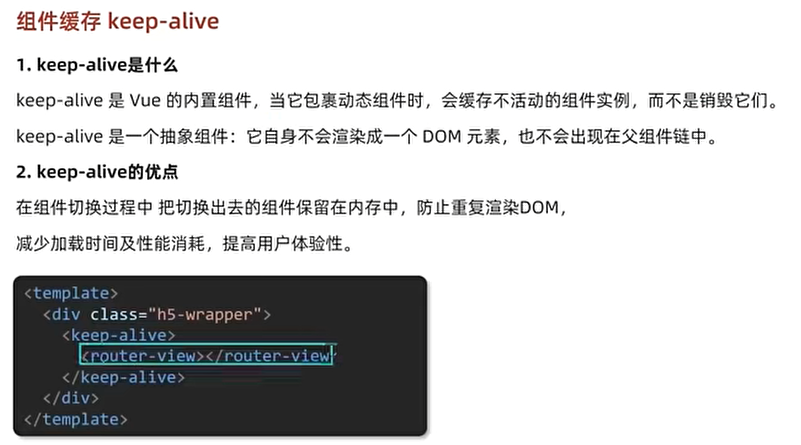
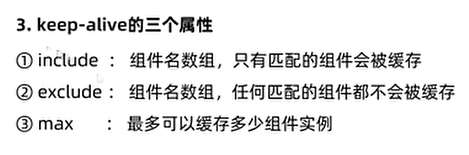
缓存组件
浏览页面返回时接着上一页的内容接着看
+++
自定义创建项目
步骤 =>
vue create 项目名
关闭ESlint代码规范

开启ESlint代码规范
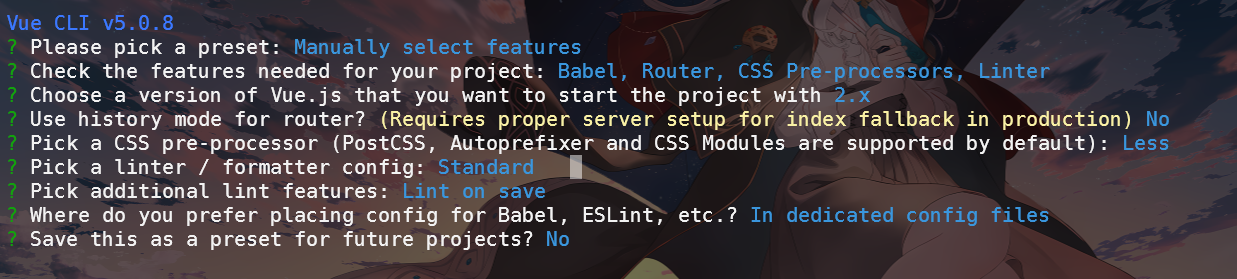
+++
Vuex
vue的一个插件, 数据管理工具, 管理vue通用的数据
一个数据在多个组件位置需要渲染, 多个组件共享同一个数据
新建文件夹
-store
--index.js
Vue.use(Vuex)
// 创建仓库
const store = new Vuex.Store({
    // state状态 , 即数据, 类似与vue组件里的data, 而他是所有组件共享的数据
    state: {
        title: '大标题',
        count: 100,
    }
})

// 导出给main.js使用
export default store
在所有可以访问数据的文件里面都可以使用
	<h1>
      根组件 - {{ $store.state.title }}
      - {{ $store.state.count }}
    </h1>
+++++++++++++++++++++++++++++++++++++++++++++++++
created () {
    console.log(this.$store.state.count);
  },
如果嫌太长了, 可以封装成一个计算属性, 来进行优化
computed: {
  ...mapState(['count', 'title'])
},
<h1>
  根组件 - {{ title }}
  - {{ count }}
</h1>
mutations
vuex是单向数据流, 组件中不能
直接修改仓库数据, 用mutations改
this.$store.state.count++
// 这样是错的
分两步走
- 在store中定义mutations
mutations: {
    // 第一个参数是当前store的state属性
    addCount (state) {
        state.count += 1
    }
}
- 在Son1中注册
<button @click="handleAdd">值 + 1</button>
--------------------------------
methods: {
  handleAdd() {
    // this.$store.state.count++
    this.$store.commit('addCount')
  }
},
+++
++1 ++5 ++10 ++n
我们需要传递参数, mutations 支持传参
this.$store.commit('addCount', 2)
+++++++++++++++++++++++++++++++++++++++++
addCount (state, n) {
   state.count += n
},
辅助函数使用 mutations
...mapMutations(['addCount', 'changeTitle']),
addCount1() {
  this.addCount(2)
},
changeTitle1() {
  this.changeTitle('我是小仓库')
}
可以偷个懒, 在上面直接用辅助函数
<button @click="addCount(2)">值 + 2</button>
<button @click="changeTitle('我是小仓库')">更改标题</button>
+++
actions
处理异步操作, mutations是同步的
需求 => 1s后 修改数据
actions: {
    changeCountAction(context, num) {
        setTimeout(() => {
            context.commit('changeCount', num)
        }, 1000)
    }
},
handleInput(e) {
  const num = +e.target.value
  this.$store.dispatch('changeCountAction', num)
}
+++
辅助函数 mapActions
把位于actions中的方法提取出来, 映射到组件methods中
...mapActions(['changeCountAction']),
handleInput(e) {
  const num = +e.target.value
  this.changeCountAction(num)
}
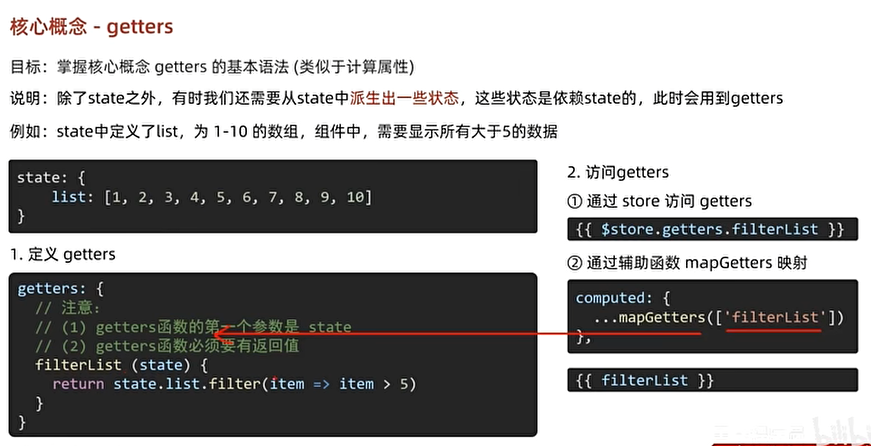
Getters
+++
Modules

+++
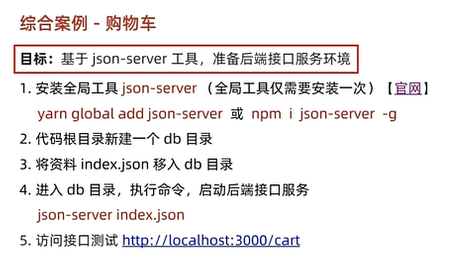
工具快速生成接口
json-server 定义假数据{_}/ hi!
yarn global add json-server
vw 的适配, postcss-px-to-viewport
一款 PostCSS 插件,用于将 px 单位转化为 vw/vh 单位。
一级路由和二级路由的区别一级路由可以单独显示
+++
图形验证码功能

+++
api接口模块
把请求封装成方法, 放到api模块, 与页面分离
优点: 请求和页面逻辑分离, 相同请求可以复用, 请求进行统一管理
api - login.js
// 此处用于存放所有登录相关的接口请求
// 1.获取图形验证码
import request from "@/utils/request";

export const getPicCode = () => {
    return request.get('/captcha/image')
}
views - index.vue
// 获取图形验证码
async getPicCode() {
  const {data: {base64, key}} = await getPicCode()
  this.picUrl = base64;  //存储地址
  this.picKey = key;   //存储唯一标识
}
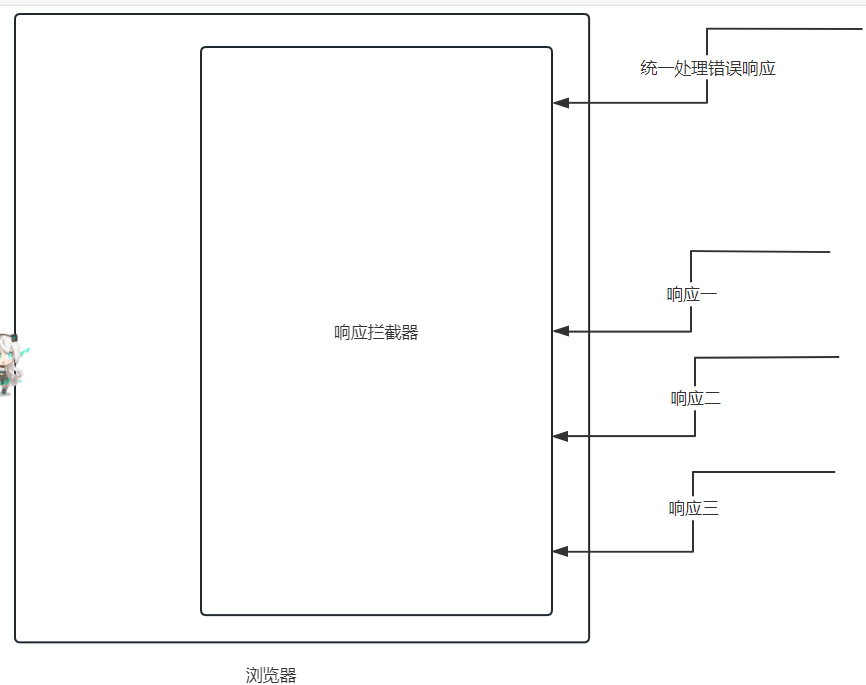
响应拦截器
通过响应拦截器, 统一处理接口的错误提示
响应拦截器统一处理错误
+++
登录权证信息存储
vuex构建user模块存储登录权证 token & userId
优点: 易于获取, 响应式

+++
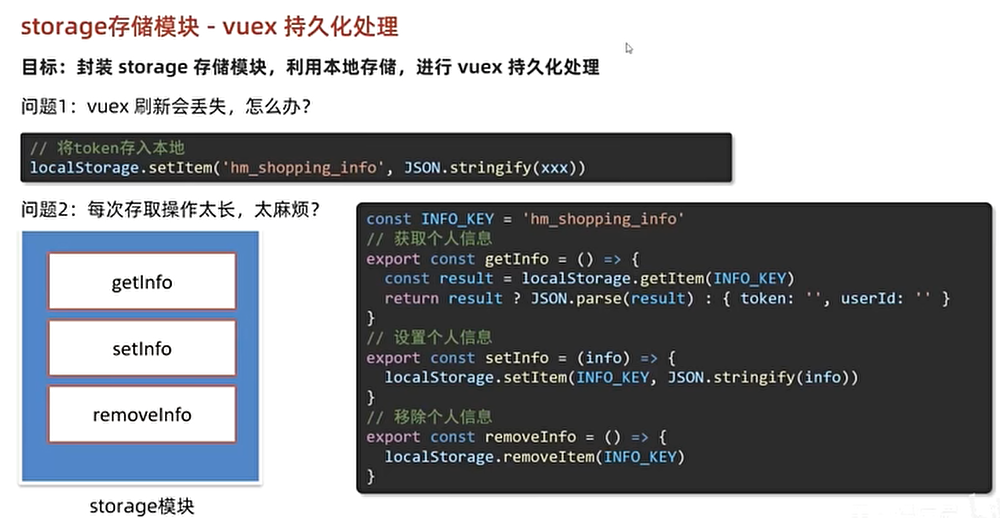
vuex的持久化处理
封装storage存储模块, 利用本地存储, 进行vuex持久化处理
+++
添加请求loading效果

+++
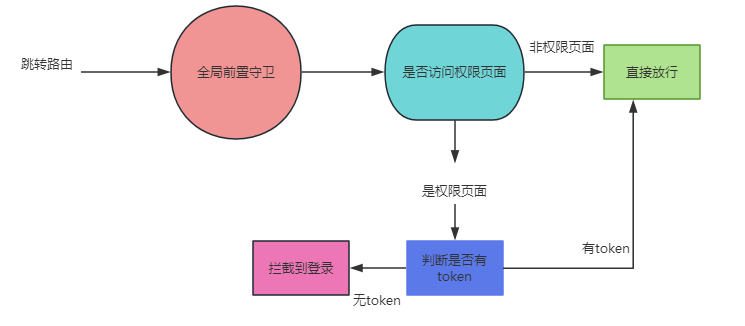
页面访问拦截
基于全局前置守卫, 进行页面访问拦截处理
- 所有路由被匹配到, 会先经过全局前置守卫
- 只有全局前置守卫放行, 才会真正解析渲染组件, 才能看到页面内容
+++
+++
打包发布
vue脚手架不参与上线
yarn build
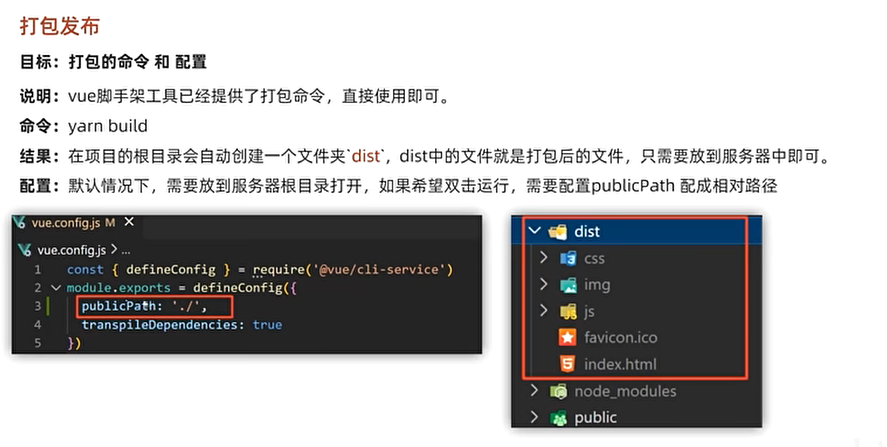
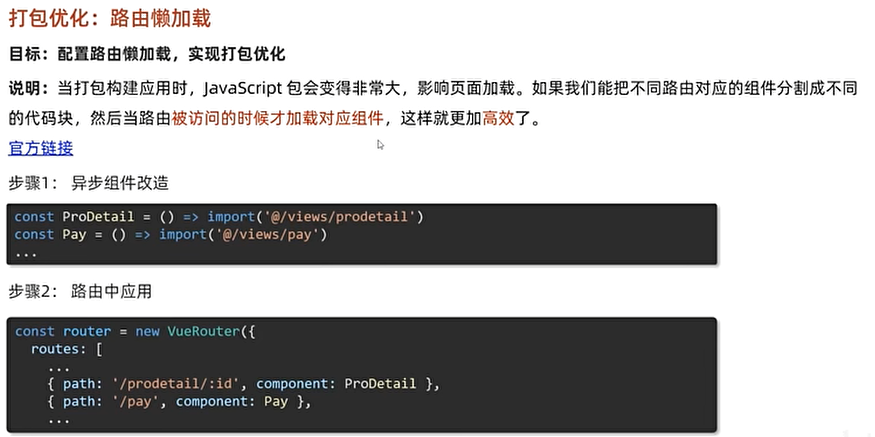
路由懒加载
+++
Vue3
使用create-vue脚手架
npm init vue@latest
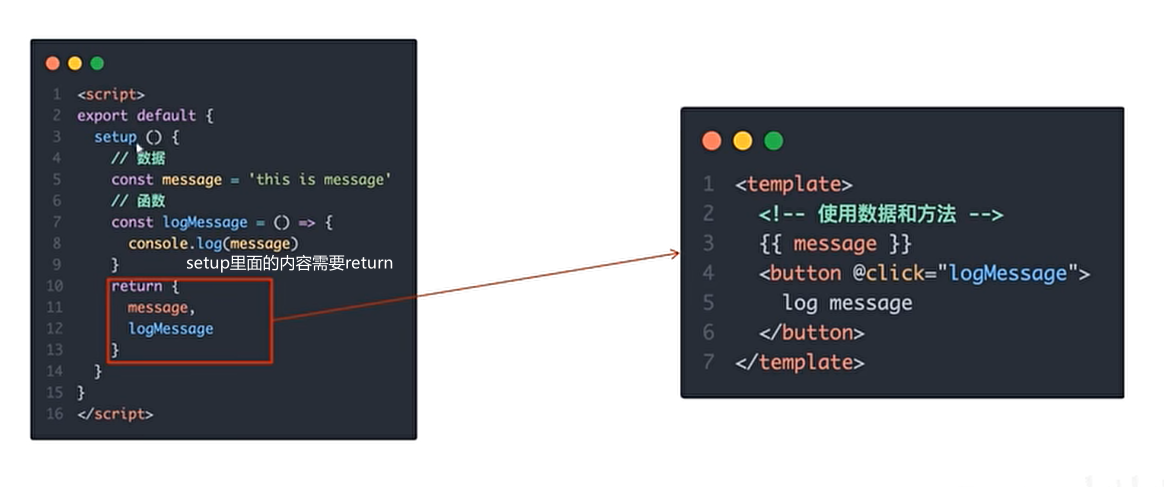
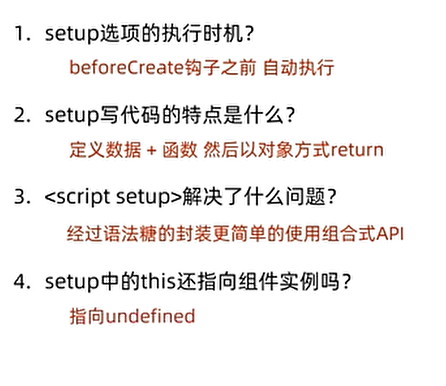
组合式API setup选项
执行时机早于beforeCreate, 最早的钩子
+++
+++
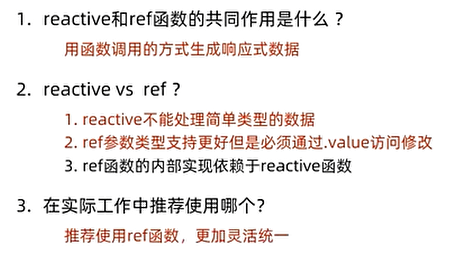
reactive 和 ref 函数
reactive 可以接收对象类型参数传入并返回一个响应式的对象
const state = reactive(对象类型数据)
在
<script setup>
  import {reactive} from "vue";

  const state = reactive({
    count: 1
  })
  const addCount = () => {
    state.count++
  }
</script>

<template>
  <div>{{ state.count }}</div>
  <button @click="addCount">+1</button>
</template>
[外链图片转存失败,源站可能有防盗链机制,建议将图片保存下来直接上传(img-jAMm1ZPy-1691723724335)(https://imgfff-1313020458.cos.ap-shanghai.myqcloud.com/image/%E5%87%A1%E5%B0%94%E8%B5%9B%E7%BF%81%E7%9C%9F.gif)]
+++
ref()
接收简单类型或者对象类型的数据传入并返回一个响应式的对象
<script setup>
// 声明数据统一使用 ref, 统一编码规范
  import { ref } from "vue";

  const count = ref(0)
  const addCount = () => {
    count.value++
  }
</script>

<template>
  <div>{{ count }}</div>
  <button @click="addCount">+1</button>
</template>
+++
组合式API - computed
const list = ref([1, 2, 3, 4, 5, 6, 7, 8])
//基于list派生计算属性, 过滤 >2 的
const list1 = computed(() => {
  return list.value.filter(item => item > 2)
})
watch函数
侦听一个或多个数据变化, 数据变化执行回调函数
const count = ref(0);
const name = ref('莲莲')
watch(count, (newValue, oldValue) => {
  console.log(`count发生变化, 老值${oldValue}新值${newValue}`);
})


watch([count, name], (newArr, oldArr) => {
  console.log(newArr, oldArr);
})
immediate deep
在侦听器创建时立即回调, 响应数据变化后继续回调
watch(count, (newValue, oldValue) => {
  console.log(`count发生变化, 老值${oldValue}新值${newValue}`);
}, {
  immediate: true,
  // deep深度监视,默认watch是浅层监视, deep监视复杂类型内部变化
  deep: true
})
精确侦听对象某个属性
const changeName = () => {
  info.value.name = '神兵瑞克'
}
const info = ref({
  name: '黑剑',
  age: 20
})
watch(
    () => info.value.name,
    (value, oldValue, onCleanup) => {
      console.log('1.' + value,'2.' +  oldValue,'3.' + onCleanup)
    }
)
生命周期函数
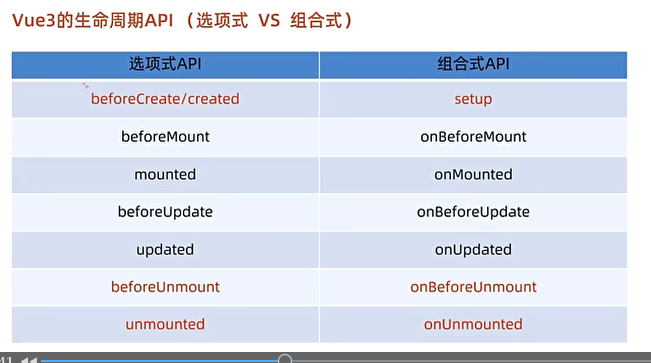
+++
const getList = () => {
  setTimeout(() => {
    console.log('发送请求');
  }, 2000)
}
getList()
// 有些代码需要在mounted生命周期执行
onMounted(() => {
  console.log(' mounted 生命周期函数');
})
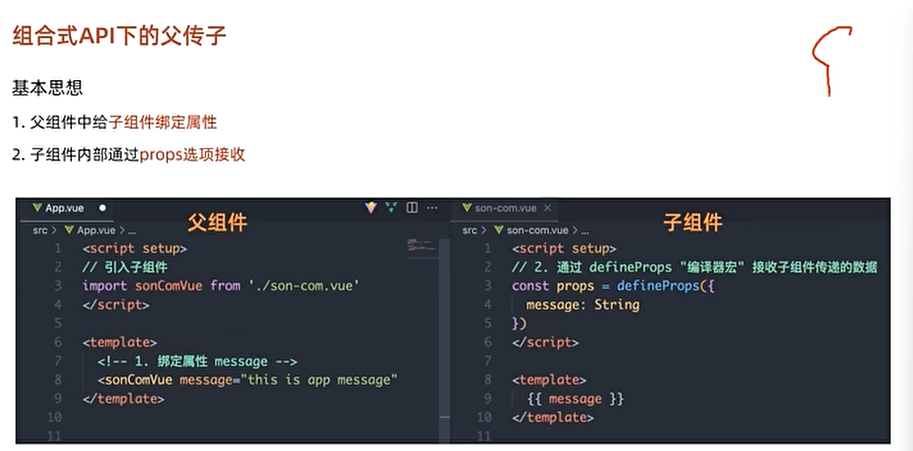
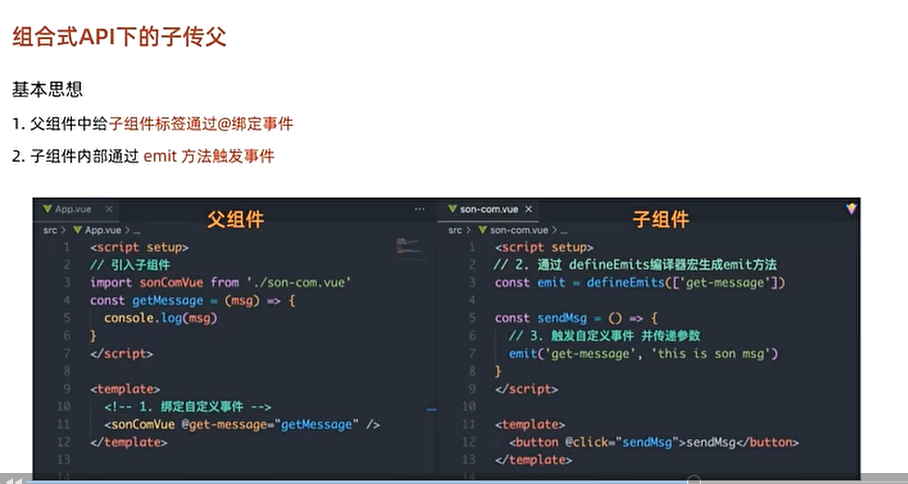
父子通信 组合式API
+++
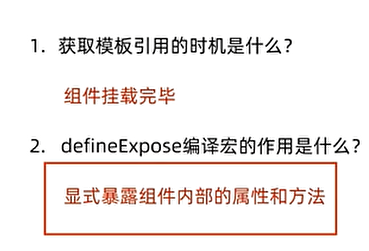
模板引用
通过ref标识获取dom对象或者组件实例对象
+++
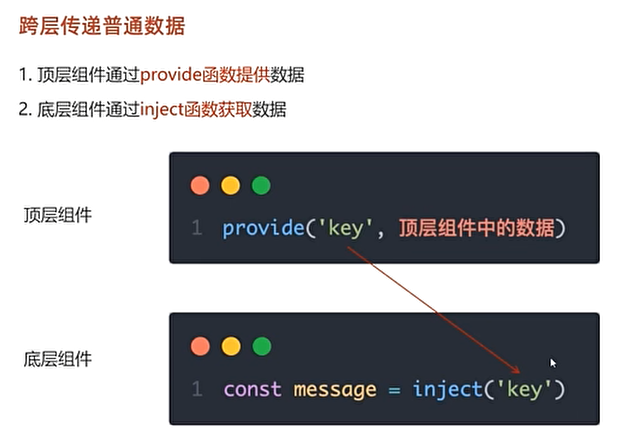
provide 和 inject
跨层级共享数据
defineOptions
<script setup>
defineOptions({
  name: "login"
})
</script>
defineModel
快速实现双向绑定

+++
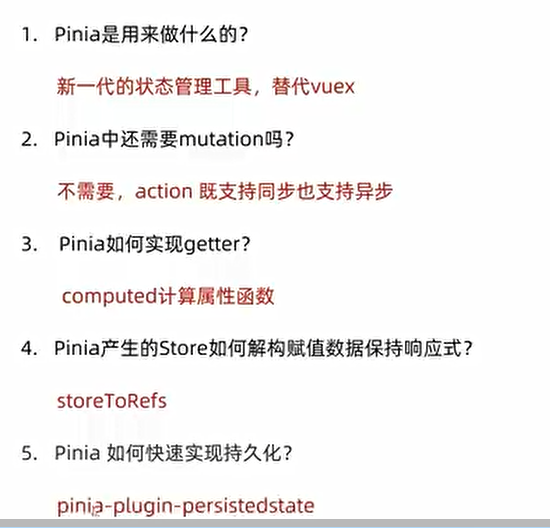
Pinia
vuex的替代品, vue的最新管理工具
+++
img-uDqDfuth-1691723724333)]
+++
页面访问拦截
基于全局前置守卫, 进行页面访问拦截处理
- 所有路由被匹配到, 会先经过全局前置守卫
- 只有全局前置守卫放行, 才会真正解析渲染组件, 才能看到页面内容
+++
[外链图片转存中…(img-uzhuhERP-1691723724333)]
+++
打包发布
vue脚手架不参与上线
yarn build
[外链图片转存中…(img-q2YLgc54-1691723724334)]
路由懒加载
[外链图片转存中…(img-UCRG1Uba-1691723724334)]
+++
Vue3
使用create-vue脚手架
npm init vue@latest
组合式API setup选项
执行时机早于beforeCreate, 最早的钩子
[外链图片转存中…(img-A68m2KZc-1691723724335)]
+++
[外链图片转存中…(img-DB555IIs-1691723724335)]
+++
reactive 和 ref 函数
reactive 可以接收对象类型参数传入并返回一个响应式的对象
const state = reactive(对象类型数据)
在
<script setup>
  import {reactive} from "vue";

  const state = reactive({
    count: 1
  })
  const addCount = () => {
    state.count++
  }
</script>

<template>
  <div>{{ state.count }}</div>
  <button @click="addCount">+1</button>
</template>
[外链图片转存中…(img-jAMm1ZPy-1691723724335)]
+++
ref()
接收简单类型或者对象类型的数据传入并返回一个响应式的对象
<script setup>
// 声明数据统一使用 ref, 统一编码规范
  import { ref } from "vue";

  const count = ref(0)
  const addCount = () => {
    count.value++
  }
</script>

<template>
  <div>{{ count }}</div>
  <button @click="addCount">+1</button>
</template>
[外链图片转存中…(img-mi7wKRqM-1691723724335)]
+++
组合式API - computed
const list = ref([1, 2, 3, 4, 5, 6, 7, 8])
//基于list派生计算属性, 过滤 >2 的
const list1 = computed(() => {
  return list.value.filter(item => item > 2)
})
watch函数
侦听一个或多个数据变化, 数据变化执行回调函数
const count = ref(0);
const name = ref('莲莲')
watch(count, (newValue, oldValue) => {
  console.log(`count发生变化, 老值${oldValue}新值${newValue}`);
})


watch([count, name], (newArr, oldArr) => {
  console.log(newArr, oldArr);
})
immediate deep
在侦听器创建时立即回调, 响应数据变化后继续回调
watch(count, (newValue, oldValue) => {
  console.log(`count发生变化, 老值${oldValue}新值${newValue}`);
}, {
  immediate: true,
  // deep深度监视,默认watch是浅层监视, deep监视复杂类型内部变化
  deep: true
})
精确侦听对象某个属性
const changeName = () => {
  info.value.name = '神兵瑞克'
}
const info = ref({
  name: '黑剑',
  age: 20
})
watch(
    () => info.value.name,
    (value, oldValue, onCleanup) => {
      console.log('1.' + value,'2.' +  oldValue,'3.' + onCleanup)
    }
)
生命周期函数
[外链图片转存中…(img-zjcj57o4-1691723724336)]
+++
const getList = () => {
  setTimeout(() => {
    console.log('发送请求');
  }, 2000)
}
getList()
// 有些代码需要在mounted生命周期执行
onMounted(() => {
  console.log(' mounted 生命周期函数');
})
父子通信 组合式API
[外链图片转存中…(img-tPhXbdsC-1691723724336)]
[外链图片转存中…(img-7UPnqYDY-1691723724337)]
+++
模板引用
通过ref标识获取dom对象或者组件实例对象
[外链图片转存中…(img-IwPuc3ro-1691723724337)]
+++
provide 和 inject
跨层级共享数据
[外链图片转存中…(img-M5irHGTa-1691723724337)]
defineOptions
<script setup>
defineOptions({
  name: "login"
})
</script>
defineModel
快速实现双向绑定
[外链图片转存中…(img-T9R602uu-1691723724337)]
+++
Pinia
vuex的替代品, vue的最新管理工具
[外链图片转存中…(img-WyDxhQEG-1691723724337)]
+++