前言
本文记录下基于docker安装gitlab并重置管理员密码的过程。
作为记录的同时也希望能帮助到需要的朋友们。
搭建过程
1. 准备好docker环境并启动docker
[root@slave-node1 docker-gitlab]# docker version
Client:
 Version:           18.06.1-ce
 API version:       1.38
 Go version:        go1.10.3
 Git commit:        e68fc7a
 Built:             Tue Aug 21 17:23:03 2018
 OS/Arch:           linux/amd64
 Experimental:      false

Server:
 Engine:
  Version:          18.06.1-ce
  API version:      1.38 (minimum version 1.12)
  Go version:       go1.10.3
  Git commit:       e68fc7a
  Built:            Tue Aug 21 17:25:29 2018
  OS/Arch:          linux/amd64
  Experimental:     false
[root@slave-node1 docker-gitlab]# systemctl status docker
● docker.service - Docker Application Container Engine
   Loaded: loaded (/usr/lib/systemd/system/docker.service; enabled; vendor preset: disabled)
   Active: active (running) since Wed 2023-08-09 11:39:10 CST; 2h 6min ago
     Docs: https://docs.docker.com
 Main PID: 1870 (dockerd)
    Tasks: 88
   Memory: 115.1M
   CGroup: /system.slice/docker.service
           ├─1870 /usr/bin/dockerd
           ├─1878 docker-containerd --config /var/run/docker/containerd/containerd.toml
           ├─9827 /usr/bin/docker-proxy -proto tcp -host-ip 0.0.0.0 -host-port 13888 -container-ip 172.17.0.2 -container-port 80
           ├─9841 /usr/bin/docker-proxy -proto tcp -host-ip 0.0.0.0 -host-port 13443 -container-ip 172.17.0.2 -container-port 443
           ├─9853 /usr/bin/docker-proxy -proto tcp -host-ip 0.0.0.0 -host-port 13222 -container-ip 172.17.0.2 -container-port 22
           └─9862 docker-containerd-shim -namespace moby -workdir /var/lib/docker/containerd/daemon/io.containerd.runtime.v1.linux/moby/46fecc380b118c78b1ac8ff45f...
....省略部分日志
2. 创建文件夹并运行容器
# 新建文件夹用于存储数据和日志
mkdir -p /opt/docker-gitlab
# 拉取镜像、创建并运行容器
docker run -d -p 13443:443 -p 13888:80 -p 13222:22 --name gitlab --restart always -v /opt/docker-gitlab/config:/etc/gitlab -v /opt/docker-gitlab/logs:/var/log/gitlab -v /opt/docker-gitlab/data:/var/opt/gitlab gitlab/gitlab-ce
首次启动过程比较慢,可以通过docker logs -f gitlab --tail 200实时查看启动日志。
3. 尝试访问
启动完成后访问服务器ip:13888即可看到gitlab首页
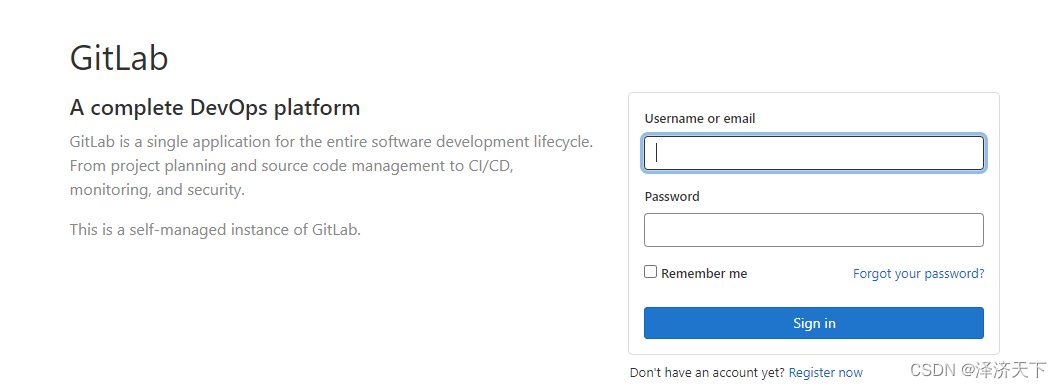
默认密码不清楚,网上很多说法是用户名是root, 密码是: 5iveL!fe 我试了下是进不去的,可能是版本升级后更换了默认密码吧。
补充说明:
后面在研究单点登录配置的时候发现在宿主机的/opt/docker-gitlab/config目录下存在initial_root_password这个文件,文件中包含了root密码,第一次登录可以使用这个密码,亲测有效。登录后建议还是要修改这个默认密码。
文件内容如下:
[root@slave-node1 config]# pwd
/opt/docker-gitlab/config
[root@slave-node1 config]# ls -ll
total 176
-rw-------. 1 root root 128291 Aug  9 11:52 gitlab.rb
-rw-------. 1 root root  19103 Aug  9 13:52 gitlab-secrets.json
-rw-------. 1 root root    749 Aug  9 11:52 initial_root_password
-rw-------. 1 root root    513 Aug  9 11:52 ssh_host_ecdsa_key
-rw-r--r--. 1 root root    179 Aug  9 11:52 ssh_host_ecdsa_key.pub
-rw-------. 1 root root    411 Aug  9 11:52 ssh_host_ed25519_key
-rw-r--r--. 1 root root     99 Aug  9 11:52 ssh_host_ed25519_key.pub
-rw-------. 1 root root   2602 Aug  9 11:52 ssh_host_rsa_key
-rw-r--r--. 1 root root    571 Aug  9 11:52 ssh_host_rsa_key.pub
drwxr-xr-x. 2 root root      6 Aug  9 11:53 trusted-certs
[root@slave-node1 config]# cat initial_root_password
# WARNING: This value is valid only in the following conditions
#          1. If provided manually (either via `GITLAB_ROOT_PASSWORD` environment variable or via `gitlab_rails['initial_root_password']` setting in `gitlab.rb`, it was provided before database was seeded for the first time (usually, the first reconfigure run).
#          2. Password hasn't been changed manually, either via UI or via command line.
#
#          If the password shown here doesn't work, you must reset the admin password following https://docs.gitlab.com/ee/security/reset_user_password.html#reset-your-root-password.

# 没错这个就是root对应的初始密码了。
Password: 3dlrX3hiA4RebgqVU7f44I1f7l2jeNThEGYjxjVp/Uw=

# NOTE: This file will be automatically deleted in the first reconfigure run after 24 hours.
4. 修改ROOT密码
修改密码需要使用gitlab自带的控制台命令行工具,需要进入到容器中执行。
[root@slave-node1 docker-gitlab]# docker exec -it gitlab bash
root@ac5a942b141f:/# cd /opt/gitlab/
root@ac5a942b141f:/opt/gitlab# ls -ll
total 19972
-rw-r--r--.  1 root root  7854098 Jan  4  2022 LICENSE
drwxr-xr-x.  2 root root     4096 Jan  4  2022 LICENSES
drwxr-xr-x.  2 root root     4096 Jan  4  2022 bin
-rw-r--r--.  1 root root 12510625 Jan  4  2022 dependency_licenses.json
drwxr-xr-x. 18 root root     4096 Aug  9 05:52 embedded
drwxr-xr-x. 11 root root     4096 Aug  9 05:53 etc
drwxr-xr-x.  2 root root     4096 Aug  9 05:53 init
drwxr-xr-x.  2 root root     4096 Jan  4  2022 licenses
drwxr-xr-x.  2 root root     4096 Aug  9 05:53 service
drwxr-xr-x. 17 root root     4096 Aug  9 05:53 sv
drwxr-xr-x.  3 root root       18 Aug  9 05:52 var
-rw-r--r--.  1 root root    31571 Jan  4  2022 version-manifest.json
-rw-r--r--.  1 root root    12062 Jan  4  2022 version-manifest.txt
root@ac5a942b141f:/opt/gitlab# gitlab-rails console
--------------------------------------------------------------------------------
 Ruby:         ruby 2.7.5p203 (2021-11-24 revision f69aeb8314) [x86_64-linux]
 GitLab:       14.6.1 (661d663ab2b) FOSS
 GitLab Shell: 13.22.1
 PostgreSQL:   12.7
--------------------------------------------------------------------------------
Loading production environment (Rails 6.1.4.1)
irb(main):001:0> user=User.find_by(username:'root')
=> #<User id:1 @root>
irb(main):002:0> user.password='xxxxxxx'
=> "xxxxxxx"
irb(main):003:0> user.password_confirmation='xxxxxxx'
=> "xxxxxxx"
irb(main):004:0> user.save!
=> true
irb(main):005:0> exit
root@ac5a942b141f:/opt/gitlab# exit
exit
简单来说就是进入到命令行—>找到用户—>设置密码—>设置确认密码—>保存并退出。跟http请求逻辑有点像。
这样就完成了密码重置,可以重新访问http://ip:13888 使用root和修改后的密码登录,亲测有效。
当然这个方法修改任何一个存在的用户密码应该都是可行的。

到此基于docker搭建的gitlab就完成了。
总结
本文简单记录了基于docker搭建gitlab环境的过程,同时提供了修改密码的过程。
针对以上内容有任何疑问或者建议欢迎留言评论~
创作不易,欢迎一键三连~~







![[Vue] Vue2和Vue3的生命周期函数](https://img-blog.csdnimg.cn/6fb8a4e983ea4fc6ae691fc3f3662fc0.png)
