目录
- 前言
- 总体设计
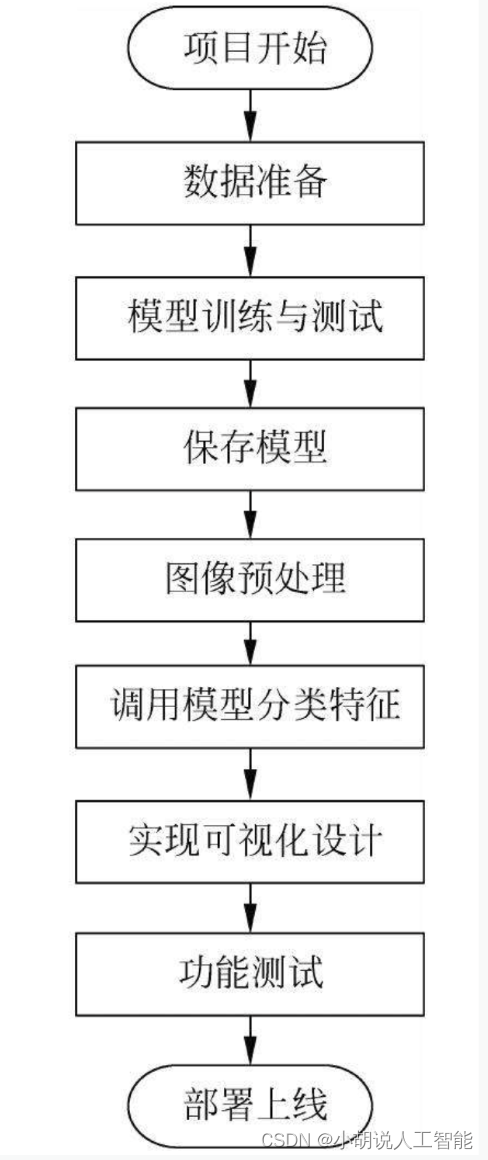
- 系统整体结构图
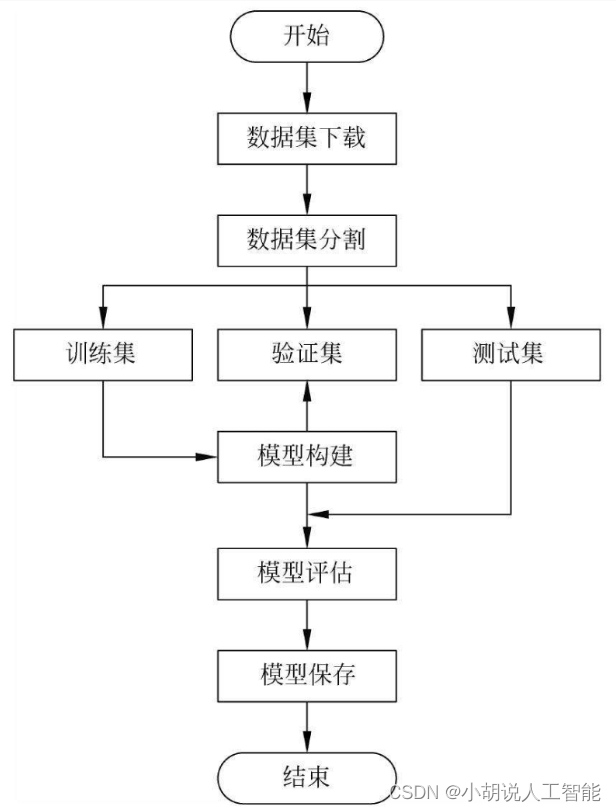
- 系统流程图
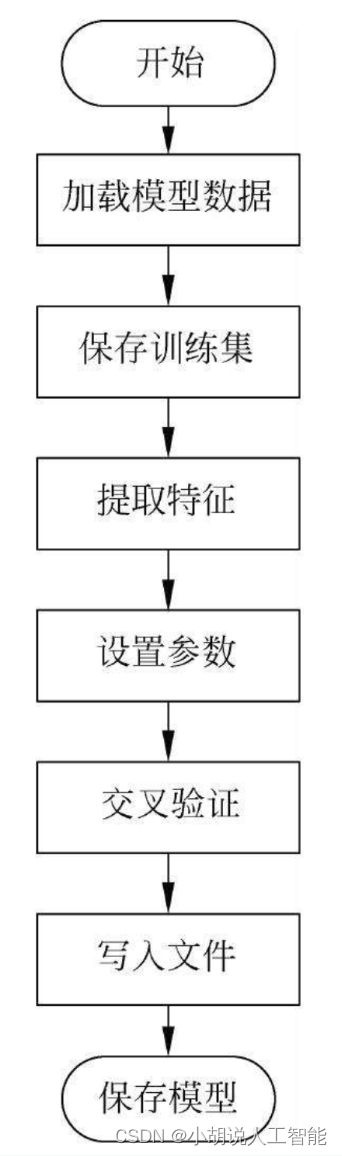
- 模型流程
- 运行环境
- Python 环境
- TensorFlow环境
- 界面编程环境
- 模块实现
- 1. 数据预处理
- 2. 模型构建
- 1)定义模型结构
- 2)交叉验证模型优化
- 3. 模型训练及保存
- 4. 模型测试
- 1)摄像头调用
- 2)模型导入及调用
- 3)前端代码
- UI设计
- 训练函数
- 自定义工具函数
- 主活动类
- 系统测试
- 1)训练准确率
- 2)测试效果
- 3)模型应用
- 工程源代码下载
- 其它资料下载

前言
本项目利用了Dlib库的训练模型,以获取精确的面部特征。在人脸检测的过程中,它不仅能够准确地定位人脸,还能够确定出面部的68个关键点的准确坐标。借助这些关键点,我们可以提取丰富的面部特征。
通过将这些面部特征应用于基于支持向量机(SVM)的分类方法,我们可以对不同的面相进行有效的分类。SVM是一种强大的机器学习算法,可以根据已知的面部特征和对应的面相进行训练,然后用于对未知面部进行分类。
这个项目的目标是实现面相分析,通过对面部特征的分类来判断面相类型。面部特征包括了眼睛、鼻子、嘴巴等各个部位的关键点位置和形态,这些信息可以帮助我们理解一个人的面相特征以及可能的性格特点。
通过这个项目,我们能够更深入地了解面相分析的原理和应用,从而为面部特征的分类和性格分析提供一种可靠的方法。这对于心理学研究、人脸识别技术以及个性化服务等领域都有着重要的意义。
总体设计
本部分主要包括系统整体结构、系统流程和模型流程。
系统整体结构图
系统整体结构如图所示。
系统流程图
系统流程如图所示。
模型流程
模型流程如图所示。
运行环境
本部分包括Python环境、TensorFlow 环境和界面编程环境。
Python 环境
需要Python 3.7及以上配置,在Windows环境下推荐下载Anaconda完成对Python环境的配置,下载地址为https://www.anaconda.com/对项目的代码编写并未使用Anaconda中自带的Spyder,而是另行安装PyCharm作为编程的IDE,实现智能代码完成、动态错误检查与快速修复项目导航。
PyCharm下载地址为https://www.jetbrains.com/pycharm/download/。
TensorFlow环境
打开Anaconda Prompt,输入清华仓库镜像。
conda config --add channels https://mirrors.tuna.tsinghua.edu.cn/anaconda/pkgs/free/
conda config -set show_channel_urls yes
创建Python 3.7的环境,名称为TensorFlow,此时Python版本和后面TensorFlow的版本有匹配问题,此步选择Python 3.x。
conda create -n tensorflow python=3.7
有需要确认的地方,都输入y。在Anaconda Prompt中激活TensorFlow环境:
conda activate tensorflow
安装CPU版本的TensorFlow:
pip install -upgrade --ignore -installed tensorflow
界面编程环境
使用PyQt5工具包进行GUI应用的开发、便捷的QtDesigner直接进行界面绘制,分离UI与逻辑,避免手写界面,简化工作流程。
准备配置:PyCharm、 Anaconda、 Python 3.7,打开Anaconda,在environment中选择安装PyQt 5。安装完成后,在Anaconda→Libra→bin中找到designer.exe。
打开PyCharm,选择File→Settings→External Tools,单击加号添加自己的工具,如图所示。
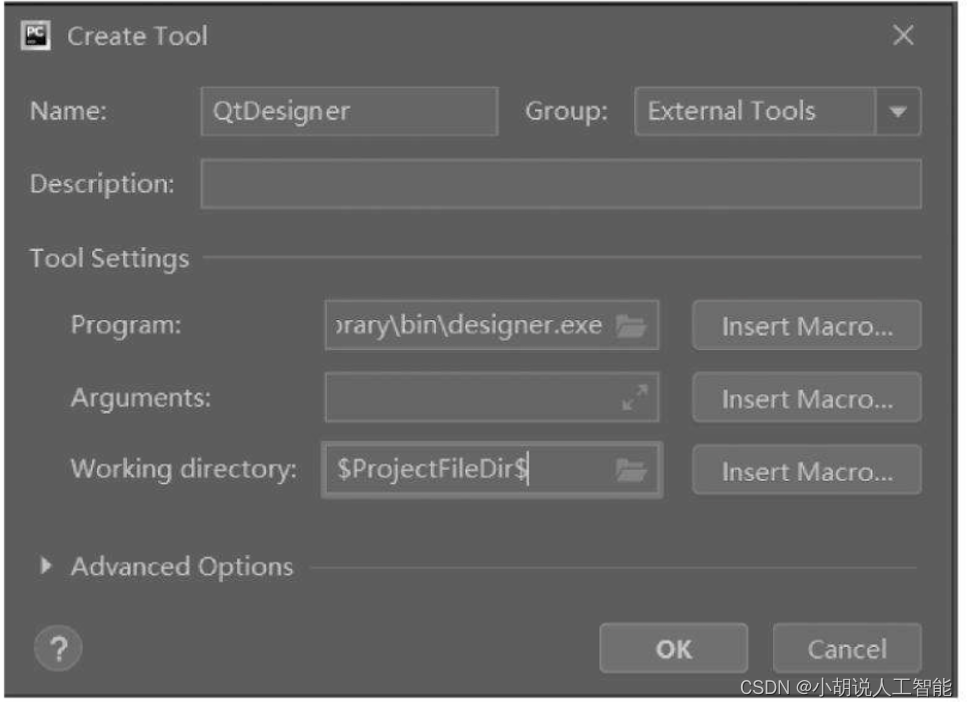
单击OK按钮,完成对QtDesigner的配置,在PyCharm中进行界面绘制,如需将界面的.ui文件转为py文件,还需对PyUIC进行配置。
在External Tools中单击加号进行配置,如图所示。
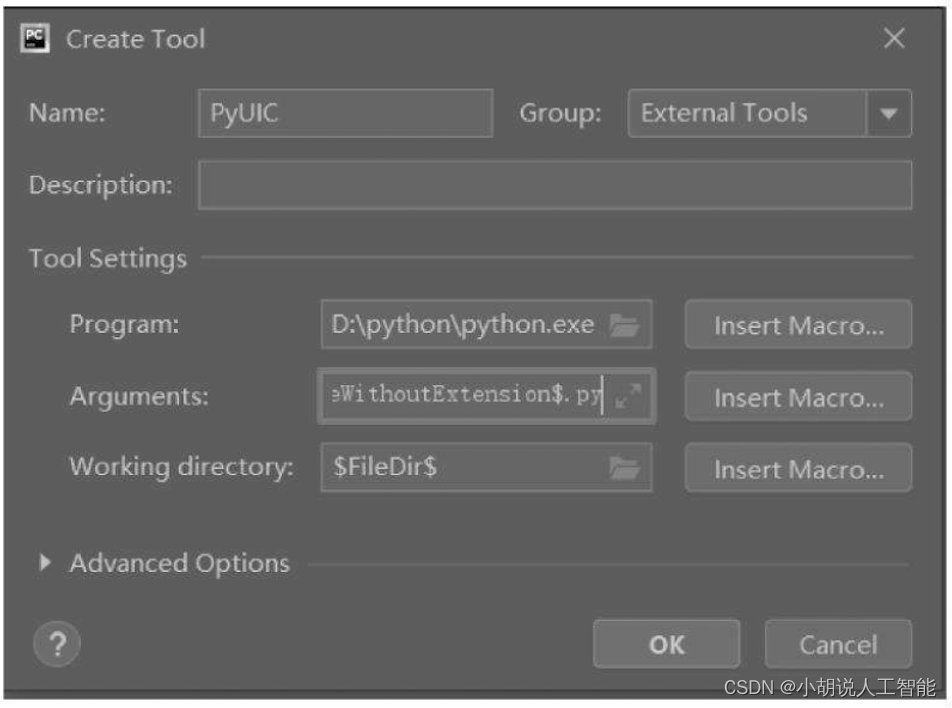
在PyCharm中的Tools→External Tools中找到并打开designer进行图形界面绘制,得到.ui文件,通过External Tools中的PyUIC工具将.ui文件转化为.py文件,以供完善逻辑使用。
模块实现
本项目包括4个模块,数据预处理、模型构建、模型训练及保存、模型测试,下面分别给出各模块的功能介绍及相关代码。
1. 数据预处理
使用批量下载工具Google-image download, pip安装后即可使用。下载数据集analysis的相关代码如下:
from __future__ import with_statement
from google_images_download import google_images_download
import json, os

TRAIN_DATA_DIR_PATH = "train_imgs"
    #下载analysis用于区域分类
with open('data/analysis.json',encoding='utf-8') as f:
    analysis = json.load(f)
	global_args = {
    "limit":75,
    "output_directory":TRAIN_DATA_DIR_PATH,
    "prefix":"",
    "keywords":"",
    "prefix_keywords":"面相"
}
    #从google_images_download中下载使用数据
for region in analysis["face_regions"]:
    region_name = region["name"]
    for feature in region["features"]:
        download_args = global_args
        download_args["output_directory"] = os.path.join(TRAIN_DATA_DIR_PATH, region_name)
        download_args["keywords"] = feature["name"]
        response = google_images_download.googleimagesdownload()
        response.download(download_args)
        default_fking_ugly_dirname = os.path.join(TRAIN_DATA_DIR_PATH, region_name, download_args["prefix_keywords"] + " " + feature["name"])
        os.rename(default_fking_ugly_dirname,default_fking_ugly_dirname.replace( download_args["prefix_keywords"] + " ", ""))
自动从数据源下载相应包,如图所示。

除此之外,还用到人脸识别检测器数据库shape_predictor_68_face_landmarks.dat。dlib官方下载地址为http://dlib.net/files/,下载文件shape_predictor_68_face_landmarks.dat.bz2。
2. 模型构建
数据加载进模型之后,需要定义模型结构,交叉验证模型优化。
1)定义模型结构
从LIBSVM库中直接使用SVM (支持向量机)的方法进行数据运算,调用代码如下:
svm.SVC(kernel="linear", probability=True)
2)交叉验证模型优化
支持向量机的优势:其一,高维空间非常高效,即使在数据维度比样本数量大的情况下仍然有效。其二,决策函数(称为支持向量)中使用训练集的子集,高效利用内存。
通用性:不同的核函数与特定的决策函数一一对应,常见的函数已经提供,也可以定制内核。交叉验证代码如下:
scores = cross_val_score(svms[region_name.encode()], X, y, cv=5)
3. 模型训练及保存
在定义模型架构和编译之后,通过训练集训练模型,使模型识别,人脸面部特征。这里,将使用训练集和测试集拟合并保存模型。
#SVM分类
import sys
path = 'E:\Anaconda\envs\\tensorflow36\Lib\site-packages\libsvm\python'
sys.path.append(path)
from svmutil import *
from utils import *
from sklearn import svm
from sklearn.externals import joblib
from sklearn.model_selection import train_test_split
from sklearn.model_selection import cross_val_score
import numpy as np
#设置数据模型存储路径
SAVE_PATH="data/trained_svms.pkl"
SAVE_TRAIN_DATA_PATH = "data/train_data.pkl"
LIBSVM_SVMS_PATH = "data/%s.svm"
LIBSVM_LABELS_PATH = "data/labels.txt"
GET_CROSS_VAL = False    #是否进行交叉验证
IS_BUILD_LIBSVM_MODEL = False   #判断是否是LIBSVM模型
#加载模型数据
if os.path.isfile(SAVE_TRAIN_DATA_PATH):
    data = joblib.load(SAVE_TRAIN_DATA_PATH)
else:
    data = loadData()
    joblib.dump(data, SAVE_TRAIN_DATA_PATH) #将模型保存至本地
svms = {}
if IS_BUILD_LIBSVM_MODEL:
    labels_file = open(LIBSVM_LABELS_PATH, 'w')
for region_name, features in data.items(): #训练数据集
    print("training svm for %s"% (region_name))
    #将数据分为训练集合和测试集
    if not IS_BUILD_LIBSVM_MODEL:
        X = []
        y = []
        for feature_name, feature_shapes in features.items(): #脸部特征提取
            for shape in feature_shapes:
                X.append(shape.flatten()) #记录向量特征
                y.append(feature_name) #记录向量名称
        X = np.squeeze(np.array(X)) #改变向量维数
        y = np.array(y,dtype='S128') #128位字符串
        #分割数据
        #X_train, X_test, y_train, y_test = train_test_split(X,y)
        svms[region_name.encode()] = svm.SVC(kernel="linear", probability=True) #设置支持向量机参数
        if GET_CROSS_VAL:#交叉验证
            scores = cross_val_score(svms[region_name.encode()], X, y, cv=5)
#cv表示选择折数
            print("Cross val score: ", scores)
            print("Accuracy:%0.2f(+/- %0.2f)"%(scores.mean(),scores.std()* 2))
        #训练部署
        svms[region_name.encode()].fit(X, y)#用训练数据拟合分类器模型
    else:#对于LIBSVM的模型处理
    #为方便程序重复使用模型,运算效率更高,将模型保存为.svm格式
  	X = []
        y = []
        for i, (feature_name, feature_shapes) in enumerate(features.items()):
#遍历脸部特征,以下同上
            for shape in feature_shapes:
                X.append(shape.flatten())
                y.append(i)
        X = np.squeeze(np.array(X))
        y = np.array(y,dtype='uint8')#这里改为使用int8存储
        #将LIBSVM模型写入文件
        labels_file.write("%s\n" % region_name)
        labels_file.write(LIBSVM_SVMS_PATH % region_name)
        labels_file.write(" ")
        labels_file.write(" ".join([k.decode() for k in features.keys()]))
        labels_file.write("\n")
        #将数据训练并保存
        prob = svm_problem(y.tolist(), X.tolist()) #tolist使数据列表化
        param = svm_parameter("-h 0 -s 0 -t 1 -b 1")
        m=svm_train(prob, param)
        svm_save_model(LIBSVM_SVMS_PATH % region_name, m)
if IS_BUILD_LIBSVM_MODEL:
    labels_file.close()
print("training svm... Done")
joblib.dump(svms, SAVE_PATH) #保存模型
print("svm saved!")
模型被保存后,可以被重用,也可以移植到其他环境中使用。
4. 模型测试
该应用实现调用计算机摄像头对人进行拍照,拍照后依照面部区域特征进行判断分析,最终给出面相分析结果,即人工智能算命。
1)摄像头调用
相关代码如下:
def getImgFromCam():
    vs = VideoStream(usePiCamera=False).start() #调用计算机摄像头
    time.sleep(2.0)
    while True:
        frame = vs.read()
        frame = imutils.resize(frame, width=400)
        gray = cv2.cvtColor(frame, cv2.COLOR_BGR2GRAY)
        #在灰度框中检测人脸
        rects = detector(gray, 0)
        if rects is not None and len(rects) > 0: #当检测到有人脸存在时结束
            return frame
2)模型导入及调用
将训练好的.svm文件放入data目录下,并声明模型存放路径。
SAVE_PATH="data/trained_svms.pkl"
SAVE_TRAIN_DATA_PATH = "data/train_data.pkl"
LIBSVM_SVMS_PATH = "data/%s.svm"
LIBSVM_LABELS_PATH = "data/labels.txt"
#将LIBSVM模型写入文件
labels_file.write("%s\n" % region_name)
labels_file.write(LIBSVM_SVMS_PATH % region_name)
labels_file.write(" ")
labels_file.write(" ".join([k.decode() for k in features.keys()]))
labels_file.write("\n")
3)前端代码
本部分包括UI设计、训练函数、自定义工具函数和主活动类。
UI设计
相关代码如下:
import sys
from PyQt5 import QtWidgets
from untitled import *
from PyQt5.QtWidgets import QFileDialog
from try_svm import *
from facereading import *
import dlib           #人脸处理库Dlib
import numpy as np  #数据处理库Numpy
import cv2            #图像处理库OpenCV
import os             #读写文件
import shutil        #读写文件
from QCandyUi.CandyWindow import colorful
global imgName
imgname = 00000
from utils import *
class MyPyQT_Form(QtWidgets.QMainWindow,Ui_MainWindow):
    def __init__(self):
        super(MyPyQT_Form,self).__init__()
        self.setupUi(self)
    #实现pushButton_click()函数,textEdit是文本框的ID
    def slot1(self):
        detector = dlib.get_frontal_face_detector()
        #OpenCV调用摄像头
        cap = cv2.VideoCapture(0)
        #人脸截图的计数器
        cnt_ss = 0
        #存储人脸的文件夹
        current_face_dir = ""
        #保存人脸图像的路径
        path_photos_from_camera = "data/data_faces_from_camera/"
        #新建保存人脸图像文件和数据CSV文件夹
        def pre_work_mkdir():
            #新建文件夹
            if os.path.isdir(path_photos_from_camera):
                pass
            else:
                os.mkdir(path_photos_from_camera)
        pre_work_mkdir()
        #可选, 默认关闭
        #删除之前存的人脸数据文件夹
        def pre_work_del_old_face_folders():
            folders_rd = os.listdir(path_photos_from_camera)
            for i in range(len(folders_rd)):
                shutil.rmtree(path_photos_from_camera + folders_rd[i])
            if os.path.isfile("data/features_all.csv"):
                os.remove("data/features_all.csv")
        #每次程序录入时删掉之前存的人脸数据
        #如果打开,每次进行人脸录入时都会删掉之前的人脸图像文件夹 person_1/,person_2/,person_3/...
        #如果启用此功能,将删除目录中所有旧数据person_1/,person_2/,/person_3/...
        #pre_work_del_old_face_folders()
        #Check people order: person_cnt
        #如果有之前录入的人脸
        #在之前person_x的序号按照person_x+1开始录入
        if os.listdir("data/data_faces_from_camera/"):
            #获取已录入的最后一个人脸序号
            person_list = os.listdir("data/data_faces_from_camera/")
            person_num_list = []
            for person in person_list:
                person_num_list.append(int(person.split('_')[-1]))
            person_cnt = max(person_num_list)
        #如果第一次存储或者没有之前录入的人脸,按照person_1开始录入
        else:
            person_cnt = 0
        #flag用来控制是否保存图像
        save_flag = 1
        #flag用来检查是否先按n再按s
        press_n_flag = 0
        while cap.isOpened():
            flag, img_rd = cap.read()
            #print(img_rd.shape)调试代码
            #默认Windows和Ubuntu为480*640,macOS为1280*720
            kk = cv2.waitKey(1)
            img_gray = cv2.cvtColor(img_rd, cv2.COLOR_RGB2GRAY)
            #人脸
            faces = detector(img_gray, 0)
            #要写的字体
            font = cv2.FONT_ITALIC
            #按下n新建存储人脸的文件夹
            if kk == ord('n'):
                person_cnt += 1
                current_face_dir = path_photos_from_camera + "person_" + str(person_cnt)
                os.makedirs(current_face_dir)
                print('\n')
                print("新建的人脸文件夹 / Create folders: ", current_face_dir)
                cnt_ss = 0  #将人脸计数器清零
                press_n_flag = 1  #已经按下n
                #检测到人脸
            if len(faces) != 0:
                    #矩形框
                for k, d in enumerate(faces):
                    #(x,y), (宽度width, 高度height)
                    pos_start = tuple([d.left(), d.top()])
                    pos_end = tuple([d.right(), d.bottom()])
                    #计算矩形框大小
                    height = (d.bottom() - d.top())
                    width = (d.right() - d.left())
                    hh = int(height / 2)
                    ww = int(width / 2)
                    #设置颜色
                    color_rectangle = (255, 255, 255)
                    #判断人脸矩形框是否超出640*480
                    if (d.right() + ww) > 640 or (d.bottom() + hh > 480) or (d.left() - ww < 0) or (d.top() - hh < 0):
                        cv2.putText(img_rd, "OUT OF RANGE", (20, 300), font, 0.8, (0, 0, 255), 1, cv2.LINE_AA)
                        color_rectangle = (0, 0, 255)
                        save_flag = 0
                        if kk == ord('s'):
                            print("请调整位置/Please adjust your position")
                    else:
                        color_rectangle = (255, 255, 255)
                        save_flag = 1
                    cv2.rectangle(img_rd,
                                  tuple([d.left() - ww, d.top() - hh]),
                                  tuple([d.right() + ww, d.bottom() + hh]),
                                  color_rectangle, 2)
                    #根据人脸大小生成空的图像
                    im_blank = np.zeros((int(height * 2), width * 2, 3), np.uint8)
                    if save_flag:
                        #按下s保存摄像头中的人脸到本地
                        if kk == ord('s'):
                            #检查是否先按n新建文件夹
                            if press_n_flag:
                                cnt_ss += 1
                                for ii in range(height * 2):
                                    for jj in range(width * 2):
                           im_blank[ii][jj] = img_rd[d.top() - hh + ii][d.left() - ww + jj]
         cv2.imwrite(current_face_dir + "/img_face_" + str(cnt_ss) + ".jpg", im_blank)
  print("写入本地 / Save into:", str(current_face_dir) + "/img_face_" + str(cnt_ss) + ".jpg")
                            else:
        print("请在按 'S' 之前先按 'N' 来建文件夹 / Please press 'N' before 'S'")
            #显示人脸数
            cv2.putText(img_rd, "Faces: " + str(len(faces)), (20, 100), font, 0.8, (0, 255, 0), 1, cv2.LINE_AA)
            #添加说明
            cv2.putText(img_rd, "Face Register", (20, 40), font, 1, (0, 0, 0), 1, cv2.LINE_AA)
            cv2.putText(img_rd, "N: Create face folder", (20, 350), font, 0.8, (0, 0, 0), 1, cv2.LINE_AA)
            cv2.putText(img_rd, "S: Save current face", (20, 400), font, 0.8, (0, 0, 0), 1, cv2.LINE_AA)
            cv2.putText(img_rd, "Q: Quit", (20, 450), font, 0.8, (0, 0, 0), 1, cv2.LINE_AA)
            #按下q键退出
            located = str('D:\\pylearn\\Face-Reading\\')+str(str(current_face_dir) + "\\img_face_" + str(cnt_ss) + ".jpg")
            load_face = cv2.imread(located)
            if kk == ord('q'):
                print(located)
                png = QtGui.QPixmap(located).scaled(self.label.width(), self.label.height()) #适应设计标签时的大小
                self.label.setPixmap(png)
                wenben = apply(load_face)
                while not wenben.empty():
                    temp = wenben.get()
                    #print(temp)调试代码
                    self.textEdit.append(temp)
                break
            #如果需要摄像头窗口大小可调
            #cv2.namedWindow("camera", 0)调试代码
            cv2.imshow("camera", img_rd)
            #释放摄像头
        cap.release()
        cv2.destroyAllWindows()
    def duqu(self):
        global imgName
        print("笑一笑就好")
        imgName, imgType = QFileDialog.getOpenFileName(self,
          "打开图片",
          "", " *.jpg;;*.png;;*.jpeg;;*.bmp;;All Files (*)")
        #显示图片
        #print(str(imgName))调试代码
        png = QtGui.QPixmap(imgName).scaled(self.label.width(), self.label.height())  #适应设计标签时的大小
        self.label.setPixmap(png)
    def suanming(self):
        self.textEdit.setReadOnly(True)
        img2 = cv2.imread(imgName)
        wenben = apply(img2)
        while not wenben.empty():
            temp = wenben.get()
            #print(temp)
            self.textEdit.append(temp)
if __name__ == '__main__':
    app = QtWidgets.QApplication(sys.argv)
    my_pyqt_form = MyPyQT_Form()
    my_pyqt_form.show()
    sys.exit(app.exec_())
训练函数
相关代码如下:
#SVM分类
import sys
path = 'E:\Anaconda\envs\\tensorflow36\Lib\site-packages\libsvm\python'
sys.path.append(path)
from svmutil import *
from utils import *
from sklearn import svm
from sklearn.externals import joblib
from sklearn.model_selection import train_test_split
from sklearn.model_selection import cross_val_score
import numpy as np
#设置数据模型存储路径
SAVE_PATH="data/trained_svms.pkl"
SAVE_TRAIN_DATA_PATH = "data/train_data.pkl"
LIBSVM_SVMS_PATH = "data/%s.svm"
LIBSVM_LABELS_PATH = "data/labels.txt"
GET_CROSS_VAL = False    #是否进行交叉验证
IS_BUILD_LIBSVM_MODEL = False   #判断是否是LIBSVM模型
#加载模型数据
if os.path.isfile(SAVE_TRAIN_DATA_PATH):
    data = joblib.load(SAVE_TRAIN_DATA_PATH)
else:
    data = loadData()
    joblib.dump(data, SAVE_TRAIN_DATA_PATH) #将模型保存至本地
svms = {}
if IS_BUILD_LIBSVM_MODEL:
    labels_file = open(LIBSVM_LABELS_PATH, 'w')
for region_name, features in data.items(): #训练数据集
    print("training svm for %s"% (region_name))
    #分割数据为训练集和测试集
    if not IS_BUILD_LIBSVM_MODEL:
        X = []
        y = []
      for feature_name, feature_shapes in features.items(): #脸部特征提取
            for shape in feature_shapes:
                X.append(shape.flatten()) #记录向量特征
                y.append(feature_name) #记录向量名称
        X = np.squeeze(np.array(X)) #改变向量维数
        y = np.array(y,dtype='S128') #128位字符串
        #分割数据
        #X_train, X_test, y_train, y_test = train_test_split(X,y)
 svms[region_name.encode()] = svm.SVC(kernel="linear", probability=True)
#设置支持向量机参数
        if GET_CROSS_VAL: #交叉验证
            scores = cross_val_score(svms[region_name.encode()], X, y, cv=5)
#cv表示选择折数
            print("Cross val score: ", scores)
           print("Accuracy: %0.2f (+/-%0.2f)"%(scores.mean(),scores.std()* 2))
        svms[region_name.encode()].fit(X, y) #用训练数据拟合分类器模型
        print(svms[region_name.encode()].score(X,y))
    else: #对于LIBSVM模型的处理
        X = []
        y = []
 for i, (feature_name, feature_shapes) in enumerate(features.items()):
#遍历脸部特征,以下同上
            for shape in feature_shapes:
                X.append(shape.flatten())
                y.append(i)
        X = np.squeeze(np.array(X))
        y = np.array(y,dtype='uint8') #这里使用int8存储
        #将LIBSVM模型写入文件
        labels_file.write("%s\n" % region_name)
        labels_file.write(LIBSVM_SVMS_PATH % region_name)
        labels_file.write(" ")
        labels_file.write(" ".join([k.decode() for k in features.keys()]))
        labels_file.write("\n")
        #将数据训练并保存
        prob = svm_problem(y.tolist(), X.tolist()) #tolist使数据列表化
        param = svm_parameter("-h 0 -s 0 -t 1 -b 1")
        m=svm_train(prob, param)
        svm_save_model(LIBSVM_SVMS_PATH % region_name, m)
if IS_BUILD_LIBSVM_MODEL:
    labels_file.close()
print("training svm... Done")
joblib.dump(svms, SAVE_PATH) #保存模型
print("svm saved!")
自定义工具函数
相关代码如下:
from __future__ import print_function
import os, sys
import cv2
import dlib
import imutils
from imutils.video import VideoStream
from imutils import face_utils
from imutils.face_utils import FaceAligner
from glob import glob
import numpy as np
#配置
USE_REGION = True # use part of the feature to train the svm, e.g. only use mouth feature points
LANDMARK_PATH = "data/shape_predictor_68_face_landmarks.dat"
#数据集Dlib人脸68个关键点
#Dlib初始化配置
detector = dlib.get_frontal_face_detector()
predictor = dlib.shape_predictor(LANDMARK_PATH)
fa = FaceAligner(predictor, desiredFaceWidth=400)
faceRegions = {   #判断区域分类
    "eye_left": list(range(36,41+1)),
    "eye_right": list(range(42, 47+1)),
    "nose": list(range(27, 35+1)),
    "mouth": list(range(48, 60+1)),
    "face": list(range(0, 16+1)),
    "eyebrow_left": list(range(17,21+1)),
    "eyebrow_right": list(range(22,26+1))
}
faceRegions["eyes"] = faceRegions["eye_left"] + faceRegions["eye_right"]
faceRegions["eyebrows"] = faceRegions["eyebrow_left"] + faceRegions["eyebrow_right"]
def loadData(dir="train_imgs"):
    data = {"face":{}, "eyebrows":{}, "eyes":{}, "nose":{}, "mouth":{}}
    tc = 0
    for region_name, v in data.items():
        paths = os.path.join(dir, region_name, '*/*.*') #路径设置
        rc = 0
        for path in glob(paths): #对于训练数据下的所有目录文件提取并进行训练
            _, feature_name = os.path.split(os.path.dirname(path))
            feature_name = feature_name.encode()
            if feature_name not in v: #若区域未设置该向量为空
                v[feature_name] = []
            img = cv2.imread(path)
            if img is None: #若图像为空则跳过
                continue
            points= getNormalizedFeature(region_name, feature_name, img)
            #若没有检测到人脸则跳过
            if points is not None:
                v[feature_name].append(points)
                rc+=1
                tc+=1
                sys.stdout.write("\033[K")
                print("loading...%s%d/%d"%(region_name,rc,
tc), end="\r")
        print("")
    print("loading... Done")
    return data
#从图像中获取面部区域名称,面部区域特征的函数将图像进行标准化处理
def getNormalizedFeature(region_name, feature_name, img):
    img = imutils.resize(img, width=800)
    gray = cv2.cvtColor(img, cv2.COLOR_BGR2GRAY)
    rects = detector(gray, 0)
    if len(rects) == 0:    #没有检测到人脸
        #sys.exit("No face is detected in %s of %s" % (feature_name, region_name))
        return None
    else: #面部特征处理并提取
        faceImg = fa.align(img, gray, rects[0])
        full_rect = dlib.rectangle(0, 0, faceImg.shape[1], faceImg.shape[0])
        shape = predictor(faceImg, full_rect)
        if USE_REGION:
            shape = face_utils.shape_to_np(shape)[faceRegions[region_name]]
        else:
            shape = face_utils.shape_to_np(shape)
        return shape
#函数的重载,对仅提供图片参数的情况处理
def getNormalizedFeatures(img, display=False):
    img = imutils.resize(img, width=800)
    gray = cv2.cvtColor(img, cv2.COLOR_BGR2GRAY)
    data = {"face":[], "eyebrows":[], "eyes":[], "nose":[], "mouth":[]}
    rects = detector(gray, 0)
    if len(rects) == 0:    #没有检测到人脸
        sys.exit("No face is detected")
        return None
    else: #图像特征提取
        faceImg = fa.align(img, gray, rects[0])
        full_rect = dlib.rectangle(0, 0, faceImg.shape[1], faceImg.shape[0])
        points = predictor(faceImg, full_rect)
        points = face_utils.shape_to_np(points)
        if display: #显示图像
            cv2.imshow("face", faceImg)
            cv2.waitKey()
        for key in data: #关键特征提取
            if USE_REGION:
                data[key] = points[faceRegions[key]]
            else:
                data[key] = points
        return faceImg, data
主活动类
相关代码如下:
#测试训练数据
import argparse
import json
import time
import queue
from textwrap import fill
import cv2
import matplotlib.pyplot as plt
import numpy as np
from imutils.convenience import url_to_image
from sklearn.externals import joblib
from utils import *
#路径设置(图片保存和测试路径)
TEST_IMAGE_PATH="test_imgs\\test1.png"
SAVE_PATH="data/trained_svms.pkl"
#初始化选择系统,用于测试各项功能
ap = argparse.ArgumentParser()
ap.add_argument("-c", "--camera", default=False, action="store_true",
   help="get input from camera")
ap.add_argument("-i", "--image", type=str, default=None,
   help="input image")
ap.add_argument("-u", "--url", type=str, default=None,
   help="input image url")
args = vars(ap.parse_args())
#加载分析数据
with open('data/analysis.json','rb') as f:
    analysis = json.load(f)
#核心算法
def apply(img):
    wenben = queue.Queue()
    faceImg, data = getNormalizedFeatures(img, False)
#调用utils工具中的函数获取面部特征(眼、鼻、口、眉)
    svms = joblib.load(SAVE_PATH)#调用训练好的模型
    #显示图像的测试函数
    #plt.imshow(imutils.opencv2matplotlib(faceImg))调试代码
    #plt.show()调试代码
    for region_name, points in data.items(): #图像data参数中的面部区域和特征点
        X = [points.flatten()] #转变为向量形式处理
        y = svms[region_name.encode()].predict(X)[0].decode() #cv2当中的预测函数
        prob = svms[region_name.encode()].predict_proba(X) #支撑向量机预测输出
        max_prob = np.amax(prob)*100
        wenben1 = "【 %s 】\t %s %f%%" % (region_name, y, max_prob)
        for region in analysis["face_regions"]: #文本存储判断的结果
            if region["name"] == region_name:
                for feature in region["features"]:
                    if feature["name"] == y:
                        wenben2 = fill(feature["analysis"], width=18)
        temp = str(wenben1) + '\n' + str(wenben2)
        wenben.put(str(temp))
        #print(wenben.get())
    return wenben
def getImgFromCam():
    vs = VideoStream(usePiCamera=False).start() #调用摄像头
    time.sleep(2.0)
    while True:
        frame = vs.read()
        frame = imutils.resize(frame, width=400)
        gray = cv2.cvtColor(frame, cv2.COLOR_BGR2GRAY)
        rects = detector(gray, 0)
        if rects is not None and len(rects) > 0: #当检测到有人脸存在时结束
            return frame
if __name__ == '__main__':
    if args["camera"]:
        img = getImgFromCam()
    elif args["image"] is not None:
        img = cv2.imread(args["image"])
    elif args["url"] is not None:
        img = url_to_image(args["url"])
    else:
        img = cv2.imread(TEST_IMAGE_PATH)
    apply(img)
系统测试
本部分包括训练准确率、测试效果和模型应用。
1)训练准确率
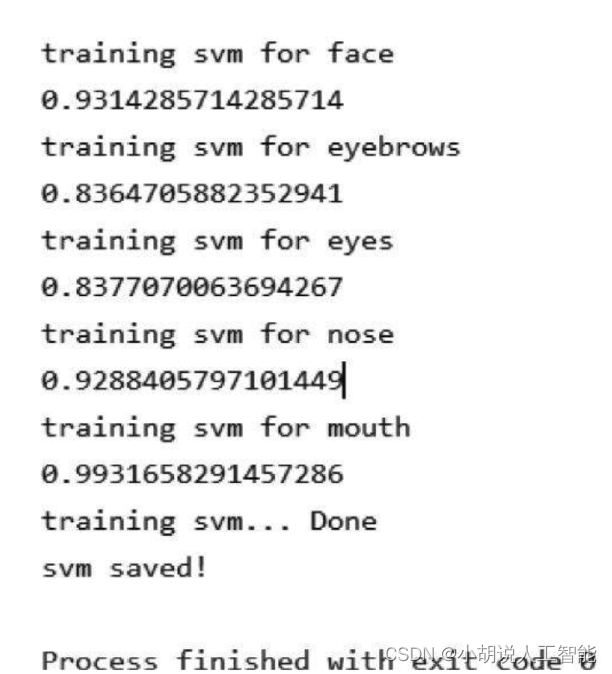
由于获取的数据存在差异,所以不同SVM模型训练效果不同,但是从总体来看,训练准确率最低83%,最高99%,均值接近90%,如图所示。
2)测试效果
将图片送入模型进行测试,分类的标签与图片的已知类型进行对比,测试得到面部特征的类型一致, 可以实现对面部特征的分类。
3)模型应用
打开应用,初始界面如图所示。
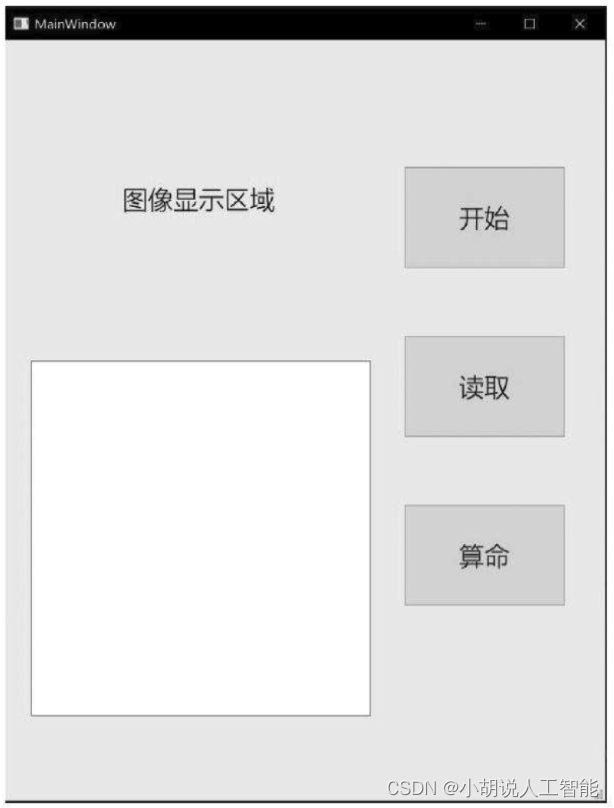
界面右侧从上至下,分别是三个按钮:“开始”是通过计算机摄像头对人脸拍照并进行面相分析;“读取” 是读取计算机本地的图像,在左侧图像显示区域进行分析;“算命”是对已读取的图像进行面相分析。界面左侧下方文本框作为分析结果的输出区域。
工程源代码下载
详见本人博客资源下载页
其它资料下载
如果大家想继续了解人工智能相关学习路线和知识体系,欢迎大家翻阅我的另外一篇博客《重磅 | 完备的人工智能AI 学习——基础知识学习路线,所有资料免关注免套路直接网盘下载》
这篇博客参考了Github知名开源平台,AI技术平台以及相关领域专家:Datawhale,ApacheCN,AI有道和黄海广博士等约有近100G相关资料,希望能帮助到所有小伙伴们。