HTML
1. 块级标签
标题:
<h1>一级标题</h1>
div:
<div>这是一个div标签</div>
p:
<p>这是一个p标签,段落标签</p>
<!DOCTYPE html>
<html lang="en">
<head>
<meta charset="UTF-8">
<title>HTML块级标签</title>
</head>
<body>
标题:
<h1>一级标题</h1>
<h2>二级标题</h2>
<h3>三级标题</h3>
<h4>四级标题</h4>
<h5>五级标题</h5>
<h6>六级标题</h6>
div:
<div>这是一个div标签</div>
p:
<p>这是一个p标签,段落标签</p>
table:表格
<table width="100%" border="1">
<caption>表格的标题</caption>
<!--表头-->
<thead>
<!--表头的行-->
<tr>
<!--每一行表头由多少个标题组成-->
<th rowspan="2">组号</th>
<th rowspan="2">姓名</th>
<th rowspan="1" colspan="2">成绩</th>
</tr>
<tr>
<th>JAVA</th>
<th>HTML</th>
</tr>
</thead>
<!--表格的主题-->
<tbody>
<!--表格的主题可能由多行数据组成-->
<!--知识点:rowspan = "3" 表示列占用的范围
colspan="1" 表示列占用的范围-->
<tr>
<th rowspan="3" colspan="1">第一组</th>
<th>张三</th>
<th>80</th>
<th>90</th>
</tr>
<tr>
<th>李四</th>
<th>80</th>
<th>90</th>
</tr>
<tr>
<th>王五</th>
<th>80</th>
<th>90</th>
</tr>
</tbody>
</table>
</body>
</html>- 列表
<!DOCTYPE html>
<html lang="en">
<head>
    <meta charset="UTF-8">
    <title>列表项</title>
</head>
<body>
ul无序列表
<ul>
    <li>AAA</li>
    <li>BBB</li>
    <li>CCC</li>
</ul>
ol有序列表,type属性可以指定序号的类型:数字字母罗马数字
<ol type="A">
    <li>AAA</li>
    <li>BBB</li>
    <li>CCC</li>
    <li>DDD</li>
</ol>
</body>
</html>- 表单
<!DOCTYPE html>
<html lang="en" xmlns="http://www.w3.org/1999/html">
<head>
    <meta charset="UTF-8">
    <title>form表单</title>
</head>
<body>
<!--action="Test01.html" method="GET"
action表示请求要发送的地址,method表示请求的方式:GET、POST,POST需要服务器,GET请求支持本地资源访问-->
<form action="Test01.html" method="GET">
    <h1>欢迎使用XXX系统</h1>
    <div><!--这是一个行级标签-->
        <input type="text" name="username">
    </div>
    <div>
        <input type="text" name="password">
    </div>
    <div>
        <input type="submit" value="登录" >
    </div>
</form>
</body>
</html>
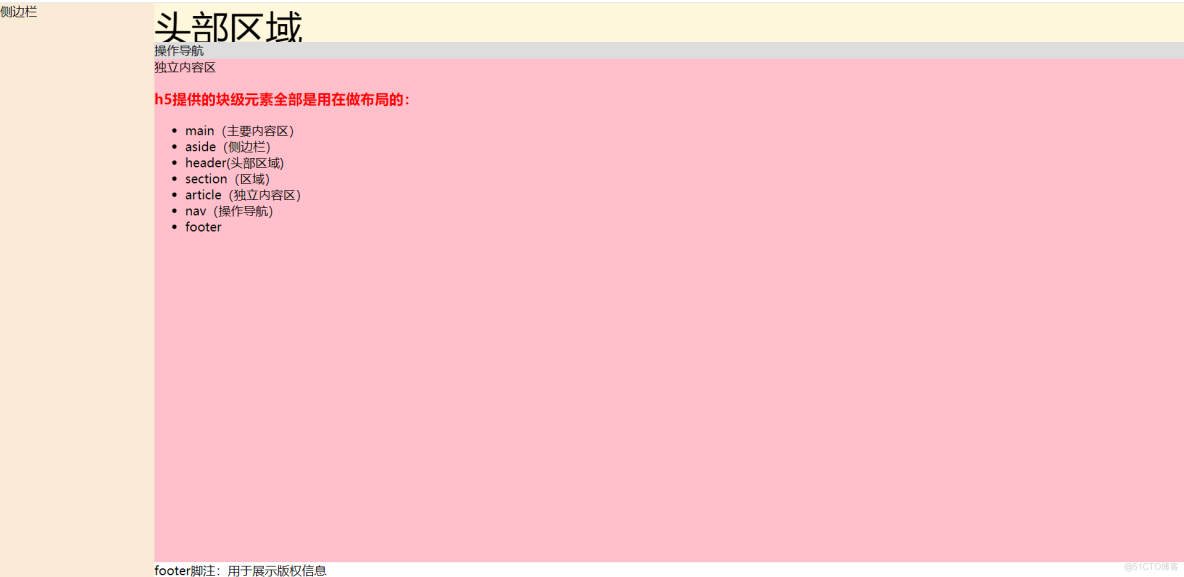
<!DOCTYPE html>
<html lang="en">
<head>
<meta charset="UTF-8">
<title>H5的块级标签</title>
<style>
html,body{
width: 100%;
height: 100%;
margin: 0;
padding: 0;
}
body{
display: flex;/*弹性布局*/
flex-direction: row;/*所有子元素在一行中排列*/
}
aside{
width: 200px;
background: antiquewhite;
}
nav {
background: #dddddd;
border-bottom: 1px solid #ddd;
}
main {
flex-grow: 1.5; /*根据空间的大小进行增长*/
flex-shrink: 0.8; /*根据空间的大小进行缩放*/
background: white;
display: flex;
flex-direction: column;
}
header {
height: 50px;
width: 100%;
background-color: cornsilk;
color: white;
}
section {
flex-grow: 1.5; /*根据空间的大小进行增长*/
flex-shrink: 0.8; /*根据空间的大小进行缩放*/
display: flex;
flex-direction: column;
}
article {
flex-grow: 1.5; /*根据空间的大小进行增长*/
flex-shrink: 0.8; /*根据空间的大小进行缩放*/
background-color: pink;
}
</style>
</head>
<body>
<aside>侧边栏</aside>
<main>
<header> <font color="black" size="10px">头部区域</font></header>
<section>
<nav>操作导航</nav>
<article>
独立内容区
<h1 style="color: red">h5提供的块级元素全部是用在做布局的:</h1>
<ul>
<li>main(主要内容区)</li>
<li>aside(侧边栏)</li>
<li>header(头部区域)</li>
<li>section(区域)</li>
<li>article(独立内容区)</li>
<li>nav(操作导航)</li>
<li>footer</li>
</ul>
</article>
</section>
<footer>
footer脚注:用于展示版权信息
</footer>
</main>
</body>
</html>结果
2. 行级标签
- input
input标签表示输入的意思,凡是可以填写内容或者可以点击的标签都是输入
input标签具有type属性
type=text文本输入框
<!DOCTYPE html>
<html lang="en">
<head>
    <meta charset="UTF-8">
    <title>行级标签</title>
</head>
<body>
<form action="Form.html" method="get">
    <div>
        <label>账号:</label>
        <input type="text" name="username">
    </div>
    <div>
        <label>密码:</label>
        <input type="password" name="password">
    </div>
    <div>
        <!--checked属性用于单选按钮和复选框时,只要在标签上出现,那么这个标签
            就应该展示选中状态。(设置默认选中),如果一个单选按钮组中的所有单选按钮均存在checked属性
            时,只有最后一个有效果-->
        <!--radio用于单选-->
        <label>性别:</label>
        <input type="radio" name="sex" value="M" checked>男
        <input type="radio" name="sex" value="F">女
        <input type="radio" name="sex" value="O">其他
    </div>
    <div>
        <!--checkbox用于多选,checked可以作用与多选时都会生效-->
        <label>爱好:</label>
        <input type="checkbox" name="hobble" value="0" checked>唱歌
        <input type="checkbox" name="hobble" value="1" checked>跳舞
        <input type="checkbox" name="hobble" value="2">打篮球
        <input type="checkbox" name="hobble" value="3">RAP
    </div>
    <div>
        <!--label 多行文本-->
        <label>评论:</label>
        <textarea rows="15" cols="100">
label多行文本
name属性除了用来采集数据之外,还可以用来对元素进行分组
作为单选按钮的时候,只有同一个组内的单选按钮才会有单选的效果
单选按钮没有value值,如果需要,那么我们可以手动的配置value属性
checked属性用于单选按钮和复选框时,只要在标签上出现,那么这个标签
就应该展示选中状态。(设置默认选中),如果一个单选按钮组中的所有单选按钮均存在checked属性
时,只有最后一个有效果
radio用于单选,checkbox用于多选,checked可以作用与多选时都会生效
input type= "file",用于文件上传
img图像标签
文件的数据采集不能通过name属性进行,那么属性采集的数据只是
文件的名字,文件数据需要通过JavaScript脚本来获取
option表示下拉列表的选项,如果没有给定value值,那么value值
就是option标签的文本内容
<span style="color: red ; font-size: 30px">9.9</span>
        </textarea>
    </div>
    <div>
        <label>头像:</label>
        <img src="img/001.jpg" height="80" width="60" title="证件照" alt="加载错误时显示的信息">
    </div>
    <!--文件的数据采集不能通过name属性进行,那么属性采集的数据只是
            文件的名字,文件数据需要通过JavaScript脚本来获取-->
    <div>
        <label>file:</label>
        <input type="file">
    </div>
    <div>
        <label>下拉选择框:</label>
        <select name="city" id="">
            <option value="">请选择</option>
            <option value="1">北京</option>
            <option value="2">上海</option>
            <option value="3">杭州</option>
            <option value="4">成都</option>
        </select>
    </div>
    <div>
        <input type="submit" value="注册">
    </div>
    <div>
        这本书的价格是<span style="color: red ; font-size: 30px">9.9</span>
    </div>
    <div>
        <label>a标签:</label>
        <a href="https://www.baidu.com"></a>
        <a href="Form.html">去自己编写的页面</a>
        <!--锚连接中的锚表示定位,定位的时候只能是#+id的值-->
        <a href="BlockLable.html#p">锚连接</a>
    </div>
</form>
</body>
</html>
结果:

JavaScript
- 在JS中,存在内置对象document,这个对象是浏览器赋予的,直接可以拿来使用,表示文档
- JS所有的语法支撑是ES来定义的 ES目前使用的最多的是ES6,在ES6中有许多新特性
- 在ES6中var定义的变量属于全局变量,使用let定义的变量属于局部变量
- 为什么会使用var或者let来定义变量呢?
- 因为JavaScript是一门弱类型的脚本语言,所谓的弱类型表示所有的变量没有类型之分。 例如 定义了一个变量 let a =1; 此时的变量a类型为数字,但是我们也可以再给塔赋一 个布尔值 a = true; 这就是弱类型语言的特征。一个变量具体到底是什么类型,需要看 具体赋的什么值
浏览器在解释执行HTML代码的时候,有可能要执行HTML中的脚本语言,只要HTML中存在脚本语言。
为了解析HTML文档,浏览器提供了一个window对象,这个对象是一个复合对象,里面里面包含了很多其他的对象。这些对象主要用于处理页面的中元素以及元素的行为。
window对象中的所有变量都是全局变量,在使用的使用可以省略window,直接使用window中 的变量 let elementById =
window.document.getElementById("username");
let element =document.getElementById("username");
在浏览器的窗口的控制台记录
element console.log(element) console.log(element.value)<!DOCTYPE html>
<html lang="en">
<head>
<meta charset="UTF-8">
<title>login</title>
</head>
<body>
<div>
<div>
<label>账号:</label>
<input type="text" id="username" value="admin">
</div>
<div>
密码:
<input type="password" id="password">
</div>
<div>
<input type="button" value="登录" id="loginBtn">
</div>
</div>
</body>
<script type="text/javascript">
let loginBtn =document.getElementById("loginBtn");
loginBtn.onclick = function () {
let usernameEl = document.getElementById("username");
let username = usernameEl.value;
let passwordEl = document.getElementById("password");
let password = passwordEl.value;
console.log(username + "\t" + password)
}
</script>
</html>CSS
层叠样式表,CSS主要用来告诉浏览器元素应该怎样呈现
1. CSS选择器
- 基本选择器
ID选择器 类选择器 标签选择器 - 高级选择器
层级选择器(子代选择器 后代选择器)
选择器的语法:
ID选择器 => #ID值{}
类选择器 => .类名{}
标签选择器 => 标签名{}
<body>
    <div>
        <input type="text" id="p">
    </div>
    <div>
        <input type="password" class="password">
    </div>
</body>
/*ID选择器*/
#p{
background-color: cornsilk;
}
/*类选择器*/
.password{
height: 20px;
width: 200px;
}
/*标签选择器*/
body{
width: 100%;
height: 100%;
background-color: pink;
}2.CSS样式的编写方式
- 行内样式
- 内部样式
- 外部样式(需要使用link 引入css)
<link rel="stylesheet" href="../css/chooser.css">子代选择器和后代选择器:
<!DOCTYPE html>
<html lang="en">
    <head>
        <meta charset="UTF-8">
        <title>子代选择器与后代选择器</title>
        <style>
            /*后代选择器,表示body下所有的input标签*/
            body input{
                background-color: red;
            }
            /*子代选择器,表示body标签下一级的input标签*/
            /*body > input{*/
            /*    background-color: black;*/
            /*}*/
        </style>
    </head>
    <body>
        <input type="text" name="" id="">
        <div>
            <input type="text" name="username" class="username">
            <div>
                <span style="color: deepskyblue">这是一个文本</span>
                <input type="text">
            </div>
        </div>
        <div>
            <input type="text" name="password" class="password">
        </div>
    </body>
</html>
3. CSS样式的属性
1. 通用的样式属性
- 宽度和高度
width:200px;
height:100px;
- 外边距margin
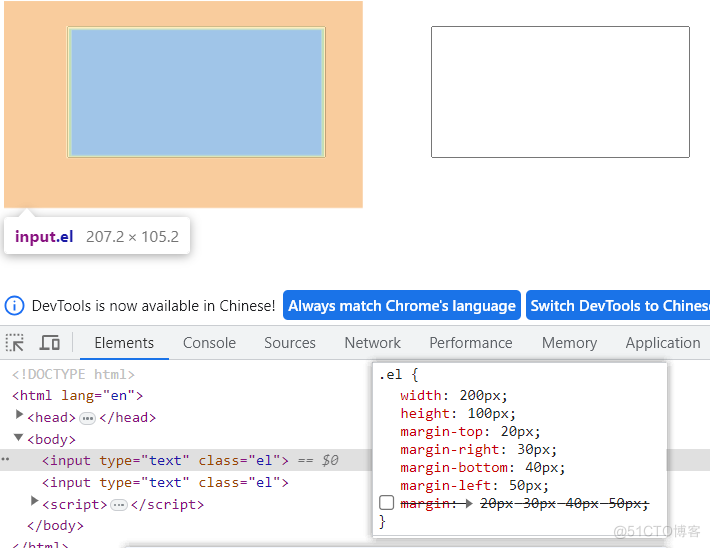
元素与元素之间的距离,外边距有4个方向:上下左右 外边距设置属性的时候必须从上边距开始,满足顺时针旋转的规则,依次为每个方向设置边距
height: 100px;
margin-top: 20px;
margin-right: 30px;
margin-bottom: 40px;
margin-left: 50px;
/*
margin: 20px 30px 40px 50px;
*/
结果:
- 内边距padding
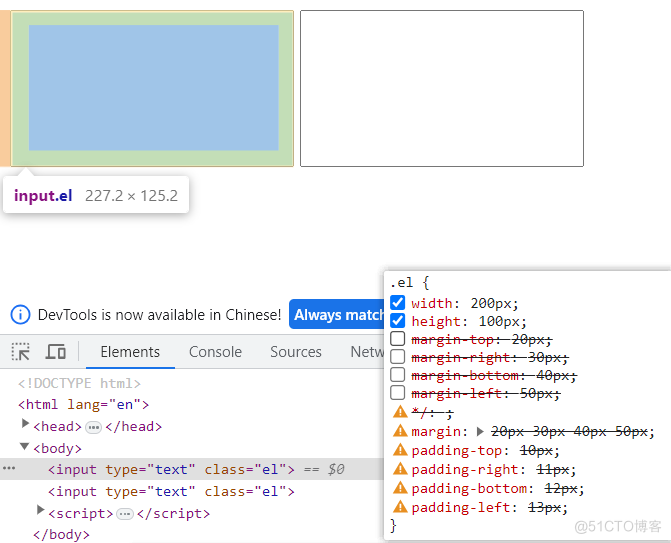
/*padding-top: 10px;*/
/*padding-right: 11px;*/
/*padding-bottom: 12px;*/
/*padding-left: 13px;*/
padding: 10px 11px 12px 13px;
结果:
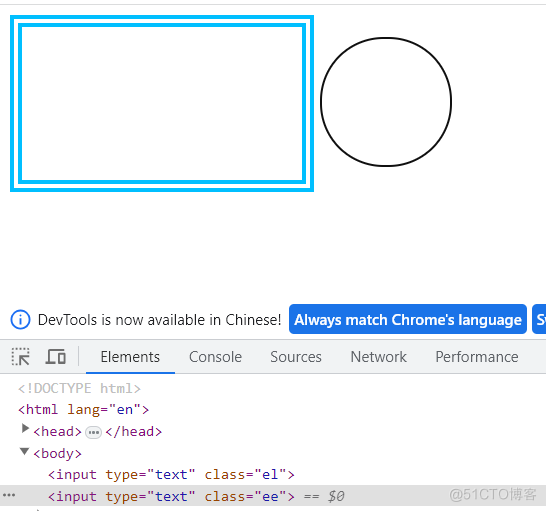
- 边框border
边框宽度: border-width
边框线条类型:border-style
边框线条颜色:border-color
复合属性:width style color,顺序可以随意调整
边框也有4边,因为也可以专门为其中一边进行设置:
border-top、border-right、border-bottom、border-left
圆角设计:border-radius
/*border-width: 10px;*/
/*border-style: double;*/
/*border-color: deepskyblue;*/
border: deepskyblue  double 10px;
.ee{
    border-width: 1px;
    width: 100px;
    height: 100px;
    border-radius: 50px;
}
结果:
- 字体font
字体类型 font-family
字体大小 font-size
字体风格 font-style
字体重量 font-weight
字体的复合属性有要求: 风格->重量->大小->类型 或者 重量->风格->大小->类型。
<style>
.font{
    /* font-family: 楷体,serif;
    font-size: 30px;
    font-style: italic;
    font-weight: bold;*/
    font: italic bold 30px 新宋体;
}
</style>
<body>
<div class="font">
<h2>这是一个标题</h2>
<lable>
字体类型 font-family
字体大小 font-size
字体风格 font-style
字体重量 font-weight
字体的复合属性有要求: 风格->重量->大小->类型 或者 重量->风格->大小->类型。
</lable>
</div>
</body>- 文本text
文本颜色 color
文本首行缩进 text-indent
文本行高 line-height:行高可以让文本垂直居中
文本装饰 text-decoration: 上划线、中横线、下划线
文本对齐方式 text-align: 居左、居右、居中、两端对齐
<div class="p">
    文本颜色 color 文本首行缩进 text-indent 文本行高  line-height:行高可以让文本垂直居中 文本装饰 text-decoration: 上划线、中横线、下划线 文本对齐方式 text-align: 居左、居右、居中、两端对齐
</div>
<div class="p2">
    文字居中对齐
</div>
<style>
.p{
width:500px;
height: 200px;
font-size: 20px;/*字体大小*/
color: #00167b;
text-indent: 2em;/*缩进两个字符*/
border:2px double cornflowerblue;/*边框*/
}
.p2{
width: 200px;
height: 40px;
border: 1px solid black;
font-family: 楷体, serif;
line-height: 40px;/*行高和元素的高度一致时,内容垂直居中*/
text-align: justify;/*两端对齐,必须配合text-align-last: justify;使用*/
text-align-last: justify;
/*overline内容上方的线*/
/*line-through中间穿过的线*/
/*underline下划线*/
text-decoration: underline;
}
</style>- 背景background
背景颜色:background-color
背景图片:background-image
背景大小:background-size
背景位置:background-position
背景是否可重复:background-repeat
html,body{
    width: 100%;
    height: 100%;
    margin: 0;
}
body{
    background-color: darkgrey;
    background-image: url("../img/002.gif");
    background-repeat: repeat;/*背景图片是否重复*/
    /*
    background-position: 100px 30px;!*背景图片的位置*!
    */
    /*
    background-size: 100% 100%;
    */
    /*背景图片的大小*/
}- 浮动float
元素一旦进行浮动,就不再占用原来的位置空间,因为元素之间的摆放存在层级关系,相当于脱离了当前层级。如果浮动后,还想要元素依然占用父元素的空间,那么需要对浮动进行清除
可以使用伪类样式来清除浮动
伪类样式的定义就是使用双冒号来表示伪类
::after 表示在渲染CSS样式的最后要使用的样式
::before 表示在渲染CSS样式之前要使用的样式
伪类样式的编写: 选择器::伪类的名称{}
<!DOCTYPE html>
<html lang="en">
    <head>
        <meta charset="UTF-8">
        <title>浮动</title>
        <style>
            input{
                float: left;
            }
            input:last-child {
                float: right;
            }
            div::after{
                content: ""; /*渲染样式的时候要加上一个空白字符串*/
                display: block;/*这个content指定的内容需要以块级元素的方式呈现*/
                clear: both; /*清除div内的元素浮动,清除的时候,因为元素已经浮动了指定的位置,清除之后不回还原,只是将元素再拉回了当前层级*/
            }
        </style>
    </head>
    <body>
        <div>
            <input type="text">
            <input type="text">
            <input type="text">
        </div>
    </body>
</html>- 定位position
元素的定位方式:static(流式定位、默认)、relative(相对定位)、absolute(绝对定位)、fixed(固定定位)
参照物:
relative:参照物是自身
absolute:向上逐层查找具有定位的父元素,如果没找到,就回以body标签进行定位,绝对定位的元素脱离了当前父容器的空间,层级已经发生了变化
拥有定位的元素可以通过z-index来调整元素的层级,值越大,层级越高。
<!DOCTYPE html>
<html lang="en">
    <head>
        <meta charset="UTF-8">
        <title>元素的定位</title>
        <style>
            #d1,
            #d2,
            #d3{
                width: 200px;
                height: 100px;
            }
            #d1{
                background-color: red;
                position: relative;/*相对定位*/
                left: 100px;/*相对自身的位置,偏离左边100个px*/
                top: 100px;
                z-index: 1;
            }
            #d2{
                background-color: blue;
                position: absolute;/*绝对定位*/
                left: 0;
                top: 0;
            }
            #d3{
                background-color: pink;
                position: fixed;/*固定窗口*/
                top: 20%;
                right: 10px;
            }
            .box{
                margin: 0;
                position: relative;
            }
            html{
                width: 100%;
                height: 100%;
            }
            body{
                height: 300%;
            }

        </style>
    </head>
    <body>
        <div class="box">
            <div id="d1"></div>
            <div id="d2"></div>
            <div id="d3"></div>
        </div>
    </body>
</html>
2. 列表样式
列表样式类型:list-style-type:disc(实心圆)、circle(空心圆)、square(正方形)、decimal(数字)
列表样式位置:list-style-position:inside(内部)、outside(外部)
列表样式的图片:list-style-image:url();
<!DOCTYPE html>
<html lang="en">
    <head>
        <meta charset="UTF-8">
        <title>列表样式list</title>
        <style>
            ol{
                /*list-style-type: disc;实心圆*/
                /*list-style-type: circle;空心圆*/
                list-style-type: square;/*正方形*/
                /*list-style-type: decimal;数字*/
                list-style-position: inside;/*列表样式的位置*/
                list-style-image: url("../img/002.gif");
            }
        </style>
    </head>
    <body>
        <div>
            <ol>
                <li>第一项</li>
                <li>第二项</li>
                <li>第三项</li>
                <li>第四项</li>
            </ol>
        </div>
    </body>
</html>
3. 超链接伪样式
超链接的伪样式有四种:点击前,鼠标单击,鼠标悬浮,鼠标单击后
link->visited->hover->active
<!DOCTYPE html>
<html lang="en">
    <head>
        <meta charset="UTF-8">
        <title>超链接的伪样式</title>
        <style>
            a:link{
                color: antiquewhite;
            }
            a:visited{
                color: blue;
            }
            a:hover{
                color: pink;
            }
            a:active{
                color: red;
            }
        </style>
    </head>
    <body>
        <div>
            <a href="https://www.baidu.com">www.baidu.com</a>
        </div>
    </body>
</html>
4. CSS3新增的样式属性
1 文本阴影
<h1>这是标题</h1>h1{
text-align: center;
text-shadow: 2px 1px 1px #da1e1e;
background-color: black;
color: white;
}2 盒子阴影
<div class="box"></div>.box{
width: 400px;
height: 200px;
border: 1px solid #ddd;
border-radius: 5px;
box-shadow: 3px 2px 10px black;
}3 关键帧动画
<!DOCTYPE html>
<html lang="en">
<head>
    <meta charset="UTF-8">
    <title>动画</title>
    <style>
        .block{
            width: 50px;
            height: 50px;
            background-color: red;
            position: relative;
            animation: move 10s infinite;
        }
        @keyframes move {
            0%{。.
                top: 0;
                left: 0;
            }
            25%{
                top: 0;
                left: 400px;
            }
            50%{
                top: 200px;
                left: 400px;
            }
            75%{
                top: 200px;
                left: 0;
            }
            100%{
                top: 0;
                left: 0;
            }
        }
    </style>
</head>
<body>
    <div class="block"></div>
</body>
</html>
4 渐变
<!DOCTYPE html>
<html lang="en">
<head>
    <meta charset="UTF-8">
    <title>背景色</title>
    <style>
        .box1{
            height: 20px;
            /*线性渐变*/
            background-image: linear-gradient(to right, #9c8484, red);
        }

        .box2{
            width: 200px;
            height: 200px;
            /*径向渐变*/
            background-image: radial-gradient(yellow, red, blue);
        }
    </style>
</head>
<body>
    <div class="box1"></div>
    <div class="box2"></div>
</body>
</html>
4.45 字体图标
CSS3可以让我们自己定义字体图标。目前用的比较多的就是font-awesome 字体
