启动流程

1.按下电源,系统启动
当电源键按下时,引导芯片代码(汇编指令)会从预定的地方(固化在ROM)开始执行,将引导程序 BootLoader 加载到 RAM中,然后执行
2.引导程序 BootLoader
BootLoader 是在 Android 操作系统开始前的一个小程序,主要作用是把系统OS拉起来并运行
位置:\bootable\bootloader
3.Linux内核启动
当 Linux系统被 BootLoader 程序拉起,内核启动时,会设置缓存,被保护存储器,计划列表,加载驱动等工作,在内核完成系统设置后,会启动进程,主要涉及3个特殊的进程,idle进程(PID = 0), init进程(PID = 1)和kthreadd进程(PID = 2),这三个进程是内核的基础
- idle进程:是 init 进程和 kthreadd 进程的父进程,是Linux系统第一个进程。
- init进程:是Android系统应用程序的始祖,app都是直接或间接以它为父进程,是Linux系统第一个用户进程
- kthreadd进程:是Linux系统内核管家,所有的内核线程都是直接或间接以它为父进程
idle进程的启动是用汇编语言写的,对应文件是/kernel/fusion/4.9/arch/arm64/kernel/head.S注意:不同版本的android文件夹名称不同
具体的也看不懂,根据大佬说的会跳转到 /kernel/fusion/4.9/include/linux/start_kernel.h

这个头文件对应的实现在 /kernel/fusion/4.9/init/main.c
asmlinkage __visible void __init start_kernel(void)
{
	......
	ftrace_init();

	/* Do the rest non-__init'ed, we're now alive */
	rest_init();
}
在 rest_init 函数中开启了 init 进程和 kthreadd 进程
static noinline void __ref rest_init(void)
{
int pid;
#if (MP_CACHE_DROP==1)
int pid_kthre_drop_cache;
struct sched_param para;
struct task_struct *p;
int srch_retval;
#endif
#ifdef CONFIG_MP_PLATFORM_PHY_ADDRESS_MORE_THAN_2G_SET_MOVABLE_DEBUG
testAddrTranslation();
#endif
//启动RCU机制,这个与后面的rcu_read_lock和rcu_read_unlock是配套的,用于多核同步
rcu_scheduler_starting();
/*
* We need to spawn init first so that it obtains pid 1, however
* the init task will end up wanting to create kthreads, which, if
* we schedule it before we create kthreadd, will OOPS.
*/
//用kernel_thread方式创建init进程,将 kernel_init函数指针传递过去创建 init 进程
kernel_thread(kernel_init, NULL, CLONE_FS);
// 设定NUMA系统的默认内存访问策略
numa_default_policy();
//同上,用kernel_thread方式创建kthreadd进程
pid = kernel_thread(kthreadd, NULL, CLONE_FS | CLONE_FILES);
#if (MP_CACHE_DROP==1)
pid_kthre_drop_cache=kernel_thread(kthre_drop_cache, NULL, CLONE_FS | CLONE_FILES);
rcu_read_lock();
srch_retval = -ESRCH;
p = pid_kthre_drop_cache ? find_task_by_vpid(pid_kthre_drop_cache) : current;
if (p != NULL)
{
srch_retval = (p->policy == SCHED_FIFO || p->policy == SCHED_RR)?1:0;
para.sched_priority=srch_retval;
//use default and set min
srch_retval = sched_setscheduler(p, p->policy, ¶);
}
rcu_read_unlock();
#endif
//打开RCU读取锁,在此期间无法进行进程切换
rcu_read_lock();
// 获取kthreadd的进程描述符,期间需要检索进程pid的使用链表,所以要加锁
kthreadd_task = find_task_by_pid_ns(pid, &init_pid_ns);
//关闭RCU读取锁
rcu_read_unlock();
// 之前kernel_init函数调用了wait_for_completion(&kthreadd_done),这里调用complete就是通知kernel_init进程kthreadd进程已创建完成,可以继续执行
complete(&kthreadd_done);
/*
* The boot idle thread must execute schedule()
* at least once to get things moving:
*/
//current表示当前进程,当前0号进程init_task设置为idle进程
init_idle_bootup_task(current);
//0号进程主动请求调度,让出cpu,1号进程kernel_init将会运行,并且禁止抢占
schedule_preempt_disabled();
/* Call into cpu_idle with preempt disabled */
// 这个函数会调用cpu_idle_loop()使得idle进程进入自己的事件处理循环
cpu_startup_entry(CPUHP_ONLINE);
}
4.init 进程启动
init 进程是 Android 系统中用户第一个进程,进程号为1,它被赋予了很多极其重要的工作职责,比如创建 Zygote(孵化器)和属性服务等,init是由多个源文件共同组成的,这些文件位置:system/core/init 中,可用ps命令查看到:

上面说到在rest_init 函数中通过 kernel_thread(kernel_init, NULL, CLONE_FS); 方法来启动init进程
kernel_thread方法位置:/kernel/fusion/4.9/kernel/fork.c

kernel_thread 的第一个参数是一个函数指针,会在创建进程后执行,第三个参数是创建进程的方式
| 参数名 | 表示 |
|---|---|
| CLONE_PARENT | 创建的子进程的父进程是调用者的父进程,新进程与创建它的进程成了“兄弟”而不是“父子” |
| CLONE_FS | 子进程与父进程共享相同的文件系统,包括root、当前目录、umask |
| CLONE_FILES | 子进程与父进程共享相同的文件描述符(file descriptor)表 |
| CLONE_NEWNS | 在新的namespace启动子进程,namespace描述了进程的文件hierarchy |
| CLONE_SIGHAND | 子进程与父进程共享相同的信号处理(signal handler)表 |
| CLONE_PTRACE | 若父进程被trace,子进程也被trace |
| CLONE_UNTRACED | 若父进程被trace,子进程不被trace |
| CLONE_VFORK | 父进程被挂起,直至子进程释放虚拟内存资源 |
| CLONE_VM | 子进程与父进程运行于相同的内存空间 |
| CLONE_PID | 子进程在创建时PID与父进程一致 |
| CLONE_THREAD | Linux 2.4中增加以支持POSIX线程标准,子进程与父进程共享相同的线程群 |

_do_fork 函数用于创建进程,它首先调用 copy_process() 创建新进程,然后调用 wake_up_new_task() 将进程放入运行队列中并启动新进程,在创建完成后会回调 /kernel/fusion/4.9/init/main.c 文件中的kernel_init 方法
static int __ref kernel_init(void *unused)
{
......
	if (ramdisk_execute_command) {	// ramdisk_execute_command 的值为"/init"
		ret = run_init_process(ramdisk_execute_command);
		if (!ret)
			return 0;
		pr_err("Failed to execute %s (error %d)\n",
		       ramdisk_execute_command, ret);
	}
	/*
	 * We try each of these until one succeeds.
	 *
	 * The Bourne shell can be used instead of init if we are
	 * trying to recover a really broken machine.
	 */
	if (execute_command) {
		ret = run_init_process(execute_command);
		if (!ret)
			return 0;
		panic("Requested init %s failed (error %d).",
		      execute_command, ret);
	}
	if (!try_to_run_init_process("/sbin/init") ||
	    !try_to_run_init_process("/etc/init") ||
	    !try_to_run_init_process("/bin/init") ||
	    !try_to_run_init_process("/bin/sh"))
		return 0;

	panic("No working init found.  Try passing init= option to kernel. "
	      "See Linux Documentation/init.txt for guidance.");
}
这个方法会去找根目录下的 init(ramdisk_execute_command) 可执行文件,并运行它,如果在根目录找不到就会去找 /sbin/init、/etc/init、/bin/init、/bin/sh 目录下的可执行文件,只要这些应用程序有一个启动了,其他就不启动了

而这个 init 可执行文件是 system/core/init/init.cpp 编译后生成的
int main(int argc, char** argv) {
	//注释一:进行ueventd/watchdogd跳转及环境变量设置
	//basename是C库中的一个函数,得到特定的路径中的最后一个'/'后面的内容,比如/sdcard/miui_recovery/backup,得到的结果是backup
    if (!strcmp(basename(argv[0]), "ueventd")) {
        return ueventd_main(argc, argv);
    }
    if (!strcmp(basename(argv[0]), "watchdogd")) {
        return watchdogd_main(argc, argv);
    }
	......
    if (REBOOT_BOOTLOADER_ON_PANIC) {//将各种信号量,如SIGABRT,SIGBUS等的行为设置为SA_RESTART,一旦监听到这些信号即执行重启系统
        InstallRebootSignalHandlers();
    }
	//之前准备工作时将INIT_SECOND_STAGE设置为true,已经不为nullptr,所以is_first_stage为false
    bool is_first_stage = (getenv("INIT_SECOND_STAGE") == nullptr);

    if (is_first_stage) {	//如果是第一次执行
        boot_clock::time_point start_time = boot_clock::now();

		// 清理 umask
        // Clear the umask.
        umask(0);
        clearenv();
        setenv("PATH", _PATH_DEFPATH, 1);
        // Get the basic filesystem setup we need put together in the initramdisk
        // on / and then we'll let the rc file figure out the rest.
        // 注释二:创建和挂载启动所需要的文件目录
        mount("tmpfs", "/dev", "tmpfs", MS_NOSUID, "mode=0755");
        mkdir("/dev/pts", 0755);
        mkdir("/dev/socket", 0755);
        ......

        // Now that tmpfs is mounted on /dev and we have /dev/kmsg, we can actually
        // talk to the outside world...
        // 注释三:初始化Kernel 的 Log,外界可获取 Kernel 的打印日志
        InitKernelLogging(argv);
        LOG(INFO) << "init first stage started!";
        if (!DoFirstStageMount()) {	//挂载分区设备
            LOG(FATAL) << "Failed to mount required partitions early ...";
        }
		....
		// 注释四:初始化selinux策略
		SelinuxSetupKernelLogging();
        SelinuxInitialize();

		// We're in the kernel domain, so re-exec init to transition to the init domain now
        // that the SELinux policy has been loaded.
        if (selinux_android_restorecon("/init", 0) == -1) { //restorecon命令用来恢复SELinux文件属性即恢复文件的安全上下文
            PLOG(FATAL) << "restorecon failed of /init failed";
        }
        setenv("INIT_SECOND_STAGE", "true", 1);	//设置环境变量

        static constexpr uint32_t kNanosecondsPerMillisecond = 1e6;
        uint64_t start_ms = start_time.time_since_epoch().count() / kNanosecondsPerMillisecond;
        setenv("INIT_STARTED_AT", std::to_string(start_ms).c_str(), 1);

        char* path = argv[0];
        char* args[] = { path, nullptr };
        execv(path, args);	//重新执行main方法

        // execv() only returns if an error happened, in which case we
        // panic and never fall through this conditional.
        PLOG(FATAL) << "execv(\"" << path << "\") failed";
    }
/***************** 第二部分 ******************/
    // At this point we're in the second stage of init.
    InitKernelLogging(argv);	//初始化 kernel 日志
    LOG(INFO) << "init second stage started!";

    // Set up a session keyring that all processes will have access to. It
    // will hold things like FBE encryption keys. No process should override
    // its session keyring.
    keyctl_get_keyring_ID(KEY_SPEC_SESSION_KEYRING, 1);		//初始化进程会话密钥 位置:/system/core/libkeyutils/Keyutils.cpp

    // Indicate that booting is in progress to background fw loaders, etc.
    close(open("/dev/.booting", O_WRONLY | O_CREAT | O_CLOEXEC, 0000)); //创建 /dev/.booting 文件,就是个标记,表示booting进行中
	// 注释五:
    property_init();	//初始化属性系统,并从指定文件读取属性

    // If arguments are passed both on the command line and in DT,
    // properties set in DT always have priority over the command-line ones.
    process_kernel_dt();		//处理DT属性
    process_kernel_cmdline();	//处理命令行属性

    // Propagate the kernel variables to internal variables
    // used by init as well as the current required properties.
    export_kernel_boot_props();	//处理其他的一些属性

    // Make the time that init started available for bootstat to log.
    property_set("ro.boottime.init", getenv("INIT_STARTED_AT"));
    property_set("ro.boottime.init.selinux", getenv("INIT_SELINUX_TOOK"));

    // Set libavb version for Framework-only OTA match in Treble build.
    const char* avb_version = getenv("INIT_AVB_VERSION");
    if (avb_version) property_set("ro.boot.avb_version", avb_version);

    // Clean up our environment.
    unsetenv("INIT_SECOND_STAGE");	//清空这些环境变量,因为之前都已经存入到系统属性中去了
    unsetenv("INIT_STARTED_AT");
    unsetenv("INIT_SELINUX_TOOK");
    unsetenv("INIT_AVB_VERSION");

    // Now set up SELinux for second stage.
    SelinuxSetupKernelLogging();
    SelabelInitialize();		// SElinux第二阶段
    SelinuxRestoreContext();	// 恢复安全上下文

    epoll_fd = epoll_create1(EPOLL_CLOEXEC);	//注释六:创建 epoll 句柄
    if (epoll_fd == -1) {
        PLOG(FATAL) << "epoll_create1 failed";
    }

    sigchld_handler_init();		//类似java中的Handelr,如果子进程(比如 Zygote 进程)异常退出,init进程会调用到该函数中设定的信号处理函数来进行处理

    if (!IsRebootCapable()) {
        // If init does not have the CAP_SYS_BOOT capability, it is running in a container.
        // In that case, receiving SIGTERM will cause the system to shut down.
        InstallSigtermHandler();
    }

    property_load_boot_defaults();	//从文件中加载一些属性,读取usb配置
    export_oem_lock_status();		//设置ro.boot.flash.locked 属性
    start_property_service();		//注释七:启动属性服务
    set_usb_controller();			//设置sys.usb.controller 属性

    const BuiltinFunctionMap function_map;
    Action::set_function_map(&function_map); //静态方法,将function_map放到Action中作为成员变量

    subcontexts = InitializeSubcontexts();

    ActionManager& am = ActionManager::GetInstance();	//得到ActionManager对象
    ServiceList& sm = ServiceList::GetInstance();

	//注释八:解析init.rc 文件
    LoadBootScripts(am, sm);	//解析 init.rc 配置文件
    // Turning this on and letting the INFO logging be discarded adds 0.2s to
    // Nexus 9 boot time, so it's disabled by default.
    if (false) DumpState();

    am.QueueEventTrigger("early-init"); //注释九:额外配置一些事件和Action

    // Queue an action that waits for coldboot done so we know ueventd has set up all of /dev...
    am.QueueBuiltinAction(wait_for_coldboot_done_action, "wait_for_coldboot_done");
    // ... so that we can start queuing up actions that require stuff from /dev.
    am.QueueBuiltinAction(MixHwrngIntoLinuxRngAction, "MixHwrngIntoLinuxRng");
    am.QueueBuiltinAction(SetMmapRndBitsAction, "SetMmapRndBits");
    am.QueueBuiltinAction(SetKptrRestrictAction, "SetKptrRestrict");
    am.QueueBuiltinAction(keychord_init_action, "keychord_init");
    am.QueueBuiltinAction(console_init_action, "console_init");

    // Trigger all the boot actions to get us started.
    am.QueueEventTrigger("init");

    // Repeat mix_hwrng_into_linux_rng in case /dev/hw_random or /dev/random
    // wasn't ready immediately after wait_for_coldboot_done
    am.QueueBuiltinAction(MixHwrngIntoLinuxRngAction, "MixHwrngIntoLinuxRng");

    // Don't mount filesystems or start core system services in charger mode.
    std::string bootmode = GetProperty("ro.bootmode", "");
    if (bootmode == "charger") {
        am.QueueEventTrigger("charger");
    } else {
        am.QueueEventTrigger("late-init");
    }

    // Run all property triggers based on current state of the properties.
    am.QueueBuiltinAction(queue_property_triggers_action, "queue_property_triggers");

    while (true) {//注释十:监听新的事件
        // By default, sleep until something happens.
        int epoll_timeout_ms = -1;

        if (do_shutdown && !shutting_down) {
            do_shutdown = false;
            if (HandlePowerctlMessage(shutdown_command)) {
                shutting_down = true;
            }
        }

        if (!(waiting_for_prop || Service::is_exec_service_running())) {
            am.ExecuteOneCommand();
        }
        if (!(waiting_for_prop || Service::is_exec_service_running())) {
            if (!shutting_down) {
                auto next_process_restart_time = RestartProcesses();

                // If there's a process that needs restarting, wake up in time for that.
                if (next_process_restart_time) {
                    epoll_timeout_ms = std::chrono::ceil<std::chrono::milliseconds>(
                                           *next_process_restart_time - boot_clock::now())
                                           .count();
                    if (epoll_timeout_ms < 0) epoll_timeout_ms = 0;
                }
            }

            // If there's more work to do, wake up again immediately.
            if (am.HasMoreCommands()) epoll_timeout_ms = 0;
        }

        epoll_event ev;
        int nr = TEMP_FAILURE_RETRY(epoll_wait(epoll_fd, &ev, 1, epoll_timeout_ms));
        if (nr == -1) {
            PLOG(ERROR) << "epoll_wait failed";
        } else if (nr == 1) {
            ((void (*)()) ev.data.ptr)();
        }
    }

    return 0;
}
init 的 main 函数做了很多的事情,
注释一:ueventd_main 创建设备节点文件,watchdogd_main
ueventd_main
Android 根文件系统的映像上不存在 /dev 目录,该目录是init进程启动后动态创建的,而init进程将创建设备节点文件的任务交给了 ueventd 子进程
位置:\system\core\init\ueventd.cpp

ueventd 通过两种方式创建设备节点文件
1.冷插拔(Cold Plug)即以预先定义的设备信息统一创建设备节点文件,这一类设备节点文件也被称为静态节点文件
2.热插拔(Hot Plug)即在系统运行中,当有设备插入USB端口时,ueventd就会监听到这一时间,为插入的设备动态创建设备节点文件,这一类设备节点文件也被称为动态节点文件
watchdogd_main
看门狗本身是一个定时电路,内部会不断进行计时操作,有两个引脚与系统相连,正常运行时每隔一段时间计算机系统会通过一个引脚向看门狗发送信号,看门狗接收到信号后会将计时器清零并重新开始计时,若系统卡死,看门狗计时结束,就会通过另一个引脚向系统发动复位信号,让系统重启
位置:\system\core\init\watchdogd.cpp

注释二:第一部分 挂载文件系统并创建目录
因为是第一次执行main函数 is_first_stage 获得为null

mount是用来挂载文件系统的,非常熟悉了,用于挂载前面创建的节点文件,mknod用于创建Linux中的设备文件
init 初始化过程中,Android分别挂载了 tmpfs,devpts,proc,sysfs,selinuxfs 这5类文件系统
tmpfs:虚拟内存文件系统,会将所有的文件存储在虚拟内存中,既可以使用RAM,也可以使用交换分区,会根据实际需要改变大小,因为是驻留在RAM中,所以读取的速度非常快
devpts:devpts文件系统为伪终端提供了一个标准的接口,标准节点是/dev/pts。只要pty的主复合设备/dev/ptmx被打开,就会在/dev/pts下动态的创建一个新的pty设备文件
proc:虚拟文件系统,它可以看作是内核内部数据结构的接口,通过它我们可以获得系统的信息,同时也能够在运行时修改特定的内核参数
sysfs:不占有任何磁盘空间的虚拟文件系统。它通常被挂接在/sys目录下。sysfs文件系统是Linux2.6内核引入的,它把连接在系统上的设备和总线组织成为一个分级的文件,使得它们可以在用户空间存取
selinuxfs:通常挂载在/sys/fs/selinux目录下,用来存放SELinux安全策略文件
注释三:初始化日志输出,挂载分区设备
InitKernelLogging
位置:/system/core/init/log.cpp
Linux 万物皆文件,/sys/fs/selinux/null 相当于一个 null 对象
首先是将标准输入输出( 0、1、2)定向到 /sys/fs/selinux/null(null设备上)

文件描述符 (file descriptor) 是内核为了高效管理已被打开的文件所创建的索引,其是一个非负整数(通常是小整数),用于指代被打开的文件,所有执行I/O操作的系统调用都通过文件描述符。
Linux 进程默认情况下会有3个缺省打开的文件描述符,分别是标准输入 0, 标准输出 1, 标准错误 2
InitLogging
位置:/system/core/base/logging.cpp

DoFirstStageMount
位置:system/core/init/init_first_stage.cpp
主要作用是初始化特定设备并挂载

注释四:启用SELinux安全策略
位置:\system\core\init\selinux.cpp
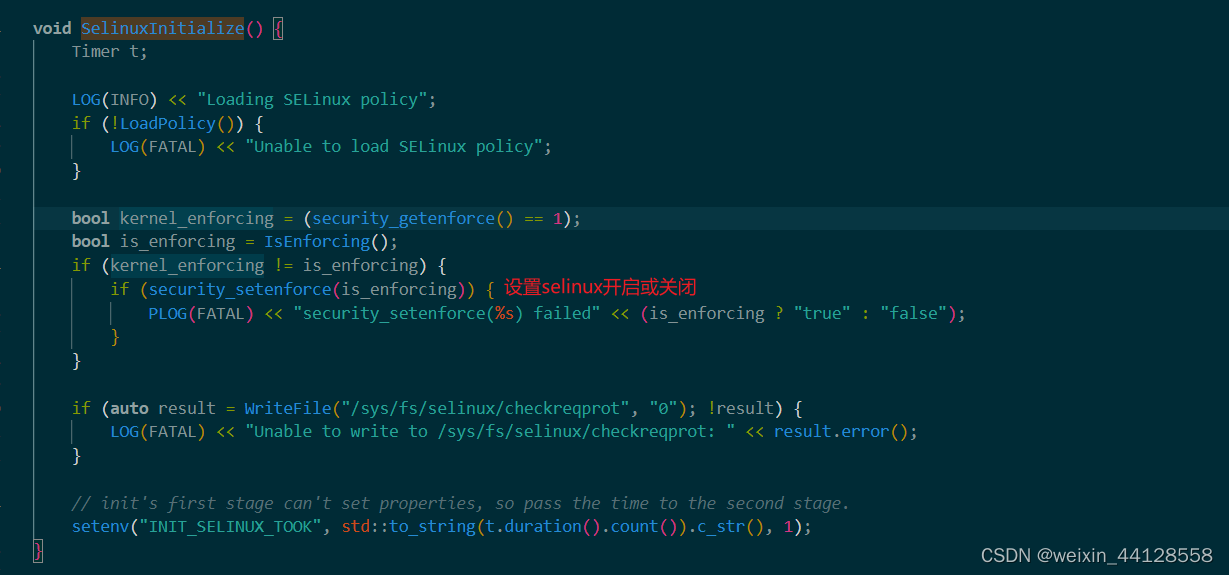
注释五:第二部分 属性服务 property_init() 函数 和 start_property_service() 函数
启用SELinux安全策略后,会重新执行main函数,由于设置了INIT_SECOND_SRAGE 属性,所以第一部分执行的代码不会再执行

位置:/system/core/init/property_service.cpp
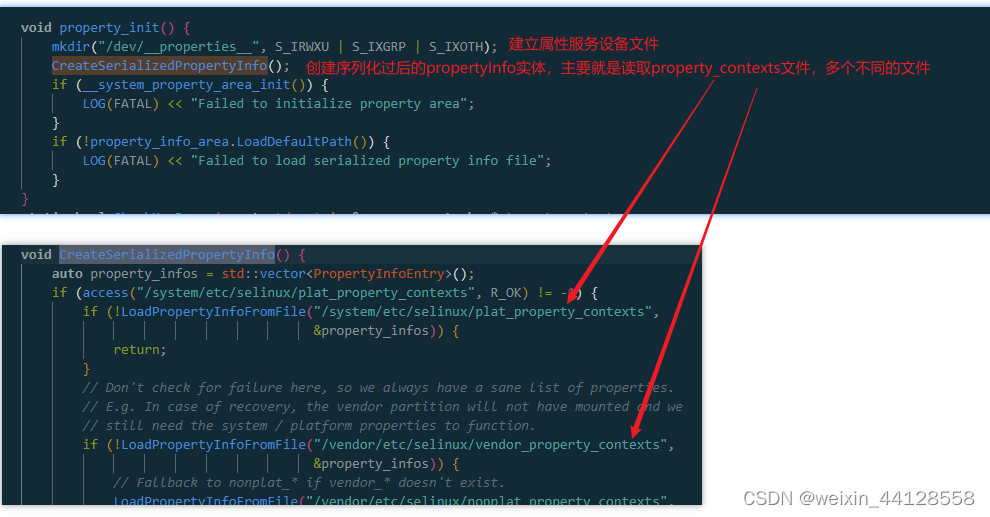
直接交给 __system_property_area_init 处理,位置 /bionic/libc/bionic/system_property_api.cpp

最终调用了system_properties中的AreaInit 方法 位置:/bionic/libc/system_properties/system_properties.cpp
主要完成的工作,清除缓存,主要清除几个链表以及在内存中的映射,新建property_fliename 目录(/dev/_properties)然后调用Initialize加载心痛属性的类别信息,最后将加载的链表写入文件并映射到内存

process_kernel_dt() 位置:/system/core/init/init.cpp
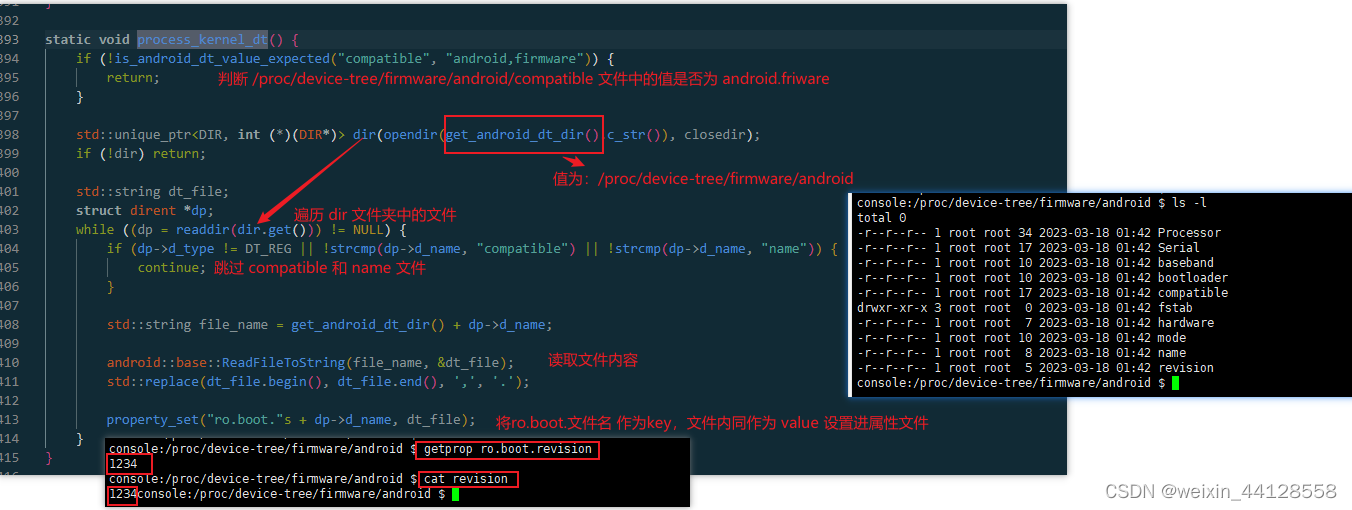
process_kernel_cmdline位置:/system/core/init/init.cpp

注释六:新建epoll并初始化子进程终止信号处理函数
epoll_create1 位置:
sigchld_handler_init() 位置:/system/core/init/signal_handler.cpp
这个函数的主要作用是注册 SIGCHLD 信号的处理函数,init是一个守护进程,为了防止init的子进程成为僵尸进程,需要init在子进程结束时获取子进程的结束码,通过结束码将程序表中的进程移除,防止僵尸进程占用程序表的空间(程序表空间达到上限时,系统不能再启动新的进程)

注释七:start_property_service() 开启属性服务
start_property_service 位置:\system\core\init\property_service.cpp
之前都是通过property_set 可以轻松设置系统属性,但不是所有的进程都有权限可以随意修改系统属性,Android 将属性的设置统一交给init进程管理,其他进程不能直接修改属性,只能通过init进程来修改
start_property_service() 位置:/system/core/init/property_service.cpp


注释八:解析init.rc文件

位置:/system/core/init/parser.cpp

这里涉及到on service import 对应的三个解析器:ActionParser、ServiceParser、ImportParser,它们是之前加入到section_parsers_这个map中

它们都是SectionParser的子类,SectionParser中有三个虚函数和一个纯虚函数,只要包含纯虚函数的类就是抽象类,不能new,只能通过子类实现


ActionParser
位置:\system\core\init\action_parser.cpp

ParseSection 函数的作用就是构造了一个Action对象,将trigger条件记录到Action这个对象中,如果是event trigger 就赋值给event_trigger_,如果是property trigger就放到property_trigger_这个map中
 ParseLineSection是直接调用Action对象的AddCommand函数,AddCommand看名字就大概知道是添加命令,其调用FindFunction查找命令对应的执行函数,最后将这些信息包装成Command对象存放到commands_数组中

FindFunction是通过命令查找对应的执行函数,比如.rc文件中定义chmod,那得在一个map中找到 chmod 具体去执行哪个函数,find相当于Java中的get,但是返回的是entry,可以通过entry ->first和entry ->second获取key-value。找到的value是一个结构体,里面有三个值,第一个是参数最小数目,第二个是参数最大数目,第三个就是执行函数,之后作了参数的数目检查,也就是说命令后的参数要在最小值和最大值之间。
这个BuiltinFunctionMap也比较简单,例如 {"chown", {2, 3, {true, do_chown}}},表示
最小的参数为2,最大的参数为3,调用的方法为 do_chown(),ture表示 是否需要在vendor_init域的子进程中运行,SELinux相关
EndSection 直接是调用ActionManager::GetInstance().AddAction,将数据存放到 actions_ 数组中,EndFile是一个空实现

ServiceParser
位置:\system\core\init\service.cpp

一样是看ParseSection 、ParseLineSection方法

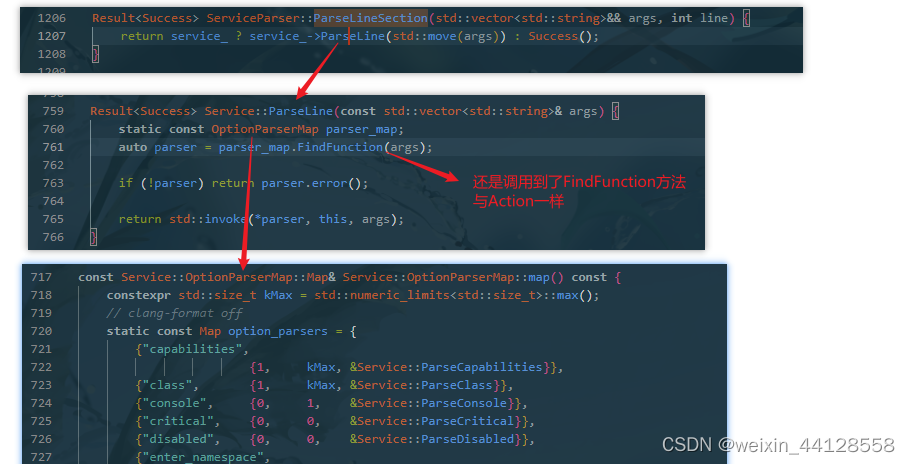
OptionParserMap也比较简单,例如 {"oneshot", {0, 0, &Service::ParseOneshot}},表示
最小的参数为0,最大的参数为0,调用的方法为 Service 类中的 ParseOneshot() 方法
EndSection,直接调用ServiceManager的AddService函数,将数据存放到 services_ 数组中,EndFile依然是一个空实现

ImportParser
位置:\system\core\init\import_parser.cpp
主要导入一些其他的rc文件进来,只实现了 ParseSection 和 EndFile ,因为它的语法比较单一


至此,解析init.rc语法的过程走完了,主要就是三个核心解析器:ActionParser、ServiceParser、ImportParser。而这几个解析器主要是实现ParseSection、ParseLineSection、EndSection、EndFile四个函数
注释九:其他事件和一些Action

注释十:监听新的事件

到这里 init 进程已经启动完成
5.Zygote(孵化器)进程启动
上面讲到在init进程中有解析.rc文件,在这个rc文件中配置了一个重要的服务service–zygote,这是app程序的鼻祖
zygote进程主要负责创建Java虚拟机,加载系统资源,启动SystemServer进程,以及在后续运行过程中启动普通的应用程序。

不同机器 zygote.rc 的文件个数可能有不同,这里有四种
- init.zygote32.rc :进程对应的执行程序是 app_process (纯 32bit 模式)
- init.zygote32_64.rc :启动两个 zygote 进程 (名为 zygote 和 zygote_secondary),对应的执行程序分别是 app_process32 (主模式)、app_process64
- init.zygote64.rc:进程对应的执行程序是 app_process64 (纯 64bit 模式)
- init.zygote64_32.rc:启动两个 zygote 进程 (名为 zygote 和 zygote_secondary),对应的执行程序分别是 app_process64 (主模式)、app_process32
上节注释九的位置,再 init 最后会加入 late-init 的 trigger,当late-init 触发时,会触发zygote-start的操作,staty zygote就会创建zygote进程并运行

上一节在解析init.rc文件时会创建解析器解析init.rc里面的命令,而start命令是由ActionParser 解析器解析

可知 start 命令对应的执行函数为 do_start,do_start函数首先通过 FindService 去service 数组中遍历,根据信息匹配出对应的service,然后调用这个 service 的 Start 方法

zygote 服务对应的二进制文件是 /system/bin/app_processXXX,对应的源文件在:/frameworks/base/cmds/app_process/app_main.cpp
int main(int argc, char* const argv[])
{
	// 将参数argv放到argv_String 字符串中
	// 上图可知,传入的参数是 -Xzygote /system/bin --zygote --start-system-server
    if (!LOG_NDEBUG) {
      String8 argv_String;
      for (int i = 0; i < argc; ++i) {
        argv_String.append("\"");
        argv_String.append(argv[i]);
        argv_String.append("\" ");
      }
      ALOGV("app_process main with argv: %s", argv_String.string());
    }

    AppRuntime runtime(argv[0], computeArgBlockSize(argc, argv)); //构建 AppRuntime 对象,并将参数传入
    // Process command line arguments
    // ignore argv[0]
    argc--;
    argv++;

    // Everything up to '--' or first non '-' arg goes to the vm.
    //
    // The first argument after the VM args is the "parent dir", which
    // is currently unused.
    //
    // After the parent dir, we expect one or more the following internal
    // arguments :
    //
    // --zygote : Start in zygote mode
    // --start-system-server : Start the system server.
    // --application : Start in application (stand alone, non zygote) mode.
    // --nice-name : The nice name for this process.
    //
    // For non zygote starts, these arguments will be followed by
    // the main class name. All remaining arguments are passed to
    // the main method of this class.
    //
    // For zygote starts, all remaining arguments are passed to the zygote.
    // main function.
    //
    // Note that we must copy argument string values since we will rewrite the
    // entire argument block when we apply the nice name to argv0.
    //
    // As an exception to the above rule, anything in "spaced commands"
    // goes to the vm even though it has a space in it.
    const char* spaced_commands[] = { "-cp", "-classpath" }; //这两个参数是Java程序需要依赖的Jar包,相当于import
    // Allow "spaced commands" to be succeeded by exactly 1 argument (regardless of -s).
    bool known_command = false;

    int i;
    for (i = 0; i < argc; i++) {
        if (known_command == true) {	//将spaced_commands中的参数额外加入VM
          runtime.addOption(strdup(argv[i]));
          // The static analyzer gets upset that we don't ever free the above
          // string. Since the allocation is from main, leaking it doesn't seem
          // problematic. NOLINTNEXTLINE
          ALOGV("app_process main add known option '%s'", argv[i]);
          known_command = false;
          continue;
        }

        for (int j = 0;
             j < static_cast<int>(sizeof(spaced_commands) / sizeof(spaced_commands[0]));
             ++j) {
          if (strcmp(argv[i], spaced_commands[j]) == 0) {//参数是否是spaced_commands中的参数
            known_command = true;
            ALOGV("app_process main found known command '%s'", argv[i]);
          }
        }

        if (argv[i][0] != '-') {	//如果参数第一个字符是”-“,直接跳出循环,之前传入的第一个参数是 -Xzygote,所以执行到这里就跳出了,i=0
            break;
        }
        if (argv[i][1] == '-' && argv[i][2] == 0) {
            ++i; // Skip --.
            break;
        }

        runtime.addOption(strdup(argv[i]));
        // The static analyzer gets upset that we don't ever free the above
        // string. Since the allocation is from main, leaking it doesn't seem
        // problematic. NOLINTNEXTLINE
        ALOGV("app_process main add option '%s'", argv[i]);
    }

    // Parse runtime arguments.  Stop at first unrecognized option.
    bool zygote = false;
    bool startSystemServer = false;
    bool application = false;
    String8 niceName;
    String8 className;

    ++i;  // Skip unused "parent dir" argument.
    //跳过一个参数,之前跳过了 -Xzygote,这里跳过 /system/bin
    while (i < argc) {
        const char* arg = argv[i++];
        if (strcmp(arg, "--zygote") == 0) {	// 表示zygote启动模式
            zygote = true;
            niceName = ZYGOTE_NICE_NAME;	//这个值根据平台可能是zygote或者zygote64
        } else if (strcmp(arg, "--start-system-server") == 0) {//需要启动SystemServer
            startSystemServer = true;
        } else if (strcmp(arg, "--application") == 0) {//表示application启动模式,普通的应用程序
            application = true;
        } else if (strncmp(arg, "--nice-name=", 12) == 0) {//进程别名
            niceName.setTo(arg + 12);
        } else if (strncmp(arg, "--", 2) != 0) {//application启动的class
            className.setTo(arg);
            break;
        } else {
            --i;
            break;
        }
    }

    Vector<String8> args;
    if (!className.isEmpty()) {	//className不为空,说明是application启动模式
        // We're not in zygote mode, the only argument we need to pass
        // to RuntimeInit is the application argument.
        //
        // The Remainder of args get passed to startup class main(). Make
        // copies of them before we overwrite them with the process name.
        args.add(application ? String8("application") : String8("tool"));
        runtime.setClassNameAndArgs(className, argc - i, argv + i);//将className和参数设置给runtime

        if (!LOG_NDEBUG) {
          String8 restOfArgs;
          char* const* argv_new = argv + i;
          int argc_new = argc - i;
          for (int k = 0; k < argc_new; ++k) {
            restOfArgs.append("\"");
            restOfArgs.append(argv_new[k]);
            restOfArgs.append("\" ");
          }
          ALOGV("Class name = %s, args = %s", className.string(), restOfArgs.string());
        }
    } else {	//zygote启动模式
        // We're in zygote mode.
        maybeCreateDalvikCache();//创建Dalvik的缓存目录

        if (startSystemServer) {//加入 start-system-server参数
            args.add(String8("start-system-server"));
        }

        char prop[PROP_VALUE_MAX];
        if (property_get(ABI_LIST_PROPERTY, prop, NULL) == 0) {
            LOG_ALWAYS_FATAL("app_process: Unable to determine ABI list from property %s.",
                ABI_LIST_PROPERTY);
            return 11;
        }

        String8 abiFlag("--abi-list=");
        abiFlag.append(prop);
        args.add(abiFlag); // 加入--abi-list=参数

        // In zygote mode, pass all remaining arguments to the zygote
        // main() method.
        for (; i < argc; ++i) {
            args.add(String8(argv[i]));//将剩下的参数加入args
        }
    }

    if (!niceName.isEmpty()) {//设置进程的别名
        runtime.setArgv0(niceName.string(), true /* setProcName */);
    }

    if (zygote) {	//zygote启动模式,加载 ZygoteInit 类
        runtime.start("com.android.internal.os.ZygoteInit", args, zygote);
    } else if (className) {	//application 启动模式,加载 RuntimeInit 类
        runtime.start("com.android.internal.os.RuntimeInit", args, zygote);
    } else {
        fprintf(stderr, "Error: no class name or --zygote supplied.\n");
        app_usage();
        LOG_ALWAYS_FATAL("app_process: no class name or --zygote supplied.");
    }
}
app_main.cpp 的 main 函数主要做的事就是参数解析,这个函数有两种启动模式
- 一种是zygote模式:初始化zygote进程,传递的参数:–start-system-server 和 --socket-name=zygote,前者表示启动SystemServer,后者指定socket的名称
- 一种是application模式:启动普通应用程序,传递的参数有class名字以及class带的参数
两种模式最终都是调用AppRuntime对象的start函数,加载 ZygoteInit 或 RuntimeInit 两个Java类,并将之前整理的参数传入进去
上面main函数最后得知,如果 zygote 为 true,说明当前在运行Zygote进程中,就会调用 AppRuntime 的 start 函数
位置:\frameworks\base\core\jni\AndroidRuntime.cpp
void AndroidRuntime::start(const char* className, const Vector<String8>& options, bool zygote)
{
    。。。。。。。
    /* start the virtual machine */
    JniInvocation jni_invocation;
    jni_invocation.Init(NULL); //注释一:初始化jni
    JNIEnv* env;
    if (startVm(&mJavaVM, &env, zygote) != 0) { //注释二:启动JAVA虚拟机
        return;
    }
    onVmCreated(env);

    /*
     * Register android functions.
     */
     //注释三:为Java虚拟机注册JNI方法
    if (startReg(env) < 0) {
        ALOGE("Unable to register all android natives\n");
        return;
    }

	 /*
     * We want to call main() with a String array with arguments in it.
     * At present we have two arguments, the class name and an option string.
     * Create an array to hold them.
     */
    jclass stringClass; //注释四:调用ZygoteInit.java 的 main 函数
    jobjectArray strArray;
    jstring classNameStr;

    stringClass = env->FindClass("java/lang/String");
    assert(stringClass != NULL);
    strArray = env->NewObjectArray(options.size() + 1, stringClass, NULL);
    assert(strArray != NULL);
  	// 获得传递的 className 参数,如果为 zygote 则传递的参数为:com.android.internal.os.ZygoteInit
  	classNameStr = env->NewStringUTF(className);
    assert(classNameStr != NULL);
    env->SetObjectArrayElement(strArray, 0, classNameStr);

    for (size_t i = 0; i < options.size(); ++i) {
        jstring optionsStr = env->NewStringUTF(options.itemAt(i).string());
        assert(optionsStr != NULL);
        env->SetObjectArrayElement(strArray, i + 1, optionsStr);
    }

    /*
     * Start VM.  This thread becomes the main thread of the VM, and will
     * not return until the VM exits.
     */
    // slashClassName 函数将className中的 “.” 替换成 “/”
    char* slashClassName = toSlashClassName(className != NULL ? className : "");
    // 找到 com.android.internal.os.ZygoteInit.java 这个类
    jclass startClass = env->FindClass(slashClassName);
    if (startClass == NULL) {
        ALOGE("JavaVM unable to locate class '%s'\n", slashClassName);
        /* keep going */
    } else {
    	// 找到 ZygoteInit.java 类中的main方法
        jmethodID startMeth = env->GetStaticMethodID(startClass, "main",
            "([Ljava/lang/String;)V");
        if (startMeth == NULL) {
            ALOGE("JavaVM unable to find main() in '%s'\n", className);
            /* keep going */
        } else {
        	//通过jni反射调用 zygoteInit.java 的 main 方法
            env->CallStaticVoidMethod(startClass, startMeth, strArray);

#if 0
            if (env->ExceptionCheck())
                threadExitUncaughtException(env);
#endif
        }
    }
    free(slashClassName);

    ALOGD("Shutting down VM\n");
    if (mJavaVM->DetachCurrentThread() != JNI_OK)//退出当前线程
        ALOGW("Warning: unable to detach main thread\n");
    if (mJavaVM->DestroyJavaVM() != 0)//创建一个线程,该线程会等待所有子线程结束后关闭虚拟机
        ALOGW("Warning: VM did not shut down cleanly\n");
}
总体流程是:1.初始化jni,2.startVm函数创建java虚拟机,3.startReg 函数为虚拟机注册JNI方法,4. 根据传递进来的参数找到对应的java类,5. 通过JNI调用对应类的main方法。通过JNI的方法zygote就从Native层进入了Java框架层了,此前没有任何代码进入Java框架层
注释一:初始化JNI
位置:\libnativehelper\JniInvocation.cpp
bool JniInvocation::Init(const char* library) {
#ifdef __ANDROID__
  char buffer[PROP_VALUE_MAX];
#else
  char* buffer = NULL;
#endif
  library = GetLibrary(library, buffer);
  // Load with RTLD_NODELETE in order to ensure that libart.so is not unmapped when it is closed.
  // This is due to the fact that it is possible that some threads might have yet to finish
  // exiting even after JNI_DeleteJavaVM returns, which can lead to segfaults if the library is
  // unloaded.
  const int kDlopenFlags = RTLD_NOW | RTLD_NODELETE;

  handle_ = dlopen(library, kDlopenFlags);
  if (handle_ == NULL) {
    if (strcmp(library, kLibraryFallback) == 0) {
      // Nothing else to try.
      ALOGE("Failed to dlopen %s: %s", library, dlerror());
      return false;
    }
    // Note that this is enough to get something like the zygote
    // running, we can't property_set here to fix this for the future
    // because we are root and not the system user. See
    // RuntimeInit.commonInit for where we fix up the property to
    // avoid future fallbacks. http://b/11463182
    ALOGW("Falling back from %s to %s after dlopen error: %s",
          library, kLibraryFallback, dlerror());
    library = kLibraryFallback;
    //dlopen的功能是以指定的模式打开指定的动态链接库文件,并返回一个句柄
    //RTLD_NOW 表示需要在dlopen返回前,解析出所有未定义的符号,如果解析不出返回NULL
    //RTLD_NODELETE 表示在dlclose()期间不卸载库,并在之后使用dlopen重新加载库的时不初始化库中的静态变量
    handle_ = dlopen(library, kDlopenFlags);
    if (handle_ == NULL) {
      ALOGE("Failed to dlopen %s: %s", library, dlerror());
      return false;
    }
  }
  // FindSymbol 函数内部实际调用的是dlsym
  // dlsym作用是根据动态链接库 操作句柄(handle)与符号(symbol),返回对应的地址
  // 这里实际就是从lobart.so库中将 JNI_GetDefaultJavaVMInitArgs 等对应的地址存放到 &JNI_GetDefaultJavaVMInitArgs_
  if (!FindSymbol(reinterpret_cast<void**>(&JNI_GetDefaultJavaVMInitArgs_),
                  "JNI_GetDefaultJavaVMInitArgs")) {
    return false;
  }
  if (!FindSymbol(reinterpret_cast<void**>(&JNI_CreateJavaVM_),
                  "JNI_CreateJavaVM")) {
    return false;
  }
  if (!FindSymbol(reinterpret_cast<void**>(&JNI_GetCreatedJavaVMs_),
                  "JNI_GetCreatedJavaVMs")) {
    return false;
  }
  return true;
}
注释二:创建虚拟机 startVm
调用的函数是\libnativehelper\JniInvocation.cpp下的 AndroidRuntime::startVm 函数,这个函数比较长,但做的事情单一,就是从系统属性中读取参数,然后通过 addOption 设置到 AndroidRuntime 的 mOptions 数组中存储起来,然后调用从 libart.so 中找到的 JNI_CreateJavaVM 函数,并将之前读到的参数传入
int AndroidRuntime::startVm(JavaVM** pJavaVM, JNIEnv** pEnv, bool zygote)
{
    JavaVMInitArgs initArgs;
    。。。。。。

    /* route exit() to our handler */
    addOption("exit", (void*) runtime_exit); //将各个参数放到mOption数组中

    。。。。。。

    initArgs.version = JNI_VERSION_1_4;
    initArgs.options = mOptions.editArray(); //将mOptions赋值给initArgs
    initArgs.nOptions = mOptions.size();
    initArgs.ignoreUnrecognized = JNI_FALSE;

    /*
     * Initialize the VM.
     *
     * The JavaVM* is essentially per-process, and the JNIEnv* is per-thread.
     * If this call succeeds, the VM is ready, and we can start issuing
     * JNI calls.
     */
    if (JNI_CreateJavaVM(pJavaVM, pEnv, &initArgs) < 0) { //调用libart.so 的JNI_CreateJavaVM 函数去创建虚拟机
        ALOGE("JNI_CreateJavaVM failed\n");
        return -1;
    }

    return 0;
}
libart.so是ART虚拟机的核心库,它包含了ART虚拟机所有的核心组件,如ClassLinker、DexFile、JNI、gc等
注释三:为虚拟机注册JNI方法 startReg
/*
 * Register android native functions with the VM.
 */
/*static*/ int AndroidRuntime::startReg(JNIEnv* env)
{
    ATRACE_NAME("RegisterAndroidNatives");
    /*
     * This hook causes all future threads created in this process to be
     * attached to the JavaVM.  (This needs to go away in favor of JNI
     * Attach calls.)
     */
     //设置Android创建线程的函数javaCreateThreadEtc,这个函数内部是通过Linux的clone来创建线程的
    androidSetCreateThreadFunc((android_create_thread_fn) javaCreateThreadEtc);

    ALOGV("--- registering native functions ---\n");

    /*
     * Every "register" function calls one or more things that return
     * a local reference (e.g. FindClass).  Because we haven't really
     * started the VM yet, they're all getting stored in the base frame
     * and never released.  Use Push/Pop to manage the storage.
     */
     //创建一个200容量的局部引用作用域,这个局部引用其实就是局部变量
    env->PushLocalFrame(200);

    if (register_jni_procs(gRegJNI, NELEM(gRegJNI), env) < 0) {//注册JNI函数
        env->PopLocalFrame(NULL);
        return -1;
    }
    env->PopLocalFrame(NULL);//释放局部引用作用域

    //createJavaThread("fubar", quickTest, (void*) "hello");

    return 0;
}
/*********************************************************/
static int register_jni_procs(const RegJNIRec array[], size_t count, JNIEnv* env)
{
    for (size_t i = 0; i < count; i++) {
        if (array[i].mProc(env) < 0) {
#ifndef NDEBUG
            ALOGD("----------!!! %s failed to load\n", array[i].mName);
#endif
            return -1;
        }
    }
    return 0;
}
startReg 处理就是交给 RegJNIRec 的 mProc,RegJNIRec是个很简单的结构体,mProc是个函数指针
static const RegJNIRec gRegJNI[] = {
    REG_JNI(register_com_android_internal_os_RuntimeInit),
    REG_JNI(register_com_android_internal_os_ZygoteInit_nativeZygoteInit),
    REG_JNI(register_android_os_SystemClock),
    REG_JNI(register_android_util_EventLog),
    REG_JNI(register_android_util_Log),
    REG_JNI(register_android_util_MemoryIntArray),
    REG_JNI(register_android_util_PathParser),
    REG_JNI(register_android_util_StatsLog),
    REG_JNI(register_android_app_admin_SecurityLog),
    REG_JNI(register_android_content_AssetManager),
    REG_JNI(register_android_content_StringBlock),
    REG_JNI(register_android_content_XmlBlock),
    REG_JNI(register_android_content_res_ApkAssets),
    REG_JNI(register_android_text_AndroidCharacter),
    REG_JNI(register_android_text_Hyphenator),
    REG_JNI(register_android_text_MeasuredParagraph),
    REG_JNI(register_android_text_StaticLayout),
    REG_JNI(register_android_view_InputDevice),
    REG_JNI(register_android_view_KeyCharacterMap),
    REG_JNI(register_android_os_Process),
    REG_JNI(register_android_os_SystemProperties),
    REG_JNI(register_android_os_Binder),
    REG_JNI(register_android_os_Parcel),
    REG_JNI(register_android_os_HidlSupport),
	。。。。。。
};
注释四:反射调用ZygoteInit类的main函数
虚拟机创建完成后,就可以运行java代码了,主要是通过jni的函数 CallStaticVoidMethod 反射调用 com.android.internal.os.ZygoteInit.java 的main函数,至此 Zygote 进程已经启动
6.SystemServer进程启动

上面已经启动了Zygote进程,并最终调用到了ZygoteInit.java 的main函数,而SystemServer就是在这个main函数中启动的
位置:\frameworks\base\core\java\com\android\internal\os\ZygoteInit.java
public static void main(String argv[]) {
        ZygoteServer zygoteServer = new ZygoteServer();

        // Mark zygote start. This ensures that thread creation will throw
        // an error.
        ZygoteHooks.startZygoteNoThreadCreation();

        // Zygote goes into its own process group.
        try {
            Os.setpgid(0, 0);
        } catch (ErrnoException ex) {
            throw new RuntimeException("Failed to setpgid(0,0)", ex);
        }

        final Runnable caller;
        try {
            // Report Zygote start time to tron unless it is a runtime restart
            if (!"1".equals(SystemProperties.get("sys.boot_completed"))) {
                MetricsLogger.histogram(null, "boot_zygote_init",
                        (int) SystemClock.elapsedRealtime());
            }

            String bootTimeTag = Process.is64Bit() ? "Zygote64Timing" : "Zygote32Timing";
            TimingsTraceLog bootTimingsTraceLog = new TimingsTraceLog(bootTimeTag,
                    Trace.TRACE_TAG_DALVIK);
            bootTimingsTraceLog.traceBegin("ZygoteInit");
            RuntimeInit.enableDdms();

			// 注释一:处理传递过来的参数
            boolean startSystemServer = false;
            String socketName = "zygote";
            String abiList = null;
            boolean enableLazyPreload = false;
            for (int i = 1; i < argv.length; i++) {
                if ("start-system-server".equals(argv[i])) { //是否启动systemServer
                    startSystemServer = true;
                } else if ("--enable-lazy-preload".equals(argv[i])) {
                    enableLazyPreload = true;
                } else if (argv[i].startsWith(ABI_LIST_ARG)) {  //ABI_LIST_ARG = "--abi-list=";
                    abiList = argv[i].substring(ABI_LIST_ARG.length());
                } else if (argv[i].startsWith(SOCKET_NAME_ARG)) {   //SOCKET_NAME_ARG = "--socket-name=";
                    socketName = argv[i].substring(SOCKET_NAME_ARG.length());
                } else {
                    throw new RuntimeException("Unknown command line argument: " + argv[i]);
                }
            }

            if (abiList == null) {
                throw new RuntimeException("No ABI list supplied.");
            }

			// 注释二:创建一个Server端的Socket,socketName的值为“zygote”
            zygoteServer.registerServerSocketFromEnv(socketName);
            // In some configurations, we avoid preloading resources and classes eagerly.
            // In such cases, we will preload things prior to our first fork.
            if (!enableLazyPreload) {
                bootTimingsTraceLog.traceBegin("ZygotePreload");
                EventLog.writeEvent(LOG_BOOT_PROGRESS_PRELOAD_START,
                    SystemClock.uptimeMillis());
                // 注释三:预加载类和资源
                preload(bootTimingsTraceLog);
                EventLog.writeEvent(LOG_BOOT_PROGRESS_PRELOAD_END,
                    SystemClock.uptimeMillis());
                bootTimingsTraceLog.traceEnd(); // ZygotePreload
            } else {
                Zygote.resetNicePriority();
            }

            // Do an initial gc to clean up after startup
            bootTimingsTraceLog.traceBegin("PostZygoteInitGC");
            gcAndFinalize();
            bootTimingsTraceLog.traceEnd(); // PostZygoteInitGC

            bootTimingsTraceLog.traceEnd(); // ZygoteInit
            // Disable tracing so that forked processes do not inherit stale tracing tags from
            // Zygote.
            Trace.setTracingEnabled(false, 0);

            Zygote.nativeSecurityInit();

            // Zygote process unmounts root storage spaces.
            Zygote.nativeUnmountStorageOnInit();

            ZygoteHooks.stopZygoteNoThreadCreation();

            if (startSystemServer) {
            	// 注释四:启动systemSercer进程
                Runnable r = forkSystemServer(abiList, socketName, zygoteServer);

                // {@code r == null} in the parent (zygote) process, and {@code r != null} in the
                // child (system_server) process.
                if (r != null) {
                    r.run();
                    return;
                }
            }

            Log.i(TAG, "Accepting command socket connections");

            // The select loop returns early in the child process after a fork and
            // loops forever in the zygote.
            //注释五:等待 AMS 请求  进入looper,等待AMS请求Zygote进程来创建新的应用程序进程
            caller = zygoteServer.runSelectLoop(abiList);
        } catch (Throwable ex) {
            Log.e(TAG, "System zygote died with exception", ex);
            throw ex;
        } finally {
            zygoteServer.closeServerSocket();
        }

        // We're in the child process and have exited the select loop. Proceed to execute the
        // command.
        if (caller != null) {
            caller.run();
        }
    }
注释一:处理传递过来的参数
在\frameworks\base\cmds\app_process\app_main.cpp中有传递对应的参数

注释二:创建一个Server端的Socket
位置:\frameworks\base\core\java\com\android\internal\os\ZygoteServer.java

之后创建 SystemServer 进程的时候,会将这个Socket传递进去,SystemServer 就会在这个务器端 Socket 上等待 AMS 请求 Zygote 进程来创建新的应用程序进程。
注释三:预处理

注释四:启动SystemSercer进程
SystemSercer进程创建
private static Runnable forkSystemServer(String abiList, String socketName,  ZygoteServer zygoteServer) {
        long capabilities = posixCapabilitiesAsBits(
            OsConstants.CAP_IPC_LOCK,
            OsConstants.CAP_KILL,
            OsConstants.CAP_NET_ADMIN,
            OsConstants.CAP_NET_BIND_SERVICE,
            OsConstants.CAP_NET_BROADCAST,
            OsConstants.CAP_NET_RAW,
            OsConstants.CAP_SYS_MODULE,
            OsConstants.CAP_SYS_NICE,
            OsConstants.CAP_SYS_PTRACE,
            OsConstants.CAP_SYS_TIME,
            OsConstants.CAP_SYS_TTY_CONFIG,
            OsConstants.CAP_WAKE_ALARM,
            OsConstants.CAP_BLOCK_SUSPEND
        );
        /* Containers run without some capabilities, so drop any caps that are not available. */
        StructCapUserHeader header = new StructCapUserHeader(
                OsConstants._LINUX_CAPABILITY_VERSION_3, 0);
        StructCapUserData[] data;
        try {
            data = Os.capget(header);
        } catch (ErrnoException ex) {
            throw new RuntimeException("Failed to capget()", ex);
        }
        capabilities &= ((long) data[0].effective) | (((long) data[1].effective) << 32);
        // Mediatek Android Patch Begin
        /* Mediatek add 1014 to setgroups for dhcp*/
        /* Hardcoded command line to start the system server */
        String args[] = { // 创建args 数组,这个数组用来保存启动 SystemServer 的启动参数
            "--setuid=1000",
            "--setgid=1000",
            "--setgroups=1001,1002,1003,1004,1005,1006,1007,1014,1008,1009,1010,1018,1021,1023,1024,1032,1065,3001,3002,3003,3006,3007,3009,3010",
            "--capabilities=" + capabilities + "," + capabilities,
            "--nice-name=system_server",
            "--runtime-args",
            "--target-sdk-version=" + VMRuntime.SDK_VERSION_CUR_DEVELOPMENT,
            "com.android.server.SystemServer",
        };
        // Mediatek Android Patch End
        ZygoteConnection.Arguments parsedArgs = null;

        int pid;

        try {
            parsedArgs = new ZygoteConnection.Arguments(args);
            ZygoteConnection.applyDebuggerSystemProperty(parsedArgs);
            ZygoteConnection.applyInvokeWithSystemProperty(parsedArgs);

            boolean profileSystemServer = SystemProperties.getBoolean(
                    "dalvik.vm.profilesystemserver", false);
            if (profileSystemServer) {
                parsedArgs.runtimeFlags |= Zygote.PROFILE_SYSTEM_SERVER;
            }

            /* Request to fork the system server process */
            pid = Zygote.forkSystemServer( //创建一个子进程,也就是 SystemServer 进程
                    parsedArgs.uid, parsedArgs.gid,
                    parsedArgs.gids,
                    parsedArgs.runtimeFlags,
                    null,
                    parsedArgs.permittedCapabilities,
                    parsedArgs.effectiveCapabilities);
        } catch (IllegalArgumentException ex) {
            throw new RuntimeException(ex);
        }

        /* For child process */
        if (pid == 0) {	//当代码逻辑运行在子进程中,既是 SystemServer 进程
            if (hasSecondZygote(abiList)) {
                waitForSecondaryZygote(socketName);
            }

            zygoteServer.closeServerSocket(); //子进程关闭 Socket
            return handleSystemServerProcess(parsedArgs);//处理 SystemServer 进程
        }

        return null;
    }
第一步:创建 SystemServer 的启动参数
从 args 数组,SystemServer 的启动参数可以看出 SystemServer 进程用户 id 和 用户组 id 被设置成了1000,并拥有
setgroups=1001,1002,1003,1004,1005,1006,1007,1014,1008,1009,1010,1018,1021,1023,1024,1032,1065,3001,3002,3003,3006,3007,3009,3010"
的权限,进程的名称为:–nice-name=system_server,启动的类名为com.android.server.SystemServer
第二步:forkSystemServer 创建出 SystemServer进程
注意: 这里有个pid == 0 的判断,android
的fork机制可以理解为分裂,分裂后有两个代码一模一样的进程,分裂后会同时执行两个进程的代码,如果是在父进程中执行
fork,则会返回分裂子进程的的进程号(pid),如果是在子进程中 执行 fork,返回值为0,所以 if (pid == 0)
里面的代码只会在子进程既 SystemServer 进程中执行
至此,就创建出了 SystemServer 进程
由于SystemServer进程 是 fork Zygote进程的,所以也会得到 Zygote 进程创建的 Socket ,但这个 Socket 对于 SystemServer 没有用处,所以关闭了这个 Socket,之后调用 handleSystemServerProcess 来初始化 SystemServer 进程

最终是得到了 SystemServer 的main方法反射
SystemSercer进程启动流程

位置:\frameworks\base\services\java\com\android\server\SystemServer.java
	/**
     * The main entry point from zygote.
     */
    public static void main(String[] args) {
        new SystemServer().run();
    }

    public SystemServer() {
        // Check for factory test mode.
        mFactoryTestMode = FactoryTest.getMode();
        // Remember if it's runtime restart(when sys.boot_completed is already set) or reboot
        mRuntimeRestart = "1".equals(SystemProperties.get("sys.boot_completed"));

        mRuntimeStartElapsedTime = SystemClock.elapsedRealtime();
        mRuntimeStartUptime = SystemClock.uptimeMillis();
    }

    private void run() {
        try {
            traceBeginAndSlog("InitBeforeStartServices");
            // If a device's clock is before 1970 (before 0), a lot of
            // APIs crash dealing with negative numbers, notably
            // java.io.File#setLastModified, so instead we fake it and
            // hope that time from cell towers or NTP fixes it shortly.
            if (System.currentTimeMillis() < EARLIEST_SUPPORTED_TIME) { //获得时间
                Slog.w(TAG, "System clock is before 1970; setting to 1970.");
                SystemClock.setCurrentTimeMillis(EARLIEST_SUPPORTED_TIME);
            }

            //
            // Default the timezone property to GMT if not set.
            //
            String timezoneProperty =  SystemProperties.get("persist.sys.timezone"); //获得时区
            if (timezoneProperty == null || timezoneProperty.isEmpty()) {
                Slog.w(TAG, "Timezone not set; setting to GMT.");
                SystemProperties.set("persist.sys.timezone", "GMT");
            }

            // If the system has "persist.sys.language" and friends set, replace them with
            // "persist.sys.locale". Note that the default locale at this point is calculated
            // using the "-Duser.locale" command line flag. That flag is usually populated by
            // AndroidRuntime using the same set of system properties, but only the system_server
            // and system apps are allowed to set them.
            //
            // NOTE: Most changes made here will need an equivalent change to
            // core/jni/AndroidRuntime.cpp
            if (!SystemProperties.get("persist.sys.language").isEmpty()) { 	//获得语言
                final String languageTag = Locale.getDefault().toLanguageTag();

                SystemProperties.set("persist.sys.locale", languageTag);
                SystemProperties.set("persist.sys.language", "");
                SystemProperties.set("persist.sys.country", "");
                SystemProperties.set("persist.sys.localevar", "");
            }

            // The system server should never make non-oneway calls
            Binder.setWarnOnBlocking(true);
            // The system server should always load safe labels
            PackageItemInfo.setForceSafeLabels(true);
            // Deactivate SQLiteCompatibilityWalFlags until settings provider is initialized
            SQLiteCompatibilityWalFlags.init(null);

            // Here we go!
            Slog.i(TAG, "Entered the Android system server!");
            int uptimeMillis = (int) SystemClock.elapsedRealtime();
            EventLog.writeEvent(EventLogTags.BOOT_PROGRESS_SYSTEM_RUN, uptimeMillis);
            if (!mRuntimeRestart) {
                MetricsLogger.histogram(null, "boot_system_server_init", uptimeMillis);
            }

            // In case the runtime switched since last boot (such as when
            // the old runtime was removed in an OTA), set the system
            // property so that it is in sync. We can | xq oqi't do this in
            // libnativehelper's JniInvocation::Init code where we already
            // had to fallback to a different runtime because it is
            // running as root and we need to be the system user to set
            // the property. http://b/11463182
            SystemProperties.set("persist.sys.dalvik.vm.lib.2", VMRuntime.getRuntime().vmLibrary());

            // Mmmmmm... more memory!
            VMRuntime.getRuntime().clearGrowthLimit();

            // The system server has to run all of the time, so it needs to be
            // as efficient as possible with its memory usage.
            VMRuntime.getRuntime().setTargetHeapUtilization(0.8f);

            // Some devices rely on runtime fingerprint generation, so make sure
            // we've defined it before booting further.
            Build.ensureFingerprintProperty();

            // Within the system server, it is an error to access Environment paths without
            // explicitly specifying a user.
            Environment.setUserRequired(true);

            // Within the system server, any incoming Bundles should be defused
            // to avoid throwing BadParcelableException.
            BaseBundle.setShouldDefuse(true);

            // Within the system server, when parceling exceptions, include the stack trace
            Parcel.setStackTraceParceling(true);

            // Ensure binder calls into the system always run at foreground priority.
            BinderInternal.disableBackgroundScheduling(true);

            // Increase the number of binder threads in system_server
            BinderInternal.setMaxThreads(sMaxBinderThreads);

            // Prepare the main looper thread (this thread).
            android.os.Process.setThreadPriority(
                android.os.Process.THREAD_PRIORITY_FOREGROUND);
            android.os.Process.setCanSelfBackground(false);
            Looper.prepareMainLooper();
            Looper.getMainLooper().setSlowLogThresholdMs(
                    SLOW_DISPATCH_THRESHOLD_MS, SLOW_DELIVERY_THRESHOLD_MS);

            // Initialize native services.
            System.loadLibrary("android_servers"); //加载动态库 libandroid_servers.so

            // Check whether we failed to shut down last time we tried.
            // This call may not return.
            performPendingShutdown();

            // Initialize the system context.
            createSystemContext();

            // Create the system service manager.
            mSystemServiceManager = new SystemServiceManager(mSystemContext); //创建SystemServiceManaager对象,会对系统服务进行创建,启动和生命周期管理
            mSystemServiceManager.setStartInfo(mRuntimeRestart,
                    mRuntimeStartElapsedTime, mRuntimeStartUptime);
            LocalServices.addService(SystemServiceManager.class, mSystemServiceManager);
            // Prepare the thread pool for init tasks that can be parallelized
            SystemServerInitThreadPool.get();
        } finally {
            traceEnd();  // InitBeforeStartServices
        }

        // Start services.
        try {
            traceBeginAndSlog("StartServices");
            startBootstrapServices(); //启动引导服务
            startCoreServices();	  //启动核心服务
            startOtherServices();	  //启动其他服务
            SystemServerInitThreadPool.shutdown();
        } catch (Throwable ex) {
            Slog.e("System", "******************************************");
            Slog.e("System", "************ Failure starting system services", ex);
            throw ex;
        } finally {
            traceEnd();
        }

        StrictMode.initVmDefaults(null);

        if (!mRuntimeRestart && !isFirstBootOrUpgrade()) {
            int uptimeMillis = (int) SystemClock.elapsedRealtime();
            MetricsLogger.histogram(null, "boot_system_server_ready", uptimeMillis);
            final int MAX_UPTIME_MILLIS = 60 * 1000;
            if (uptimeMillis > MAX_UPTIME_MILLIS) {
                Slog.wtf(SYSTEM_SERVER_TIMING_TAG,
                        "SystemServer init took too long. uptimeMillis=" + uptimeMillis);
            }
        }

        // Loop forever.
        Looper.loop();
        throw new RuntimeException("Main thread loop unexpectedly exited");
    }
startBootStrapServices():对应系统引导服务。我们熟悉的ATM、AMS、PMS、PKMS服务就是在这启动的
startCoreServices():对应核心服务。如电池服务就是在这启动
startOtherServices():对应其他服务。在这个方法中,启动的服务大概有70+个,WMS服务就是在这里启动的
| 引导服务 | 作用 |
|---|---|
| Installer | 系统安装APK时的一个服务,启动完成 Installer 服务之后才能启动其他的服务 |
| ActivityManagerService | 负责四大组件的启动,切换,调度 |
| PowerManagerService | 系统中和 Power 相关的计算,然后决策系统应该如何相应 |
| LightsService | 管理背光显示LED |
| DisplayManagerService | 管理所有显示设备 |
| UserManagerService | 多用户模式管理 |
| SensorService | 为系统提供各种感应器服务 |
| PackageManagerService | 用来对APK进行安装,解析,删除,卸载等操作 |
| … | … |
| 核心服务 | 作用 |
|---|---|
| DropBoxManagerService | 用于生成和管理系运行时的一些日志文件 |
| BatteryService | 管理电池相关服务 |
| UsageStatsService | 手机用户使用每个app的频率,时长 |
| WebViewUpdateService | WebView 更新服务 |
| … | … |
| 其他服务 | 作用 |
|---|---|
| CameraService | 摄像头相关服务 |
| AlarmManagerService | 全局定时器管理服务 |
| InputManagerService | 管理输入事件 |
| WindowManagerService | 窗口管理服务 |
| VrManagerService | VR模式夫管理服务 |
| BluetoothService | 蓝牙管理服务 |
| NotificationManagerService | 通知管理服务 |
| DeviceStorageMonitorService | 存储相关管理服务 |
| LocationManagerService | 定位相关管理服务 |
| AudioService | 音频相关服务 |
| … | … |
startBootStrapServices() startCoreServices() startOtherServices()方法里都是调用类似的方法去开启服务

mPowerManagerService = mSystemServiceManager.startService(PowerManagerService.class);以 PowerManagerService 为例,调用了SystemServiceManager 的 startService 方法开启服务
位置: \frameworks\base\services\core\java\com\android\server\SystemServiceManager.java

7.Launcher 启动
系统启动的最后一步是启动一个应用程序用来显示系统中已经安装的应用程序,并作为这些安装程序的启动入口,这个应用程序就是Launcher
上面得知SystemServer 进程启动中会启动很多其他的服务,其中一个就是 ActivityManagerService,在 startOtherServices 中会调用 AMS 的 systemReady() 方法将 Lanuncher 启动起来

位置:\frameworks\base\services\core\java\com\android\server\am\ActivityManagerService.java
public void systemReady(final Runnable goingCallback, TimingsTraceLog traceLog) {
        traceLog.traceBegin("PhaseActivityManagerReady");
        。。。。。。

        synchronized (this) {
            。。。。。。
            startHomeActivityLocked(currentUserId, "systemReady");

            。。。。。。
        }
    }
在 AMS 中的 systemReady() 方法中执行 startHomeActivityLocked()方法,传入当前用户ID

Launcher本身就是一个系统APP,用于显示桌面等,LauncherApp启动之后会执行其生命周期方法初始化桌面布局,至此,Launcher就启动完成了,用户进入到界面,整个Android系统也启动起来
