学习视频:
【2023新版Vue2+Vue3基础入门到实战项目全套教程,自学前端vue就选黑马程序员,一套全通关!】
初识VUE


Vue2官网 https://v2.cn.vuejs.org
Vue3官网 https://cn.vuejs.org
<!DOCTYPE html>
<html lang="en">

<head>
    <meta charset="UTF-8">
    <meta name="viewport" content="width=device-width, initial-scale=1.0">
    <title>Document</title>
</head>

<body>
    <!-- 创建Vue实例,初始化渲染
        1.容器
        2.引包   官网   (开发/生产版本)
        3.创建实例
        4.添加配置项=> 完成渲染
    -->

    <div id="app">
        <h1>{{msg}}</h1>
        <a href="">{{count}}</a>
    </div>
</body>


<script src="https://cdn.jsdelivr.net/npm/vue@2.7.14"></script>

<script>
    // 一旦引入VueJS核心包,在全局环境,就有了Vue构造函数
    const app = new Vue({
        el: '#app',//  通过el配置选择器,指定盒子
        data: {   // 通过data提供数据
            msg: 'hello',
            count: 999
        }
    })
</script>

</html>
插值表达式
注意点

响应式特性
响应式数据:数据变化,视图自动变化
data中的数据,会被添加到实例上
- 访问数据: 实例.属性名 app.count
- 修改数据: 实例.属性名=xxx app.count=9
  // 一旦引入VueJS核心包,在全局环境,就有了Vue构造函数
    const app = new Vue({
        el: '#app',//  通过el配置选择器,指定盒子
        data: {   // 通过data提供数据
            msg: 'hello',
            count: 999
        }
    })
    console.log(app.count);

Vue指令
带有v-前缀的特殊属性
v-html
动态设置元素的innerHTML,会覆盖之前的内容
<!DOCTYPE html>
<html lang="en">

<head>
    <meta charset="UTF-8">
    <meta name="viewport" content="width=device-width, initial-scale=1.0">
    <title>Document</title>
</head>

<body>
    <div id="app">
        <div v-html="msg"></div>
    </div>
</body>

<script src="../vue.js"></script>
<script>
    const app = new Vue({
        el: '#app',
        data: {
            msg: '<p style="color: aqua;">slxslxslx</p>'
        }
    })
    console.log(app.count);
</script>

</html>
v-show
底层原理:切换css的display:none 来控制显示和隐藏
<!DOCTYPE html>
<html lang="en">

<head>
    <meta charset="UTF-8">
    <meta name="viewport" content="width=device-width, initial-scale=1.0">
    <title>Document</title>
</head>

<body>

    <div v-show="flag" id="app">我是v-show</div>
    <div v-if="flag" id="app">我是v-if</div>


</body>

<script src="../vue.js"></script>
<script>
    const app = new Vue({
        el: '#app',
        data: {
            flag: false
        }
    })
    console.log(app.count);
</script>

</html>
v-if
底层原理:根据判断条件控制元素的创建和移除

v-else 和v-else-if
v-else 后面不加表达式,就光杆就行,并且要紧挨着v-if
<!DOCTYPE html>
<html lang="en">

<head>
    <meta charset="UTF-8">
    <meta name="viewport" content="width=device-width, initial-scale=1.0">
    <title>Document</title>
</head>

<body>
    <div id="app">
        <p v-if="gender==1">性别:女</p>
        <p v-else>性别:男</p>

        <hr>

        <p v-if="score>=90">成绩等级:A</p>
        <p v-else-if="score>=80">成绩等级:B</p>
        <p v-else-if="score>=70">成绩等级:C</p>
        <p v-else="60">成绩等级:D</p>
    </div>

</body>

<script src="../vue.js"></script>
<script>
    const app = new Vue({
        el: '#app',
        data: {
            gender: 1,
            score: 88

        }
    })
    console.log(app.count);
</script>

</html>
v-on
作用:注册事件=添加监听 + 提供处理逻辑
[语法1] v-on:事件名=“内联语句”
<button @click="count--">-</button>
<!DOCTYPE html>
<html lang="en">

<head>
    <meta charset="UTF-8">
    <meta name="viewport" content="width=device-width, initial-scale=1.0">
    <title>Document</title>
</head>

<body>
    <div id="app">
        <!-- <button v-on:click="count--">-</button>
        <span>{{count}}</span>
        <button v-on:click="count++">+</button>
        <button v-on:click="count+=2">+2</button> -->

        <button @click="count--">-</button>
        <span>{{count}}</span>
        <button @click="count++">+</button>
        <button @mouseover="count+=2">+2</button>


    </div>
</body>

<script src="../vue.js"></script>
<script>
    const app = new Vue({
        el: '#app',
        data: {
            count: 100
        }
    })
    console.log(app.count);
</script>

</html>
[语法2] v-on:时间名=“methods中的函数名”
<!DOCTYPE html>
<html lang="en">

<head>
    <meta charset="UTF-8">
    <meta name="viewport" content="width=device-width, initial-scale=1.0">
    <title>Document</title>
</head>

<body>
    <div id="app">
        <!-- 函数名后面不加() -->
        <button @click="fn">点击切换隐藏</button>
        <h1 v-show="flag">hello</h1>

    </div>
</body>

<script src="../vue.js"></script>
<script>
    const app = new Vue({
        el: '#app',
        data: {
            flag: true
        },

        //在这里
        methods: {
            fn() {
                // 提供的所有methods中的函数,this都指向当前实例
                this.flag = !this.flag
            }
        }
    })

</script>

</html>
带参数的
<!DOCTYPE html>
<html lang="en">

<head>
    <meta charset="UTF-8">
    <meta name="viewport" content="width=device-width, initial-scale=1.0">
    <title>Document</title>
</head>
<style>
    .box {
        width: 300px;
        height: 180px;
        border: 3px solid black;
        border-radius: 13px;
    }

    .btn {
        display: flex;
        margin-top: 50px;
        /* background-color: #673e3e; */
        justify-content: space-around;
    }
</style>

<body>
    <div id="app">
        <div class="box">
            <h1 style="text-align: center;">小茶狐售货机</h1>
            <div class="btn">
                <button @click="buy(10)">酸奶10元</button>
                <button @click="buy(5)">草莓5元</button>
                <button @click="buy(3)">牛奶3元</button>
            </div>
        </div>
        <p>银行卡余额:{{money}}</p>
    </div>
</body>

<script src="../vue.js"></script>
<script>
    const app = new Vue({
        el: '#app',
        data: {
            money: 100
        },

        //在这里
        methods: {
            buy(price) {//函数名和@click="buy(3)" 里的必须相同
                this.money -= price
            }
        }
    })

</script>

</html>
v-bind
v-bind 基础

<!DOCTYPE html>
<html lang="en">

<head>
    <meta charset="UTF-8">
    <meta name="viewport" content="width=device-width, initial-scale=1.0">
    <title>Document</title>
</head>
<style>
    .box {
        width: 300px;
        height: 180px;
        border: 3px solid black;
        border-radius: 13px;
    }

    .btn {
        display: flex;
        margin-top: 50px;
        /* background-color: #673e3e; */
        justify-content: space-around;
    }
</style>

<body>
    <div id="app">
        <img v-bind:src="url" style="width:200px;height: 400px;">
        <a v-bind:href="url">跳转</a>

        <!-- 简写 -->
        <img :src="url"  style="width:200px;height: 400px;">
        <a :href="url">跳转</a>
    </div>
</body>

<script src="../vue.js"></script>
<script>
    const app = new Vue({
        el: '#app',
        data: {
            url: 'https://gimg2.baidu.com/image_search/src=http%3A%2F%2Fci.xiaohongshu.com%2F03029p01ksdcyt21157010qpwdk06ilmvr%3FimageView2%2F2%2Fw%2F1080%2Fformat%2Fjpg&refer=http%3A%2F%2Fci.xiaohongshu.com&app=2002&size=f9999,10000&q=a80&n=0&g=0n&fmt=auto?sec=1693465713&t=8fd5a1a2c32f8d7fb5a819493f6e9e76'
        },

    })

</script>

</html>
【案例】——点击上一页、下一页
<!DOCTYPE html>
<html lang="en">

<head>
    <meta charset="UTF-8">
    <meta name="viewport" content="width=device-width, initial-scale=1.0">
    <title>Document</title>
</head>
<style>
    img {
        width: 200px;
        height: 300px;

    }
</style>

<body>
    <div id="app">
        <button @click="fn(-1)">up</button>
        <img :src="list[index]">
        <button @click="fn(1)">down</button>
    </div>
</body>

<script src="../vue.js"></script>
<script>
    const app = new Vue({
        el: '#app',
        data: {
            index: 0,
            list: [
                './img/01.jpg',
                './img/02.jpg',
                './img/03.jpg',
                './img/04.jpg'
            ]
        },
        methods: {
            fn(page) {
                this.index += page
                if (this.index == this.list.length) this.index = 0
                else if (this.index < 0) this.index = this.list.length - 1
            }
        }

    })

</script>

</html>
优化后,第一页up按钮消失,最后一页down按钮消失
<!DOCTYPE html>
<html lang="en">

<head>
    <meta charset="UTF-8">
    <meta name="viewport" content="width=device-width, initial-scale=1.0">
    <title>Document</title>
</head>
<style>
    img {
        width: 200px;
        height: 300px;

    }
</style>

<body>
    <div id="app">

        <!-- 在这里不用this.index -->
        <button v-show="index > 0" @click="index--">up</button>
        <img :src="list[index]">
        <button v-show="index < list.length-1" @click="index++">down</button>
    </div>
</body>

<script src="../vue.js"></script>
<script>
    const app = new Vue({
        el: '#app',
        data: {
            index: 0,
            list: [
                './img/01.jpg',
                './img/02.jpg',
                './img/03.jpg',
                './img/04.jpg'
            ]
        },


    })

</script>

</html>
v-bind进阶
v-bind对于样式控制的增强 —— 操作class

<!DOCTYPE html>
<html lang="en">

<head>
    <meta charset="UTF-8">
    <meta name="viewport" content="width=device-width, initial-scale=1.0">
    <title>Document</title>
</head>
<script src="../vue.js"></script>
<style>
    .box {
        width: 100px;
        height: 100px;
        border: 2px solid black;
    }

    .pink {
        background-color: pink;
    }

    .big {
        width: 300px;
        height: 300px;
    }
</style>

<body>
    <div id="app">
        <div class="box" :class="{pink:true,big:true}">Hello</div>
        <div class="box" :class="['pink','big']">Hello</div>

    </div>
</body>
<script>
    const app = new Vue({
        el: '#app',
        data: {

        },
        method: {

        }
    })
</script>

</html>
[案例]——京东秒杀

<!DOCTYPE html>
<html lang="en">

<head>
    <meta charset="UTF-8">
    <meta name="viewport" content="width=device-width, initial-scale=1.0">
    <title>Document</title>
</head>
<script src="../vue.js"></script>
<link rel="stylesheet" href="../base.css">
<style>
    ul {
        display: flex;
        border-bottom: rgb(245, 12, 12) 2px solid;
    }

    li a {
        display: block;
        width: 70px;
        height: 30px;
        line-height: 30px;
        text-align: center;
    }

    .mouseover_active {
        background-color: rgba(247, 101, 101, 0.874);
    }

    .active {
        background-color: red;
    }
</style>

<body>
    <div id="app">
        <ul>
            <!--                                              @mouseover -->
            <li v-for="(item , index) in list" :key="item.id" @mouseover="activeIndex2=index"
                @click="activeIndex1=index">
                <a :class="{mouseover_active:index==activeIndex2,active:index==activeIndex1 }"
                    href="#">{{item.name}}</a>

            </li>
        </ul>
    </div>
</body>
<script>
    const app = new Vue({
        el: '#app',
        data: {
            activeIndex2: 0,
            activeIndex1: 0,

            list: [
                { id: 1, name: '京东秒杀' },
                { id: 2, name: '每日特价' },
                { id: 3, name: '品类秒杀' },
            ]
        },
        method: {

        }
    })
</script>

</html>
v-bind 对于样式控制的增强——style操作

[案例]—— 进度条
<!DOCTYPE html>
<html lang="en">

<head>
    <meta charset="UTF-8">
    <meta name="viewport" content="width=device-width, initial-scale=1.0">
    <title>Document</title>
</head>
<script src="../vue.js"></script>
<link rel="stylesheet" href="../base.css">
<style>
    #app {
        margin: 10px;
    }

    .progress {
        width: 300px;
        height: 40px;
        margin-bottom: 40px;
        background-color: #cdf92c;
        border-radius: 25px;
        padding: 5px;
    }

    .inner {
        background-color: #0df6c7;
        border-radius: 25px;
        height: 30px;
        /* width: 20%; */
    }

    .low {
        background-color: #92ee61;

    }

    .high {
        background-color: rgb(141, 179, 216);
    }

    .over {
        background-color: rgb(0, 128, 255);
    }

    .inner span {
        width: 100%;
        text-align: right;
        display: block;
        line-height: 90px;
    }
</style>

<body>
    <div id="app">
        <div class="progress">
            <!-- 在这里面num  不用加{{}}    并且{}里面 是js对象  ,所以要遵守驼峰命名法 也就是 background-color 要变成 backgroundColor-->
            <div class="inner" :class="{low:num<50,high:num>70,over:num==100}" :style="{width:num+'%'}">

                <span>{{num}}%</span>
            </div>

        </div>
        <button @click="num=25">设置25%</button>
        <button @click="num=50">设置50%</button>
        <button @click="num=75">设置75%</button>
        <button @click="num=100">设置100%</button>
    </div>
</body>
<script>
    const app = new Vue({
        el: '#app',
        data: {
            num: 10
        },
        method: {

        }
    })
</script>

</html>
v-for
 index可省,()也可以不要了
<!DOCTYPE html>
<html lang="en">

<head>
    <meta charset="UTF-8">
    <meta name="viewport" content="width=device-width, initial-scale=1.0">
    <title>Document</title>
</head>
<script src="../vue.js"></script>


<body>
    <div id="app">
        <li v-for="(item,index) in fruit">{{item}}</li>
        <li v-for="(item) in fruit">{{item}}</li>
        <li v-for="item in fruit">{{item}}</li>
    </div>
</body>
<script>
    const app = new Vue({
        el: '#app',
        data: {
            fruit: ['榴莲', '草莓', '蓝莓', '奇异果']
        }
    })
</script>

</html>

【案例】——小黑的书架
<!DOCTYPE html>
<html lang="en">

<head>
    <meta charset="UTF-8">
    <meta name="viewport" content="width=device-width, initial-scale=1.0">
    <title>Document</title>
</head>
<script src="../vue.js"></script>


<body>
    <div id="app">
        <ul>
            <!-- v-for的默认行为会尝试原地修改元素(就地复用) -->
            <!-- :key="item.id"  给元素添加唯一表示,便于Vue进行列表项的正确排序复用        -->
            <li v-for="(item,index) in bookList" :key="item.id">
                <span>{{item.name}}</span>
                <span>{{item.author}}</span>
                <button @click="del(item.id)">delete</button>
                <!-- 删除操作,有id优先用,index没有他稳定 -->
            </li>
        </ul>
    </div>
</body>
<script>
    const app = new Vue({
        el: '#app',
        data: {
            bookList: [
                { id: 1, name: '红楼梦', author: 'zzz' },
                { id: 2, name: '但如果真是个', author: '娃儿' },
                { id: 3, name: '高帮鞋复', author: '自动更新' },
                { id: 4, name: '二个人头梦', author: '发个' },

            ],

        },
        methods: {
            del(aa) {
                // 数据驱动的特性,所以想删除书籍,就删除数组中的元素就行
                // 通过id删除数组中的对应项  -> filter
                // filter根据条件,保留满足条件的对应项,得到一个新数组,原来的数组不变
                this.bookList = this.bookList.filter(item => item.id != aa)
            }
        }
    })
</script>

</html>
v-model

<!DOCTYPE html>
<html lang="en">

<head>
    <meta charset="UTF-8">
    <meta name="viewport" content="width=device-width, initial-scale=1.0">
    <title>Document</title>
</head>
<script src="../vue.js"></script>


<body>
    <div id="app">
        账户:<input type="text" v-model="username"><br><br>
        密码:<input type="text" v-model="psd">

        <!-- 所以,有啥优点吗 -->
        <button @click="login">登录</button>
        <button @click="reset">重置</button>
        <!-- 可以快速 获取 和重置 表单元素内容 -->
    </div>
</body>
<script>
    const app = new Vue({
        el: '#app',
        data: {
            username: '',
            psd: ''
        },
        methods: {
            login() {
                console.log(this.username, this.psd);

            },
            reset() {
                this.username = '',
                    this.psd = ''
            }
        }
    })
</script>

</html>
【案例】——小黑记事本
<!DOCTYPE html>
<html lang="en">

<head>
    <meta charset="UTF-8">
    <meta name="viewport" content="width=device-width, initial-scale=1.0">
    <title>Document</title>
</head>
<script src="../vue.js"></script>

<style>
    #app {
        margin: 50px 50px;
    }


    * {
        box-sizing: border-box;
        margin: 0;
        padding: 0;
        list-style: none;
    }

    .head {
        width: 243px;
        /* background-color: #584949; */
    }

    input {
        height: 30px;
        vertical-align: middle;
    }

    .head button {
        height: 30px;
    }

    .body li {
        width: 234px;
        height: 50px;
        display: flex;
        line-height: 50px;
        /* justify-content: space-between; */
        background-color: #de8282;
        border-bottom: black solid 2px;
    }

    .body li .content {
        flex: 1;

    }

    .body li button {
        height: 50%;
        align-self: center;
        display: none;
    }

    .body li:hover button {
        display: block;
        width: 20px;

    }

    .footer {
        width: 234px;
        display: flex;
        justify-content: space-between;
    }
</style>

<body>
    <!-- 需求:
    1.删除单个
    2.添加事项           ->unshift
    3.底部合计
       和   清空全部     ->删除todolist
    4.序号自动增加        ->unshift
    5.优化:合计为0时,footer隐藏
    -->


    <!-- 添加事项
    1.通过v-model绑定 输入框 ->  实时获取表单元素内容
    2.点击按钮,进行新增,向数组最前面加 ->  unshift
    -->
    <div id="app">
        <h1>小黑记事本</h1>
        <div class="head">
            <input v-model="todoName" type="text" placeholder="请输入待办事项">
            <button @click="add">添加任务</button>
        </div>
        <section class="body">
            <ul>
                <li v-for="(item,index) in todoList" :key="item.id">
                    <!-- 为了删除后序号连续 用index+1 从0起 -->
                    <span>{{index+1}}</span>
                    <span class="content">{{item.name}}</span>
                    <button @click="del(item.id)">×</button>
                </li>


            </ul>
        </section>

        <div v-show="todoList.length>0" class="footer">
            <span>合计:<strong>{{todoList.length}}</strong></span>
            <button @click="clear()">清空任务</button>

        </div>
    </div>
</body>
<script>
    const app = new Vue({
        el: '#app',
        data: {
            todoName: '',  //v-model绑定的表单元素内容
            todoList: [
                { id: 1, name: '吃水果' },
                { id: 2, name: '喝酸奶' }
            ]
        },
        methods: {
            del(tt) {
                this.todoList = this.todoList.filter(item => item.id != tt)
            },
            add() {
                if (this.todoName.trim() == '') {
                    // 输入许多的空格,无效输入,不让添加
                    alert('请输入内容')
                    return
                }

                this.todoList.unshift({
                    id: +new Date(),//正常id是后台传过来的
                    name: this.todoName
                })
                // 点击添加之后,输入框清空
                this.todoName = ''
            },

            clear() {
                this.todoList = []
            }
        }

    })
</script>

</html>
v-model应用于其他表单元素

<!DOCTYPE html>
<html lang="en">

<head>
    <meta charset="UTF-8">
    <meta name="viewport" content="width=device-width, initial-scale=1.0">
    <title>Document</title>
</head>
<script src="../vue.js"></script>
<link rel="stylesheet" href="../base.css">
<style>


</style>

<body>
    <div id="app">
        姓名:<input type="text" v-model="username"><br><br>

        是否单身:
        <input type="checkbox" v-model="isSingle"><br><br>

        性别:
        <!-- name="gender"加一样的名字 就是单选框 -->
        <!-- value用于提交给后台数据 -->
        <input type="radio" v-model="gender" name="gender" value="0">男
        <input type="radio" v-model="gender" name="gender" value="1">女<br><br>

        <!--
            1.option要设置value值,提交给后台
            2.select的value值,关联了选中的option 的value值
            3.结合Vue使用->  v-model
        -->
        所在城市:
        <select v-model="cityId">
            <option value="101">北京</option>
            <option value="102">上海</option>
            <option value="103">辽宁</option>
            <option value="104">蒙古</option>
        </select><br><br>


        自我描述:
        <textarea v-model="desc"></textarea>
        <br><br>
        <button @click="fn">立即注册</button>
    </div>
</body>
<script>
    const app = new Vue({
        el: '#app',
        data: {
            username: '',
            isSingle: false,
            gender: '0',  //是字符,不是数字
            cityId: '101',
            desc: ""
        },
        methods: {
            fn() {
                console.log(this.username, this.isSingle, this.gender, this.cityId, this.desc);

            }
        }
    })
</script>

</html>
指令修饰符
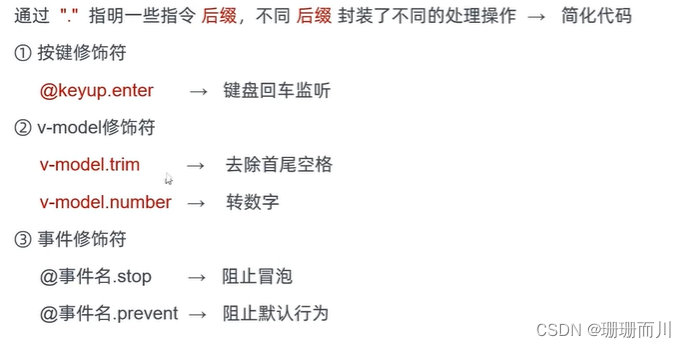
v-model.trim
v-model.number
分数:<input type="text" v-model.number="score">
@事件名.stop @click.stop
@事件名.prevent
<button @click="add" type="submit" @click.prevent style="margin: 10px 100px;">添加</button>
@keyup.enter
<!DOCTYPE html>
<html lang="en">

<head>
    <meta charset="UTF-8">
    <meta name="viewport" content="width=device-width, initial-scale=1.0">
    <title>Document</title>
</head>
<script src="../vue.js"></script>

<style>
    #app {
        margin: 50px 50px;
    }


    * {
        box-sizing: border-box;
        margin: 0;
        padding: 0;
        list-style: none;
    }

    .head {
        width: 243px;
        /* background-color: #584949; */
    }

    input {
        height: 30px;
        vertical-align: middle;
    }

    .head button {
        height: 30px;
    }

    .body li {
        width: 234px;
        height: 50px;
        display: flex;
        line-height: 50px;
        /* justify-content: space-between; */
        background-color: #de8282;
        border-bottom: black solid 2px;
    }

    .body li .content {
        flex: 1;

    }

    .body li button {
        height: 50%;
        align-self: center;
        display: none;
    }

    .body li:hover button {
        display: block;
        width: 20px;

    }

    .footer {
        width: 234px;
        display: flex;
        justify-content: space-between;
    }
</style>

<body>
    <!-- 需求:

    6.优化:除了点击按钮添加事项,在输入框回车,也可以完成添加
    -->


    <div id="app">
        <h1>小黑记事本</h1>
        <div class="head">


            <!-- 按键(回车)按下,出发add事件,和button的事件一样 -->
            <input @keyup.enter="add" v-model="todoName" type="text" placeholder="请输入待办事项">
            <button @click="add">添加任务</button>
        </div>
        <section class="body">
            <ul>
                <li v-for="(item,index) in todoList" :key="item.id">
                    <span>{{index+1}}</span>
                    <span class="content">{{item.name}}</span>
                    <button @click="del(item.id)">×</button>
                </li>


            </ul>
        </section>

        <div v-show="todoList.length>0" class="footer">
            <span>合计:<strong>{{todoList.length}}</strong></span>
            <button @click="clear()">清空任务</button>

        </div>
    </div>
</body>
<script>
    const app = new Vue({
        el: '#app',
        data: {
            todoName: '',
            todoList: [
                { id: 1, name: '吃水果' },
                { id: 2, name: '喝酸奶' }
            ]
        },
        methods: {
            del(tt) {
                this.todoList = this.todoList.filter(item => item.id != tt)
            },
            add() {
                if (this.todoName.trim() == '') {
                    alert('请输入内容')
                    return
                }

                this.todoList.unshift({
                    id: +new Date(),
                    name: this.todoName
                })
                this.todoName = ''
            },

            clear() {
                this.todoList = []
            }
        }

    })
</script>

</html>


