目录
- 0 HBuilderX修改注释
- 0 HBuilderX 修改.VUE中的注释颜色
- 1 Vue入门
- 1.1 什么是Vue
- 1.2 Vue优点
- 1.3 Vue案例
- 1.3.1入门案例
- 1.3.2 v-cloak属性
- 1.3.3.1 v-text 指令
- 1.3.3.2 v-html 指令
- 1.3.3.3 v-pre 指令
- 1.3.3.4 v-once 指令
- 1.3.3.5 v-model 指令
- 1.3.4 MVVM思想
- 1.4 事件绑定
- 1.4.1 v-on指令
- 1.4.2 事件修饰符
- 1.4.3 按键修饰符
- 1.4.4 综合案例练习
- 1.5 属性绑定
- 1.5.1 v-bind属性绑定
- 1.5.2 v-bind Class样式绑定
- 1.5.3 v-bind Style样式绑定
- 1.6 分支结构语法
- 1.6.1 分支结构说明
- 1.6.2 分支结构用法
- 1.7 循环结构
- 1.7.1 v-for循环
- 1.8 Vue常用特性
- 1.8.1 表单操作
- 1.8.1.1 表单常用属性
- 1.8.1.2 表单数据与vue进行数据绑定的写法
- 1.8.2 表单域修饰符
- 1.8.2.1 常用属性
- 1.8.2.2 number属性
- 1.8.2.2 trim属性
- 1.8.2.3 lazy属性
- 1.8.3 计算属性
- 1.8.3.1 为什么需要计算属性
- 1.8.3.2 计算属性案
- 1.8.4 计算属性与方法的区别
- 1.8.5 侦听器
- 1.8.5.1 监听器作用
- 1.8.5.2 配置监听器
- 1.8.5.3 监听器案例实现
- 1.8.6 过滤器
- 1.8.6.1 过滤器作用
- 1.8.6.2 过滤器用法
- 1.9 VUE生命周期
- 1.9.1 主要阶段
- 1.9.2 页面结构调用
- 1.10 VUE数组操作
- 1.10.1 文档位置
- 1.10.2 数组用法介绍
- 1.10.3 数组使用案例
- 2.VUE组件化
- 2.1 组件介绍
- 2.2 组件注册
- 2.2.1 基本语法
- 2.2.2 案例使用
- 2.3 局部组件注册
- 2.3.1 通过components定义局部组件
- 2.3.2 编辑组件demo
- 3.Vue前端交互
- 3.1 Promise概述
- 3.2 Promise基本用法
- 3.3 Promise API介绍
- 3.4 Axios方式
- 3.4.1 Axios介绍
- 3.4.2 Axios入门案例
- 3.4.3 Axios GET/DELETE调用
- 3.4.4 Axios post/put 调用
- 3.4.4.1 对象方式提交数据
- 3.4.4.2 restFul方式提交数据
- 3.4.4.3 form表单数据
- 3.4.5 Axios 配置信息
- 3.4.6 Axios 拦截器机制
- 3.4.6.1 请求拦截器
- 3.4.6.2 响应拦截器
- 3.4.7 async-await用法
- 3.4.7.1 介绍
- 3.4.7.2 入门案例用法
- 3.4.8 ajax教学案例
- 3.4.8.1 编辑页面html
- 3.4.8.2 编辑页面Controller
- 4 VUE路由
- 4.1 VUE Router介绍
- 4.2 Router 路由入门案例
- 4.2.1 Router使用步骤
- 4.2.2 Router 入门案例
- 4.3 Router 重定向
- 4.4 Router 嵌套
0 HBuilderX修改注释

修改颜色:
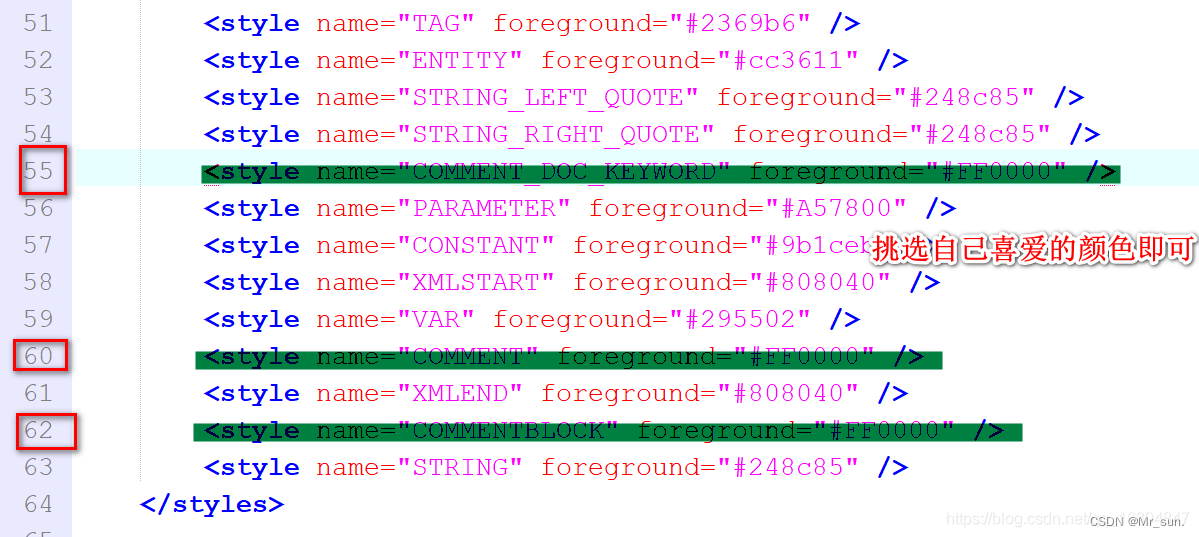
0 HBuilderX 修改.VUE中的注释颜色

1 Vue入门
1.1 什么是Vue
Vue (读音 /vjuː/,类似于 view) 是一套用于构建用户界面的渐进式框架。 与其它大型框架不同的是,Vue 被设计为可以自底向上逐层应用。Vue 的核心库只关注视图层,不仅易于上手,还便于与第三方库或既有项目整合。另一方面,当与现代化的工具链以及各种支持类库结合使用时,Vue 也完全能够为复杂的单页应用提供驱动。
渐进式: 构建项目可以由简单到复杂
1.2 Vue优点
- 体积小 压缩后的文件只有33k
- 运行效率更高 采用虚拟机DOM,一种可以预先通过javaScript对数据进行计算.把最终的DOM操作计算出来并且优化的技术. 由于这个DOM操作属于预处理操作,并没有真实的操作DOM ,所以叫做虚拟DOM
- 双向数据绑定 让开发者不再去操作DOM,将更多的经历投入到业务中
- 生态丰富 市面上有大量的开源项目基于vue 进行开发 成熟稳定.
1.3 Vue案例
1.3.1入门案例
<!DOCTYPE html>
<html>
	<head>
		<meta charset="utf-8">
		<title>hello 入门案例</title>
	</head>
	<body>
		<div id="app">
			<h1>双向数据绑定测试</h1>
			<h3>{{ hello }}</h3>
		</div>

		<!-- 引入js -->
		<script src="../js/vue.js"></script>
		<script type="text/javascript">
			const app = new Vue({
				//element 元素
				el: "#app",
				data: {
					hello: "helloVue"
				}
			})
		</script>
	</body>
</html>
1.3.2 v-cloak属性
介绍:
这个指令保持在元素上直到关联实例结束编译。和 CSS 规则如 [v-cloak] { display: none } 一起用时,这个指令可以隐藏未编译的 Mustache 标签直到实例准备完毕。
<!DOCTYPE html>
<html>
	<head>
		<meta charset="utf-8">
		<title>v-clock属性</title>

		<style>
			/* 定义属性样式 */
			[v-cloak]{
				/*将元素进行隐藏  */
				display: none;
			}
		</style>
	</head>
	<body>
		这个指令保持在元素上直到关联实例结束编译。编译成功之后属性消失
		<div id="app" v-cloak>
			<h1>v-clock属性</h1>
			<h3>{{ hello }}</h3>
		</div>


		<!-- 引入js -->
		<script src="../js/vue.js"></script>
		<script type="text/javascript">
			const app = new Vue({
				//element 元素
				el: "#app",
				data: {
					hello: "helloVue"
				}
			})
		</script>
	</body>
</html>
1.3.3.1 v-text 指令
作用: 直接展现解析数据
	<!-- v-text指令 没有闪动效果 -->
	<h3 v-text="text"></h3>
	<!-- 引入js -->
		<script src="../js/vue.js"></script>
		<script type="text/javascript">
			const app = new Vue({
				//element 元素
				el: "#app",
				data: {
					hello: "helloVue",
					text: "数据绑定text"
				}
			})
		</script>
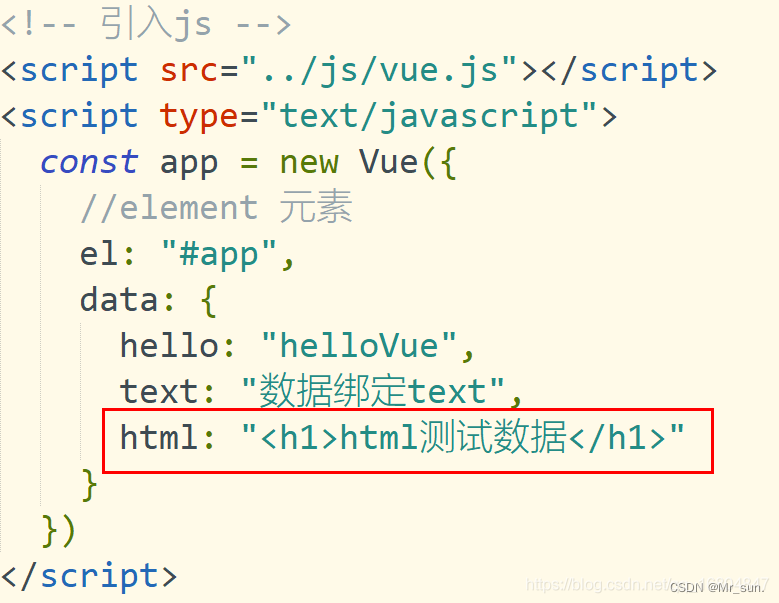
1.3.3.2 v-html 指令
说明: 解析html的数据

1.3.3.3 v-pre 指令
用法:
跳过这个元素和它的子元素的编译过程。可以用来显示原始 Mustache 标签。跳过大量没有指令的节点会加快编译。
编辑html:

1.3.3.4 v-once 指令
用法:
只渲染元素和组件一次。随后的重新渲染,元素/组件及其所有的子节点将被视为静态内容并跳过。这可以用于优化更新性能。
html用法:

控制台测试
app.once 则页面渲染内容不变.
1.3.3.5 v-model 指令
用法: 在表单控件或者组件上创建双向绑定,当js数据修改时,页面内容变化, 当页面内容修改时,则数据变化.

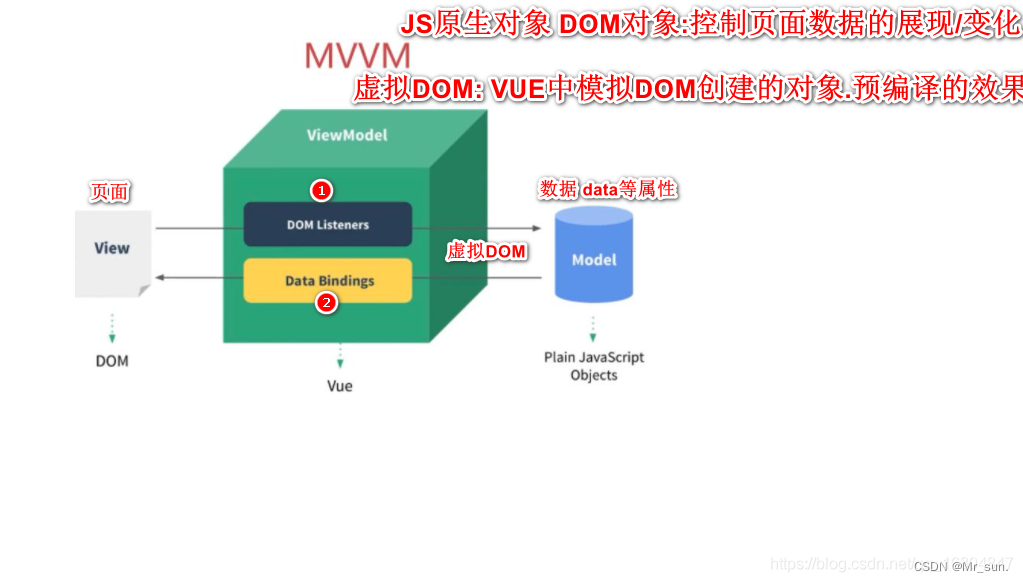
1.3.4 MVVM思想
- 字母解释
- M model 数据
- V view 视图
- VM (view-model) 数据和视图的控制
- 当页面数据发生变化时,则通过dom监听将数据传给model
- 当model的数据发生变化时,则通过数据绑定 绑定到页面中
1.4 事件绑定
1.4.1 v-on指令
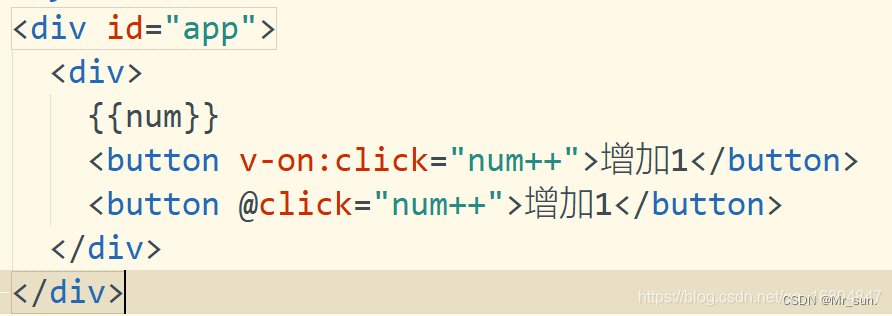
1).<button v-on:click="num++">增加1</button>   绑定点击事件
2).<button @click="num++">增加1</button>		   简化写法
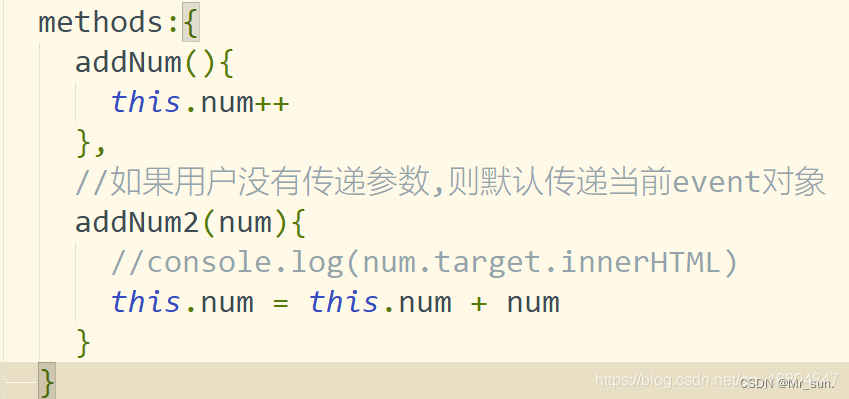
3).<button @click="addNum">增加1</button>
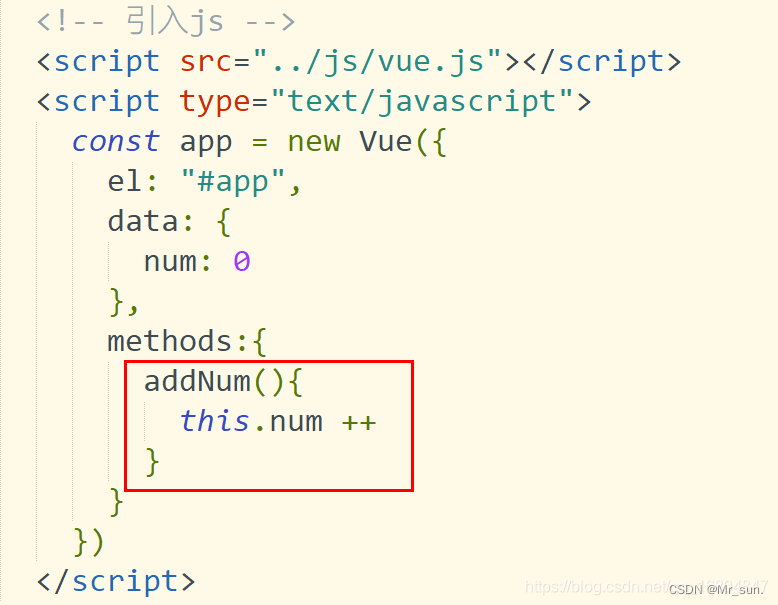
4).<button @click=“addNum2($event)”>传递event对象
1.4.2 事件修饰符
- 阻止冒泡 .stop

- 阻止默认行为 @click.prevent

1.4.3 按键修饰符
<div>
	<input name="username" type="text" @keyup.enter="handler" value="回车触发"/>
	<input name="username" type="text" @keyup.space="handler" value="空格触发"/>
	<input name="username" type="text" @keyup.delete="handler" value="删除键触发"/>
	<input name="username" type="text" @keyup.left="handler" value="<-触发"/>
	<input name="username" type="text" @keyup.right="handler" value="->键触发"/>
	<input type="text"  @click.middle ="handler"   value="鼠标滚轮触发" />
	<input type="text"  @click.left="handler"   value="鼠标左键触发" />
	<input type="text"  @click.right ="handler"   value="鼠标右键触发" />
</div>
1.4.4 综合案例练习
<!DOCTYPE html>
<html>
	<head>
		<meta charset="utf-8">
		<title>计算器案例</title>
	</head>
	<body>

		<div id="app">
			<h1>实现计算器功能</h1>
			<div>
				<div>数据A:<input type="text" name="num1" v-model="num1"/></div>
				<div>数据B:<input type="text" name="num2" v-model="num2"/></div>
				<button type="button" @click="count">计算</button>
				<div>结果:<span v-text="result"></span></div>
			</div>
		</div>
		<script type="text/javascript" src="../../js/vue.js"></script>
		<script type="text/javascript">
				const app = new Vue({
					el : "#app",
					data : {
						num1 : '',
						num2 : '',
						result : ''
					},
					methods:{
						count(){
							this.result = parseInt(this.num1) + parseInt(this.num2);
							//this.result = eval(this.num1) + eval(this.num2)
						}
					}
				})
		</script>
	</body>
</html>
1.5 属性绑定
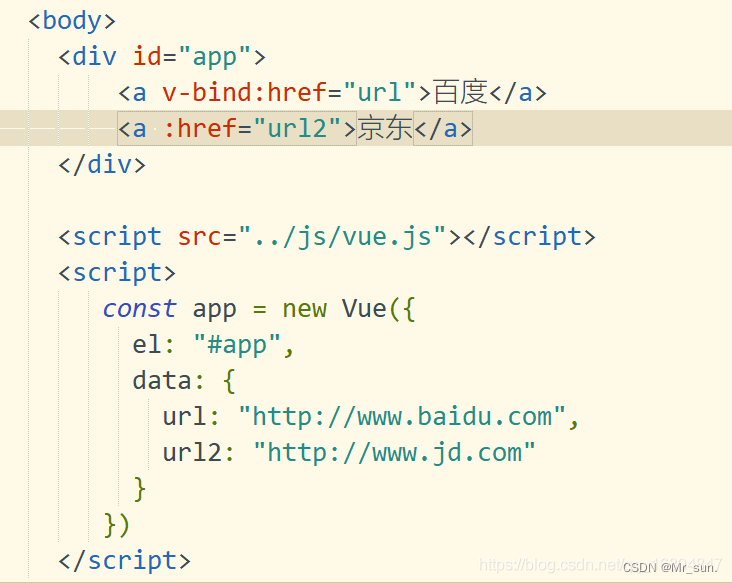
1.5.1 v-bind属性绑定
1.5.2 v-bind Class样式绑定
	<div>
		样式绑定
		<div v-bind:class="{red: isActive}">样式测试</div>
		<button @click="isActive = !isActive">切换</button>
	</div>

	<div>
		样式数组写法
		<div v-bind:class="[redClass,fontSize]">属性样式测试</div>
		<button @click="changeCss">切换</button>
	</div>

	<script>
			 const app = new Vue({
				 el: "#app",
				 data: {
					 url: "http://www.baidu.com",
					 url2: "http://www.jd.com",
					 isActive: true,
					 redClass: "red",
					 fontSize:	"fontSize"
				 },
				 methods: {
					 changeCss(){
						 this.redClass = ''
						 this.fontSize = ''
					 }
				 }
			 })
	</script>
1.5.3 v-bind Style样式绑定
1).样式绑定
	style 样式绑定
		<div v-bind:style="{border: borderStyle,width: widthStyle,height: heightStyle}">123</div>

		 data: {
					 url: "http://www.baidu.com",
					 url2: "http://www.jd.com",
					 isActive: true,
					 redClass: "red",
					 fontSize:	"fontSize",
					 borderStyle: "1px solid blue",
					 widthStyle: "100px",
					 heightStyle: "100px"
				 },
2).对象封装写法
	<div v-bind:style="myStyle">456</div>
	data: {
		 myStyle : {
			 border: '2px solid green',
			 width: "20px",
			 height: "20px"
		 }
	 },
1.6 分支结构语法
1.6.1 分支结构说明
1).v-if
2).v-else
3).v-else-if
4).v-show
1.6.2 分支结构用法
<!DOCTYPE html>
<html>
	<head>
		<meta charset="utf-8">
		<title>分支结构语法</title>
	</head>
	<body>
		<div id="app" align="center">
			<h1>根据根据分数评级</h1>
			<!-- v-if当判断条件成立时 div展现  控制dom元素增加 开销较大 -->
			<div v-if="score>=90">优秀</div>
			<div v-else-if="score>=80">良好</div>
			<div v-else-if="score>=70">中等</div>
			<div v-else>不及格</div>

			<!-- 直接渲染到页面中采用display: none;隐藏属性 如果频繁展现的元素 使用v-show -->
			<div v-show="flag">测试show数据</div>
			<button @click="flag= !flag">展现</button>
		</div>

		<script src="../js/vue.js"></script>
		<script>
			const app = new Vue({
				el: "#app",
				data: {
					//定义分数
					score: 100,
					flag: false
				}
			})
		</script>
	</body>
</html>
1.7 循环结构
1.7.1 v-for循环
		<div id="app">
			<!-- 插值表达式如果渲染不完全会展现{{}} -->
			<span v-for="item in hobby">{{item}}</span>
			<!-- 使用v-text优化属性 -->
			<span v-for="item in hobby" v-text="item"></span>
			<!-- 展现数组下标 -->
			<span v-for="(item,index) in hobby" v-text="index"></span>

			<!-- 循环遍历数组对象 :key用来区分遍历的节点信息 -->
			<div v-for="item in users" :key="item.id">
					<span v-text="item.id"></span>
					<span v-text="item.name"></span>
			</div>

			<!-- 遍历对象 获取对象的key-value-index索引 -->
			<div v-for="(value,key,index) in user">
				<span v-text="key"></span>
				<span v-text="value"></span>
				<span v-text="index"></span>
			</div>
		</div>

		<script src="../js/vue.js"></script>
		<script>
			const app = new Vue({
				el : "#app",
				data : {
					hobby: ['吃','喝','玩','乐'],
					users: [{
						id: 100,
						name: '王昭君'
					},{
						id: 101,
						name: '安琪拉'
					}],
					user: {
						id: 1,
						name: '张三',
						age: 18
					}
				}
			})
		</script>
1.8 Vue常用特性
1.8.1 表单操作
1.8.1.1 表单常用属性
- input 文本输入框
- textarea 多行文本
- select 下拉多选框
- radio 单选框
- checkbok 多选框
1.8.1.2 表单数据与vue进行数据绑定的写法
<!DOCTYPE html>
<html>
	<head>
		<meta charset="utf-8">
		<title>常用表单属性</title>
	</head>
	<body>
		<h1>本案例练习 表单提交数据时  数据如何与vue进行数据绑定</h1>
		<div id="app">
			<form id="userForm"action="http://www.baidu.com">
				<div>
					<span>
						姓名:
					</span>
					<span>
						<input type="text" name="name" v-model="name"/>
					</span>
				</div>
				<div>
					<span>性别:</span>
					<span>
						<input type="radio" name="gender" value="男" id="man" v-model="gender"/>
						<label for="man">男</label>
						<input type="radio" name="gender" value="女" id="women" v-model="gender"/>
						<label for="women">女</label>
					</span>
				</div>
				<div>
					<span>爱好:</span>
					<input type="checkbox" name="hobbies" value="吃" v-model="hobbies"/>吃
					<input type="checkbox" name="hobbies" value="喝" v-model="hobbies"/>喝
					<input type="checkbox" name="hobbies" value="玩" v-model="hobbies"/>玩
				</div>
				<div>
					<span>职业</span>
					<!-- 如果需要设置为多选 则添加属性 -->
					<select name="occupation" v-model="occupation" multiple="true">
						<option value="工人">工人</option>
						<option value="教师">教师</option>
						<option value="工程师">工程师</option>
					</select>
				</div>
				<div>
					<span>个人简介</span>
					<textarea name="userInfo" style="width: 200px;height: 50px;" v-model="userInfo"></textarea>
				</div>
				<div>
					<!-- 阻止默认提交事件 -->
					<input type="submit"  value="提交" v-on:click.prevent="submitForm"/>
				</div>
			</form>
		</div>


		<!-- 引入JS文件 -->
		<script src="../js/vue.js"></script>
		<script>
			const app = new Vue({
				el:	"#app",
				data: {
					name: '',
					gender: '男',
					//多个数据定义时 应该使用数组
					hobbies:	['吃','喝'],
					occupation: ['工人'],
					userInfo: ''
				},
				methods: {
					submitForm(){
						//数据提交
						console.log("姓名:"+this.name)
						console.log("性别:"+this.gender)
						console.log('爱好:'+this.hobbies)
						console.log('职业:'+this.occupation)
						console.log('用户详情:'+this.userInfo)
						console.log('封装好数据之后,可以使用ajax方式实现数据提交')
					}
				}
			})
		</script>
	</body>
</html>
1.8.2 表单域修饰符
1.8.2.1 常用属性
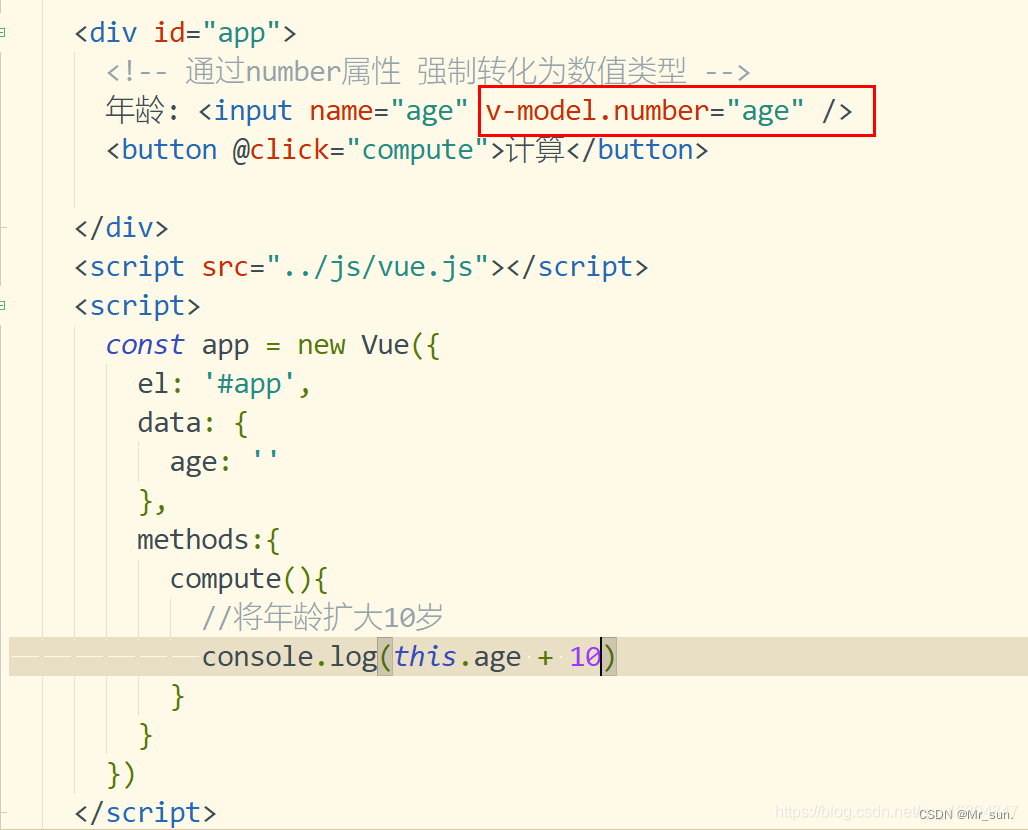
1).number : 将数据转化为数值
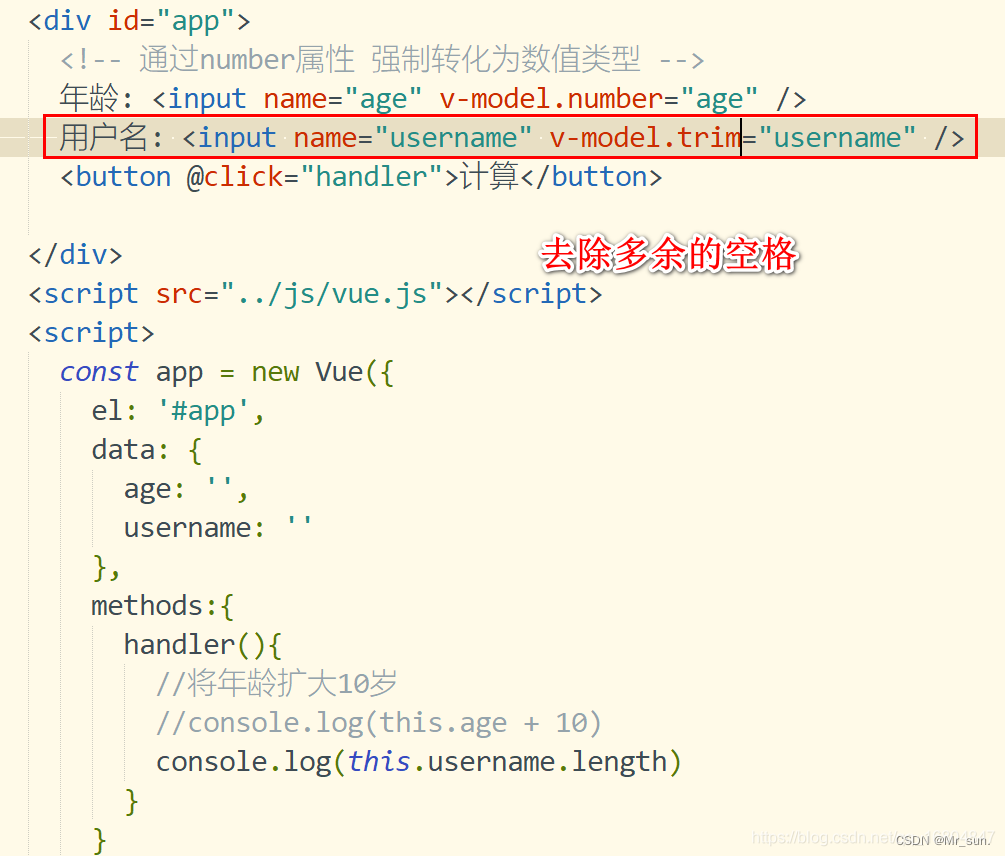
2).trim: 去掉开始和结尾的空格
3).lazy: 将input事件 切换为change事件
1.8.2.2 number属性
1.8.2.2 trim属性
1.8.2.3 lazy属性

1.8.3 计算属性
1.8.3.1 为什么需要计算属性
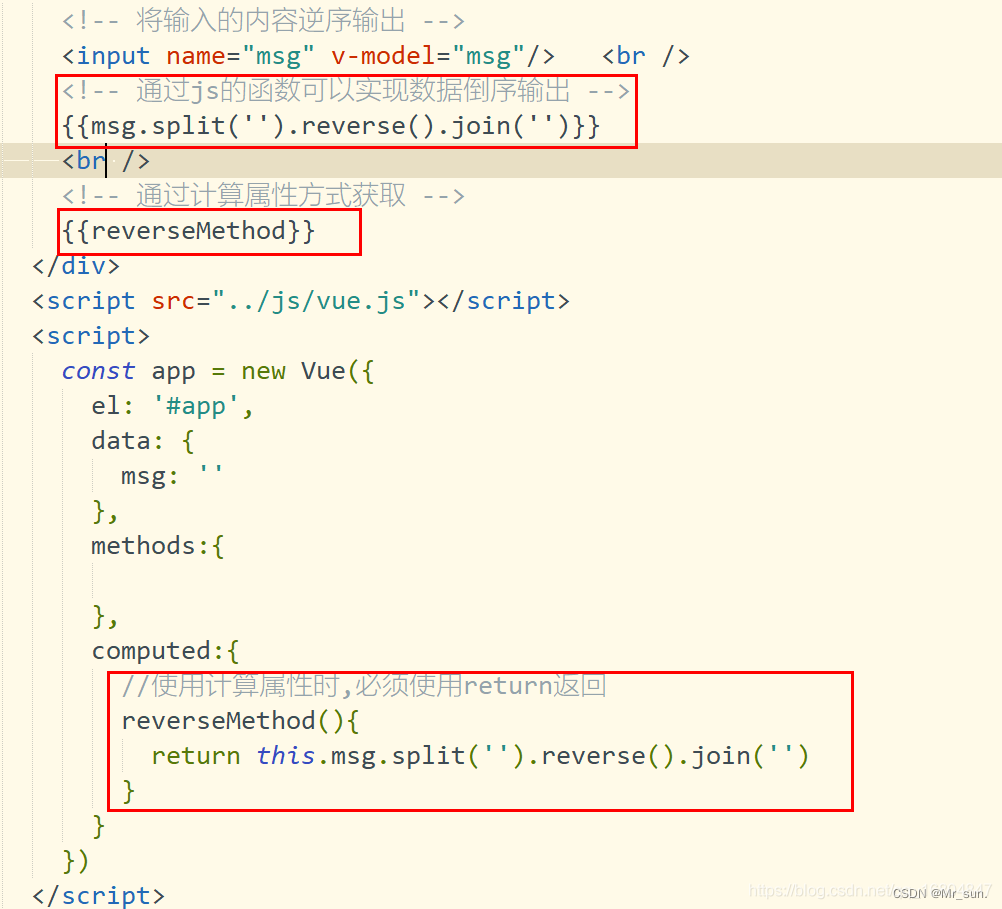
由于业务需要,表达式的业务逻辑可能比较复杂 阅读起来不够简洁,通过计算属性可以优化代码结构
1.8.3.2 计算属性案
1.8.4 计算属性与方法的区别
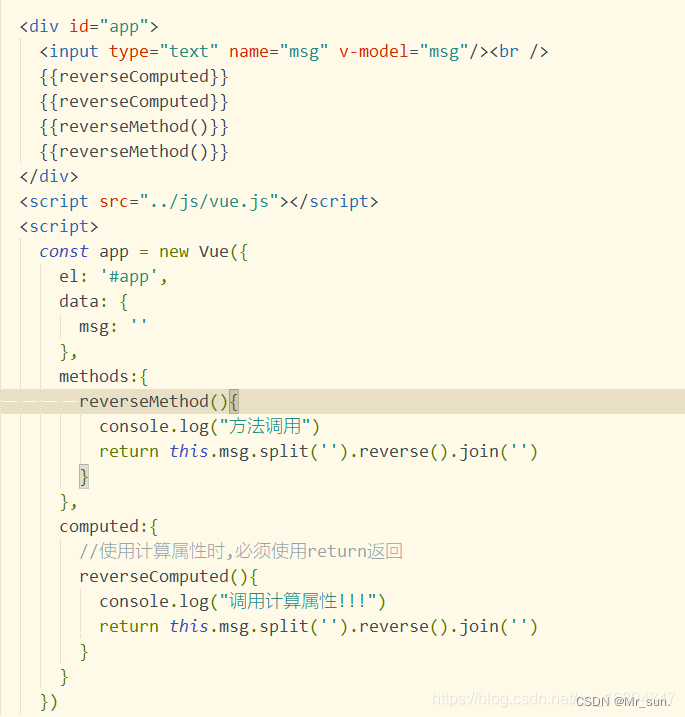
1).计算属性有缓存 方法没有缓存
1.8.5 侦听器
1.8.5.1 监听器作用
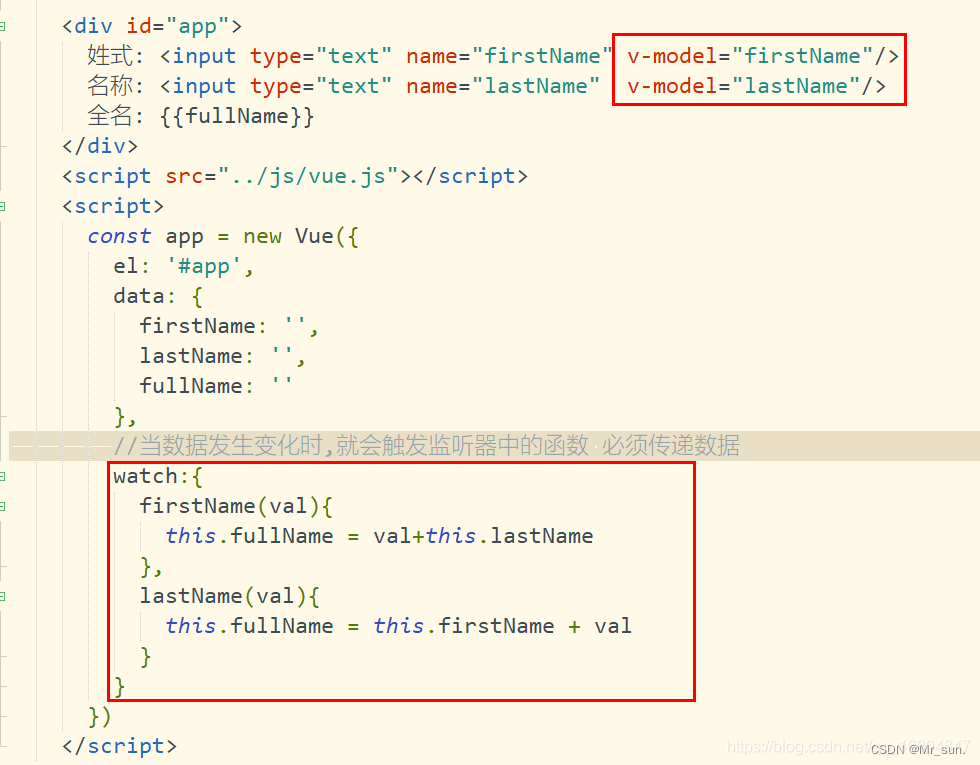
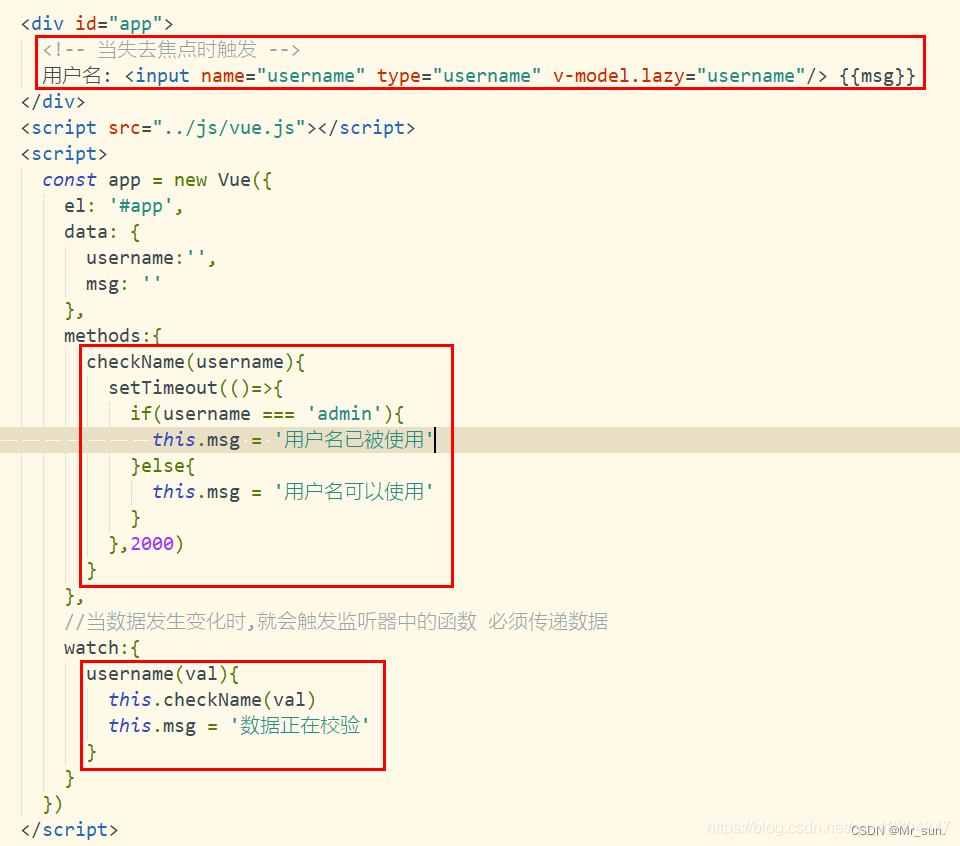
当属性数据发生变化 则通知监听器所绑定的方法 一般多用于执行异步操作
1.8.5.2 配置监听器
1.8.5.3 监听器案例实现
1.8.6 过滤器
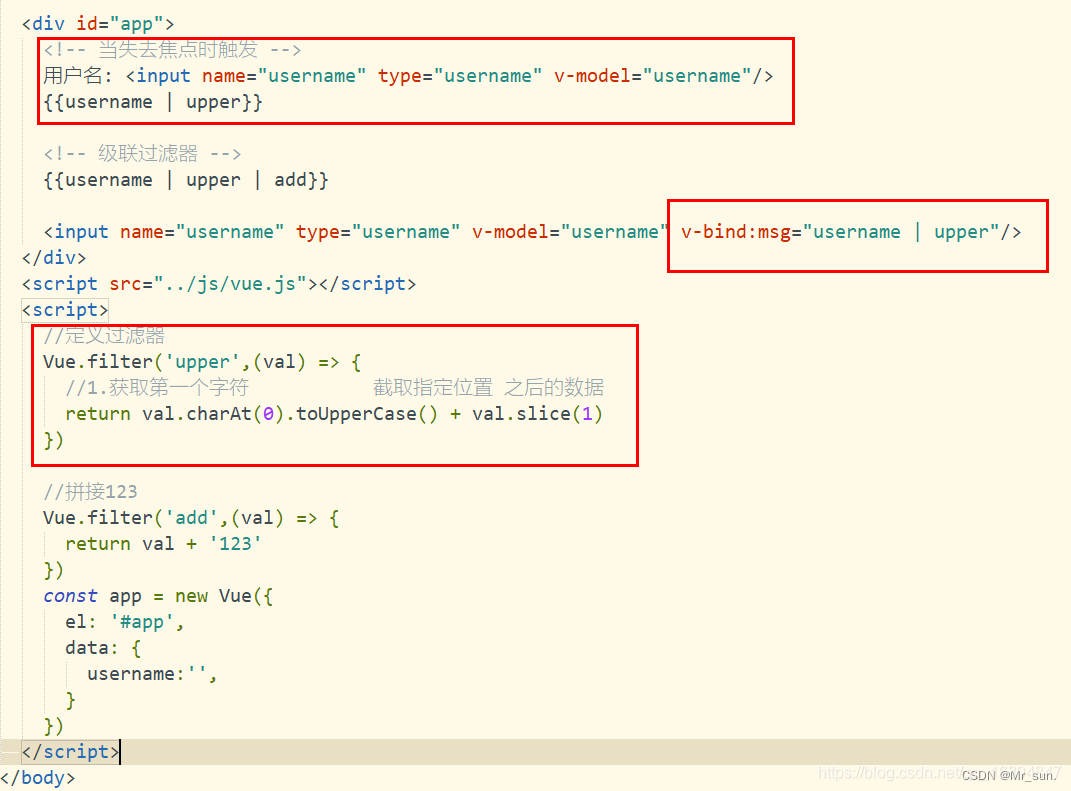
1.8.6.1 过滤器作用
格式化数据,比如格式化日期,特殊数据格式时使用
1.8.6.2 过滤器用法
1.9 VUE生命周期
1.9.1 主要阶段
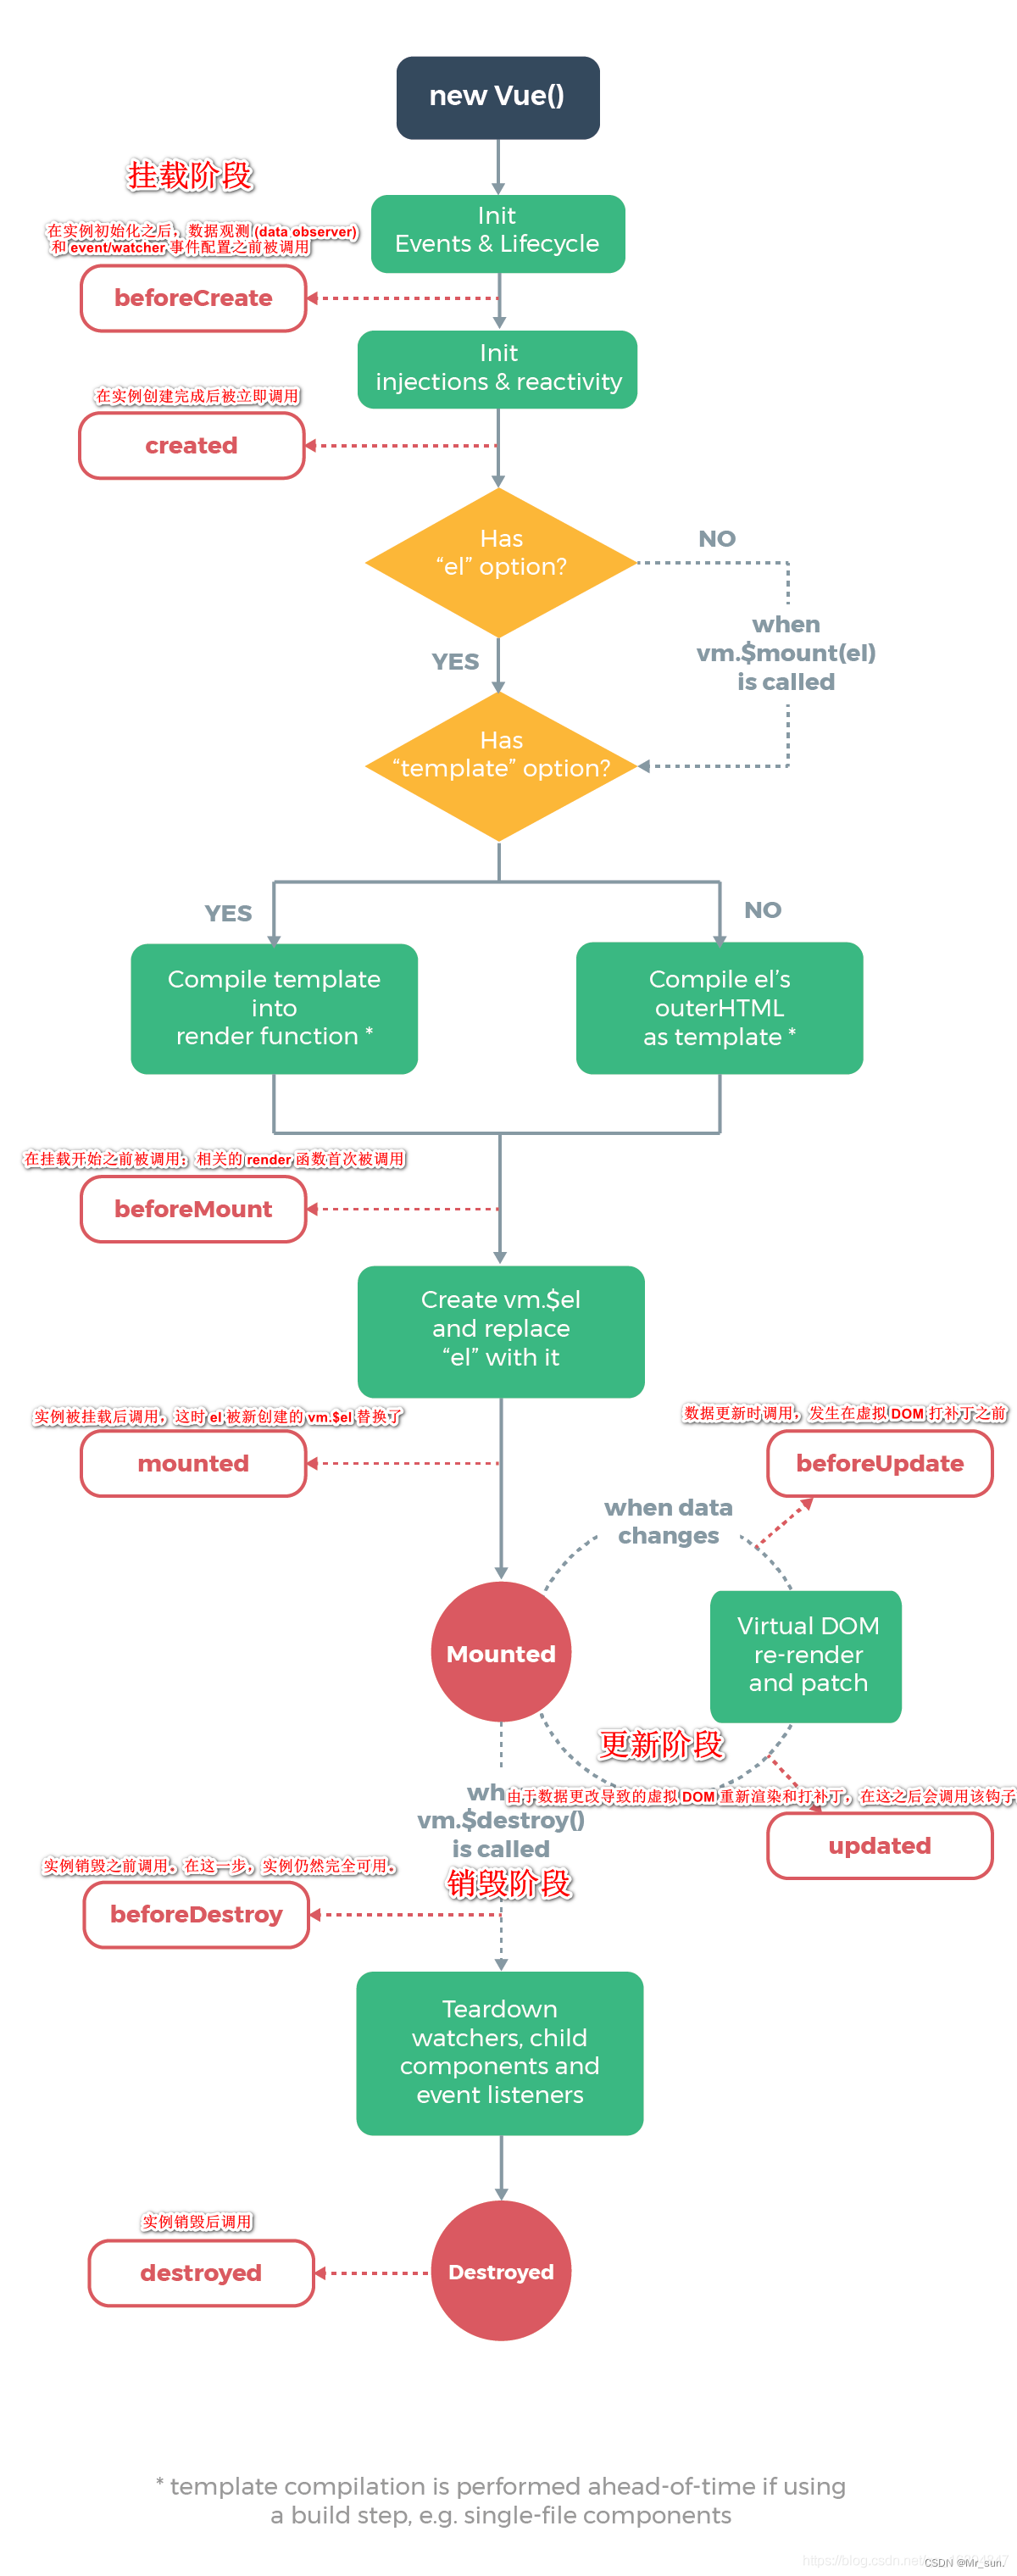
1.9.2 页面结构调用
只要熟练掌握 mounted 就可以了
<!DOCTYPE html>
<html>
	<head>
		<meta charset="utf-8">
		<title>测试vue生命周期函数</title>
	</head>
	<body>

		<div id="app">
			<h3 v-text="msg"></h3>
			<button @click="destroy">销毁</button>
		</div>

		<!--引入js函数类库  -->
		<script src="../js/vue.js"></script>
		<script>
			const app = new Vue({
				el : "#app",
				data : {
					msg: "vue生命周期"
				},

				//在实例初始化之后,数据观测 (data observer) 和 event/watcher 事件配置之前被调用。
				beforeCreate(){
					console.log("beforeCreate")
				},
				//在实例创建完成后被立即调用
				created(){
					console.log("created")
				},
				//在挂载开始之前被调用:相关的 render 函数首次被调用。
				beforeMount(){
					console.log("beforeMount")
				},
				//实例被挂载后调用,这时 el 被新创建的 vm.$el 替换了。
				mounted(){
					console.log("mounted")
				},
				//数据更新时调用,发生在虚拟 DOM 打补丁之前
				beforeUpdate(){
					console.log("beforeUpdate")
				},
				//由于数据更改导致的虚拟 DOM 重新渲染和打补丁,在这之后会调用该钩子。
				updated(){
					console.log("updated")
				},
				//实例销毁之前调用。在这一步,实例仍然完全可用
				beforeDestroy(){
					console.log("beforeDestroy")
				},
				//实例销毁后调用。
				destroyed(){
					console.log("destroyed")
				},
				methods:{
					destroy(){
						this.$destroy()
					}
				}
			})
		</script>
	</body>
</html>
1.10 VUE数组操作
1.10.1 文档位置
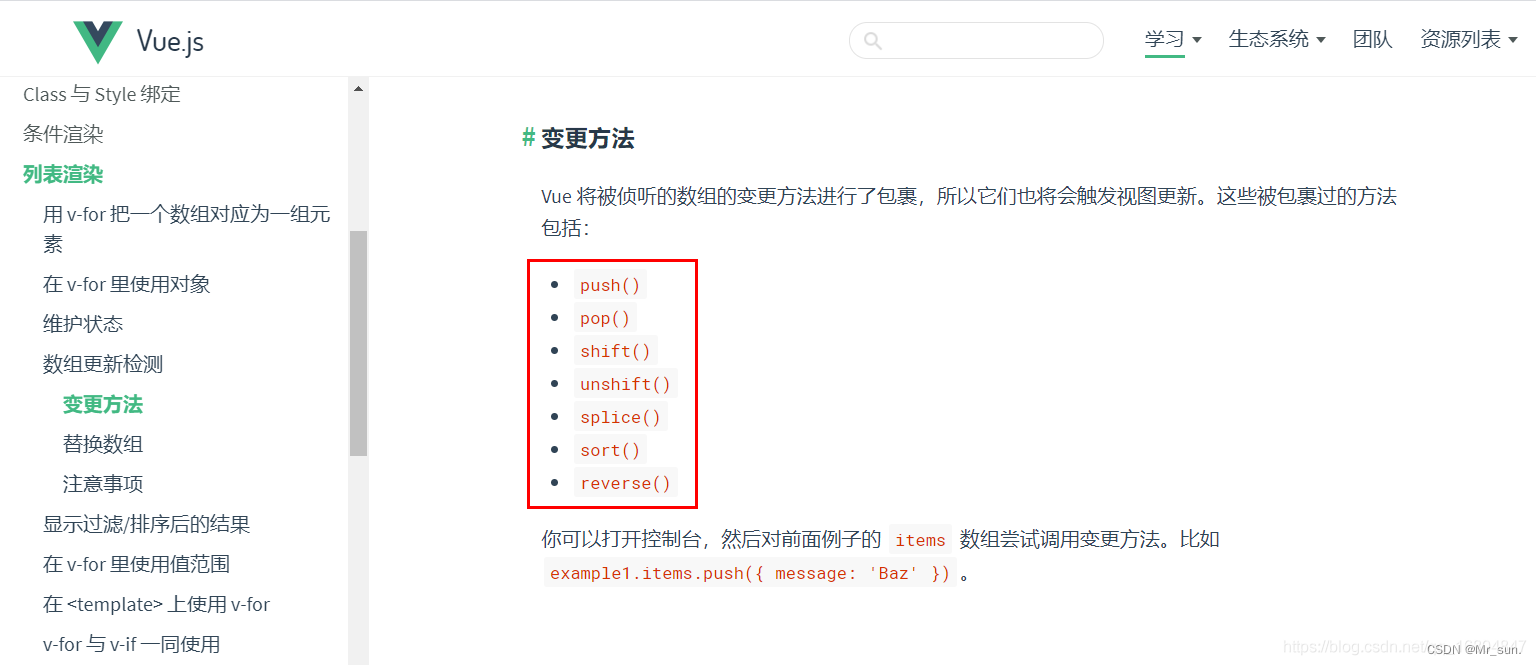
1.10.2 数组用法介绍
- push() 在最后一个追加
- pop() 删除最后一个
- shift() 删除第一个元素
- unshift() 在开头追加一个元素
- splice() 在指定位置替换元素
- sort() 数组排序 默认是按照字符编码的顺序进行排序
- reverse() 数组反转
1.10.3 数组使用案例
<!DOCTYPE html>
<html>
	<head>
		<meta charset="utf-8">
		<title>数组用法</title>
	</head>
	<body>

		<div id="app">
			<span v-for="num in array"> {{num}}</span>
			<hr />
			<input type="text" name="num" v-model="num"/>
			<button @click="add">添加</button>
			<button @click="del">删除</button>
			<button @click="shift">删除第一个</button>
			<button @click="upshift">从第一个元素添加</button>
			<button @click="splice">替换数据</button>
			<button @click="sort">排序</button>
			<button @click="reverse">反转</button>
		</div>

		<!--引入js函数类库  -->
		<script src="../js/vue.js"></script>
		<script>
			const app = new Vue({
				el : "#app",
				data : {
					array: [4,2,3,1,5],
					num: ''
				},
				methods:{
					add(){
						this.array.push(this.num)
					},
					del(){
						this.array.pop()
					},
					shift(){
						this.array.shift()
					},
					upshift(){
						this.array.unshift(this.num)
					},
					splice(){
						//参数说明: 1.操作数据起始位置  2. 操作数量  3.替换元素的值(如果不写表示删除)
						//将第二位进行替换
						//this.array.splice(1,1,this.num)
						//删除第二位数据
						this.array.splice(1,1)
					},
					sort(){
						//数组从小到大
						this.array.sort()
					},
					//数组反转
					reverse(){
						this.array.reverse()
					}
				}
			})
		</script>
	</body>
</html>
2.VUE组件化
2.1 组件介绍
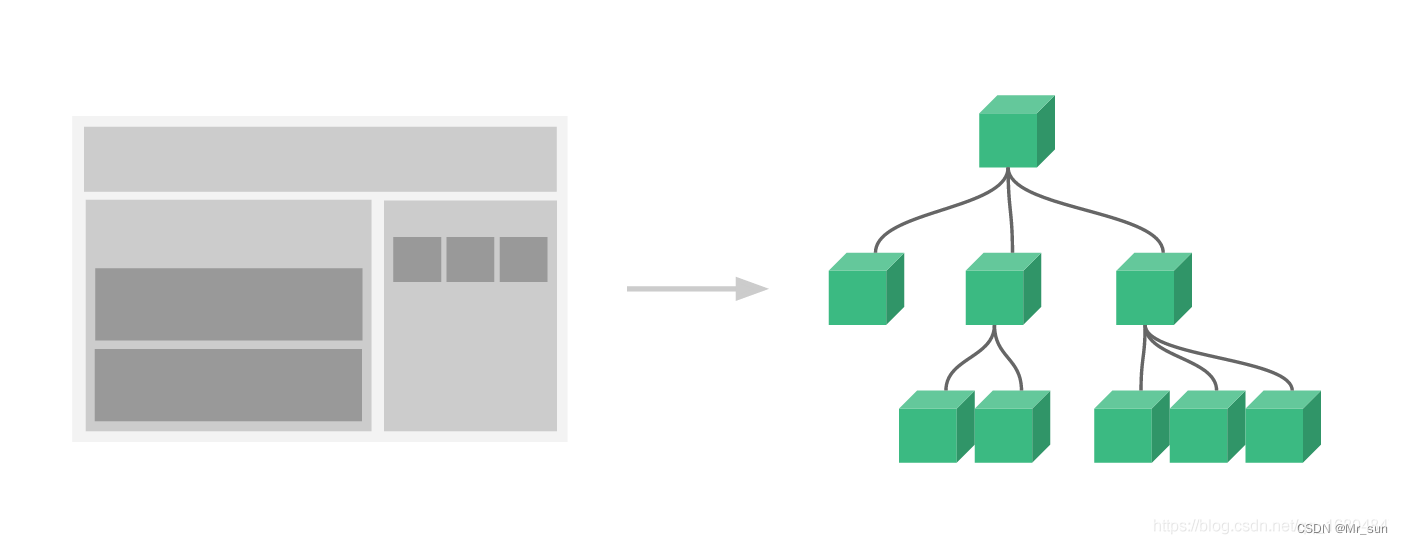
组件系统是 Vue 的另一个重要概念,因为它是一种抽象,允许我们使用小型、独立和通常可复用的组件构建大型应用。仔细想想,几乎任意类型的应用界面都可以抽象为一个组件树.
使用组件可以将一些重复的内容进行封装.各个组件单独维护.体现了分治的思想(分布式思想)
补充知识: 为了保证组件化 相互之间互不干扰,则应该在组件内部 单独定义html/js/css.
2.2 组件注册
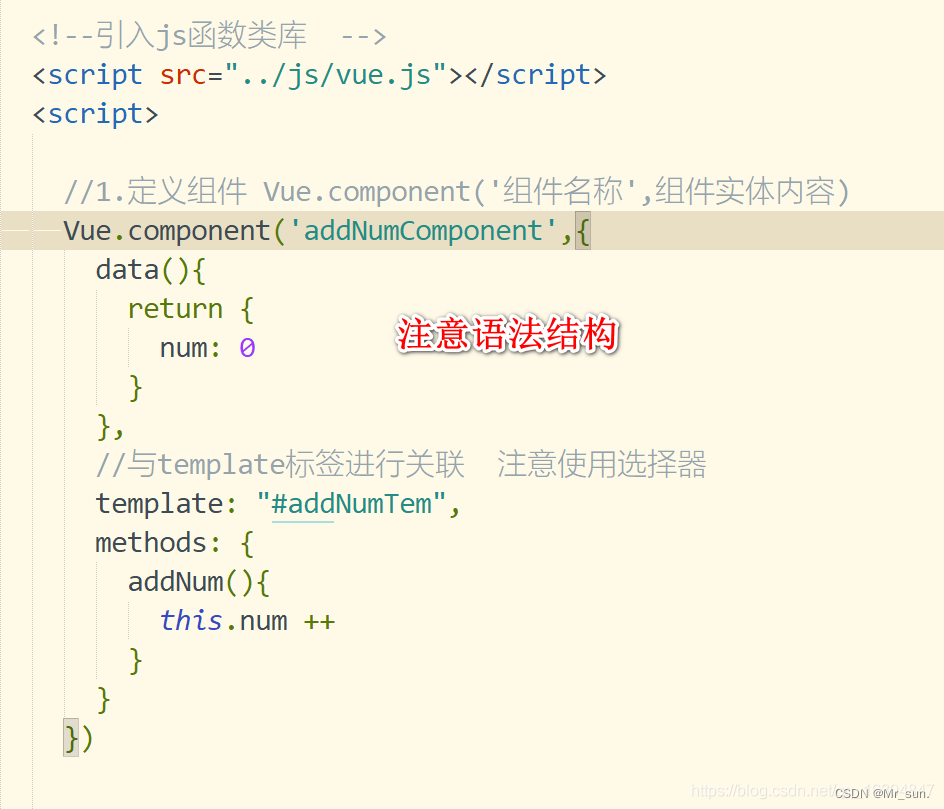
2.2.1 基本语法
注意事项:
- 组件中的data 是一个函数 data(){return {}}
- 组件模版的内容必须是一个根元素.
- 组件如果采用驼峰规则命名,则使用-线进行关联
2.2.2 案例使用
<!DOCTYPE html>
<html>
	<head>
		<meta charset="utf-8">
		<title>组件注册</title>
	</head>
	<body>

		<div id="app">
			<!-- 驼峰规则使用-线隔开 -->
			<add-num-component></add-num-component>

			<!-- 组件可以复用 -->
			<add-num-component></add-num-component>
			<add-num-component></add-num-component>
		</div>

		<!-- 定义模版标签 必须使用跟标签定义不然编译无效 -->
		<template id="addNumTem">
			<div>
				数值: {{num}}
				<button @click="addNum">添加</button>
			</div>
		</template>

		<!--引入js函数类库  -->
		<script src="../js/vue.js"></script>
		<script>

			//1.定义组件 Vue.component('组件名称',组件实体内容)
			Vue.component('addNumComponent',{
				data(){
					return {
						num: 0
					}
				},
				//与template标签进行关联  注意使用选择器
				template: "#addNumTem",
				methods: {
					addNum(){
						this.num ++
					}
				}
			})


			const app = new Vue({
				el : "#app",
				data : {

				}
			})
		</script>
	</body>
</html>
2.3 局部组件注册
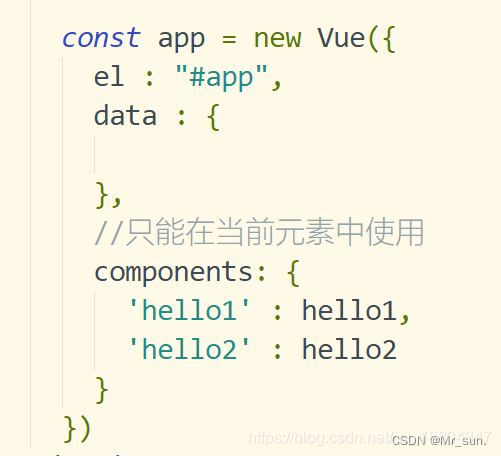
2.3.1 通过components定义局部组件
2.3.2 编辑组件demo
<!DOCTYPE html>
<html>
	<head>
		<meta charset="utf-8">
		<title>组件注册</title>
	</head>
	<body>

		<div id="app">
				<hello1></hello1>
				<hello2></hello2>
				<hello3></hello3>
		</div>

		<!-- 定义模版代码1 -->
		<template id="hello1">
			<div>
				{{msg}}
			</div>
		</template>

		<template id="hello2">
			<div>
				{{msg}}
			</div>
		</template>

		<template id="hello3">
			<div>
				{{name}}

				<!-- 在全局组件中引用局部组件 使用不生效 -->
				<!-- <hello1></hello1> -->
			</div>
		</template>

		<!--引入js函数类库  -->
		<script src="../js/vue.js"></script>
		<script>

			//定义全局组件
			Vue.component('hello3',{
				data(){
					return {
						name: '定义全局组件'
					}
				},
				template: "#hello3"
			})


			/* 定义局部组件 */
			let hello1 = {
				data(){
					return {
						msg: '你好Hello1'
					}
				},
				template: "#hello1"
			}

			let hello2 = {
				data(){
					return {
						msg: '你好Hello2'
					}
				},
				template: "#hello2"
			}


			const app = new Vue({
				el : "#app",
				data : {

				},
				//只能在当前元素中使用
				components: {
					'hello1' : hello1,
					'hello2' : hello2
				}
			})
		</script>
	</body>
</html>
3.Vue前端交互
3.1 Promise概述
Promise是一种异步编程的一种解决方案.从语法上将Promise是一个对象.从它身上可以获取异步调用的信息
作用:
1.有效避免回调地狱问题 典型的Ajax嵌套问题 (闭包方式)
2.Promise对象提供了简洁的API 用法简单
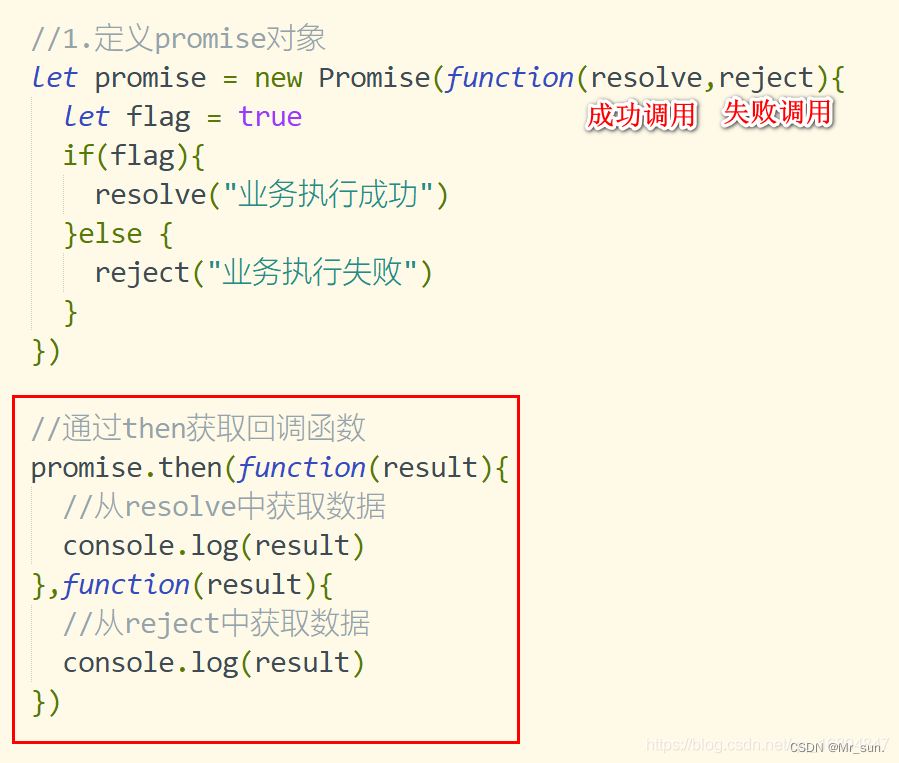
3.2 Promise基本用法
3.3 Promise API介绍
- then 异步调用正确时返回
- catch 获取异常信息
- finally 成功与否都会执行的操作
<!DOCTYPE html>
<html>
	<head>
		<meta charset="utf-8">
		<title>promise调用API</title>
	</head>
	<body>
		<div id="app">
		</div>
		<script>

			let promise = new Promise(function(resolve,reject){
				let flag = true
				if(flag){
					resolve("业务执行成功")
				}else {
					reject("业务执行失败")
				}
			})

			//通过then获取回调函数
			promise.then(function(result){
				//从resolve中获取数据
				console.log(result)
			})
			.catch(function(data){
				console.log(data)
			})
			.finally(function(){
				console.log("最终都会执行")
			})
		</script>
	</body>
</html>
3.4 Axios方式
3.4.1 Axios介绍
Axios 是一个基于 promise 的 HTTP 库,可以用在浏览器和 node.js 中。
特点:
- 从浏览器中创建 XMLHttpRequests
- 从 node.js 创建 http 请求
- 支持 Promise API
- 拦截请求和响应
- 转换请求数据和响应数据
- 取消请求
- 自动转换 JSON 数据
- 客户端支持防御 XSRF
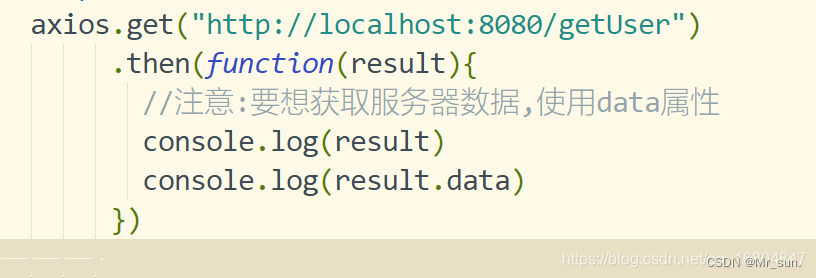
3.4.2 Axios入门案例
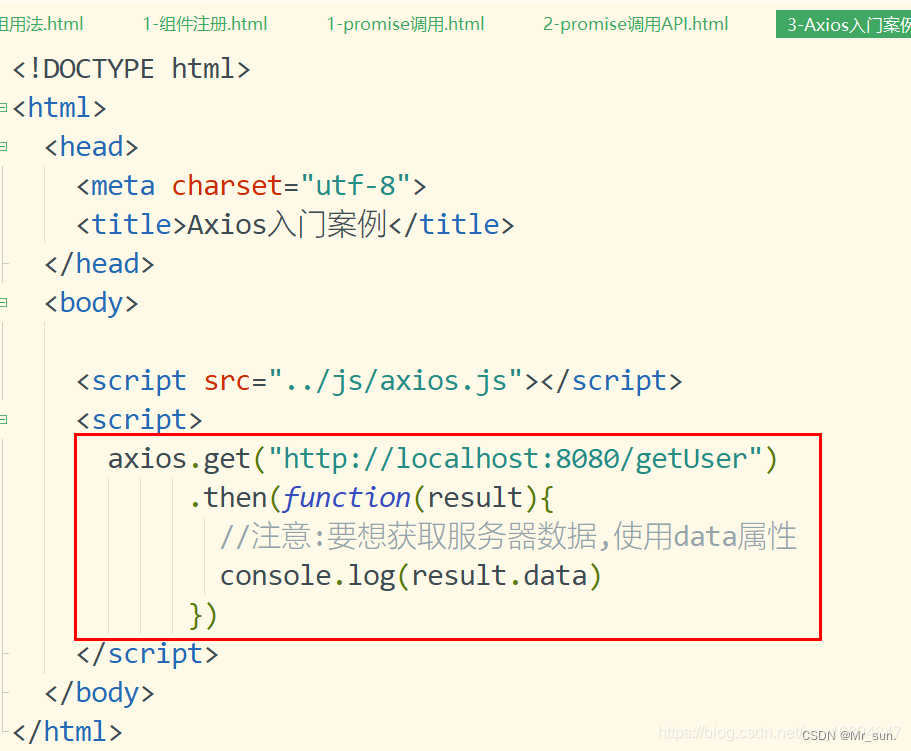
关于result的说明:

3.4.3 Axios GET/DELETE调用
1).get方式
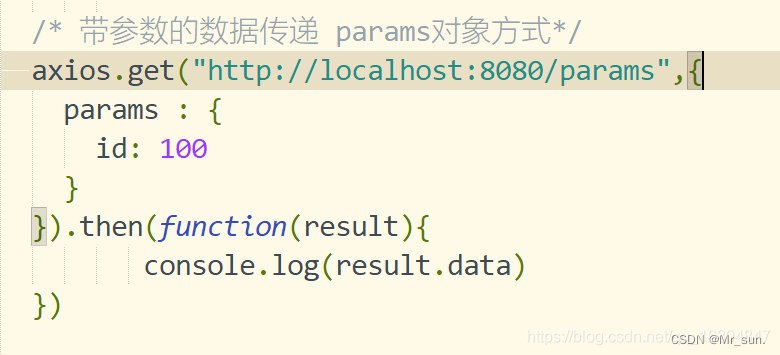
2).带参数的方式

3.restFul风格方式

4.params参数方式
3.4.4 Axios post/put 调用
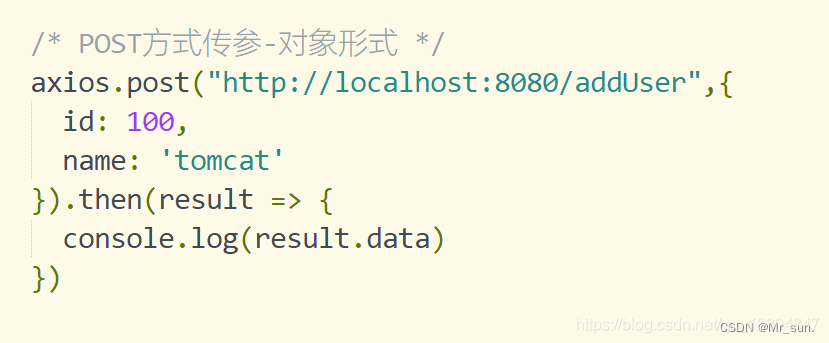
3.4.4.1 对象方式提交数据
1).编辑页面JS
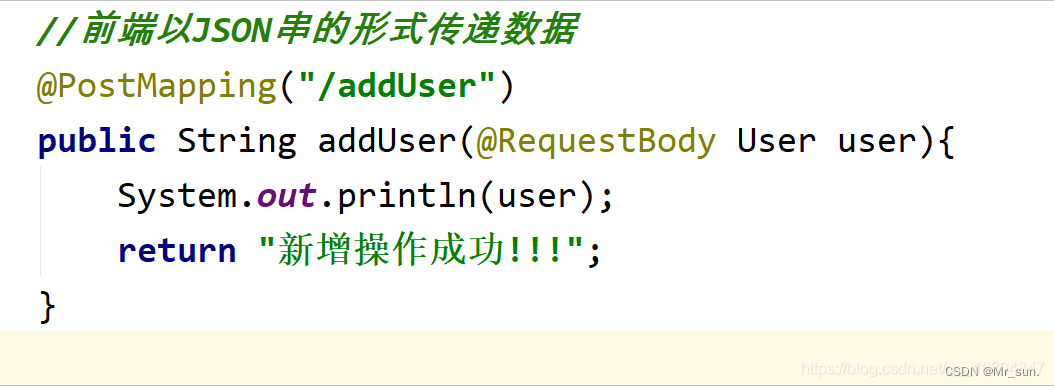
2).编辑后台Controller
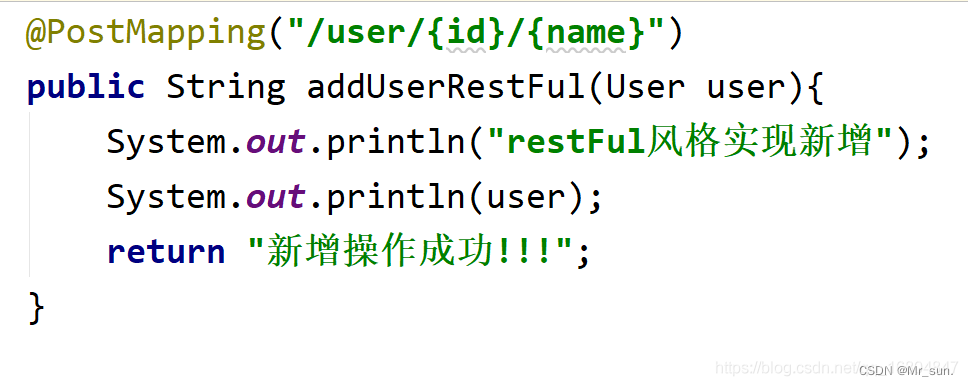
3.4.4.2 restFul方式提交数据
1).编辑页面JS

2).编辑后台Controller
3.4.4.3 form表单数据
1).编辑页面JS
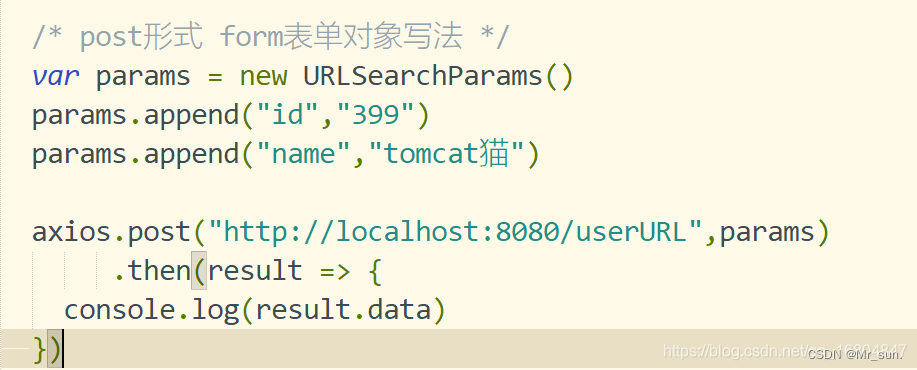
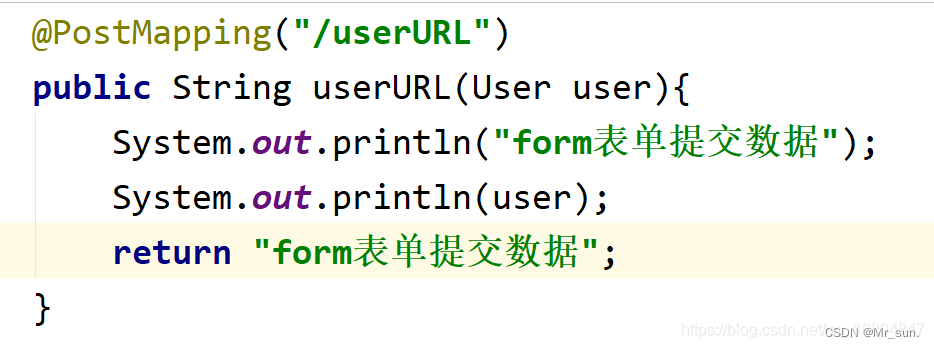
2).页面提交参数结构

3.编辑Controller
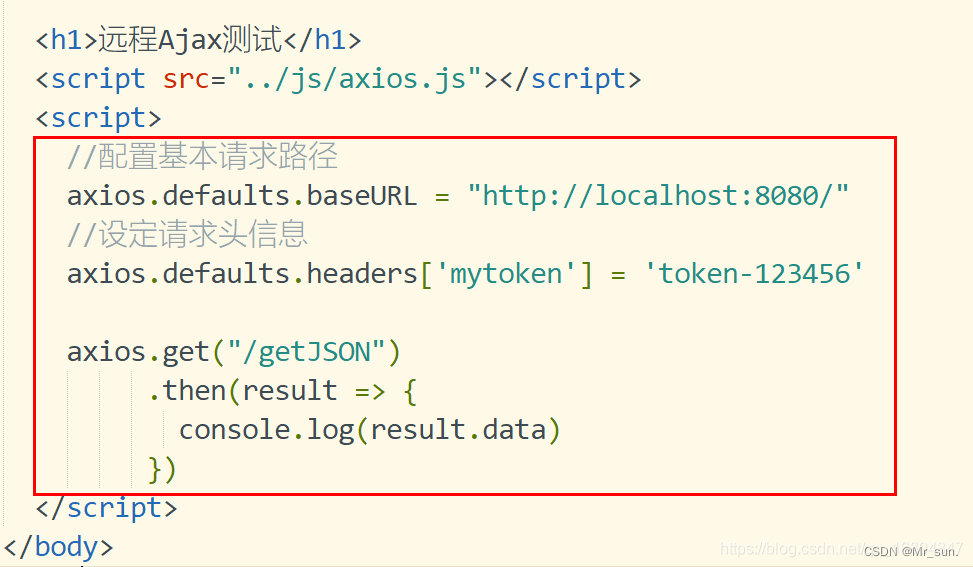
3.4.5 Axios 配置信息
	//配置基本请求路径
	axios.defaults.baseURL = "http://localhost:8080/"
	//设定请求头信息
	axios.defaults.headers['mytoken'] = 'token-123456'
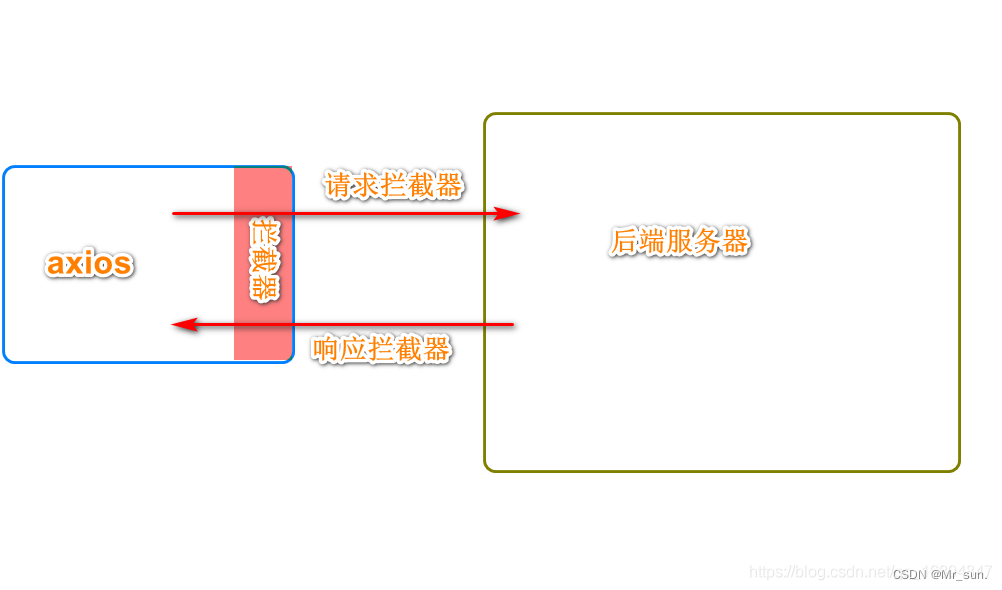
3.4.6 Axios 拦截器机制
3.4.6.1 请求拦截器
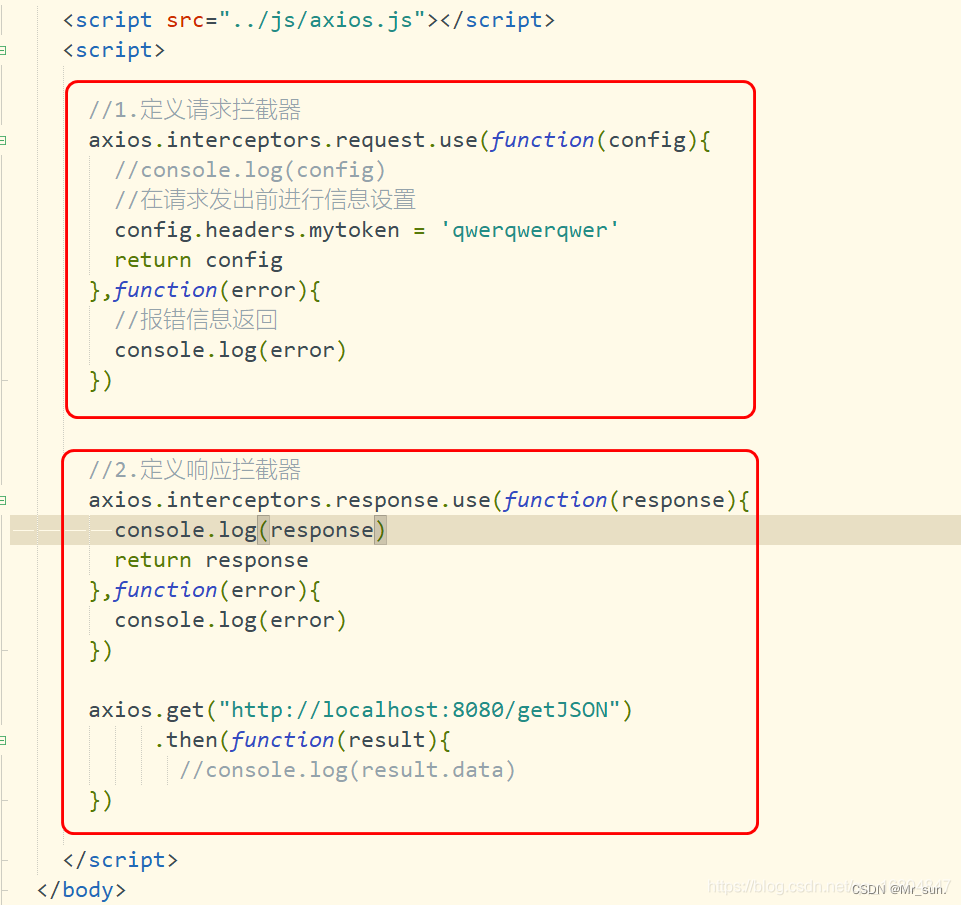
	//1.定义请求拦截器
	axios.interceptors.request.use(function(config){
		//console.log(config)
		//在请求发出前进行信息设置
		config.headers.mytoken = 'qwerqwerqwer'
		return config
	},function(error){
		//报错信息返回
		console.log(error)
	})
3.4.6.2 响应拦截器
//2.定义响应拦截器
	axios.interceptors.response.use(function(response){
		console.log(response)
		return response
	},function(error){
		console.log(error)
	})

	axios.get("http://localhost:8080/getJSON")
			 .then(function(result){
				 //console.log(result.data)
	})
3.4.7 async-await用法
3.4.7.1 介绍
- async/await 是ES7引入的新语法 可以更加方便的进行异步操作
- async 关键字用在函数上. 返回值是一个promise对象
- await 关键字用在async 函数中
3.4.7.2 入门案例用法
<!DOCTYPE html>
<html>
	<head>
		<meta charset="utf-8">
		<title>Axios配置</title>
	</head>
	<body>

		<h1>远程Ajax测试</h1>
		<script src="../js/axios.js"></script>
		<script>
			async function getJSON(){
				//返回一个promise对象
				const result = await axios.get('http://localhost:8080/getJSON')
				//通过data获取数据
				return result.data
			}

			//调用函数
			getJSON().then(function(result){
				console.log(result)
			})
		</script>
	</body>
</html>
3.4.8 ajax教学案例
3.4.8.1 编辑页面html
<!DOCTYPE html>
<html>
	<head>
		<meta charset="utf-8">
		<title>用户列表展现案例</title>
	</head>
	<body>
		<div id="app">
			<h1 align="center">用户列表展现案例</h1>
			<table align="center" border="1px" width="800px">
				<tr align="center">
					<td>ID编号</td>
					<td>姓名</td>
					<td>年龄</td>
					<td>性别</td>
					<td>操作</td>
				</tr>
				<tr align="center" v-for="user in userList" :key="user.id">
					<td>{{user.id}}</td>
					<td>{{user.name}}</td>
					<td>{{user.age}}</td>
					<td>{{user.sex}}</td>
					<td>
						<button @click="updateUser(user)">修改</button>
						<button @click="deleteUser(user)">删除</button>
					</td>
				</tr>
			</table>
			<hr />
			<div>
				<h3 align="center">用户修改操作</h3><br>
				<p>
						用户ID号: <input type="text" name="id" v-model="user.id" disabled/>
						用户名称: <input type="text" name="name" v-model="user.name"/>
				</p>
				<p>
					用户年龄: <input type="text" name="age" v-model="user.age"/>
					用户性别: <input type="text" name="sex" v-model="user.sex"/>
				</p>
				<p>
					<button @click="updateUserBtn">修改</button>
				</p>
			</div>
		</div>


		<script src="../js/axios.js"></script>
		<script src="../js/vue.js"></script>
		<script>
			//1.定义默认的axios请求路径
			axios.defaults.baseURL = "http://localhost:8090/"

			const app = new Vue({
				el: "#app",
				data: {
					//准备用户数据
					userList: [],
					user: {
						id: '',
						name: '',
						age: '',
						sex: ''
					}
				},
				methods: {
					//1.发起get请求
					async getUserList(){
						const {data: result} = await axios.get('/getUserList')
						this.userList = result
					},
					updateUser(user){
						//1.获取页面修改的数据
						this.user = user
					},
					async updateUserBtn(){
						await axios.put('updateUser',this.user)
						//重新加载页面数据
						this.getUserList()
					},
					async deleteUser(user){
						let id = user.id
						await axios.delete('user/'+id)
						//删除之后,重新加载数据
						this.getUserList()
					}
				},
				mounted(){
					this.getUserList()
				}
			})
		</script>
	</body>
</html>
3.4.8.2 编辑页面Controller
package com.jt.controller;

import com.jt.pojo.User;
import com.jt.service.UserService;
import org.springframework.beans.factory.annotation.Autowired;
import org.springframework.web.bind.annotation.*;

import java.util.List;

/**
 * @author 刘昱江
 * 时间 2021/5/9
 */
@RestController
@CrossOrigin
public class UserController {

    @Autowired
    private UserService userService;

    @GetMapping("/getUserList")
    public List<User> findAll(){

        return userService.findAll();
    }

    @PutMapping("/updateUser")
    public void updateUser(@RequestBody User user){

        userService.updateUser(user);
    }

    @DeleteMapping("/user/{id}")
    public void deleteUser(@PathVariable Integer id){
        userService.deleteUser(id);
    }
}
4 VUE路由
4.1 VUE Router介绍
Vue Router 是 Vue.js 官方的路由管理器。它和 Vue.js 的核心深度集成,让构建单页面应用变得易如反掌。包含的功能有:
嵌套的路由/视图表
模块化的、基于组件的路由配置
路由参数、查询、通配符
基于 Vue.js 过渡系统的视图过渡效果
细粒度的导航控制
带有自动激活的 CSS class 的链接
HTML5 历史模式或 hash 模式,在 IE9 中自动降级
自定义的滚动条行为
4.2 Router 路由入门案例
4.2.1 Router使用步骤
- 引入相关的库文件
- 添加路由链接
- 添加路由填充位
- 定义路由组件.
- 配置路由规则并且创建路由实例
- 把路由挂载到Vue根实例中
4.2.2 Router 入门案例
<!DOCTYPE html>
<html>
	<head>
		<meta charset="utf-8">
		<title>路由实例</title>
	</head>
	<body>
		<div id="app">

			<!-- 2.添加路由连接
				Vue中默认添加路由规则
					1.router-link会默认渲染为a标签
					2.to属性默认渲染为 href标签
			 -->
			<router-link to="/user">用户</router-link>
			<router-link to="/dog">狗</router-link>


			<!-- 3.定义路由填充位
				将来通过路由匹配到的组件,将通过路由填充位进行展现
			 -->
			<router-view></router-view>

		</div>
		<!--引入js函数类库  -->
		<script src="../js/vue.js"></script>
		<!-- 引入路由规则 -->
		<script src="../js/vue-router.js"></script>
		<script>

			//4.定义user组件
			const user = {
				template: '<h1>我是User组件</h1>'
			}

			//定义dog组件
			const dog = {
				template: `<h1>我是Dog组件</h1>`
			}

			//5.创建路由规则
			//属性routes[] 定义路由规则
			//path: 定义路径
			//component: 定义组件名称
			const router = new VueRouter({
				//routes 定义路由规则
				routes: [
					{path:"/user",component: user},
					{path:"/dog",component: dog}
				]
			})


			//6.将路由挂载到Vue实例中
			const app = new Vue({
				el: "#app",
				//挂载路由实例对象   如果名称一致 可以简化
				//router: router
				router
			})

		</script>
	</body>
</html>
4.3 Router 重定向
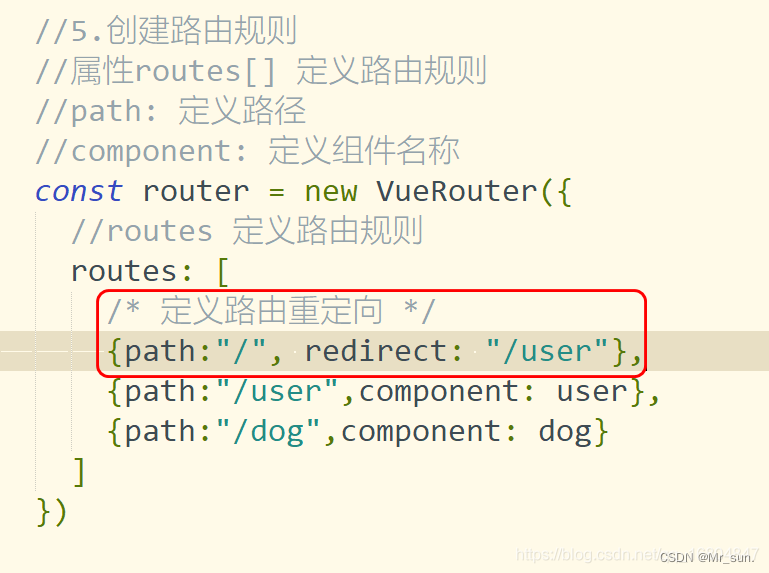
说明: 当用户访问A地址时,强制跳转访问B 则需要使用路由重定向技术
关键子: redirect
用法如下:
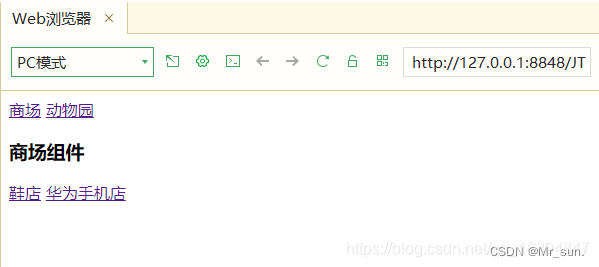
4.4 Router 嵌套
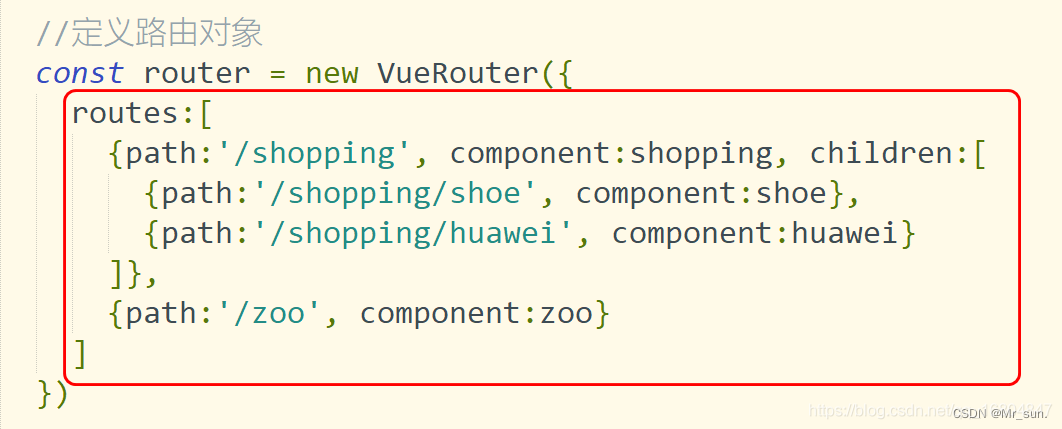
核心代码:
<!DOCTYPE html>
<html>
	<head>
		<meta charset="utf-8">
		<title>路由实例</title>
	</head>
	<body>
		<div id="app">
			<router-link to="/shopping">商场</router-link>
			<router-link to="/zoo">动物园</router-link>
			<router-view></router-view>
		</div>

		<template id="shopping">
			<div>
				<h3>商场组件</h3>
				<!-- 定义子路由 -->
				<router-link to="/shopping/shoe">鞋店</router-link>
				<router-link to="/shopping/huawei">华为手机店</router-link>
				<router-view></router-view>
			</div>
		</template>
		<template id="zoo">
			<div>
				<h3>动物园组件</h3>
			</div>
		</template>
		<template id="shoe">
			<div>
				<h3>鞋的组件</h3>
			</div>
		</template>
		<template id="huawei">
			<div>
				<h3>欢迎光临华为手机店</h3>
			</div>
		</template>

		<!--引入js函数类库  -->
		<script src="../js/vue.js"></script>
		<!-- 引入路由规则 -->
		<script src="../js/vue-router.js"></script>
		<script>
			//1.定义商场组件
			const shopping = {
				template: "#shopping"
			}

			const zoo = {
				template: "#zoo"
			}

			const shoe = {
				template: "#shoe"
			}

			const huawei = {
				template: "#huawei"
			}

			//定义路由对象
			const router = new VueRouter({
				routes:[
					{path:'/shopping', component:shopping, children:[
						{path:'/shopping/shoe', component:shoe},
						{path:'/shopping/huawei', component:huawei}
					]},
					{path:'/zoo', component:zoo}
				]
			})


			const app = new Vue({
				el: '#app',
				router

			})

		</script>
	</body>
</html>
