自定义View
对现有控件进行扩展
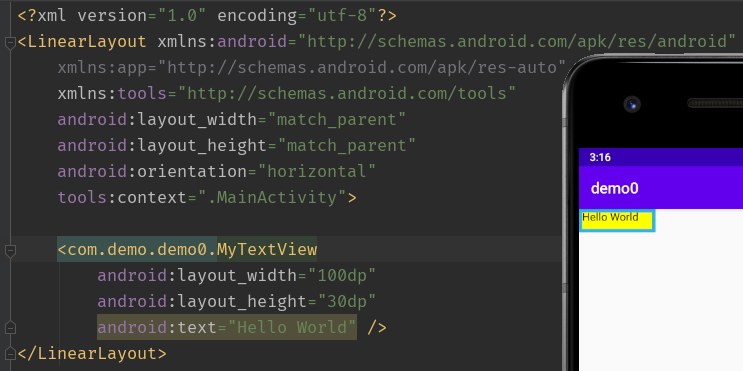
案例一:添加背景
如下继承TextView
public class MyTextView extends androidx.appcompat.widget.AppCompatTextView {

    private Paint mPaint1;
    private Paint mPaint2;

    public MyTextView(Context context) {
        this(context, null);
    }

    public MyTextView(Context context, @Nullable AttributeSet attrs) {
        this(context, attrs, 0);
    }

    public MyTextView(Context context, @Nullable AttributeSet attrs, int defStyleAttr) {
        super(context, attrs, defStyleAttr);
        mPaint1 = new Paint();
        mPaint1.setColor(getResources().getColor(android.R.color.holo_blue_light));
        mPaint1.setStyle(Paint.Style.FILL);
        mPaint2 = new Paint();
        mPaint2.setColor(Color.YELLOW);
        mPaint2.setStyle(Paint.Style.FILL);
    }

    @Override
    protected void onDraw(Canvas canvas) {
        //绘制蓝色外层矩形
        canvas.drawRect(0, 0, getMeasuredWidth(), getMeasuredHeight(), mPaint1);
        //绘制黄色内层矩形
        canvas.drawRect(10, 10, getMeasuredWidth() - 10, getMeasuredHeight() - 10, mPaint2);
        canvas.save();
        //将文字平移10像素,避免遮挡
        canvas.translate(10, 0);
        super.onDraw(canvas);
        canvas.restore();
    }
}
在其onDraw()绘制文字之前,绘制两个不同的矩形背景,如下
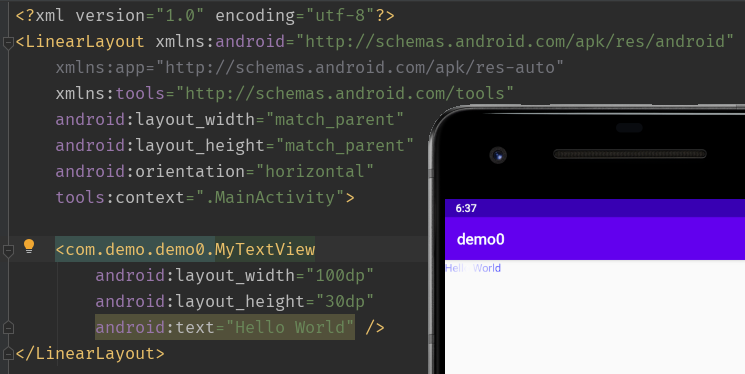
案例二:文字闪动
如下继承TextView
public class MyTextView extends androidx.appcompat.widget.AppCompatTextView {

    private Paint mPaint;
    private int mViewWidth;
    private LinearGradient mLinearGradient;
    private Matrix mGradientMatrix;
    private int mTranslate = -mViewWidth;

    public MyTextView(Context context) {
        this(context, null);
    }

    public MyTextView(Context context, @Nullable AttributeSet attrs) {
        this(context, attrs, 0);
    }

    public MyTextView(Context context, @Nullable AttributeSet attrs, int defStyleAttr) {
        super(context, attrs, defStyleAttr);
    }

    @Override
    protected void onDraw(Canvas canvas) {
        super.onDraw(canvas);
        if (mGradientMatrix != null) {
            mTranslate += mViewWidth / 5;   //每隔100毫秒加1/5
            if (mTranslate > 2 * mViewWidth) {  //实现循环,超过2倍宽,从头开始
                mTranslate = -mViewWidth;
            }
            mGradientMatrix.setTranslate(mTranslate, 0);//让矩阵不断平移
            mLinearGradient.setLocalMatrix(mGradientMatrix);//将矩阵设置到Gradient
            postInvalidateDelayed(100);
        }
    }

    @Override
    protected void onSizeChanged(int w, int h, int oldw, int oldh) {
        super.onSizeChanged(w, h, oldw, oldh);
        if (mViewWidth == 0) {
            mViewWidth = getMeasuredWidth();
            if (mViewWidth > 0) {
                mPaint = getPaint();    //获取TextView的Paint
                mLinearGradient = new LinearGradient(0, 0, mViewWidth, 0,
                        new int[]{Color.BLUE, 0xffffffff, Color.BLUE},
                        null, Shader.TileMode.CLAMP);
                mPaint.setShader(mLinearGradient);//为其设置Shader
                mGradientMatrix = new Matrix();
            }
        }
    }
}
为TextView设置LinearGradient线性渐变,通过矩阵不断平移渐变效果,从而在绘制文字时,产生动态闪动效果
创建复合控件
如下创建一个标题栏TopBar,在res-values新建attrs.xml定义属性
<?xml version="1.0" encoding="utf-8"?>
<resources>
    <declare-styleable name="TopBar">
        <attr name="title" format="string" />
        <attr name="titleTextSize" format="dimension" />
        <attr name="titleTextColor" format="color" />

        <attr name="leftTextColor" format="color" />
        <attr name="leftBackground" format="reference|color" />
        <attr name="leftText" format="string" />

        <attr name="rightTextColor" format="color" />
        <attr name="rightBackground" format="reference|color" />
        <attr name="rightText" format="string" />
    </declare-styleable>
</resources>
新建TopBar继承RelativeLayout,初始化属性-控件-点击事件-暴露方法
public class TopBar extends RelativeLayout {

    private int mLeftTextColor;
    private Drawable mLeftBackground;
    private String mLeftText;
    private int mRightTextColor;
    private Drawable mRightBackground;
    private String mRightText;
    private float mTitleTextSize;
    private int mTitleTextColor;
    private String mTitle;
    private Button mLeftButton;
    private Button mRightButton;
    private TextView mTitleView;
    private LayoutParams mLeftParams;
    private LayoutParams mRightParams;
    private LayoutParams mTitleParams;
    private topBarClickListener mListener;

    public TopBar(Context context) {
        this(context, null);
    }

    public TopBar(Context context, AttributeSet attrs) {
        this(context, attrs, 0);
    }

    public TopBar(Context context, AttributeSet attrs, int defStyleAttr) {
        this(context, attrs, defStyleAttr, 0);
    }

    public TopBar(Context context, AttributeSet attrs, int defStyleAttr, int defStyleRes) {
        super(context, attrs, defStyleAttr, defStyleRes);
        initAttrs(context, attrs);
        initView(context);
        initListener();
    }

    public interface topBarClickListener {
        void leftClick();

        void RightClick();
    }

    public void setOnTopBarClickListener(topBarClickListener listener) {
        this.mListener = listener;
    }

    public void setButtonVisible(int id, boolean flag) {
        if (flag) {
            if (id == 0) {
                mLeftButton.setVisibility(VISIBLE);
            } else {
                mRightButton.setVisibility(VISIBLE);
            }
        } else {
            if (id == 0) {
                mLeftButton.setVisibility(GONE);
            } else {
                mRightButton.setVisibility(GONE);
            }
        }
    }

    private void initListener() {
        mLeftButton.setOnClickListener(new OnClickListener() {
            @Override
            public void onClick(View v) {
                mListener.leftClick();
            }
        });
        mRightButton.setOnClickListener(new OnClickListener() {
            @Override
            public void onClick(View v) {
                mListener.RightClick();
            }
        });
    }

    private void initView(Context context) {
        mLeftButton = new Button(context);
        mRightButton = new Button(context);
        mTitleView = new TextView(context);

        mLeftButton.setTextColor(mLeftTextColor);
        mLeftButton.setBackground(mLeftBackground);
        mLeftButton.setText(mLeftText);

        mRightButton.setTextColor(mRightTextColor);
        mRightButton.setBackground(mRightBackground);
        mRightButton.setText(mRightText);

        mTitleView.setText(mTitle);
        mTitleView.setTextColor(mTitleTextColor);
        mTitleView.setTextSize(mTitleTextSize);
        mTitleView.setGravity(Gravity.CENTER);

        mLeftParams = new LayoutParams(LayoutParams.WRAP_CONTENT, LayoutParams.MATCH_PARENT);
        mLeftParams.addRule(ALIGN_PARENT_LEFT, TRUE);
        addView(mLeftButton, mLeftParams);

        mRightParams = new LayoutParams(LayoutParams.WRAP_CONTENT, LayoutParams.MATCH_PARENT);
        mRightParams.addRule(ALIGN_PARENT_RIGHT, TRUE);
        addView(mRightButton, mRightParams);

        mTitleParams = new LayoutParams(LayoutParams.WRAP_CONTENT, LayoutParams.MATCH_PARENT);
        mTitleParams.addRule(CENTER_IN_PARENT, TRUE);
        addView(mTitleView, mTitleParams);
    }

    private void initAttrs(Context context, AttributeSet attrs) {
        TypedArray ta = context.obtainStyledAttributes(attrs, R.styleable.TopBar);
        mLeftTextColor = ta.getColor(R.styleable.TopBar_leftTextColor, 0);
        mLeftBackground = ta.getDrawable(R.styleable.TopBar_leftBackground);
        mLeftText = ta.getString(R.styleable.TopBar_leftText);

        mRightTextColor = ta.getColor(R.styleable.TopBar_rightTextColor, 0);
        mRightBackground = ta.getDrawable(R.styleable.TopBar_rightBackground);
        mRightText = ta.getString(R.styleable.TopBar_rightText);

        mTitleTextSize = ta.getDimension(R.styleable.TopBar_titleTextSize, 10);
        mTitleTextColor = ta.getColor(R.styleable.TopBar_titleTextColor, 0);
        mTitle = ta.getString(R.styleable.TopBar_title);
        ta.recycle();
    }

}
创建topbar.xml,指定命名空间app引用自定义属性
<?xml version="1.0" encoding="utf-8"?>
<com.demo.demo0.TopBar xmlns:android="http://schemas.android.com/apk/res/android"
    xmlns:app="http://schemas.android.com/apk/res-auto"
    android:id="@+id/topBar"
    android:layout_width="match_parent"
    android:layout_height="40dp"
    app:leftBackground="@color/colorPrimaryDark"
    app:leftText="Back"
    app:leftTextColor="#FFFFFF"
    app:rightBackground="@color/colorPrimaryDark"
    app:rightText="More"
    app:rightTextColor="#FFFFFF"
    app:title="自定义标题"
    app:titleTextColor="#123412"
    app:titleTextSize="10sp">
</com.demo.demo0.TopBar>
通过<include>引用

重写View实现全新控件
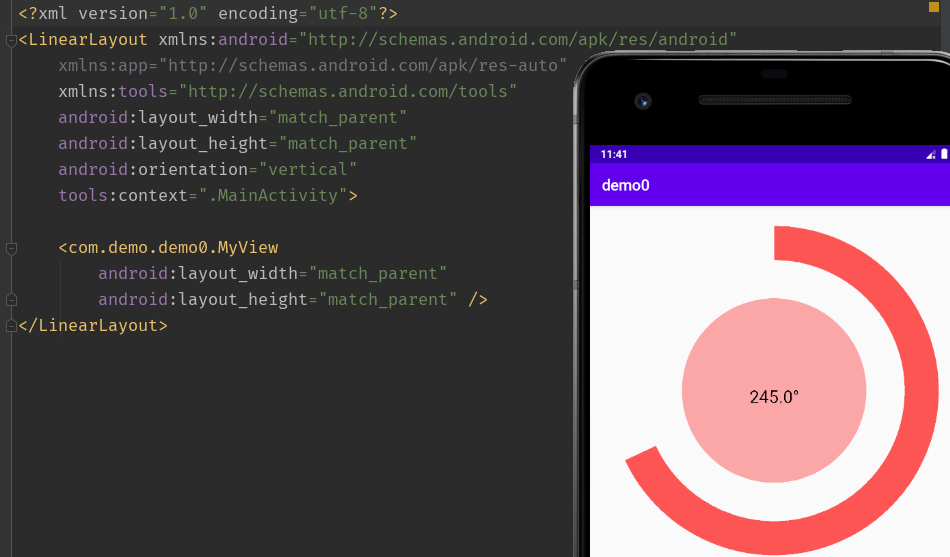
案例一:弧线展示图
public class MyView extends View {
    private Paint mCirclePaint, mArcRectPaint, mArcPaint, mTextPaint;

    private float length;
    private float mRadius;
    private RectF mArcRect;
    private float mCircleXY;
    private static final float DEFAULT_SWEEP_ANGLE = 245;
    private float mSweepAngle = DEFAULT_SWEEP_ANGLE;
    private String mShowText = mSweepAngle + "°";

    public MyView(Context context) {
        this(context, null);
    }

    public MyView(Context context, AttributeSet attrs) {
        this(context, attrs, 0);
    }

    public MyView(Context context, AttributeSet attrs, int defStyleAttr) {
        super(context, attrs, defStyleAttr);
        initView();
    }

    private void initView() {
        mCirclePaint = new Paint();
        mCirclePaint.setColor(Color.parseColor("#55FF0000"));

        mArcRectPaint = new Paint();
        mArcRectPaint.setColor(Color.GRAY);

        mArcPaint = new Paint();
        mArcPaint.setColor(Color.parseColor("#AAFF0000"));
        mArcPaint.setStrokeWidth(100);
        mArcPaint.setStyle(Paint.Style.STROKE);

        mTextPaint = new Paint();
        mTextPaint.setColor(Color.BLACK);
        mTextPaint.setTextSize(50);
    }

    @Override
    protected void onSizeChanged(int w, int h, int oldw, int oldh) {
        super.onSizeChanged(w, h, oldw, oldh);
        length = w;
        mCircleXY = length / 2;         //圆心 = (length / 2, length / 2)
        mRadius = (float) (length * 0.5 / 2);   //半径 = length / 4
        mArcRect = new RectF((float) (length * 0.1), (float) (length * 0.1),
                (float) (length * 0.9), (float) (length * 0.9));    //圆弧的内切矩形,上下去掉0.1length
    }

    @Override
    protected void onDraw(Canvas canvas) {
        super.onDraw(canvas);
        //mArcPaint.setStrokeWidth(10);
        //canvas.drawRect(mArcRect, mArcRectPaint);   //用于展示内切矩形,了解原理
        canvas.drawCircle(mCircleXY, mCircleXY, mRadius, mCirclePaint); //画圆,传入圆心半径

        //画弧线,传入内切正方形,从270度即0点(0度位置在3点)开始顺时针转mSweepAngle角度,true会连接圆心,false只画边界
        canvas.drawArc(mArcRect, 270, mSweepAngle, false, mArcPaint);
        //画文字,传入文字,传入开始、结束位置、绘制在(x,y)处
        float textWidth = mTextPaint.measureText(mShowText); //测量文字宽度,为了让其居中
        canvas.drawText(mShowText, 0, mShowText.length(), mCircleXY - (textWidth / 2), mCircleXY + (textWidth / 4), mTextPaint);
    }

    public void setSweepAngle(float angle) {
        if (angle != 0) {
            mSweepAngle = angle;
        } else {
            mSweepAngle = DEFAULT_SWEEP_ANGLE;
        }
        invalidate();
    }
}
由一个圆、圆弧和文字组成,可通过setSweepAngle()设置显示比例
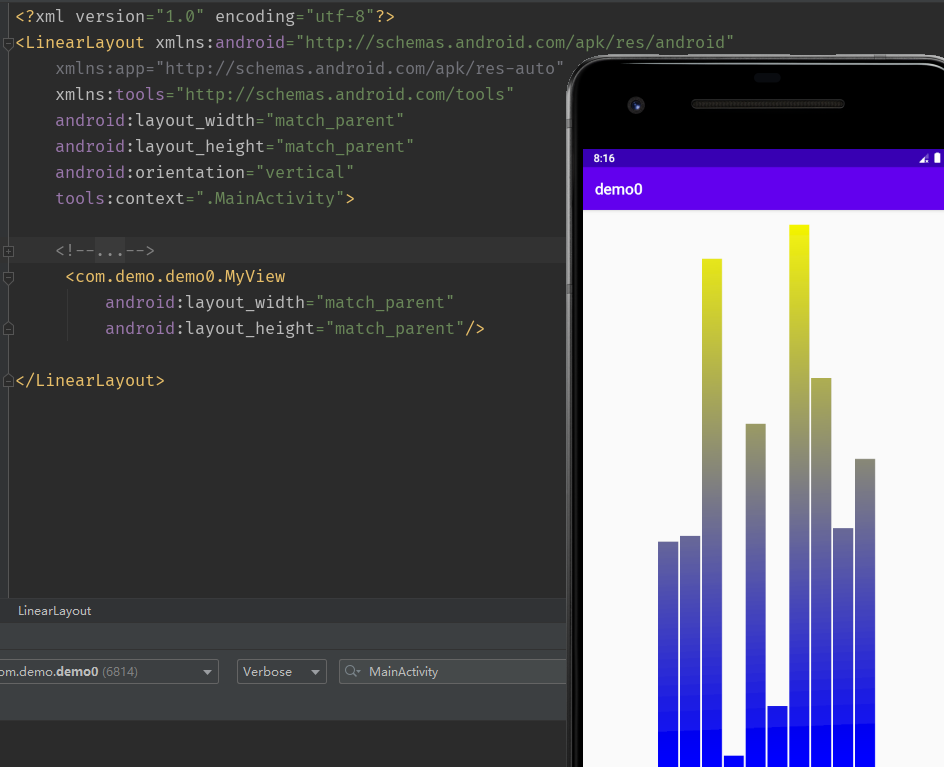
案例二:音频条形图
public class MyView extends View {

    private double mRandom;
    private int mWidth;
    private int mRectHeight;
    private int mRectWidth;
    private double mRectCount = 10;
    private Paint mPaint;
    private LinearGradient mLinearGradient;

    public MyView(Context context) {
        this(context, null);
    }

    public MyView(Context context, AttributeSet attrs) {
        this(context, attrs, 0);
    }

    public MyView(Context context, AttributeSet attrs, int defStyleAttr) {
        super(context, attrs, defStyleAttr);
        mPaint = new Paint();
    }

    @Override
    protected void onSizeChanged(int w, int h, int oldw, int oldh) {
        super.onSizeChanged(w, h, oldw, oldh);
        mWidth = getWidth();        //View宽度
        mRectHeight = getHeight();  //View高度
        mRectWidth = (int) (mWidth * 0.6 / mRectCount); //第一个长方形的left坐标,为总宽度60%除以个数
        mLinearGradient = new LinearGradient(
                0,
                0,
                mRectWidth,
                mRectHeight,
                Color.YELLOW,
                Color.BLUE,
                Shader.TileMode.CLAMP); //左上角(0,0)到右下角(mRectWidth,mRectHeight)从黄到蓝的线性渐变
        mPaint.setShader(mLinearGradient);
    }

    @Override
    protected void onDraw(Canvas canvas) {
        super.onDraw(canvas);
        int offset = 5;
        for (int i = 0; i < mRectCount; i++) {
            mRandom = Math.random();
            float currentHeight = (float) (mRectHeight * mRandom);
            canvas.drawRect(
                    (float) (mWidth * 0.4 / 2 + mRectWidth * i + offset),   //left, mWidth * 0.4 / 2 为了居中, mRectWidth * i 计算每个长方形left, offset为空隙
                    currentHeight,  //top, 随机值
                    (float) (mWidth * 0.4 / 2 + mRectWidth * (i + 1)),  //right, mWidth * 0.4 / 2 为了居中, mRectWidth * (i + 1)计算每个长方形right
                    mRectHeight,    //bottom, 以左上角为原点计算
                    mPaint);
        }
        postInvalidateDelayed(300); //300ms后重绘实现动态显示
    }
}
onDraw()通过不断创建长方形并平移,实现模拟音频条的跳动
自定义ViewGroup
滑动组件
当子View上拉超过一定距离,松开后自动滑到下一个子View,下滑同理,布局如下
<?xml version="1.0" encoding="utf-8"?>
<LinearLayout xmlns:android="http://schemas.android.com/apk/res/android"
    xmlns:app="http://schemas.android.com/apk/res-auto"
    xmlns:tools="http://schemas.android.com/tools"
    android:layout_width="match_parent"
    android:layout_height="match_parent"
    tools:context=".ScrollViewActivity">

    <com.demo.demo0.MyScrollView
        android:layout_width="wrap_content"
        android:layout_height="wrap_content">

        <TextView
            android:layout_width="match_parent"
            android:layout_height="match_parent"
            android:background="#ff0000" />

        <TextView
            android:layout_width="match_parent"
            android:layout_height="match_parent"
            android:background="#00ff00" />

        <TextView
            android:layout_width="match_parent"
            android:layout_height="match_parent"
            android:background="#0000ff" />
    </com.demo.demo0.MyScrollView>
</LinearLayout>
通过触摸事件获取Y值坐标判断滑动
public class MyScrollView extends ViewGroup {

    private static final String TAG = MyScrollView.class.getSimpleName();
    private int mScreenHeight;
    private Scroller mScroller;
    private int mLastY;
    private int mStart;
    private int mEnd;

    public MyScrollView(Context context) {
        this(context, null);
    }

    public MyScrollView(Context context, AttributeSet attrs) {
        this(context, attrs, 0);
    }

    public MyScrollView(Context context, AttributeSet attrs, int defStyleAttr) {
        this(context, attrs, defStyleAttr, 0);
    }

    public MyScrollView(Context context, AttributeSet attrs, int defStyleAttr, int defStyleRes) {
        super(context, attrs, defStyleAttr, defStyleRes);
        initView(context);
    }

    private void initView(Context context) {
        WindowManager wm = (WindowManager) context.getSystemService(Context.WINDOW_SERVICE);
        DisplayMetrics dm = new DisplayMetrics();
        wm.getDefaultDisplay().getMetrics(dm);
        mScreenHeight = dm.heightPixels;    //上面获取屏幕的高度
        mScroller = new Scroller(context);
    }

    @Override
    protected void onLayout(boolean changed, int l, int t, int r, int b) {
        int childCount = getChildCount();
        MarginLayoutParams mlp = (MarginLayoutParams) getLayoutParams();
        mlp.height = mScreenHeight * childCount;    //父View实际高度=子View高度之和
        setLayoutParams(mlp);
        for (int i = 0; i < childCount; i++) {  //将图片依次拼接,摆放子View
            View child = getChildAt(i);
            if (child.getVisibility() != View.GONE) {
                child.layout(
                        l,
                        i * mScreenHeight,
                        r,
                        (i + 1) * mScreenHeight);
            }
        }
    }

    @Override
    protected void onMeasure(int widthMeasureSpec, int heightMeasureSpec) {
        super.onMeasure(widthMeasureSpec, heightMeasureSpec);
        int count = getChildCount();
        for (int i = 0; i < count; ++i) {   //每个子View宽高等于ViewGroup显示宽高,即占满屏幕
            View childView = getChildAt(i);
            measureChild(childView, widthMeasureSpec, heightMeasureSpec);
        }
        setMeasuredDimension(widthMeasureSpec, heightMeasureSpec * count);
    }

    @Override
    public boolean onTouchEvent(MotionEvent event) {
        int x = (int) event.getX();
        int y = (int) event.getY();
        switch (event.getAction()) {
            case MotionEvent.ACTION_DOWN:
                mLastY = y;
                mStart = getScrollY();  //ScrollY是top向Y轴方向滚动的距离
                break;
            case MotionEvent.ACTION_MOVE:
                /*if (!mScroller.isFinished()) {
                    mScroller.abortAnimation();
                }*/
                int dy = mLastY - y;
                Log.d(TAG, "onTouchEvent: dy = " + dy);
                if (getScrollY() < 0) { //已经滑到第一个
                    dy = 0;
                }
                if (getScrollY() > (getChildCount() - 1) * mScreenHeight) {  //已经滑到最后一个
                    dy = 0;
                }
                scrollBy(0, dy);
                mLastY = y;     //实时更新滑动坐标,计算偏移量
                break;
            case MotionEvent.ACTION_UP:
                mEnd = getScrollY();
                int dScrollY = mEnd - mStart;
                Log.d(TAG, "onTouchEvent: getScrollY() = " + getScrollY());
                Log.d(TAG, "onTouchEvent: dScrollY = " + dScrollY);
                if (dScrollY > 0) {//向下滑动
                    //超过屏幕高度的1/3,则展示上一张图片,否则反弹显示当前图片
                    if (dScrollY < mScreenHeight / 3) {
                        mScroller.startScroll(
                                0, getScrollY(),
                                0, -dScrollY);
                    } else {
                        mScroller.startScroll(
                                0, getScrollY(),
                                0, mScreenHeight - dScrollY);
                    }
                } else {
                    if (-dScrollY < mScreenHeight / 3) {
                        mScroller.startScroll(
                                0, getScrollY(),
                                0, -dScrollY);
                    } else {
                        mScroller.startScroll(
                                0, getScrollY(),
                                0, -mScreenHeight - dScrollY);
                    }
                }
                break;
        }
        postInvalidate();
        return true;
    }

    @Override
    public void computeScroll() {
        super.computeScroll();
        if (mScroller.computeScrollOffset()) {
            scrollTo(0, mScroller.getCurrY());
            postInvalidate();
        }
    }
}