note
- GLM将针对不同类型下游任务的预训练目标统一为了自回归填空,结合了混合的注意力机制和新的二维位置编码。
- 本文浅析sft,并基于GLM在广告描述数据集上进行sft+p-tuning代码的数据流讲解
文章目录
- note
- 零、ChatGLM2模型
- 一、Supervised fine-tuning
- 1. 数据样本的准备
- 2. stanford_alpaca的dataset类
- 3. 数据格式、计算loss的数据
- 二、P-Tuning v2的数据流
- 1. 数据准备
- 2. P-Tuning v2微调
- 3. 模型推理
- 三、垂直领域训练注意事项
- Reference
零、ChatGLM2模型
后面对chatglm2进行sft微调,这里顺带着先介绍下glm2:

- chatglm-6b:https://github.com/THUDM/ChatGLM-6B
- chatglm2-6b:https://github.com/THUDM/ChatGLM2-6B
- chatglm130:https://github.com/THUDM/GLM-130B
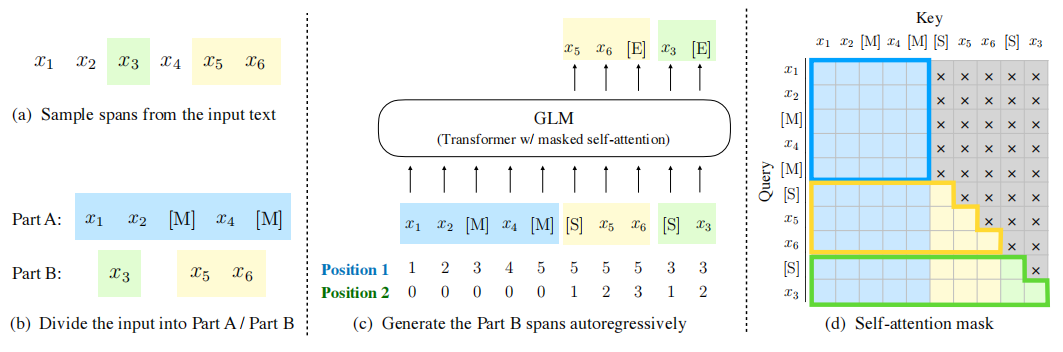
- 自回归空格填充任务:
- 初始文本输入:x1, x2,x3,x4,x5,x6
- 随机掩码mask
- PartA 部分:x1,x2,M,x4,M ,其中M表示mask的跨度
- PartB 部分: S,x5,x6,S,x3(刚才mask掉的那几坨,随机排序后,对起始位置加入token)
- 拼接PartA和PartB
- 自注意机制(chatglm在Q、K中加入了RoPE位置信息): Q = W q X K = W k X V = W v X Attention ( Q , K , V , A ) = softmax ( Q K T d k ) V \begin{aligned} Q & =W_q X \\ K & =W_k X \\ V & =W_v X \\ \operatorname{Attention}(Q, K, V, A) & =\operatorname{softmax}\left(\frac{Q K^T}{\sqrt{d_k}}\right) V \end{aligned} QKVAttention(Q,K,V,A)=WqX=WkX=WvX=softmax(dkQKT)V
- mask:chatglm6b使用prefix-LM的mask,对于输入的前缀使用双向注意力,对于后续的生成部分则是causal mask
- PartA部分内的各token可以互相注意到
- PartB部分内的tokens可以注意到PartA和PartB中已经生成的token

    def get_masks(self, input_ids, past_key_values, padding_mask=None):
        batch_size, seq_length = input_ids.shape
        full_attention_mask = torch.ones(batch_size, seq_length, seq_length, device=input_ids.device)
        full_attention_mask.tril_()
        past_length = 0
        if past_key_values:
            past_length = past_key_values[0][0].shape[0]
        if past_length:
            full_attention_mask = torch.cat((torch.ones(batch_size, seq_length, past_length,
                                                        device=input_ids.device), full_attention_mask), dim=-1)
        if padding_mask is not None:
            full_attention_mask = full_attention_mask * padding_mask.unsqueeze(1)
        if not past_length and padding_mask is not None:
            full_attention_mask -= padding_mask.unsqueeze(-1) - 1
        full_attention_mask = (full_attention_mask < 0.5).bool()
        full_attention_mask.unsqueeze_(1)
        return full_attention_mask
一、Supervised fine-tuning
sft就是下面的第一个环节,使用指令数据做有监督精调 (supervised fine-tuning)。
1. 数据样本的准备
参考stanford_alpaca的sft:
- 整理的数据有三列:instruction、input、output。
- Instruction和input通过prompt组搞在一起,为sourse;output换为target
- 把source和target和token.eos_token_id直接拼接在一起,这个时候暂时叫sentence。
- 然后把sentence通过tokenizer转换成input_ids。
- 最后一步,要把input_ids复制一份,叫labels。然后把labels前面的位置,即source对应的tokenid,全部变成-100。
- 那么这个时候,一个面向sft任务的input_ids和labels就已经构造好了。
在这个任务里面,使用的就是transformers的DataCollatorForSeq2Seq。这个data_collator任务很简单:就是让每一个batch内的input_ids和labels都长度对齐。
def _tokenize_fn(strings: Sequence[str], tokenizer: transformers.PreTrainedTokenizer) -> Dict:
    """Tokenize a list of strings."""
    tokenized_list = [
        tokenizer(
            text,
            return_tensors="pt",
            padding="longest",
            max_length=tokenizer.model_max_length,
            truncation=True,
        )
        for text in strings
    ]
    input_ids = labels = [tokenized.input_ids[0] for tokenized in tokenized_list]
    input_ids_lens = labels_lens = [
        tokenized.input_ids.ne(tokenizer.pad_token_id).sum().item() for tokenized in tokenized_list
    ]
    return dict(
        input_ids=input_ids,
        labels=labels,
        input_ids_lens=input_ids_lens,
        labels_lens=labels_lens,
    )


def preprocess(
    sources: Sequence[str],
    targets: Sequence[str],
    tokenizer: transformers.PreTrainedTokenizer,
) -> Dict:
    """Preprocess the data by tokenizing."""
    examples = [s + t for s, t in zip(sources, targets)]
    examples_tokenized, sources_tokenized = [_tokenize_fn(strings, tokenizer) for strings in (examples, sources)]
    input_ids = examples_tokenized["input_ids"]
    labels = copy.deepcopy(input_ids)
    for label, source_len in zip(labels, sources_tokenized["input_ids_lens"]):
        label[:source_len] = IGNORE_INDEX
    return dict(input_ids=input_ids, labels=labels)
2. stanford_alpaca的dataset类
class SupervisedDataset(Dataset):
    """Dataset for supervised fine-tuning."""

    def __init__(self, data_path: str, tokenizer: transformers.PreTrainedTokenizer):
        super(SupervisedDataset, self).__init__()
        logging.warning("Loading data...")
        list_data_dict = utils.jload(data_path)

        logging.warning("Formatting inputs...")
        prompt_input, prompt_no_input = PROMPT_DICT["prompt_input"], PROMPT_DICT["prompt_no_input"]
        sources = [
            prompt_input.format_map(example) if example.get("input", "") != "" else prompt_no_input.format_map(example)
            for example in list_data_dict
        ]
        targets = [f"{example['output']}{tokenizer.eos_token}" for example in list_data_dict]

        logging.warning("Tokenizing inputs... This may take some time...")
        data_dict = preprocess(sources, targets, tokenizer)

        self.input_ids = data_dict["input_ids"]
        self.labels = data_dict["labels"]

    def __len__(self):
        return len(self.input_ids)

    def __getitem__(self, i) -> Dict[str, torch.Tensor]:
        return dict(input_ids=self.input_ids[i], labels=self.labels[i])
3. 数据格式、计算loss的数据
简单分析hf的trainer:hugggingface自带的trainer类中参数如下:
    def __init__(
        self,
        model: Union[PreTrainedModel, nn.Module] = None,
        args: TrainingArguments = None,
        data_collator: Optional[DataCollator] = None,
        train_dataset: Optional[Dataset] = None,
        eval_dataset: Optional[Union[Dataset, Dict[str, Dataset]]] = None,
        tokenizer: Optional[PreTrainedTokenizerBase] = None,
        model_init: Optional[Callable[[], PreTrainedModel]] = None,
        compute_metrics: Optional[Callable[[EvalPrediction], Dict]] = None,
        callbacks: Optional[List[TrainerCallback]] = None,
        optimizers: Tuple[torch.optim.Optimizer, torch.optim.lr_scheduler.LambdaLR] = (None, None),
        preprocess_logits_for_metrics: Optional[Callable[[torch.Tensor, torch.Tensor], torch.Tensor]] = None,
    )
hf自带的trainer中的compute_loss函数中,用到了标签平滑的正则化(将真实标签的概率分布进行平滑,减少模型过拟合):

对于上面trainer类的参数data_collator,对于encoder和decoder模型都是不同的:比如前者的bert模型,用于ner词性标注任务时:
BertForTokenClassification(
  (bert): BertModel(
    (embeddings): BertEmbeddings(
      (word_embeddings): Embedding(28996, 768, padding_idx=0)
      (position_embeddings): Embedding(512, 768)
      (token_type_embeddings): Embedding(2, 768)
      (LayerNorm): LayerNorm((768,), eps=1e-12, elementwise_affine=True)
      (dropout): Dropout(p=0.1, inplace=False)
    )
    (encoder): BertEncoder(
      (layer): ModuleList(
        (0-11): 12 x BertLayer(
          (attention): BertAttention(
            (self): BertSelfAttention(
              (query): Linear(in_features=768, out_features=768, bias=True)
              (key): Linear(in_features=768, out_features=768, bias=True)
              (value): Linear(in_features=768, out_features=768, bias=True)
              (dropout): Dropout(p=0.1, inplace=False)
            )
            (output): BertSelfOutput(
              (dense): Linear(in_features=768, out_features=768, bias=True)
              (LayerNorm): LayerNorm((768,), eps=1e-12, elementwise_affine=True)
              (dropout): Dropout(p=0.1, inplace=False)
            )
          )
          (intermediate): BertIntermediate(
            (dense): Linear(in_features=768, out_features=3072, bias=True)
            (intermediate_act_fn): GELUActivation()
          )
          (output): BertOutput(
            (dense): Linear(in_features=3072, out_features=768, bias=True)
            (LayerNorm): LayerNorm((768,), eps=1e-12, elementwise_affine=True)
            (dropout): Dropout(p=0.1, inplace=False)
          )
        )
      )
    )
  )
  (dropout): Dropout(p=0.1, inplace=False)
  (classifier): Linear(in_features=768, out_features=9, bias=True)
)
对于上面这种encoder模型的data_collator定义如下(比如我们要做文本分类,每个数据样本即对应一个文本序列+一个label):
from transformers import BertTokenizer
from torch.utils.data import DataLoader

tokenizer = BertTokenizer.from_pretrained('bert-base-cased')

class TextClassificationDataset(Dataset):
    def __init__(self, texts, labels, max_length):
        self.texts = texts
        self.labels = labels
        self.max_length = max_length

    def __len__(self):
        return len(self.texts)

    def __getitem__(self, index):
        text = self.texts[index]
        label = self.labels[index]
        input_ids, attention_mask = self.encode_text(text)
        return {'input_ids': input_ids, 'attention_mask': attention_mask, 'label': label}

    def encode_text(self, text):
        input_ids = tokenizer.encode(text, add_special_tokens=True, max_length=self.max_length, truncation=True)
        attention_mask = [1] * len(input_ids)
        padding_length = self.max_length - len(input_ids)
        input_ids = input_ids + [0] * padding_length
        attention_mask = attention_mask + [0] * padding_length
        return input_ids, attention_mask

def collate_fn(batch):
    input_ids = [item['input_ids'] for item in batch]
    attention_mask = [item['attention_mask'] for item in batch]
    labels = [item['label'] for item in batch]
    label_map = {label: i for i, label in enumerate(set(labels))}
    encoded_labels = [label_map[label] for label in labels]
    return {'input_ids': input_ids, 'attention_mask': attention_mask, 'labels': encoded_labels}

train_dataset = TextClassificationDataset(texts=train_texts, labels=train_labels, max_length=128)
train_dataloader = DataLoader(train_dataset, batch_size=32, collate_fn=collate_fn)
后者的gpt是next token prediction,以chatglm为栗子,特点是加入了ROPE旋转位置编码、使用RMSNorm正则化等操作:
ChatGLMForConditionalGeneration(
  (transformer): ChatGLMModel(
    (embedding): Embedding(
      (word_embeddings): Embedding(65024, 4096)
    )
    (rotary_pos_emb): RotaryEmbedding()
    (encoder): GLMTransformer(
      (layers): ModuleList(
        (0-27): 28 x GLMBlock(
          (input_layernorm): RMSNorm()
          (self_attention): SelfAttention(
            (query_key_value): QuantizedLinear()
            (core_attention): CoreAttention(
              (attention_dropout): Dropout(p=0.0, inplace=False)
            )
            (dense): QuantizedLinear()
          )
          (post_attention_layernorm): RMSNorm()
          (mlp): MLP(
            (dense_h_to_4h): QuantizedLinear()
            (dense_4h_to_h): QuantizedLinear()
          )
        )
      )
      (final_layernorm): RMSNorm()
    )
    (output_layer): Linear(in_features=4096, out_features=65024, bias=False)
  )
)
对于上面这种decoder模型,我们的data_collator定义如下(TextGenerationDataset对输入文本进行编码,并且将目标序列往后移动一位以便预测,dataloader将数据集分为多个mini-batch,collate_fn函数对每个mini-batch数据进行自定义组合):
from transformers import GPT2Tokenizer
from torch.utils.data import Dataset, DataLoader
from torch.nn.utils.rnn import pad_sequence

tokenizer = GPT2Tokenizer.from_pretrained('gpt2')

class TextGenerationDataset(Dataset):
    def __init__(self, texts, max_length):
        self.texts = texts
        self.max_length = max_length

    def __len__(self):
        return len(self.texts)

    def __getitem__(self, index):
        text = self.texts[index]
        input_ids, attention_mask = self.encode_text(text)
        return {'input_ids': input_ids, 'attention_mask': attention_mask}

    def encode_text(self, text):
        input_ids = tokenizer.encode(text, add_special_tokens=True, max_length=self.max_length, truncation=True)
        attention_mask = [1] * len(input_ids)
        padding_length = self.max_length - len(input_ids)
        input_ids = input_ids + [tokenizer.pad_token_id] * padding_length
        attention_mask = attention_mask + [0] * padding_length
        return input_ids, attention_mask

def collate_fn(batch):
    input_ids = [torch.tensor(item['input_ids'], dtype=torch.long) for item in batch]
    attention_mask = [torch.tensor(item['attention_mask'], dtype=torch.long) for item in batch]
    input_ids = pad_sequence(input_ids, batch_first=True, padding_value=tokenizer.pad_token_id)
    attention_mask = pad_sequence(attention_mask, batch_first=True, padding_value=0)
    return {'input_ids': input_ids, 'attention_mask': attention_mask}

train_dataset = TextGenerationDataset(texts=train_texts, max_length=128)
train_dataloader = DataLoader(train_dataset, batch_size=32, collate_fn=collate_fn)
在计算loss时也会将input_id向后移动1位后作为label,比如下面chatglm2-6b的源码:
lm_logits:初始[batch_size, sequence_length, vocab_size],减1是将最后一个位置的预测结果去掉labels:初始[batch_size, sequence_length],下面代码的labels[..., 1:]即第1个(0开始计算)维度从位置1开始取- 最后计算
nll_loss和smoothed_loss的加权和,作为loss值
    def __call__(self, model_output, labels, shift_labels=False):
        logits = model_output["logits"] if isinstance(model_output, dict) else model_output[0]
        if shift_labels:
            logits = logits[..., :-1, :].contiguous()
            labels = labels[..., 1:].contiguous()

        log_probs = -nn.functional.log_softmax(logits, dim=-1)
        if labels.dim() == log_probs.dim() - 1:
            labels = labels.unsqueeze(-1)

        padding_mask = labels.eq(self.ignore_index)
        # In case the ignore_index is -100, the gather will fail, so we replace labels by 0. The padding_mask
        # will ignore them in any case.
        labels = torch.clamp(labels, min=0)
        nll_loss = log_probs.gather(dim=-1, index=labels)
        # works for fp16 input tensor too, by internally upcasting it to fp32
        smoothed_loss = log_probs.sum(dim=-1, keepdim=True, dtype=torch.float32)

        nll_loss.masked_fill_(padding_mask, 0.0)
        smoothed_loss.masked_fill_(padding_mask, 0.0)

        # Take the mean over the label dimensions, then divide by the number of active elements (i.e. not-padded):
        num_active_elements = padding_mask.numel() - padding_mask.long().sum()
        nll_loss = nll_loss.sum() / num_active_elements
        smoothed_loss = smoothed_loss.sum() / (num_active_elements * log_probs.shape[-1])
        return (1 - self.epsilon) * nll_loss + self.epsilon * smoothed_loss
二、P-Tuning v2的数据流
项目:基于广告数据集,chatglm2的p-tuning v2微调
背景:sft指令微调时为了加快训练, Parameter-Efficient Model Adaptation,所以经常伴随着prompt tuning、lora tuning、p-tuning v2等peft操作。下面以chatglm2官方的p-tuning v2为例介绍。
1. 数据准备
ADGEN 数据集任务为根据输入(content)生成一段广告词(summary)。
{
    "content": "类型#上衣*版型#宽松*版型#显瘦*图案#线条*衣样式#衬衫*衣袖型#泡泡袖*衣款式#抽绳",
    "summary": "这件衬衫的款式非常的宽松,利落的线条可以很好的隐藏身材上的小缺点,穿在身上有着很好的显瘦效果。领口装饰了一个可爱的抽绳,漂亮的绳结展现出了十足的个性,配合时尚的泡泡袖型,尽显女性甜美可爱的气息。"
}
2. P-Tuning v2微调
train.sh中的PRE_SEQ_LEN和LR分别是 soft prompt 长度和训练的学习率,可以进行调节以取得最佳的效果。- P-Tuning-v2 方法会冻结全部的模型参数,可通过调整
quantization_bit来被原始模型的量化等级,不加此选项则为 FP16 精度加载。 - glm2源码中的
data_collator使用了transformer的DataCollatorForSeq2Seq,其实很多时候直接用这个就行了,不用像上面1.1中的stanford_alpaca中一样去自定义:
from transformers import DataCollatorForSeq2Seq
    data_collator = DataCollatorForSeq2Seq(
        tokenizer,
        model=model,
        label_pad_token_id=label_pad_token_id,
        pad_to_multiple_of=None,
        padding=False
    )
3. 模型推理
在 P-tuning v2 训练时模型只保存 PrefixEncoder 部分的参数(继承了trainer的PrefixTrainer类,重写了父类的_save函数),所以在推理时需要同时加载原 ChatGLM2-6B 模型以及 PrefixEncoder 的权重,因此需要指定 evaluate.sh 中的参数:
--model_name_or_path THUDM/chatglm2-6b
--ptuning_checkpoint $CHECKPOINT_PATH
如果是,只需要跟之前一样设定 model_name_or_path:
--model_name_or_path $CHECKPOINT_PATH
评测指标为中文 Rouge score 和 BLEU-4。
三、垂直领域训练注意事项
如PowerLawGLM的训练。(怎么做法律条文的准确输出)
- 对pretrained 进行法文垂直场景的增量微调。 收集大量的法文数据(网络,离线):对GLM130基座模型进行增量预训练,先把垂直场景的法律条文数据注入到pretrained 模型。
- 对齐法律场景对齐:用监督数据做SFT微调(百万级真实法律条文的数据)。
- 解决出现的幻觉问题(输出不存在的法律条文): (重点工程优化,比如做基于检索的条文输出)可参考Langchain+LLM的输出方式(外挂知识库)。
Reference
[1] GLM: General Language Model Pretraining with Autoregressive Blank Infilling ,ACL2022
[2] https://aclanthology.org/2022.acl-long.26.pdf
[3] GLM论文精读-自回归填空的通用语言模型